Connect to Oracle Database from Azure Logic Apps
Applies to: Azure Logic Apps (Consumption)
Using the Oracle Database connector, you create organizational workflows that use data in your existing database. This connector can connect to an on-premises Oracle Database, or an Azure virtual machine with Oracle Database installed. With this connector, you can:
- Build your workflow by adding a new customer to a customers database, or updating an order in an orders database.
- Use actions to get a row of data, insert a new row, and even delete. For example, when a record is created in Dynamics CRM Online (a trigger), then insert a row in an Oracle Database (an action).
This connector doesn't support the following items:
- Any table with composite keys
- Nested object types in tables
- Database functions with non-scalar values
This article shows you how to use the Oracle Database connector in a logic app.
Prerequisites
Supported Oracle versions:
- Oracle 9 and later
- Oracle Data Access Client (ODAC) 11.2 and later
Install the on-premises data gateway. Connect to on-premises data from logic apps lists the steps. The gateway is required to connect to an on-premises Oracle Database, or an Azure VM with Oracle DB installed.
Note
The on-premises data gateway acts as a bridge, and provides a secure data transfer between on-premises data (data that is not in the cloud) and your logic apps. The same gateway can be used with multiple services, and multiple data sources. So, you may only need to install the gateway once.
Install the Oracle Client on the machine where you installed the on-premises data gateway. Make sure that you install the 64-bit Oracle Data Provider for .NET from Oracle, and select the Windows installer version because the
xcopyversion doesn't work with the on-premises data gateway:64-bit ODAC 12c Release 4 (12.1.0.2.4) for Windows x64
Tip
If the Oracle client is not installed, an error occurs when you try to create or use the connection. See the common errors in this article.
Add the connector
Important
This connector does not have any triggers. It has only actions. So when you create your logic app, add another trigger to start your logic app, such as Schedule - Recurrence, or Request / Response - Response.
In the Azure portal, create a blank logic app.
At the start of your logic app, select the Request / Response - Request trigger:
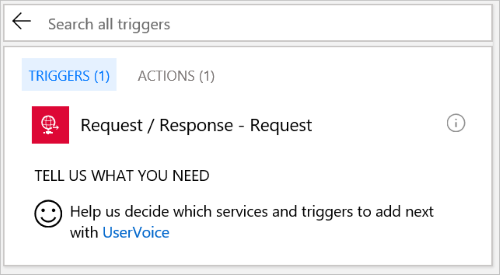
Select Save. When you save, a request URL is automatically generated.
Select New step, and select Add an action. Type in
oracleto see the available actions: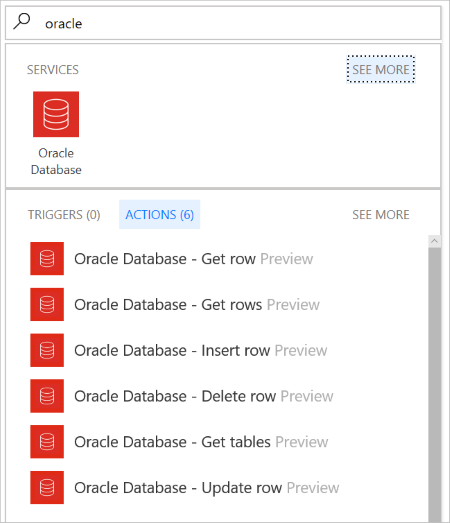
Tip
This is also the quickest way to see the triggers and actions available for any connector. Type in part of the connector name, such as
oracle. The designer lists any triggers and any actions.Select one of the actions, such as Oracle Database - Get row. Select Connect via on-premises data gateway. Enter the Oracle server name, authentication method, username, password, and select the gateway:

Once connected, select a table from the list, and enter the row ID to your table. You need to know the identifier to the table. If you don't know, contact your Oracle DB administrator, and get the output from
select * from yourTableName. This gives you the identifiable information you need to proceed.In the following example, job data is being returned from a Human Resources database:

In this next step, you can use any of the other connectors to build your workflow. If you want to test getting data from Oracle, then send yourself an email with the Oracle data using one of the send email connectors, such as Office 365 Outlook. Use the dynamic tokens from the Oracle table to build the
SubjectandBodyof your email:
Save your logic app, and then select Run. Close the designer, and look at the runs history for the status. If it fails, select the failed message row. The designer opens, and shows you which step failed, and also shows the error information. If it succeeds, then you should receive an email with the information you added.
Workflow ideas
You want to monitor the #oracle hashtag, and put the tweets in a database so they can be queried, and used within other applications. In a logic app, add the
Twitter - When a new tweet is postedtrigger, and enter the #oracle hashtag. Then, add theOracle Database - Insert rowaction, and select your table:
Messages are sent to a Service Bus queue. You want to get these messages, and put them in a database. In a logic app, add the
Service Bus - when a message is received in a queuetrigger, and select the queue. Then, add theOracle Database - Insert rowaction, and select your table: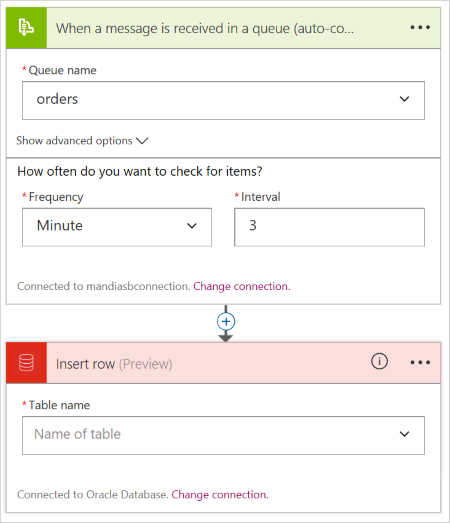
Common errors
Error: Cannot reach the Gateway
Cause: The on-premises data gateway is not able to connect to the cloud.
Mitigation: Make sure your gateway is running on the on-premises machine where you installed it, and that it can connect to the internet. We recommend not installing the gateway on a computer that may be turned off or sleep. You can also restart the on-premises data gateway service (PBIEgwService).
Error: The provider being used is deprecated: 'System.Data.OracleClient requires Oracle client software version 8.1.7 or greater.'. See https://go.microsoft.com/fwlink/p/?LinkID=272376 to install the official provider.
Cause: The Oracle client SDK is not installed on the machine where the on-premises data gateway is running.
Resolution: Download and install the Oracle client SDK on the same computer as the on-premises data gateway.
Error: Table '[Tablename]' does not define any key columns
Cause: The table does not have any primary key.
Resolution: The Oracle Database connector requires that a table with a primary key column be used.
Connector-specific details
View any triggers and actions defined in the swagger, and also see any limits in the connector details.
Get some help
The Microsoft Q&A question page for Azure Logic Apps is a great place to ask questions, answer questions, and see what other Logic Apps users are doing.
You can help improve Logic Apps and connectors by voting and submitting your ideas at https://aka.ms/logicapps-wish.
Next steps
คำติชม
เร็วๆ นี้: ตลอดปี 2024 เราจะขจัดปัญหา GitHub เพื่อเป็นกลไกคำติชมสำหรับเนื้อหา และแทนที่ด้วยระบบคำติชมใหม่ สำหรับข้อมูลเพิ่มเติม ให้ดู: https://aka.ms/ContentUserFeedback
ส่งและดูข้อคิดเห็นสำหรับ