Register a plug-in
After a plug-in is written and compiled, it must be registered with the event framework to execute when a specific entity (table row) and message (operation) is processed by Dataverse. To register a plug-in with the Dataverse event framework requires use of a tool - Plug-in Registration tool (PRT), or the Power Platform Tools extension for Visual Studio.
The PRT creates Dataverse object registrations and supports editing those registrations. This article describes how to register a plug-in assembly and step, add an assembly to a solution, and perform other common plug-in related operations using the Plug-in Registration tool.
The Visual Studio extension provides a more feature rich development environment and covers the entire coding, deployment, and debugging/profiling development process. For information about using the Power Platform Tools extension for Visual Studio, see the quickstart.
About the Plug-in Registration tool
The Plug-in Registration tool (PRT) supports registration of plug-in assemblies, message processing steps, and other types of objects with Dataverse. PRT is one of several Dataverse tools available for download from NuGet.org. Follow the instructions in Dataverse development tools to download PRT and optionally other development tools.
After you download the PRT, follow the Connect using the Plug-in Registration tool instructions to connect the tool to your target Dataverse environment where your plug-in is to be registered.

Assembly registration
Registering an assembly includes uploading the assembly to the Dataverse database, which is handled by the tool. See the instructions found at Register your assembly in the Tutorial: Write and register a plug-in
Note
You will find options related to the isolation mode and location for the assembly. These refer to options that apply to on-premise deployments. Dataverse is not available for on-premises deployments, so you will always accept the default options of SandBox and Database for these options.
When an assembly is uploaded, it's stored in the PluginAssembly table. Most of the properties are set using reflection of the imported assembly. The base64 encoded bytes of the assembly are stored in the Content column. While viewing the Properties of the assembly in the PRT, you can only edit the Description value. All compiled classes within the assembly that implement the IPlugin interface or derive from CodeActivity are automatically registered.
View registered assemblies
You can view information about registered plug-in assemblies in the Power Apps classic Solution Explorer, under Solutions in Power Apps left navigation pane, and in the PRT assembly view. To access Solution Explorer in Power Apps, choose Solutions and then choose Switch to classic in the toolbar. To access the default solution from Power Apps, choose Solutions, select "Default Solution" in the list, and then choose Plug-in assemblies within the left Objects pane.
Note
Each assembly you register will be added to the Default Solution which should not be confused with the Common Data Services Default Solution. For more information about solutions, see Introduction to solutions
Add your assembly to a solution
As described in View registered assemblies, the assembly registration you created was added to the system Default Solution. You should add your assembly to an unmanaged solution so you can distribute it to other organizations. The PRT does not allow you to specify a solution when registering an assembly or steps.
To learn more about solutions and how to create one see Solutions overview and Create a solution. Once you have a solution created, you can add your plug-in assembly to it in Power Apps by first choosing the solution in the solution list, and then choose Add existing > More > Developer > Plug-in assembly.
Note
Any existing or subsequent step registrations (see next section) are not added to the unmanaged solution that includes the plug-in assemblies. You must add each registered step to the solution separately. More information: Add step to solution
Step registration
When an assembly is loaded or updated, any classes that implement IPlugin are made available in the PRT. Use the instructions in Register a new step in the Tutorial: Write and register a plug-in to create a new step registration.
When you register a step, there are several registration options available to you depending on the stage of the event pipeline and the type of operation you intend to register your code on.
General Configuration Information Fields
| Field | Description |
|---|---|
| Message | PRT auto-completes available message names in the system. More information: Use messages with the SDK for .NET |
| Primary Entity | PRT auto-completes valid tables that apply to the selected message. These messages have a Target parameter that accepts an Entity or EntityReference type. If valid tables apply, you should set this field value when you want to limit the number of times the plug-in is called. If you leave it blank for core table messages like Update, Delete, Retrieve, and RetrieveMultiple or any message that can be applied with the message the plug-in will be invoked for all the tables that support this message. |
| Secondary Entity | This field remains for backward compatibility for deprecated messages that accepted an array of EntityReference as the Target parameter. This field is typically not used anymore. |
| Filtering Attributes | With the Update or OnExternalUpdated message, when you set the Primary Entity, filtering columns limits the execution of the plug-in to cases where the selected columns are included in the update. Setting this field is a best practice for performance. Don't include the primary key of the entity in the filtering attributes. The primary key is always included in update operations, so doing this will negate all other filtered attributes. |
| Event Handler | This field value will be populated based on the name of the assembly and the plug-in class. |
| Step Name | The name of the step. A value is pre-populated based on the configuration of the step, but this value can be overridden. |
| Run in User's Context | Provides options for applying impersonation for the step. The default value is Calling User. If the calling user doesn't have privileges to perform operations in the step, you may need to set this field value to a user who has these privileges. More information: Set user impersonation for a step |
| Execution Order | Multiple steps can be registered for the same stage of the same message. The number in this field determines the order in which they'll be applied from lowest to highest. Note: You should set this to control the order in which plug-ins are applied in the stage. It's not recommended to simply accept the default value. The actual execution order of the plugins with the same Execution Order value (for the same stage, table and message) isn't guaranteed and can be random. |
| Description | A description for step. This value is pre-populated but can be overwritten. |
Event Pipeline Stage of execution
Choose the stage in the event pipeline that best suites the purpose for your plug-in.
| Option | Description |
|---|---|
| PreValidation | For the initial operation, this stage will occur before the main system operation. This provides an opportunity to include logic to cancel the operation before the database transaction. Subsequent operations triggered by extensions registered in other stages will pass through this stage as well but will be included within the transaction of the calling extensions. This stage occurs before any security checks are preformed to verify that the calling or logged-on user has the correct permission to perform the intended operation. |
| PreOperation | Occurs before the main system operation and within the database transaction. If you want to change any values for an entity included in the message, you should do it here. Avoid cancelling an operation here. Canceling will trigger a rollback of the transaction and have significant performance impact. |
| PostOperation | Occurs after the main system operation and within the database transaction. Use this stage to modify any properties of the message before it is returned to the caller. Avoid applying changes to an entity included in the message because this will trigger a new Update event. Within the PostOperation stage you can register steps to use the asynchronous execution mode. These steps will run outside of the database transaction using the asynchronous service. You must use asynchronous mode when registering your plug-in if the plug-in is designed to perform an update operation and is registered on the Create message of the User (SystemUser) entity. More information: Asynchronous service. |
More information: Event execution pipeline
Execution Mode
There are two modes of execution asynchronous, and synchronous.
| Option | Description |
|---|---|
| Asynchronous | The execution context and the definition of the business logic to apply is moved to system job, which will execute after the operation completes. |
| Synchronous | Plug-ins execute immediately according to the stage of execution and execution order. The entire operation will wait until they complete. |
Asynchronous plug-ins can only be registered for the PostOperation stage. For more information about how system jobs work, see Asynchronous service
Special step registration scenarios
There are certain scenarios where a step registration and table combination isn't obvious. This is the result of how the system is designed internally where there's a special relationship between tables or operations. The information below identifies these cases and provides step registration guidance.
- There are certain cases where plug-ins registered for the Update event can be called twice. More information: Behavior of specialized update operations
- Register a plug-in step on account or contact when you want to handle data changes to customeraddress, leadaddress, publisheraddress, or competitoraddress records.
Deployment
| Option | Description |
|---|---|
| Server | The plug-in will run on the Dataverse server. |
| Offline | The plug-in will run within the Dynamics 365 for Outlook client when the user is in offline mode. |
Set configuration data
The Unsecure Configuration and Secure Configuration fields in the PRT allow you to specify configuration data to pass to the plug-in for a specific step.
Note
Secure Configuration data is not included with the step registration when you export a solution.
You can write your plug-in to accept string values in the constructor to use this data to control how the plug-in should work for the step. More information: Pass configuration data to your plug-in
Define entity images
Within your plug-in, you may want to reference primary table property values that weren't included in an operation. For example, in an Update operation you might want to know what a value was before it was changed, but the execution context doesn't provide this information, it only includes the changed value.
If your plug-in step is registered in the PreValidation or PreOperation stages of the execution pipeline, you could use the IOrganizationService instance to retrieve the current value of the property, but this isn't a good practice for performance. A better practice is to define a pre-entity image with your plug-in step registration. This will capture a 'snapshot' of the table with the fields you're interested in as they existed before the operation that you can use to compare with the changed values.
Important
The default behavior when creating an entity image is to select all columns. Don't use this default behavior. This will negatively impact performance. Only include those columns that are required by the logic of your plug-in.
Messages that support entity images
In Dataverse, only the following messages support entity images:
| Message | Request Class Property | Description |
|---|---|---|
Assign |
Target |
The assigned table. |
Create |
Target |
The created table. |
Delete |
Target |
The deleted table. |
DeliverIncoming |
EmailId |
The delivered email ID. |
DeliverPromote |
EmailId |
The delivered email ID. |
Merge |
Target or SubordinateId |
The parent table, into which the data from the child table is being merged or the child table that is being merged into the parent table. |
Route |
Target |
The item being routed. |
Send |
FaxId, EmailId, or TemplateId |
The item being sent. |
SetState |
EntityMoniker |
The table for which the state is set. |
Update |
Target |
The updated table. |
Types of entity images
There are two types of entity images: Pre Image and Post Image. When you configure them, these images will be available within the execution context as PreEntityImages and PostEntityImages properties respectively. As the names suggest, these snapshots represent what the table looks like before the operation and after the operation. When you configure an entity image, you'll define a table alias* value that will be the key value you'll use to access a specific entity image from the PreEntityImages or PostEntityImages properties.
Availability of images
When you configure an entity image, it's important that you recognize that the type of entity images available depend on the stage of the registered step and the type of operation. For example:
- You can't have a Pre Image for the
Createmessage because the table doesn't exist yet. - You can't have a Post Image for the
Deletemessage because the table won't exist anymore. - You can only have a Post Image for steps registered in the PostOperation stage of the execution pipeline because there's no way to know what the table properties will be until the transaction is completed.
- For an
Updateoperation that is registered in the PostOperation stage you can have both a Pre Image AND a Post Image.
Add an entity image
Use the Power Platform Tools extension for Visual Studio to add an entity image to a plug-in step.
Alternately, you can use the Plug-in Registration Tool to add an entity image to a step by following the instructions in Tutorial: Update a plug-in under the section Add an image.
Add step to solution
As mentioned in Add your assembly to a solution, Plug-in Assemblies are solution components that can be added to an unmanaged solution. Sdk Message Processing Steps are also solution components and must also be added to an unmanaged solution in order to be distributed.
The procedure to add a step to a solution is similar to adding an assembly. You'll use the Add Existing command to move it into the desired unmanaged solution. The only difference is that if you attempt to add a step but haven't already added the assembly that contains the class used in the step, you'll be prompted to add missing required components.
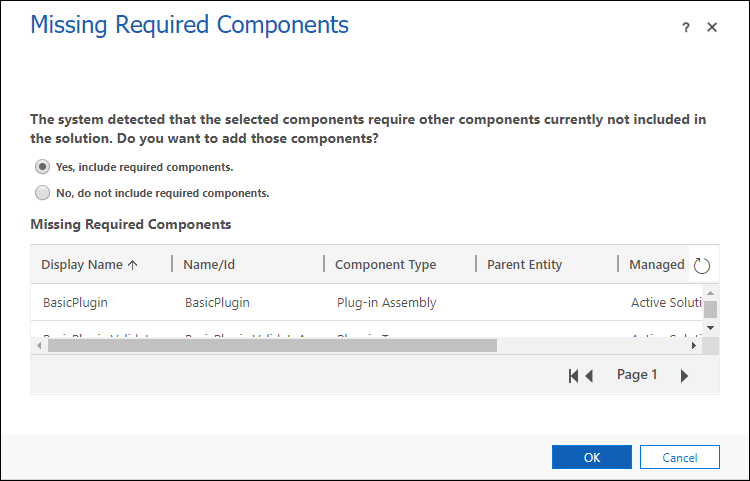
If you encounter this, you should usually select OK to bring the assembly in with the unmanaged solution. The only time you wouldn't select this is if your solution is designed to be installed in an environment where another solution containing the assembly is already installed.
Similarly, you should note that removing the assembly from the solution won't remove any steps that depend on it.
Set user impersonation for a step
With the Plug-in Registration tool running and logged into the target Dataverse environment, you can proceed to set or change a plug-in step registration. In this section, we will discuss changing the user on whos behalf the plug-in will perform its operations. Meaning, the effective user that is performing the data operations initiated by the plug-in. By default, the calling user (the user that invoked an operation in Dataverse) is the owner of said operations. However a different user can be specified in the step registration. You will need to have the System Administrator or System Customizer security role to perform this operation.
To set the user context of a plug-in step:
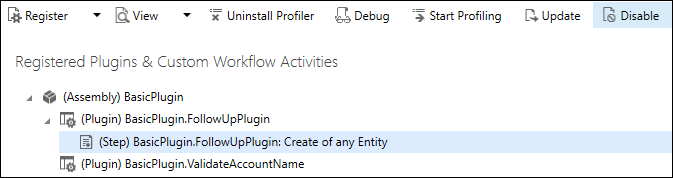
- Expand the target plug-in assembly node in the assembly view until you see the desired (Step) registration node.
- Choose the step node, and then choose Update in either the context menu or the toolbar.
- Choose a user from the drop-down list of available users next to the Run in User's Context label.
- Choose Update Step.
More information: Impersonate a user
Update an assembly
When you change and rebuild an assembly that you've previously registered, you'll need to update it. See the Update the plug-in assembly registration step in the Tutorial: Update a plug-in for the steps.
Assembly versioning
If you're making changes to a plug-in assembly that is part of a managed solution that has been deployed you need to consider the impact your changes may have when you update that managed solution. The version of the assembly will control the behavior.
Plug-in assemblies can be versioned using a semantic versioning format of major.minor.build.revision defined in the Assembly.info file of the Microsoft Visual Studio project. Depending on what part of the assembly version number is changed in a newer solution, the following behavior applies when an existing solution is updated through import.
The build or revision assembly version number is changed
This is considered an in-place upgrade. The older version of the assembly is removed when the solution containing the updated assembly is imported. Any pre-existing steps from the older solution are automatically changed to refer to the newer version of the assembly.
The major or minor assembly version number is changed
When an updated solution containing the revised assembly is imported, the assembly is considered a different assembly than the previous version of that assembly in the existing solution. Plug-in registration steps in the existing solution will continue to refer to the previous version of the assembly. If you want existing plug-in registration steps for the previous assembly to point to the revised assembly, you'll need to use the Plug-in Registration tool to manually change the step configuration to refer to the revised assembly type. This should be done before exporting the updated assembly into a solution for later import.
Unregister or disable plug-ins and components
You can unregister or disable plug-ins and their components using the Plug-in Registration tool (PRT).
Important
It is no longer possible to unregister or disable Microsoft or out-of-box system plug-ins and steps. Previously, you were able to unregister or disable some of the Microsoft.* and other out-of-box system plug-ins. We have changed this behavior to no longer allow this. The change in functionality was made because unregistering or disabling these plug-ins or steps can cause product features not to work as expected. If you have a need to unregister or disable such a plug-in or step, file a Microsoft support request.
Disable or enable a plug-in step
With the Plug-in Registration tool running and logged into the target Dataverse environment, you can proceed to disable or enable a plug-in step. Disabling a step effectively turns off the plug-in from executing when Dataverse processes the entity and message combination specified in the step registration.
Important
Disabling a plug-in can negatively affect the functionality of your app, a solution, or the Dataverse system. Make sure you understand the implications before you proceed.
To disable or enable a registered plug-in step:
- Expand the target plug-in assembly node in the assembly view until you see the desired step registration node.
- Choose the step, and then choose Enable or Disable in either the context menu or the toolbar.
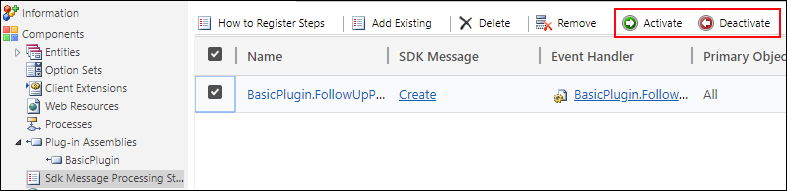
You can also disable or enable steps in the legacy Dataverse Solution Explorer user interface using the Activate and Deactivate command options.
Unregister components
The PRT provides commands to unregister assemblies, types, steps, and images. See the Unregister assembly, plug-in, and step instructions in the Tutorial: Update a plug-in for the procedure.
These are delete operations on the PluginAssembly, PluginType, SdkMessageProcessingStep, and SdkMessageProcessingStepImage tables.
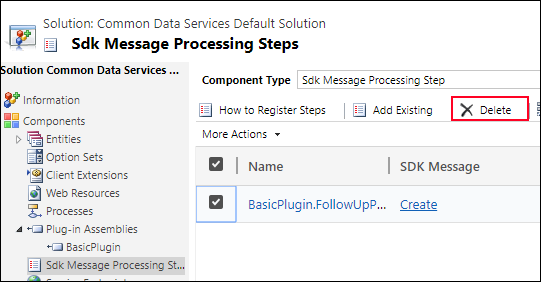
You can also delete Plug-in Assemblies and Sdk Message Processing Steps in the solution explorer to achieve the same result. In the figure below, a custom solution named Common Data Service Default Solution is shown.
Note
You cannot delete (unregister) any Plug-in Assemblies while existing Sdk Message Processing Steps depend on them. Entity images are not available to be deleted separately, but they will be deleted when any steps that use them are deleted.
Next steps
See also
Write plug-ins to extend business processes
Write a plug-in
Tutorial: Write and register a plug-in
Tutorial: Debug a plug-in
Tutorial: Update a plug-in
Geri Bildirim
Çok yakında: 2024 boyunca, içerik için geri bildirim mekanizması olarak GitHub Sorunları’nı kullanımdan kaldıracak ve yeni bir geri bildirim sistemiyle değiştireceğiz. Daha fazla bilgi için bkz. https://aka.ms/ContentUserFeedback.
Gönderin ve geri bildirimi görüntüleyin