Extend a basic volume
Applies To: Windows 11, Windows 10, Windows Server 2022, Windows Server 2019, Windows Server 2016
You can add space to an existing volume by extending the volume into available unallocated (empty) space on a disk drive. To extend a volume, the configuration of the volume and free space must satisfy the following conditions:
- The empty space must be unallocated space that doesn't have a volume on it.
- The empty space must be located on the disk drive immediately after the volume that you want to extend.
- There can't be any volumes between the volume to extend and the empty space to add.
- The volume to extend must be formatted with the NTFS or ReFS file systems.
You can extend a volume by using Disk Management or Windows PowerShell. On Windows Server 2012 R2 or later, you can also use Azure File Sync to extend your volume into the cloud. For more information, see Planning for an Azure File Sync deployment on Windows Server.
View unallocated space on a disk drive
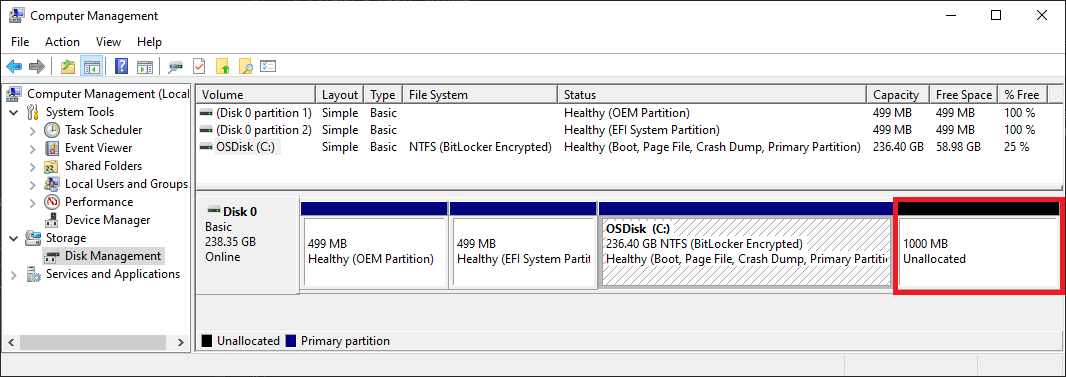
You can view the space utilization for a disk drive by using Disk Management. The following image shows the details for a disk drive. The unallocated space on the disk drive appears at the right and has a red border outline.
Extend a volume with Disk Management
To extend a volume by using Disk Management, follow these steps.
Open Disk Management with administrator permissions.
- In the search box on the taskbar, enter Disk Management.
- Select and hold (or right-click) Disk Management, and then select Run as administrator > Yes.
If you can't open Disk Management as an administrator, follow these steps:
- In the search box on the taskbar, enter Computer Management, and then select Run as administrator > Yes.
- After Computer Management opens, go to Storage > Disk Management.
Select and hold (or right-click) the volume that you want to extend, and then select Extend Volume. The Extend Volume Wizard opens.
Note
If the Extend Volume option isn't available, see the following section and check for volume extension issues to resolve.
In the Extend Volume Wizard, select Next.
In the wizard, under Select Disks, select how much disk drive space to use to extend the volume.
The default approach is to use all available empty space (Maximum available) on the disk drive.
If you plan to create other volumes in the available empty space, you can select a smaller amount of space to use to extend the volume.
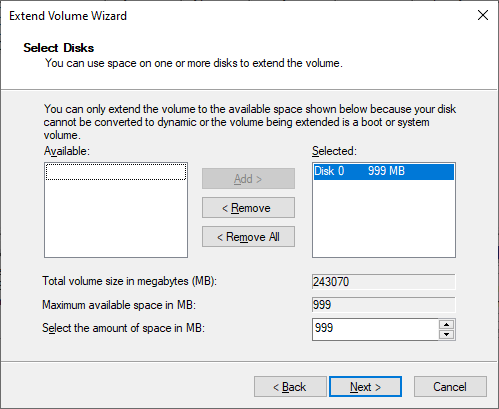
Select Next, and then select Finish to extend the volume.
Check for volume extension issues
If the Disk Management Extend Volume option isn't available, check your configuration for the following possible issues.
| Issue to check | Description | Resolution steps |
|---|---|---|
| Elevated permissions for Disk Management | Confirm the Disk Management (or Computer Management) prompt has administrator (elevated) permissions. | If the Disk Management (or Computer Management) prompt doesn't have administrator permissions, close the prompt and reopen Disk Management by following the steps earlier in the article. |
| Location of empty space on disk drive | Confirm the disk drive has unallocated space immediately after (or to the right of) the volume to extend. For an example of this spacing, see View unallocated space on a disk drive. In the image, a red border outlines the unallocated space. | If another volume is between the unallocated space and the volume that you want to extend, you have several options: - Delete the in-between volume on the disk drive and all files on that volume. Be sure to back up or move any important files on the in-between volume before you delete the volume. - Use a non-Microsoft disk partitioning application that can move volumes without destroying data. - Don't proceed with this volume extension. Instead, create a new separate volume in the unallocated space on the disk drive. |
| Volume uses NTFS or ReFS file system | Confirm the volume is formatted with the NTFS or ReFS file system. Other file systems can't be extended. | If the volume to extend has a different file system, you must first move or back up the files on the volume, and then reformat the volume with the NTFS or ReFS file system. |
| Disk drive size and format | Check the disk drive format. If the volume to extend is on a disk drive that's larger than 2 terabytes, the disk must use the GPT partitioning scheme. | To use more than 2 terabytes on a disk, the disk drive must be initialized with the GPT partitioning scheme. To convert a disk drive to the GPT format, see Change an MBR disk into a GPT disk. |
After you address these issues, if you still can't extend the volume, try searching the Microsoft community - Files, folders, and storage site.
If you don't find an answer on the site, you can post a question for input from Microsoft or other members of the community. You can also Contact Microsoft Support.
Extend a volume with PowerShell
To extend a volume by using PowerShell, follow these steps.
Select and hold (or right-click) Windows Start, and then select Windows PowerShell (Admin).
Enter the following command to resize the volume to the maximum size.
For the $drive_letter variable, specify the drive letter of the volume to extend.
# Variable specifies the disk drive to extend
$drive_letter = "C"

# Script gets the partition sizes, and resizes the volume
$size = (Get-PartitionSupportedSize -DriveLetter $drive_letter)
Resize-Partition -DriveLetter $drive_letter -Size $size.SizeMax
Related links
Geri Bildirim
Çok yakında: 2024 boyunca, içerik için geri bildirim mekanizması olarak GitHub Sorunları’nı kullanımdan kaldıracak ve yeni bir geri bildirim sistemiyle değiştireceğiz. Daha fazla bilgi için bkz. https://aka.ms/ContentUserFeedback.
Gönderin ve geri bildirimi görüntüleyin