Customize the Retail Demo Experience (RDX)
Showcase your new devices on the retail sales floor with a rich, engaging experience with the Windows Retail Demo Experience (RDX).
- Attract shoppers with demo videos. We’ve included videos that show off the latest Windows 10 features. Add your own videos to show off your own unique hardware, apps, and services.
- Let shoppers try it out. Shoppers can experience the device first-hand, working with sample data in contacts, photos, email and messaging apps.
Retail mode works best when demo devices have high-speed Internet access.
Customizable components of RDX:
- Attract loop app: a perpetually looping video or images intended to attract customers to the device. The content is intended to draw the customer in to interact with the device.
- Retail Demo app: an app that launches automatically when a customer ends the attract loop by tapping a keyboard key, clicking the mouse, or touching the screen (if touchscreen) while the Attract loop app plays. The Retail Demo app educates the customer about the device, Windows, and associated services available with the purchase of the device. After a period of inactivity, the attract loop begins playing again.
- Demo mode content: content the customer can interact with during the demo. This includes pre-loaded (image) or downloaded app content, documents, music, photos, videos, and Store apps.
- Setup and operation of retail demo mode: determine RDX enablement on the device, automatic device clean-up between customers, and automated removal of RDX content after purchase.
- Digital Fact Tag app: an app that launches automatically at the same time as the Retail Demo app. This app sits on the right side of the screen and displays key information in a perpetual way for the shopper. The app cannot be closed by the shopper, nor do apps display above or behind the app.
RDX 3.0
RDX 3.0 is included in Windows 10, version 1809. For Windows 10, version 1803, you can preload RDX 2.0, and once the device is connected, it will upgrade to RDX 3.0 automatically.
Key updates include:
- The Retail Demo app has a new webpage-style layout. New home page, navigation style, and content.
- New: RD Provisioning extension API allows you to manage online assets yourself. In RDX 2.0, online assets are managed through the Retail Demo Asset Manager (RDAM), and the time from start to finish (submission > review > approval > sent to devices) is 2-3 weeks. If you manage your own online assets using our API, you may be able to complete these tasks faster.
- New: On-device admin (ODA) app (part of the provisioning API) allows retailers to update specs, price locally on non-networked devices.
- Coming soon: Digital fact tag (DFT) shows customers device specs and price. This feature will be available as part of an online update. After receiving the online update, retailers can manually update the DFT through the Retail Demo Mode Advanced Configuration menus. To learn more, see the RDX Windows Experience Guide (WEG).
Attract loop
The retail demo experience begins with a video, which plays repeatedly while the device is idle. When the video attract loop plays, the Start screen is restored back to a pre-set state. Photos and videos taken by previous customers are deleted and the demo photos are also restocked.
Important
The device must be plugged into AC power for the video attract loop to start.
Design recommendations
Create your own custom attraction video that highlights key features of your device.
Use full-screen imagery to focus on key selling points (KSPs) of the device. Our research shows that shoppers are attracted to loops that show off hardware features with fast moving graphics and colorful imagery, but loops that function as advertisements don't resonate with shoppers.
Limit the video message to 1 or 2 KSPs. The loop is designed to get shoppers to interact with device. If the attract loop looks like an advertisement, shoppers are less likely to pay attention and interact with the system.
Avoid text in your video. Videos without text are easier to scale across multiple markets and locales since there are no localization costs. In addition, shoppers typically view only part of the video, so your text might not be viewed in its entirety.
We strongly recommend that you use the attract loop to show how your brand, apps, services, and the devices themselves are differentiated from your competitors.
Requirements
The following are the specifications for the attract loop video.
- Videos must be less than 60 seconds.
- Must not include an audio track.
- Acceptable compression format: H.264/MPEG4
- Videos must be designed so they don’t cause screen burn even when played for hours at a time for the entire shelf life of the device.
- The source video should be appropriate quality to ensure the best possible playback on the device based on its graphics rendering capabilities (resolution, color capabilities, and graphics processing power).
- We recommend matching the video resolution to the optimal resolution on each device when possible. Otherwise, resolution should be 1920 x 1080.
Add the video to the image
You can replace the default attract loop video with your own customized video, which you can save to your device images. Doing so makes this video available to the shopper even if the retailer never connects the demo device to the internet. This content should not be time-sensitive or seasonal, and it should be appropriate for all regions and languages the device will ship to.
Create the default set of content first. This content is stored in the \Neutral file path, and it must be named: attract.wmv:
%programdata%\Microsoft\Windows\RetailDemo\OfflineContent\OEM\Content\Neutral\AttractContent\attract.wmv
For devices sold in multiple regions or with multiple languages: You can add region and/or language-specific versions for attract loops. When there is no region-specific or language-specific content, the default (\Neutral) content is displayed.
For a complete list of supported languages and locales, see Language Identifier Constants and Strings.
%programdata%\Microsoft\Windows\RetailDemo\OfflineContent\OEM\Content\[locale]\AttractContent\attract.wmv%programdata%\Microsoft\Windows\RetailDemo\OfflineContent\OEM\[region]\Content\Neutral\AttractContent\attract.wmv%programdata%\Microsoft\Windows\RetailDemo\OfflineContent\OEM\[region]\Content\[locale]\AttractContent\attract.wmv
Example: Canada-specific content in French:
%programdata%\Microsoft\Windows\RetailDemo\OfflineContent\OEM\CA\Content\fr-ca\AttractContent\attract.wmv
Add the video using the Microsoft RDX Submission Tool
Add your default attract loop video, as well as any updated videos, to the RDX Submission Tool. If you don’t currently have an account for the RDX Submission Tool, please reach out to your Account Manager, and let them know which Microsoft Account (MSA) you'd like to use to access the tool.
In the tool, you can target your videos by language, region, and model, so that when a targeted device is connected to the internet, it automatically replaces the video and plays it.
Retail Demo app
To get started, you can include the Windows inbox Retail Demo app.
In RDX 2.0, shoppers select content through navigation tabs:
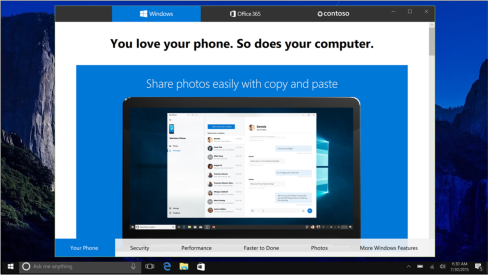
Example of current RDX 2.0 Navigation Tabs experience
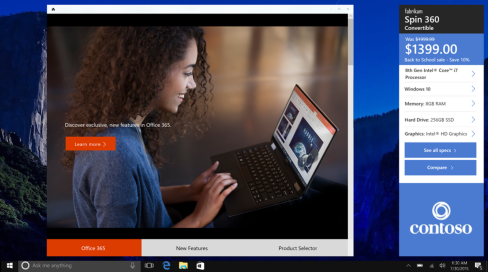
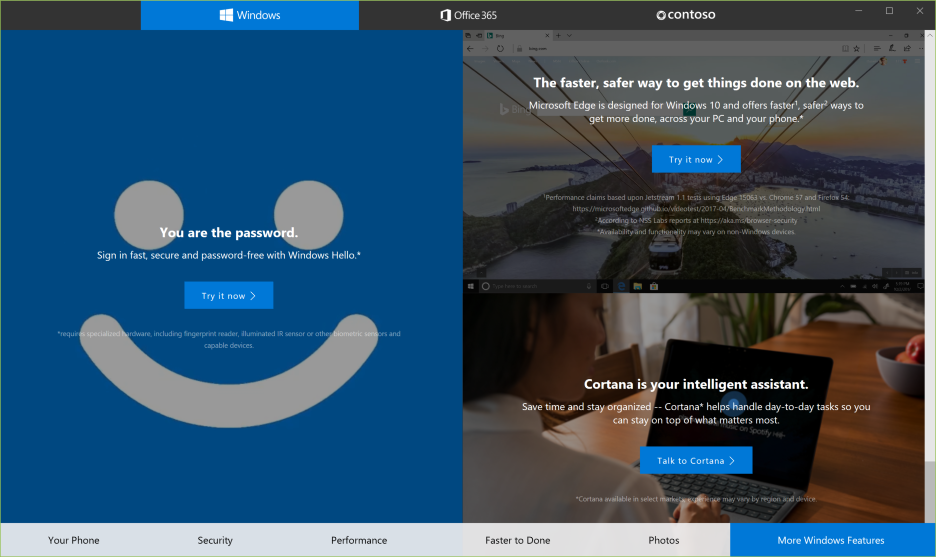
In RDX 3.0, shoppers select content through tiles, and can see more info on the Digital Fact Tag (right):

Each content page contains one or more sections that are comprised of media (images and video), text copy, and Call-to-Action (CTA) buttons or links to encourage the shopper to explore the featured content. If a content page contains multiple sections, a feature bar displays at the bottom. The customer can move between content sections of the page by selecting features in the bar or by scrolling up and down the page.
The app highlights key features as determined by the Microsoft marketing team. Some content in the app only appears when Office is installed or certain hardware is detected. For example, when Office 365 is installed, the Office section may show a “Try it now” button to open Word or PowerPoint. When a digitizer is detected, the Office section may display an collection of videos showing how Office works with a pen.
The content shown changes based on the device. For example, if you have preinstalled Office 365, the demos show Office's pen and inking functionality.
When a shopper closes the Retail Demo app, they see the desktop of the device.
In RDX 3.0, they'll also see a Digital Fact Tag to the right (unless the language reads right-to-left, in which case then the Digital Fact Tag is on the left).
Create custom content
OEMs and Retailers can create new custom content for the Retail Demo app using the Microsoft RDX Submission Tool. If you don’t currently have an account for the RDX Submission Tool, please reach out to your Account Manager, and let them know which Microsoft Account (MSA) you'd like to use to access the tool.
In the tool, you can create a base set of content which you can save to your device images. Doing so makes this content available to the shopper even if the retailer never connects the demo device to the internet. This content should not be time-sensitive or seasonal, and it should be appropriate for all regions and languages the device will ship to.
In the tool you can also create new or updated content which can be delivered online to your devices. This content can be targeted by language, region, and model, so that when a targeted device is connected to the internet, it automatically receives the updates and shows the new content.
OEMs can specify a theme color, navigation selected-button color, and logos for the Retail Demo app, in addition to adding unique page content. Colors and logos are specified at the app level, and content is specified at the page level. OEMs can also choose between one of three templates: Hero, Immersive Hero, and Mosaic (described below).
Template options, examples, and requirements
There are four templates available for the Retail Demo app content sections: Hero, Feature, Immersive Hero, and Mosaic.
Hero template
Use the Hero template to showcase key content. A full-bleed image must be used – this can be combined with a title, copy, and/or call-to-action link. This template can also support full-bleed videos. All text in a video must be embedded into the media. Below are the media and copy requirements for the Hero template:
| Element | Requirements |
|---|---|
| Image or video | Images must be PNG, have a transparent background and no padding; videos must be .mp4 files. Resolution recommendations are provided by the RDX Submission Tool when you build your content and vary by template. |
| Logo | 946 x 220 pixels; images must be PNG, have a transparent background and no padding. |
| Header | We recommend a 55-character limit, not counting spaces in between characters. This allows room for localization. |
| Sub header | We recommend a 55-character limit, not counting spaces in between characters. This allows room for localization. |
| Paragraph | 140 characters, not counting spaces in between characters. |
| Call-to-action (CTA) button text | We recommend an 11-character limit, not counting spaces in between characters. |
| Legal text | 150 characters, not counting spaces in between characters. |
There are 4 actions that can be set for a CTA button:
- Jump to another page within group
- Launch an app
- Launch the default browser and go to a URL (online devices only)
- Open media (image, video, or document)
Here is an example of a Hero template:
Immersive Hero template
Use the Immersive Hero template when there is a specific part of the device, or a specific feature, you want to call out. You can switch the position of the copy and the image for an alternative placement. A combination of title, copy, and/or a call-to-action link can be used here.
Below are the media and copy requirements for the Immersive Hero template:
| Element | Requirements |
|---|---|
| Image or video | Images must be PNG, have a transparent background and no padding; videos must be .mp4 files. Resolution recommendations are provided by the RDX Submission Tool when you build your content and vary by template. |
| Logo | 946 x 220 pixels; images must be PNG, have a transparent background and no padding. |
| Header | We recommend a 55-character limit, not counting spaces in between characters. This allows room for localization. |
| Sub header | We recommend a 55-character limit, not counting spaces in between characters. This allows room for localization. |
| Paragraph | 140 characters, not counting spaces in between characters. |
| Call-to-action (CTA) button text | We recommend an 11-character limit, not counting spaces in between characters. |
| Legal text | 150 characters, not counting spaces in between characters. |
There are 4 actions that can be set for a CTA button:
- Jump to another page within group
- Launch an app
- Launch the default browser and go to a URL (online devices only)
- Open media (image, video, or document)
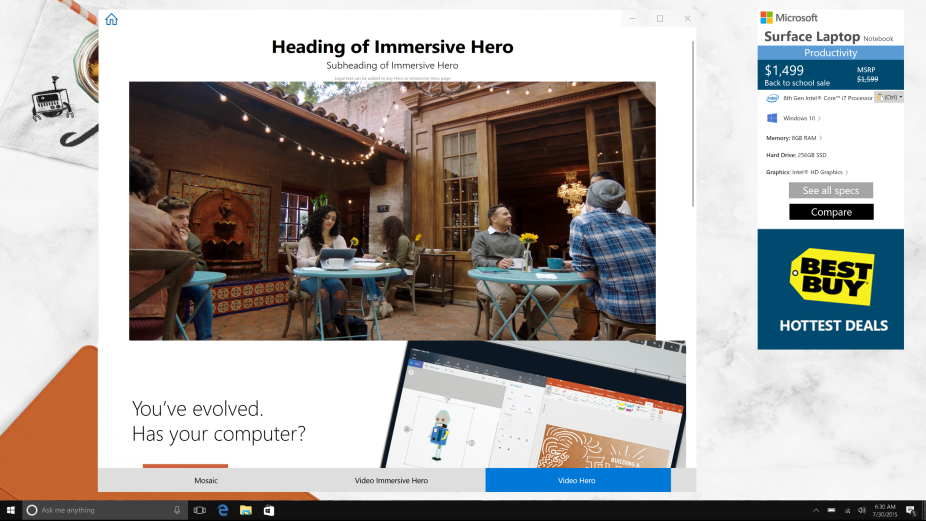
Below is an example of the Immersive Hero template.
Mosaic template
Use this template to show components as a graphic montage. This template is very versatile because you can use it with or without a text file. It always extends the full content area. Use the mosaic to support a theme, communicate an idea, or present top picks around particular topics. Add call-to-action links if you need to direct users to another page. CTAs are typically centrally aligned and appear at the bottom of the tile.
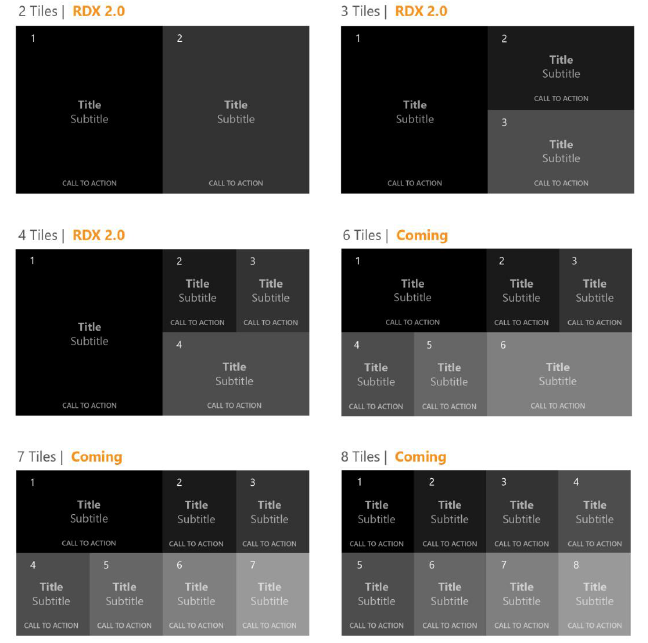
The mosaic layout follows several predefined patterns, depending on the number of tiles you wish to include. The layout will appear as follows:
Below are the media and copy requirements for the Mosaic template:
| Element | Requirements |
|---|---|
| Mosaic layout | Mosaic template allows for 2 – 4 tiles. The layout of the tiles is auto-generated based on number of tiles input into the RDX Submission Tool. The layout is not adjustable, so you will need to place tiles in the correct order for the layout. |
| Tile background image | Resolution varies based on number of tiles used, but generally images should be square or 2:1 resolution appropriate to the screen; images must be PNG, have a transparent background and no padding |
| Tile paragraph image | Recommend 220 x 220 pixels; images must be PNG, have a transparent background and no padding |
| Logo | 946 x 220 pixels; images must be PNG, have a transparent background and no padding. |
| Header | We recommend a 55-character limit, not counting spaces in between characters. This allows room for localization. |
| Sub header | We recommend a 55-character limit, not counting spaces in between characters. This allows room for localization. |
| Paragraph | 140 characters, not counting spaces in between characters. |
| Call-to-action (CTA) button text | We recommend an 11-character limit, not counting spaces in between characters. |
| Legal Text | Mosaic does not support legal text on tiles due to tile size. |
There are 4 actions that can be set for a CTA button:
- Jump to another page within group
- Launch an app
- Launch the default browser and go to a URL
- Open media (image, video, or document)
Note
Keep in mind that if you are building content for offline devices, CTA buttons should not open URLs as this will create a poor user experience.
Here is an example of a 3-tile Mosaic layout:
Add Retail Demo app content packages to OEM image
You will need to go through the process outlined below for each language you intend to provide Retail Demo app content for. The process will take you through building content for specific regions or locales, and storing it in the appropriate file path.
Create the default set of content first. This content should be appropriate for all regions and languages the device will ship to. This content is stored in the \Neutral file path:
For devices sold in multiple regions:
You can add region and/or language-specific versions for attract loops. When there is no region-specific or language-specific content, the default (\Neutral) content is displayed.
For a complete list of supported languages and locales, see Language Identifier Constants and Strings.
Note
To support languages, your images will need Retail Demo Mode language packs.
Add the content to the image:
After building your content on the RDX Submission Tool, download and save locally.
Save the file as oem.json.
On the computer on which you’re building your device images, copy the default (“neutral”) oem.json file to:
%programdata%\Microsoft\Windows\RetailDemo\OfflineContent\OEM \Content\Neutral\HubContent\oem.json
In addition, create a set for US-English. You must include files for both the default and US-English, regardless of which other languages you support:
%programdata%\Microsoft\Windows\RetailDemo\OfflineContent\OEM\US\Content\en-us\HubContent\oem.json
File paths for localized content (optional):
%programdata%\Microsoft\Windows\RetailDemo\OfflineContent\OEM\Content\[locale]\HubContent\oem.json%programdata%\Microsoft\Windows\RetailDemo\OfflineContent\OEM\[region]\Content\Neutral\HubContent\oem.json%programdata%\Microsoft\Windows\RetailDemo\OfflineContent\OEM\[region]\Content\[locale]\HubContent\oem.json
Example: Canada-specific content in French:
%programdata%\Microsoft\Windows\RetailDemo\OfflineContent\OEM\CA\Content\fr-ca\HubContent\oem.json
Create a folder of all assets (images and video) and name the folder oem_assets. Create a zipped version of the oem_assets folder and name it oem.zip.
Copy the oem.zip folder of assets for the Retail Demo app to the default and US-English folders:
%programdata%\Microsoft\Windows\RetailDemo\OfflineContent\OEM \Content\Neutral\HubContent\oem.zip%programdata%\Microsoft\Windows\RetailDemo\OfflineContent\OEM\US\Content\en-us\HubContent\oem.zip
File paths for localized content (optional):
%programdata%\Microsoft\Windows\RetailDemo\OfflineContent\OEM\Content\[locale]\HubContent\oem.zip%programdata%\Microsoft\Windows\RetailDemo\OfflineContent\OEM\[region]\Content\Neutral\HubContent\oem.zip%programdata%\Microsoft\Windows\RetailDemo\OfflineContent\OEM\[region]\Content\[locale]\HubContent\oem.zip
Build the image.
Other types of retail demo mode content
In addition to the Retail Demo app and the Attract Loop app, there are other types of content the shopper can see or experience in Retail Demo mode.
Library content
Many shoppers use the library content (photos, videos, documents) to fully explore the experience within the many apps available on the device or from the Microsoft Store. It is highly recommended to include this content in your image.
Apps
Include retail demo features in your Windows apps so customers who try out your PCs and devices on the sales floor can jump right in.
We strongly recommend you ensure that the apps included on the device take advantage of the retail demo mode. Not only will your app look amazing for a retail customer, you may even get increased app awareness due to the discovery of your app that leads to post-purchase install.
We recommend the following guidelines when developing retail demo features for your app:
Show off, but be focused: Use the retail mode version of your app as an opportunity to showcase why it rocks and is a reason to buy a Windows device. Put your best foot forward. Keep the story simple: elevator pitch to land your app’s value prop.
Make sure your app cleans up between uses.
Minimize error and pop-up dialogs: Error pop-ups invoke a negative experience with the app, Windows and the shopping experience. Minimize pop-ups as much as possible.
To learn more, see Add retail demo (RDX) features to your app.
Add retail demo mode, including language packs, to your images
Add each of the following packages to your images. Note, these packages must be installed in order.
If your devices will include multiple languages, add language packs and language interface packs first. Example:
Microsoft-Windows-Client-Language-Pack_x64_fr-FR.cabMicrosoft-Windows-Client-Language-Pack_x64_vi-VN.cab
Note, do not remove the English language pack, this pack is required for Retail Demo Mode.
Next, add the basic language pack for each language, including English. For example:
Microsoft-Windows-LanguageFeatures-Basic-en-US-Package.cabMicrosoft-Windows-LanguageFeatures-Basic-fr-FR-Package.cabMicrosoft-Windows-LanguageFeatures-Basic-vi-VN-Package.cab
Next, add the base retail demo pack:
Microsoft-Windows-RetailDemo-OfflineContent-Content-Package.cab
Next, add the localized retail demo pack for each language, including English. Example:
Microsoft-Windows-RetailDemo-OfflineContent-Content-en-us-Package.cabMicrosoft-Windows-RetailDemo-OfflineContent-Content-fr-fr-Package.cabMicrosoft-Windows-RetailDemo-OfflineContent-Content-vi-VN-Package.cab
Available RetailDemo language packs:
- Arabic [ar-SA]
- Bulgarian [bg-BG]
- Chinese
- Hong Kong SAR (Traditional) [zh-HK]
- Taiwan (Traditional) [zh-TW]
- China (Simplified) [zh-CN]
- Croatian [hr-HR]
- Czech [cs-CZ]
- Danish [da-DK]
- Dutch [nl-NL]
- English
- USA [en-US]
- UK [en-GB]
- Estonian [et-EE]
- Finnish [fi-FI]
- French
- Canada [fr-CA]
- France [fr-FR]
- German [de-DE]
- Greek [el-GR]
- Hebrew [he-IL]
- Hungarian [hu-HU]
- Indonesian [id-ID]
- Italian [it-IT]
- Japanese [ja-JP]
- Korean [ko-KR]
- Latvian [lv-LV]
- Lithuanian [lt-LT]
- Norwegian [nb-NO]
- Polish [pl-PL]
- Portuguese
- Portugal [pt-PT]
- Brazil [pt-BR]
- Romanian [ro-RO]
- Russian [ru-RU]
- Serbian (Latin) [sr-Latn-CS]
- Slovak [sk-SK]
- Slovenian [sl-SI]
- Spanish
- Spain [es-ES]
- Mexico [es-MX]
- Swedish [sv-SE]
- Turkish [tr-TR]
- Thai [th-TH]
- Ukrainian [uk-UA]
- Vietnamese [vi-VN]
To learn more, see Add Language Packs to Windows.
Setup and operate retail demo mode
Resetting the system
In a short time after a shopper stops interacting with the device, the retail demo plays, and Windows begins resetting any sample data in the contacts, photos, and other apps. Depending on the device, this could take between 1-5 minutes to fully reset everything back to normal.
Retail demo mode capabilities
In Retail Demo mode, shoppers are prevented from modifying key system areas. For example, they won’t be able to:
- Add or change the user password
- Change a Microsoft account name
- Access the command line, Registry Editor, or PowerShell utilities
- Anything that requires administrative permissions to the system
Activate retail mode
This process can be used to verify that the device is properly configured to launch any custom demo applications. It can also be used to start retail demo mode on a demonstration device.
Use the following process to activate retail demo mode on any retail device.
Remove the device from the box and press the power button to power up the device.
Enter Retail Demo Mode. For instructions, see this section in the RDX Windows Experience Guide (WEG).
Proceed with OOBE setup, including acceptance of the legal terms, until you get to RDX setup.
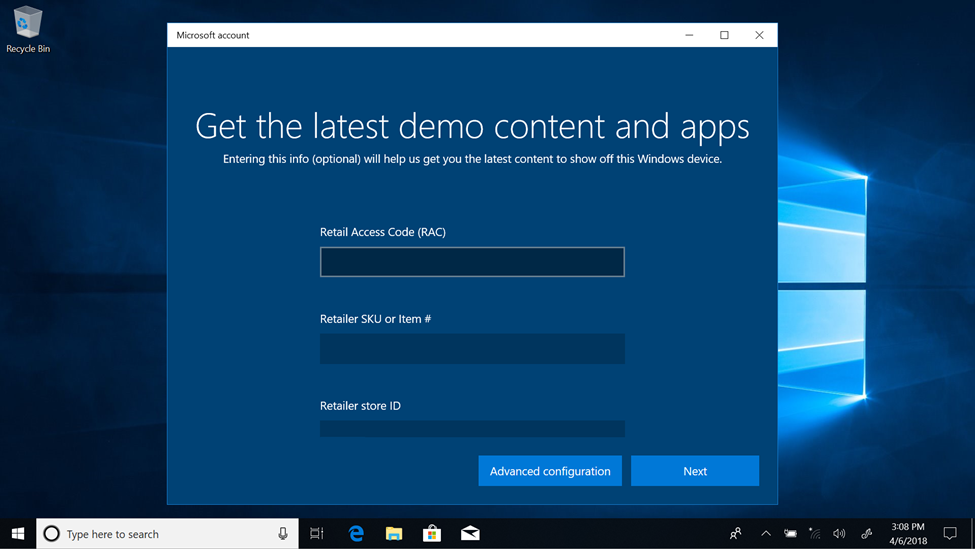
In the Get the latest demo content and apps page, enter your Retail Access Code (RAC). The available SKUs and items for the RAC are downloaded. Select the Retailer SKU or Item#, Retailer store ID, and then click Next. If the device is offline, go to the next step.
Note
“SKU” is optional and is only required if the retailer associated with the Retail Access Code (RAC) explicitly designed an experience under a specific SKU. The RAC (Retail Access Code), SKU, and Retailer store ID only apply and are only used by Retailers. If this applies to you, the codes should be requested through your Microsoft Account Manager. A list of SKUs will only be available if the retailer associated with the Retail Access Code (RAC) has previously provided it to Microsoft with this intent. If a SKU is not entered, the device will get content specific to the retailer and specific to the model of the hardware.
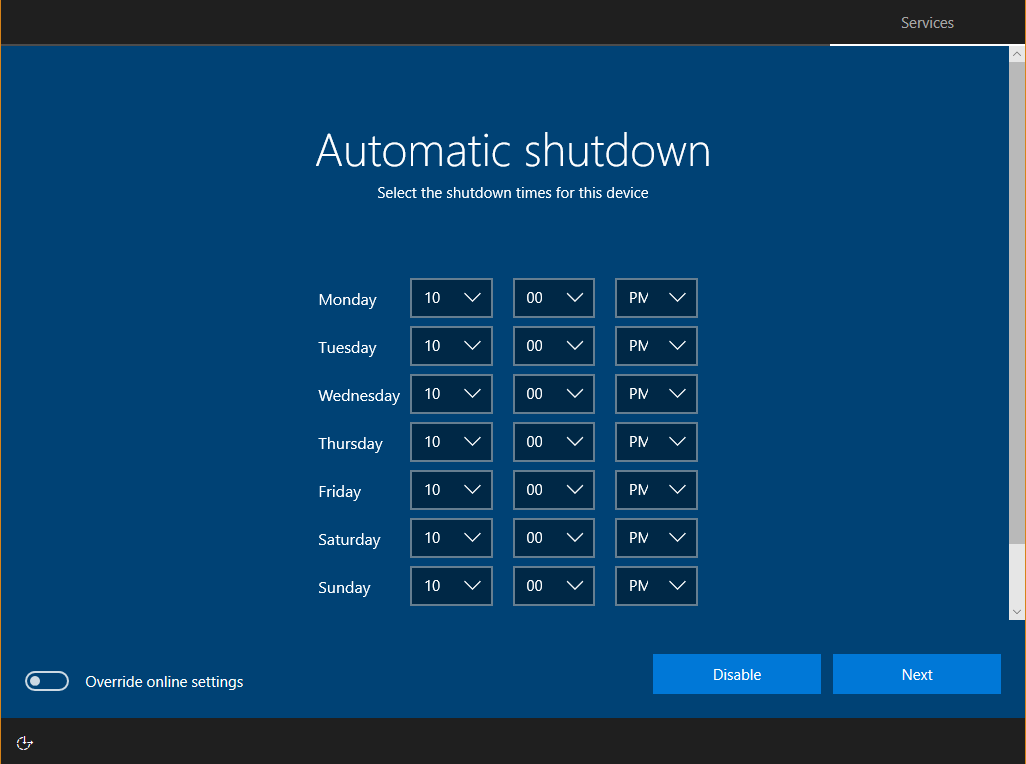
If you would like to specify start up and shut down times, select Advanced configuration.
In the Automatic shutdown page, configure and click Next.
In the RDX admin settings page, you can choose up to 21 days to keep admin account active, or you can choose to keep it active perpetually. A password is required to make an admin account perpetually active.
If the device is online, select Finish on the next page.
Retail demo setup will reboot the device soon after the desktop appears, and then retail demo configuration will continue in the background until the device begins showing the video attract loop.
Highlight your device
Retail Demo mode can showcase additional Windows features and apps based on the type of device’s form factor.
To access this content, make sure that the DeviceForm Unattend setting is set.
For example, when DeviceForm identifies the device as a Convertible laptop, Retail Demo mode includes content to show off Convertible features in Windows.
Additional recommendations:
If you are setting up your demo on a tablet device, configure your devices to boot to tablet mode and turn hardware-based prompting off:
- Make sure that ConvertibleSlateMode is always accurate for your devices.
- To support booting to tablet mode, configure the SignInMode setting.
- To remove prompts triggered by changes to ConvertibleSlateMode, configure ConvertibleSlateModePromptPreference setting.
Schedule automatic shutdown
Windows provides a way to set times for the devices to turn on and start retail demo mode automatically. Likewise, you can schedule when the devices shut down. These features allow you to save energy costs, to schedule updates, and to restore the retail demo experience automatically. You can configure shutdown times on the client during the out-of-box experience (OOBE), or post-OOBE during the retail demo mode setup. Additionally, you can configure automatic shutdown times using Retail Demo Asset Management (RDAM) after retail demo mode has been set up.
To schedule shutdowns on a local device
Open retail demo mode configuration. For instructions, see this section in the RDX Windows Experience Guide (WEG).
The retail demo mode configuration UI is displayed. Select the Advanced configuration button.
In the Advanced RDX settings page, under Automatic Shutdown, select Edit settings. This allows you to configure the automatic shutdown of the device.

Remove retail demo components
After a customer completes the out-of-box experience (OOBE), Windows schedules the removal of all RDX components, including any customizations you’ve added in the %programdata%\Microsoft\Windows\RetailDemo\OfflineContent\ folder.
For devices with more than 32GB of storage, the components are automatically removed 7 days after the customer completes OOBE.
For devices with 32GB of storage or less, by default, the components are automatically removed 30 minutes after the customer completes OOBE. To change this schedule, find the registry key HKLM\Software\Microsoft\Windows\CurrentVersion\Setup\OOBE and set the value DeleteDemoContentDelay to a number of minutes from 30 and 10080 (= 7 days).
md c:\HWID
Set-Location c:\HWID
Set-ExecutionPolicy Unrestricted
Install-Script -Name Get-WindowsAutoPilotInfo
Get-WindowsAutoPilotInfo.ps1 -OutputFile AutoPilotHWID.csv