How to restore Secured-core PC configurations for Enterprise Administrators
This document provides the steps to restore Secured-core PC configuration settings in the scenario where an Enterprise customer reimages a Secured-core PC, and subsequently needs to reenable all the Secured-core PC features. In sum, this document will cover the steps to enable the following Secured-core PC features, which can also be found on the Windows 10 Secured-core PCs webpage:
- Modern Standby
- System Management Mode (SMM) Protection
- Memory Access Protection enabled
- Enhanced Sign-in Security capable
- Memory Integrity (HVCI) enabled
- Trusted Platform Module 2.0
- Modern Device Servicing
- UEFI Secure Boot enabled
- Firmware Virtualization enabled
Managing Secured-core PC settings
Broadly, the settings for a Secured-core PC can be broken into two categories: those that can be configured via Windows, and those that are configured via the device UEFI firmware. However, even in these categories, some of the Windows settings require the device firmware to have specific settings. This document will explain how to manage these settings from these two perspectives and will call-out any firmware settings required to support those settings.
Windows settings
Windows Defender System Guard and SMM Protection
To protect critical resources such as the Windows authentication stack, single sign-on tokens, the Windows Hello biometric stack, and the Virtual Trusted Platform Module, a system's firmware and hardware must be trustworthy. Windows Defender System Guard (WDSG) reorganizes the existing Windows 10 system integrity features under one roof and sets up the next set of investments in Windows security. It's designed to make these security guarantees:
- Protect and maintain the integrity of the system as it starts up
- Validate that system integrity has truly been maintained through local and remote attestation
Additionally, WDSG also protects against System Management Mode (SMM) attacks. SMM is a special-purpose CPU mode in x86 microcontrollers that handles power management, hardware configuration, thermal monitoring, and anything else the manufacturer deems useful. Whenever one of these system operations is requested, a non-maskable interrupt (SMI) is invoked at runtime, which executes SMM code installed by the BIOS. SMM code executes in the highest privilege level and is invisible to the OS, which makes it an attractive target for malicious activity. Even if System Guard Secure Launch is used to late launch, SMM code can potentially access hypervisor memory and change the hypervisor.
To defend against this, two techniques are used:
- Paging protection to prevent inappropriate access to code and data
- SMM hardware supervision and attestation
Paging protection can be implemented to lock certain code tables to be read-only to prevent tampering. This prevents access to any memory that has not been specifically assigned.
A hardware-enforced processor feature known as a supervisor SMI handler can monitor SMM and make sure it does not access any part of the address space that it is not supposed to.
SMM protection is built on top of the Secure Launch technology and requires it to function. In the future, Windows 10 will also measure this SMI Handler's behavior and attest that no OS-owned memory has been tampered with.
Reenabling WDSG protection can be done this in several ways. For example, to enable WDSG protection using GPO you would deploy the “Turn on Virtualization Based Security” template and set the Secure Launch Configuration:
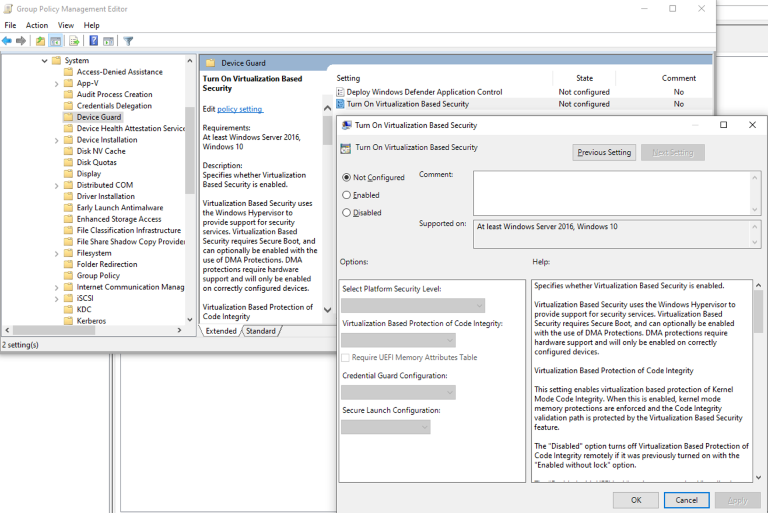
More information on the ways to enable System Guard Secure Launch are covered below:
Memory Access Protection
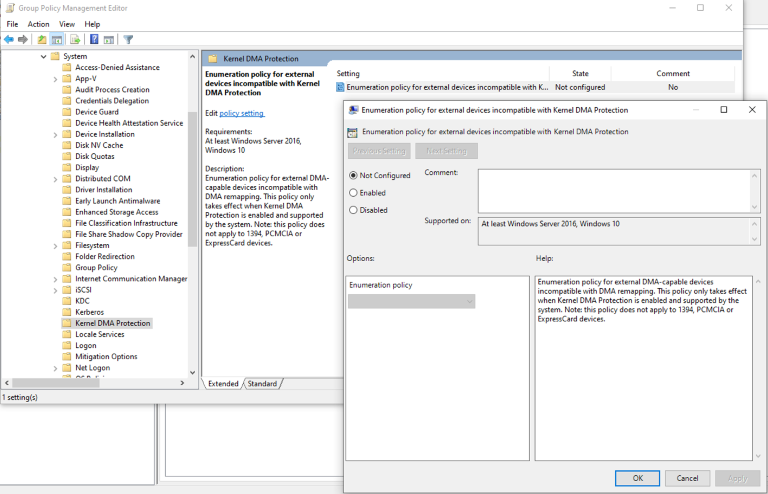
Windows leverages the system Input/Output Memory Management Unit (IOMMU) to block external peripherals from starting and performing DMA unless the drivers for these peripherals support memory isolation (such as DMA-remapping). Peripherals with DMA Remapping compatible drivers will be automatically enumerated, started and allowed to perform DMA remapping to their assigned memory regions.
By default, peripherals with DMA Remapping incompatible drivers will be blocked from starting and performing DMA until an authorized user signs into the system or unlocks the screen. IT administrators can ensure that this default behavior is applied to devices with DMA Remapping incompatible drivers using the DMAGuard MDM policies and selecting that the policy is enabled.
Enhanced Sign-in Security (ESS)
Windows Hello enables a user to authenticate using their biometrics or a PIN eliminating the need for a password. Biometric authentication uses facial recognition or fingerprint to prove a user's identity in a way that is secure, personal, and convenient. Enhanced Sign-in Security provides an additional level of security by leveraging specialized hardware and software components, such as Virtualization Based Security (VBS) and Trusted Platform Module to isolate and protect a user's authentication data and secure the channel by which that data is communicated.
To enable ESS in a custom image you will need to ensure that:
- Face authentication
- HKLM\SYSTEM\CurrentControlSet\Control\DeviceGuard\Scenarios\SecureBiometrics is set to 1
- The OEM Secure Camera driver is installed
- Fingerprint authentication
- HKLM\SYSTEM\CurrentControlSet\Control\DeviceGuard\Scenarios\SecureBiometrics is set to 1
- HKLM\SYSTEM\CurrentControlSet\Control\DeviceGuard\Scenarios\SecureFingerprint is set to 1
- The OEM Secure Fingerprint driver is installed.
Memory Integrity (HVCI)
Memory Integrity, also known as Hypervisor-Protected Code Integrity (HVCI), is a Virtualization Based Security (VBS) feature that provides critical protection and hardening of the Windows kernel. It uses virtualization to isolate the Code Integrity (CI) decision-making function from the rest of the Windows operating system, securely managing kernel memory and the processes that run in this high-privilege environment. To enable HVCI on Windows 10 devices with supporting hardware throughout an enterprise, use any of these options:
- Windows Security app
- Microsoft Intune (or another MDM provider)
- Group Policy
- Microsoft Endpoint Configuration Manager
- Registry
Trusted Platform Module
Trusted Platform Module (TPM) technology is designed to provide hardware-based, security-related functions. A TPM chip is a secure crypto-processor that is designed to carry out cryptographic operations. The chip includes multiple physical security mechanisms to make it tamper resistant, and malicious software is unable to tamper with the security functions of the TPM. Some of the key advantages of using a TPM are:
- Generate, store, and limit the use of cryptographic keys.
- Use TPM technology for platform device authentication by using the TPM's unique RSA key.
- Help ensure platform integrity by taking and storing security measurements.
The most common TPM functions are used for system integrity measurements and for key creation and use. During the boot process of a system, the boot code that is loaded (including firmware and the operating system components) can be measured and recorded in the TPM. The integrity measurements can be used as evidence for how a system started and to make sure that a TPM-based key was used only when the correct software was used to boot the system.
Review Configuration information TPM Group Policy settings for details on how to configure TPMs via GPO. Additionally, you can utilize the TPM cmdlets to configure the TPM.
Both require that the TPM be enabled in device firmware.
Modern Device Servicing
Windows Update supports Modern Device Servicing, and the device OEM will provide Windows Update with the appropriate drivers and firmware. Enterprise administrators need only ensure that their devices can be serviced by Windows Update.
UEFI Firmware settings
When doing an OS reimage, the UEFI settings are not modified; however, in the scenario where users may have modified the UEFI settings themselves prior to a reimage, the following will assist in determining whether the settings are correct.
OEM Firmware Settings Deployment Tools
As several Windows Secured-core PC settings require enablement of specific firmware settings, an Enterprise Administrator will need to configure these either directly on the target device or by deploying firmware settings via OEM Deployment Tools.
These tools are available directly from the OEM and are outside the scope of this document. Microsoft provides information on how to perform this for Microsoft Surface device in Manage and deploy Surface driver and firmware updates.
UEFI Secure Boot
Secure boot is a security standard developed by members of the PC industry to help make sure that a device boots using only software that is trusted by the Original Equipment Manufacturer (OEM). When the PC starts, the firmware checks the signature of each piece of boot software, including UEFI firmware drivers (also known as Option ROMs), EFI applications, and the operating system. If the signatures are valid, the PC boots, and the firmware gives control to the operating system.
The OEM can use instructions from the firmware manufacturer to create Secure boot keys and to store them in the PC firmware. Enterprise Administrators will need to use their OEM firmware setting distribution tools to deploy the required Secure Boot firmware settings. For a generic description of how to enable and disable Secure Boot in firmware please review Enabling Secure Boot.
Firmware Virtualization
To support running of Virtual Machines and several Windows security services, the device must have virtualization enabled in the device firmware. The options in firmware depend on whether the device has an Intel or AMD platform. For devices using the Intel platform, you will need to enable “Intel Virtualization Technology (Intel VT)”, and for devices using the AMD platform, you will need to enable “AMD Virtualization (AMD-V) technology”.