Windows Autopilot deployment for existing devices
Modern desktop deployment with Windows Autopilot helps easily deploy the latest version of Windows to existing devices. Apps used by the organization can be automatically installed. If Windows user data is managed with OneDrive for work or school, data is synchronized, so users can resume working right away.
Windows Autopilot for existing devices allows reimaging and provisioning a Windows device for Autopilot user-driven mode using a single, native Configuration Manager task sequence. The existing device can be on-premises domain-joined. The end result is a Windows device joined to either Microsoft Entra ID or Active Directory (Microsoft Entra hybrid join).
Note
The JSON file for Windows Autopilot for existing devices only supports user-driven Microsoft Entra ID and user-driven hybrid Microsoft Entra Autopilot profiles. Self-deploying and pre-provisioning Autopilot profiles aren't supported with JSON files due to these scenarios requiring TPM attestation.
However, during the Windows Autopilot for existing devices deployment, if the following conditions are true:
- Device is already a Windows Autopilot device before the deployment begins
- Device has an Autopilot profile assigned to it
then the assigned Autopilot profile takes precedence over the JSON file installed by the task sequence. In this scenario, if the assigned Autopilot profile is either a self-deploying or pre-provisioning Autopilot profile, then the self-deploying and pre-provisioning scenarios are supported.
Tip
Using Autopilot for existing devices could be used as a method to convert existing hybrid Microsoft Entra devices into Microsoft Entra devices. Using the setting Convert all targeted devices to Autopilot in the Autopilot profile doesn't automatically convert existing hybrid Microsoft Entra device in the assigned groups into a Microsoft Entra device. The setting only registers the devices in the assigned groups for the Autopilot service.
Prerequisites
A currently supported version of Microsoft Configuration Manager current branch.
Assigned Microsoft Intune licenses.
Microsoft Entra ID P1 or P2.
A supported version of Windows imported into Configuration Manager as an OS image.
The Windows Management Framework is required for Windows Server 2012/2012 R2 when running the PowerShell commands and scripts that installs the required modules.
Enrollment restrictions aren't configured to block personal devices. For more information, see What are enrollment restrictions?: Blocking personal Windows devices.
Configure the Enrollment Status Page (optional)
If desired, an enrollment status page (ESP) for Autopilot can be set up using Intune.
Open the Microsoft Intune admin center.
Go to Devices > Enroll Devices > Windows enrollment > Enrollment Status Page and Set up the Enrollment Status Page.

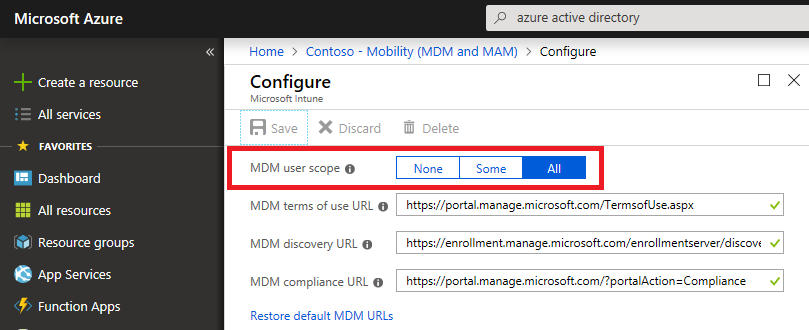
Go to Microsoft Entra ID > Mobility (MDM and MAM) > Microsoft Intune and enable Windows automatic enrollment. Configure the MDM user scope for some or all users.
Install required modules
Note
The PowerShell code snippets in this section were updated in July of 2023 to use the Microsoft Graph PowerShell modules instead of the deprecated AzureAD Graph PowerShell modules. The Microsoft Graph PowerShell modules might require approval of additional permissions in Microsoft Entra ID when they're first used. It was also updated to force using an updated version of the WindowsAutoPilot module. For more information, see AzureAD and Important: Azure AD Graph Retirement and PowerShell Module Deprecation.
On an internet-connected Windows PC or server, open an elevated Windows PowerShell command window.
Enter the following commands to install and import the necessary modules:
Install-PackageProvider -Name NuGet -MinimumVersion 2.8.5.201 -Force
Install-Module WindowsAutopilotIntune -MinimumVersion 5.4.0 -Force
Install-Module Microsoft.Graph.Groups -Force
Install-Module Microsoft.Graph.Authentication -Force
Install-Module Microsoft.Graph.Identity.DirectoryManagement -Force

Import-Module WindowsAutopilotIntune -MinimumVersion 5.4
Import-Module Microsoft.Graph.Groups
Import-Module Microsoft.Graph.Authentication
Import-Module Microsoft.Graph.Identity.DirectoryManagement
Enter the following commands and provide Intune administrative credentials:
Make sure the specified user account has sufficient administrative rights.
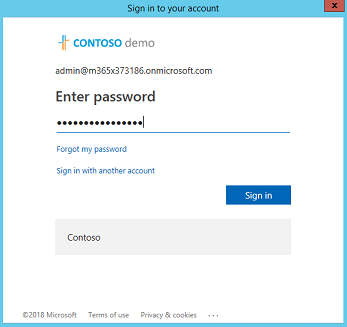
Connect-MgGraph -Scopes "Device.ReadWrite.All", "DeviceManagementManagedDevices.ReadWrite.All", "DeviceManagementServiceConfig.ReadWrite.All", "Domain.ReadWrite.All", "Group.ReadWrite.All", "GroupMember.ReadWrite.All", "User.Read"Windows requests the username and password for the account with a standard Microsoft Entra ID form. Type the username and password, and then select Sign in.
The first time Intune Graph APIs are used on a device, it prompts to enable Microsoft Intune PowerShell read and write permissions. To enable these permissions, select Consent on behalf or your organization and then Accept.
Get Autopilot profiles for existing devices
Get all the Autopilot profiles available in the Intune tenant, and display them in JSON format:
Get-AutopilotProfile | ConvertTo-AutopilotConfigurationJSON
See the following sample output:
PS C:\> Get-AutopilotProfile | ConvertTo-AutopilotConfigurationJSON
{
    "CloudAssignedTenantId": "1537de22-988c-4e93-b8a5-83890f34a69b",
    "CloudAssignedForcedEnrollment": 1,
    "Version": 2049,
    "Comment_File": "Profile Autopilot Profile",
    "CloudAssignedAadServerData": "{\"ZeroTouchConfig\":{\"CloudAssignedTenantUpn\":\"\",\"ForcedEnrollment\":1,\"CloudAssignedTenantDomain\":\"M365x373186.onmicrosoft.com\"}}",
    "CloudAssignedTenantDomain": "M365x373186.onmicrosoft.com",
    "CloudAssignedDomainJoinMethod": 0,
    "CloudAssignedOobeConfig": 28,
    "ZtdCorrelationId": "7F9E6025-1E13-45F3-BF82-A3E8C5B59EAC"
}
Each profile is encapsulated within braces ({ }). The previous example displays a single profile.
JSON file properties
| Property | Type | Required | Description |
|---|---|---|---|
| Version | Number | Optional | The version number that identifies the format of the JSON file. |
| CloudAssignedTenantId | GUID | Required | The Microsoft Entra tenant ID that should be used. This property is the GUID for the tenant, and can be found in properties of the tenant. The value shouldn't include braces. |
| CloudAssignedTenantDomain | String | Required | The Microsoft Entra tenant name that should be used. For example: tenant.onmicrosoft.com. |
| CloudAssignedOobeConfig | Number | Required | This property is a bitmap that shows which Autopilot settings were configured.
|
| CloudAssignedDomainJoinMethod | Number | Required | This property specifies whether the device should join Microsoft Entra ID or Active Directory (Microsoft Entra hybrid join).
|
| CloudAssignedForcedEnrollment | Number | Required | Specifies that the device should require Microsoft Entra join and MDM enrollment.
|
| ZtdCorrelationId | GUID | Required | A unique GUID (without braces) provided to Intune as part of the registration process. This ID is included in the enrollment message as the OfflineAutopilotEnrollmentCorrelator. This attribute is present only if enrollment happens on a device registered with Zero Touch Provisioning via offline registration. |
| CloudAssignedAadServerData | Encoded JSON string | Required | An embedded JSON string used for branding. It requires enabling Microsoft Entra organization branding. For example:"CloudAssignedAadServerData": "{\"ZeroTouchConfig\":{\"CloudAssignedTenantUpn\":\"\",\"CloudAssignedTenantDomain\":\"tenant.onmicrosoft.com\"}} |
| CloudAssignedDeviceName | String | Optional | The name automatically assigned to the computer. This name follows the naming pattern convention configured in the Intune Autopilot profile. An explicit name can also be specified. |
Create the JSON file
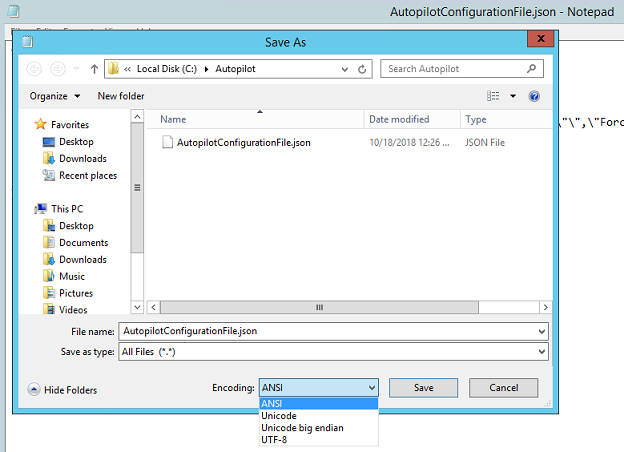
Save the Autopilot profile as a JSON file in ASCII or ANSI format. Windows PowerShell defaults to Unicode format. If redirecting output of the commands to a file, also specify the file format. The following PowerShell example saves the file in ASCII format. The Autopilot profiles appear in a subfolder under the folder specified by the $targetDirectory variable. By default, the $targetDirectory variable is C:\AutoPilot, but it can be changed to another location if desired. The subfolder has the name of the Autopilot profile from Intune. If there are multiple Autopilot profiles, each profile has its own subfolder. In each folder, there's a JSON file named AutopilotConfigurationFile.json
Connect-MgGraph -Scopes "Device.ReadWrite.All", "DeviceManagementManagedDevices.ReadWrite.All", "DeviceManagementServiceConfig.ReadWrite.All", "Domain.ReadWrite.All", "Group.ReadWrite.All", "GroupMember.ReadWrite.All", "User.Read"
$AutopilotProfile = Get-AutopilotProfile
$targetDirectory = "C:\Autopilot"
$AutopilotProfile | ForEach-Object {
    New-Item -ItemType Directory -Path "$targetDirectory\$($_.displayName)"
    $_ | ConvertTo-AutopilotConfigurationJSON | Set-Content -Encoding Ascii "$targetDirectory\$($_.displayName)\AutopilotConfigurationFile.json"
}
Tip
When the PowerShell cmdlet Out-File is used to redirect the JSON output to a file, it uses Unicode encoding by default. This cmdlet might also truncate long lines. Use the Set-Content cmdlet with the -Encoding ASCII parameter to set the proper text encoding.
Important
The file name has to be AutopilotConfigurationFile.json and encoded as ASCII or ANSI.
The profile can also be saved to a text file and edit in Notepad. In Notepad, when choosing Save as, select the save as type: All Files, and then choose ANSI for the Encoding.
After saving the file, move it to a location for a Microsoft Configuration Manager package source.
Important
The configuration file can only contain one profile. Multiple JSON profile files can be used, but each one must be named AutopilotConfigurationFile.json. This requirement is for OOBE to follow the Autopilot experience. To use more than one Autopilot profile, create separate Configuration Manager packages.
If the file is saved with one of the following criteria:
- Unicode encoding
- UTF-8 encoding
- a file name other than
AutopilotConfigurationFile.json
then Windows OOBE doesn't follow the Autopilot experience.
Create a package containing the JSON file
In the Configuration Manager console, go to the Software Library workspace, expand Application Management, and select the Packages node.
On the ribbon, select Create Package.
In the Create Package and Program Wizard, enter the following details for the package:
- Name: Autopilot for existing devices config
- Select This package contains source files
- Source folder: Specify the UNC network path that contains the
AutopilotConfigurationFile.jsonfile
For more information, see Packages and programs in Configuration Manager.
For the program, select the Program Type: Don't create a program
Complete the wizard.
Note
If the user-driven Autopilot profile settings in Intune are changed at a later date, make sure to recreate and update the JSON file. After updating the JSON file, redistribute the associated Configuration Manager package.
Create a target collection
In the Configuration Manager console, go to the Assets and Compliance workspace, and select the Device Collections node.
On the ribbon, select Create, and then choose Create Device Collection. An existing collection can also be used. If using an existing collection, proceed to the Create a task sequence section.
In the Create Device Collection Wizard, enter the following General details:
- Name: Autopilot for existing devices collection
- Comment: Add an optional comment to further describe the collection
- Limiting collection: All Systems or if desired, an alternate collection.
On the Membership Rules page, select Add Rule. Specify either a direct or query-based collection rule to add the target Windows devices to the new collection.
For example, if the hostname of the computer to be wiped and reloaded is
PC-01, and Name is being used as the attribute:Select Add Rule, select Direct Rule to open the Create Direct Membership Rule Wizard, and select Next on the Welcome page.
On the Search for Resources page, enter PC-01 as the Value.
Select Next, and select PC-01 in the Resources.
Complete the wizard with the default settings.
For more information, see How to create collections in Configuration Manager.
Create a task sequence
In the Configuration Manager console, go to the Software Library workspace, expand Operating Systems and select the Task Sequences node.
On the Home ribbon, select Create Task Sequence.
On the Create new task sequence page, select the option to Deploy Windows Autopilot for existing devices.
On the Task sequence information page, specify the following information:
- A name for the task sequence. For example, Autopilot for existing devices.
- Optionally add a description to better describe the task sequence.
- Select a boot image. For more information on supported boot image versions, see Support for the Windows ADK in Configuration Manager.
On the Install Windows page, select the Windows Image package. Then configure the following settings:
Image index: Select either Enterprise, Education, or Professional, as required by the organization.
Enable the option to Partition and format the target computer before installing the operating system.
Configure task sequence for use with Bitlocker: If this option is enabled, the task sequence includes the steps necessary to enable BitLocker.
Product key: If a product key needs to be specified for Windows activation, enter it here.
Select one of the following options to configure the local administrator account in Windows:
- Randomly generate the local administrator password and disable the account on all support platforms (recommended)
- Enable the account and specify the local administrator password
On the Configure Network page, select the option to Join a workgroup.
Important
The Autopilot for existing devices task sequence runs the Prepare Windows for capture step, which uses the Windows System Preparation Tool (Sysprep). This action fails if the device is joined to a domain.
Sysprep runs with the
/Generalizeparameter, which on currently supported version of Windows deletes the Autopilot profile file. The device then boots into the OOBE phase instead of Autopilot. To fix this issue, see Windows Autopilot - known issues: Windows Autopilot for existing devices doesn't work for Windows 10, version 1903 or 1909.On the Install Configuration manager page, add any necessary installation properties for the environment.
The Include updates page selects by default the option to Do not install any software updates.
On the Install applications page, applications to install during the task sequence can be selected. However, Microsoft recommends that to mirror the signature image approach with this scenario. After the device provisions with Autopilot, apply all applications and configurations from Microsoft Intune or Configuration Manager co-management. This process provides a consistent experience between users receiving new devices and those using Windows Autopilot for existing devices.
On the System Preparation page, select the package that includes the Autopilot configuration file. By default, the task sequence restarts the computer after it runs Windows Sysprep. The option to Shutdown computer after this task sequence completes can also be selected. This option allows preparation of a device and then delivery to a user for a consistent Autopilot experience.
Complete the wizard.
The Windows Autopilot for existing devices task sequence results in a device joined to Microsoft Entra ID.
For more information on creating the task sequence, including information on other wizard options, see Create a task sequence to install an OS.
If the task sequence is viewed, it's similar to the default task sequence to apply an existing OS image. This task sequence includes the following extra steps:
Apply Windows Autopilot configuration: This step applies the Autopilot configuration file from the specified package. It's not a new type of step, it's a Run Command Line step to copy the file.
Prepare Windows for Capture: This step runs Windows Sysprep, and has the setting to Shutdown the computer after running this action. For more information, see Prepare Windows for Capture.
For more information on editing the task sequence, see Use the task sequence editor and Task sequence steps.
Note
The Prepare Windows for Capture step deletes the AutopilotConfigurationFile.json file. For more information and a workaround, see Windows Autopilot - known issues: Windows Autopilot for existing devices doesn't work for Windows 10, version 1903 or 1909.
To make sure the user's data is backed up before the Windows upgrade, use OneDrive for work or school known folder move.
Distribute content to distribution points
Next distribute all content required for the task sequence to distribution points.
Select the Autopilot for existing devices task sequence, and in the ribbon select Distribute Content.
On the Specify the content destination page, select Add to specify either a Distribution Point or Distribution Point Group.
Specify content destinations that let the devices get the content.
After specifying content distribution, complete the wizard.
For more information, see Manage task sequences to automate tasks.
Deploy the Autopilot task sequence
Select the Autopilot for existing devices task sequence, and in the ribbon select Deploy.
In the Deploy Software Wizard, specify the following details:
General
Task Sequence: Autopilot for existing devices
Collection: Autopilot for existing devices collection
Deployment Settings
Action: Install.
Purpose: Available.
Make available to the following: Only Configuration Manager Clients.
Note
Choose the option here that is relevant for the context of testing. If the target client doesn't have the Configuration Manager agent or Windows installed, the task sequence needs to be started via PXE or Boot Media.
Scheduling
- Set a time for when this deployment becomes available
User Experience
- Select Show Task Sequence progress
Distribution Points
- Deployment options: Download content locally when needed by the running task sequence
Complete the wizard.
Complete the deployment process
On the target Windows device, go to the Start menu, type
Software Center, and open it.In the Software Library, under Operating Systems, select Autopilot for existing devices, and then select Install.
The task sequence runs and does the following actions:
Downloads content.
Restarts the device into WinPE.
Formats the drive.
Installs Windows from the specified OS image.
Prepares for Autopilot.
After the task sequence completes, the device boots into OOBE for the Autopilot experience:
Note
If devices need to be joined to Active Directory as part of a Microsoft Entra hybrid join scenario, don't do so through the task sequence and the Apply Network Settings Task. Instead, create a Domain Join device configuration profile. Since there's no Microsoft Entra device object for the computer to do group-based targeting, target the profile to All Devices. For more information, see User-driven mode for Microsoft Entra hybrid join.
Register the device for Windows Autopilot
Devices provisioned with Autopilot only receive the guided OOBE Autopilot experience on first boot.
After Windows is updated on an existing device, make sure to register the device so it has the Autopilot experience when the PC resets. Automatic registration can be enabled for a device by using the Convert all targeted devices to Autopilot setting in the Autopilot profile that is assigned to a group that the device is a member of. For more information, see Create an Autopilot deployment profile.
Also see Adding devices to Windows Autopilot.
Note
Typically, the target device isn't registered with the Windows Autopilot service. If the device is already registered, the assigned profile takes precedence. The Autopilot for existing devices profile only applies if the online profile times out.
How to speed up the deployment process
To speed up the deployment process, see Windows Autopilot deployment for existing devices: Speed up the deployment process section of the Autopilot Tutorial.
Tutorial
For a detailed tutorial on configuring Windows Autopilot for existing devices, see the following article:
Related articles
Feedback
Coming soon: Throughout 2024 we will be phasing out GitHub Issues as the feedback mechanism for content and replacing it with a new feedback system. For more information see: https://aka.ms/ContentUserFeedback.
Submit and view feedback for