MR Input 213: Motion controllers
Note
The Mixed Reality Academy tutorials were designed with HoloLens (1st gen) and Mixed Reality Immersive Headsets in mind. As such, we feel it is important to leave these tutorials in place for developers who are still looking for guidance in developing for those devices. These tutorials will not be updated with the latest toolsets or interactions being used for HoloLens 2. They will be maintained to continue working on the supported devices. A new series of tutorials has been posted for HoloLens 2.
Motion controllers in the mixed reality world add another level of interactivity. With motion controllers, we can directly interact with objects in a more natural way, similar to our physical interactions in real life, increasing immersion and delight in your app experience.
In MR Input 213, we will explore the motion controller's input events by creating a simple spatial painting experience. With this app, users can paint in three-dimensional space with various types of brushes and colors.
Topics covered in this tutorial
 |
 |
 |
|---|---|---|
| Controller visualization | Controller input events | Custom controller and UI |
| Learn how to render motion controller models in Unity's game mode and runtime. | Understand different types of button events and their applications. | Learn how to overlay UI elements on top of the controller or fully customize it. |
Device support
| Course | HoloLens | Immersive headsets |
|---|---|---|
| MR Input 213: Motion controllers | ✔️ |
Before you start
Prerequisites
See the installation checklist for immersive headsets on this page.
- This tutorial requires Unity 2017.2.1p2
Project files
- Download the files required by the project and extract the files to the Desktop.
Note
If you want to look through the source code before downloading, it's available on GitHub.
Unity setup
Objectives
- Optimize Unity for Windows Mixed Reality development
- Setup Mixed Reality Camera
- Setup environment
Instructions
Start Unity.
Select Open.
Navigate to your Desktop and find the MixedReality213-master folder you previously unarchived.
Click Select Folder.
Once Unity finishes loading project files, you will be able to see Unity editor.
In Unity, select File > Build Settings.
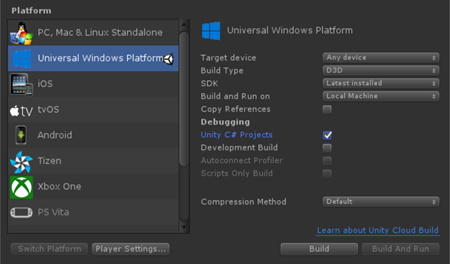
Select Universal Windows Platform in the Platform list and click the Switch Platform button.
Set Target Device to Any device
Set Build Type to D3D
Set SDK to Latest Installed
Check Unity C# Projects
- This allows you modify script files in the Visual Studio project without rebuilding Unity project.
Click Player Settings.
In the Inspector panel, scroll down to the bottom
In XR Settings, check Virtual Reality Supported
Under Virtual Reality SDKs, select Windows Mixed Reality
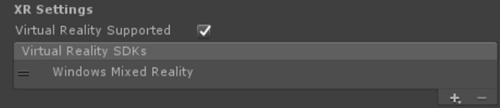
Close Build Settings window.
Project structure
This tutorial uses Mixed Reality Toolkit - Unity. You can find the releases on this page.
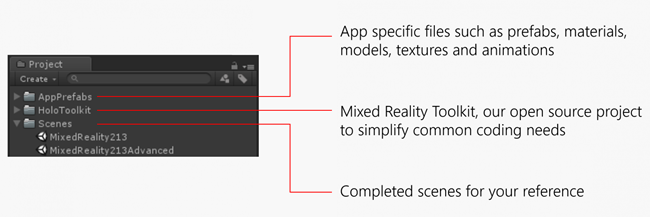
Completed scenes for your reference
- You will find two completed Unity scenes under Scenes folder.
- MixedReality213: Completed scene with single brush
- MixedReality213Advanced: Completed scene for advanced design with multiple brushes
New Scene setup for the tutorial
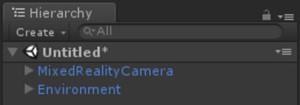
In Unity, click File > New Scene
Delete Main Camera and Directional Light
From the Project panel, search and drag the following prefabs into the Hierarchy panel:
- Assets/HoloToolkit/Input/Prefabs/MixedRealityCamera
- Assets/AppPrefabs/Environment
There are two camera prefabs in Mixed Reality Toolkit:
- MixedRealityCamera.prefab: Camera only
- MixedRealityCameraParent.prefab: Camera + Teleportation + Boundary
- In this tutorial, we will use MixedRealityCamera without teleportation feature. Because of this, we added simple Environment prefab which contains a basic floor to make the user feel grounded.
- To learn more about the teleportation with MixedRealityCameraParent, see Advanced design - Teleportation and locomotion
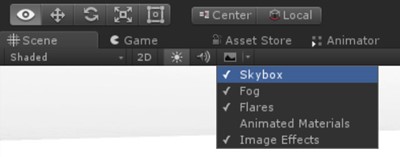
Skybox setup
Click Window > Lighting > Settings
Click the circle on the right side of the Skybox Material field
Type in ‘gray’ and select SkyboxGray (Assets/AppPrefabs/Support/Materials/SkyboxGray.mat)

Check Skybox option to be able to see assigned gray gradient skybox
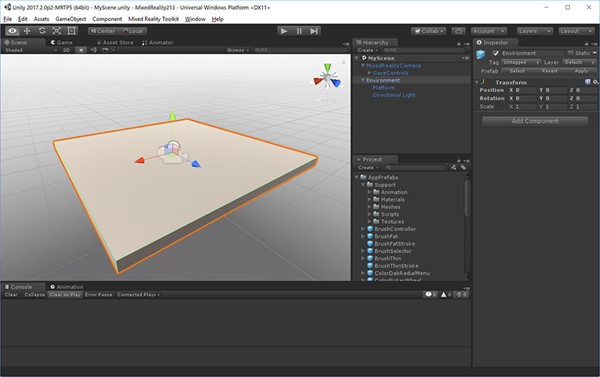
The scene with MixedRealityCamera, Environment and gray skybox will look like this.
Click File > Save Scene as
Save your scene under Scenes folder with any name
Chapter 1 - Controller visualization
Objectives
- Learn how to render motion controller models in Unity's game mode and at runtime.
Windows Mixed Reality provides an animated controller model for controller visualization. There are several approaches you can take for controller visualization in your app:
- Default - Using default controller without modification
- Hybrid - Using default controller, but customizing some of its elements or overlaying UI components
- Replacement - Using your own customized 3D model for the controller
In this chapter, we will learn about the examples of these controller customizations.
Instructions
- In the Project panel, type MotionControllers in the search box . You can also find it under Assets/HoloToolkit/Input/Prefabs/.
- Drag the MotionControllers prefab into the Hierarchy panel.
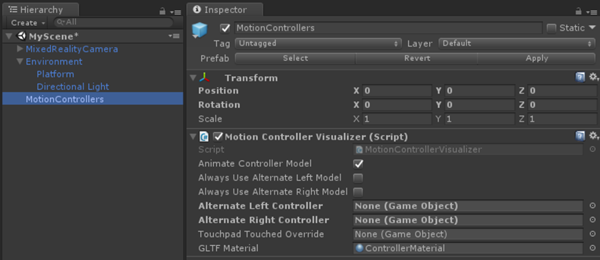
- Click on the MotionControllers prefab in the Hierarchy panel.
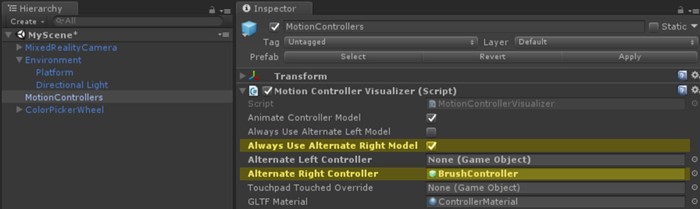
MotionControllers prefab
MotionControllers prefab has a MotionControllerVisualizer script which provides the slots for alternate controller models. If you assign your own custom 3D models such as a hand or a sword and check 'Always Use Alternate Left/Right Model', you will see them instead of the default model. We will use this slot in Chapter 4 to replace the controller model with a brush.
Instructions
- In the Inspector panel, double click MotionControllerVisualizer script to see the code in the Visual Studio
MotionControllerVisualizer script
The MotionControllerVisualizer and MotionControllerInfo classes provide the means to access & modify the default controller models. MotionControllerVisualizer subscribes to Unity's InteractionSourceDetected event and automatically instantiates controller models when they are found.
protected override void Awake()
{
    ...
    InteractionManager.InteractionSourceDetected += InteractionManager_InteractionSourceDetected;
    InteractionManager.InteractionSourceLost += InteractionManager_InteractionSourceLost;
    ...
}
The controller models are delivered according to the glTF specification. This format has been created to provide a common format, while improving the process behind transmitting and unpacking 3D assets. In this case, we need to retrieve and load the controller models at runtime, as we want to make the user's experience as seamless as possible, and it's not guaranteed which version of the motion controllers the user might be using. This course, via the Mixed Reality Toolkit, uses a version of the Khronos Group's UnityGLTF project.
Once the controller has been delivered, scripts can use MotionControllerInfo to find the transforms for specific controller elements so they can correctly position themselves.
In a later chapter, we will learn how to use these scripts to attach UI elements to the controllers.
In some scripts, you will find code blocks with #if !UNITY_EDITOR or UNITY_WSA. These code blocks run only on the UWP runtime when you deploy to Windows. This is because the set of APIs used by the Unity editor and the UWP app runtime are different.
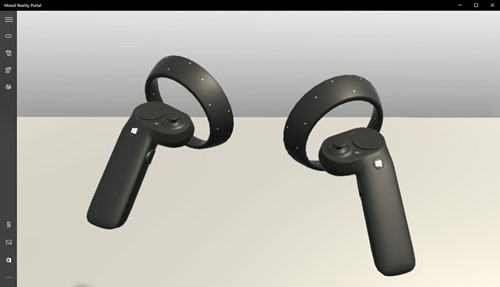
- Save the scene and click the play button.
You will be able to see the scene with motion controllers in your headset. You can see detailed animations for button clicks, thumbstick movement, and touchpad touch highlighting.
Chapter 2 - Attaching UI elements to the controller
Objectives
- Learn about the elements of the motion controllers
- Learn how to attach objects to specific parts of the controllers
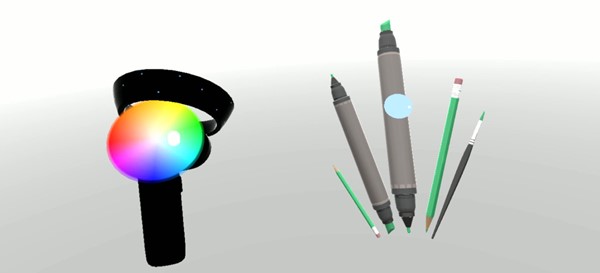
In this chapter, you will learn how to add user interface elements to the controller which the user can easily access and manipulate at anytime. You will also learn how to add a simple color picker UI using the touchpad input.
Instructions
- In the Project panel, search MotionControllerInfo script.
- From the search result, double click MotionControllerInfo script to see the code in Visual Studio.
MotionControllerInfo script
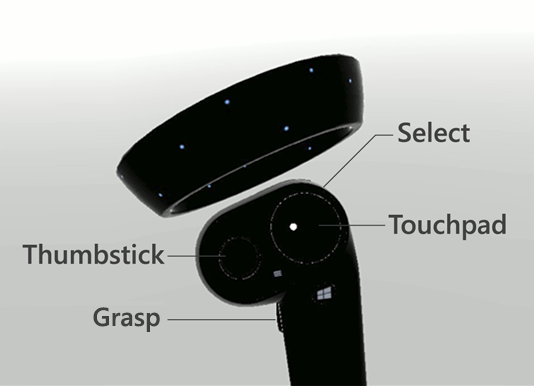
The first step is to choose which element of the controller you want the UI to attach to. These elements are defined in ControllerElementEnum in MotionControllerInfo.cs.
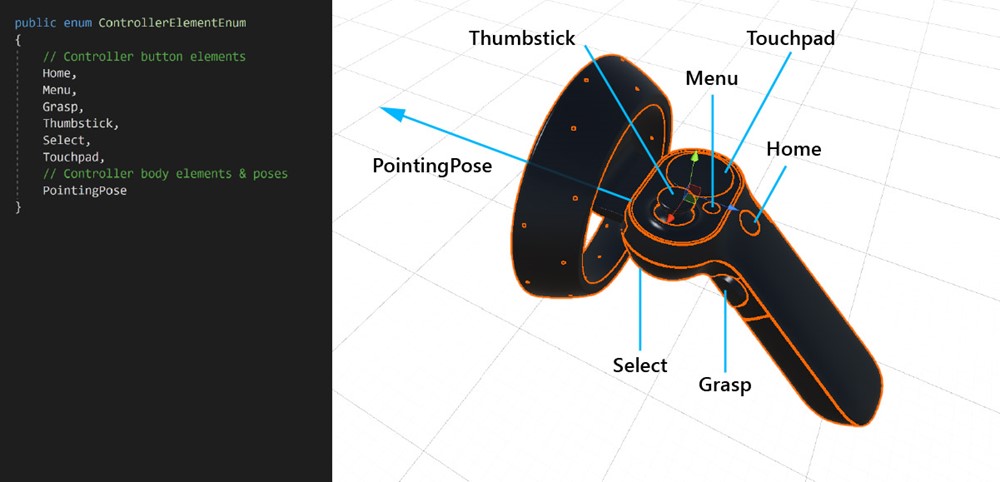
- Home
- Menu
- Grasp
- Thumbstick
- Select
- Touchpad
- Pointing pose – this element represents the tip of the controller pointing forward direction.
Instructions
- In the Project panel, search AttachToController script.
- From the search result, double click AttachToController script to see the code in Visual Studio.
AttachToController script
The AttachToController script provides a simple way to attach any objects to a specified controller handedness and element.
In AttachElementToController(),
- Check handedness using MotionControllerInfo.Handedness
- Get specific element of the controller using MotionControllerInfo.TryGetElement()
- After retrieving the element's transform from the controller model, parent the object under it and set object's local position & rotation to zero.
public MotionControllerInfo.ControllerElementEnum Element { get { return element; } }

private void AttachElementToController(MotionControllerInfo newController)
{
     if (!IsAttached && newController.Handedness == handedness)
     {
          if (!newController.TryGetElement(element, out elementTransform))
          {
               Debug.LogError("Unable to find element of type " + element + " under controller " + newController.ControllerParent.name + "; not attaching.");
               return;
          }

          controller = newController;

          SetChildrenActive(true);

          // Parent ourselves under the element and set our offsets
          transform.parent = elementTransform;
          transform.localPosition = positionOffset;
          transform.localEulerAngles = rotationOffset;
          if (setScaleOnAttach)
          {
               transform.localScale = scale;
          }

          // Announce that we're attached
          OnAttachToController();
          IsAttached = true;
     }
}
The simplest way to use AttachToController script is to inherit from it, as we've done in the case of ColorPickerWheel. Simply override the OnAttachToController and OnDetachFromController functions to perform your setup / breakdown when the controller is detected / disconnected.
Instructions
- In the Project panel, type in the search box ColorPickerWheel. You can also find it under Assets/AppPrefabs/.
- Drag ColorPickerWheel prefab into the Hierarchy panel.
- Click the ColorPickerWheel prefab in the Hierarchy panel.
- In the Inspector panel, double click ColorPickerWheel Script to see the code in Visual Studio.

ColorPickerWheel script
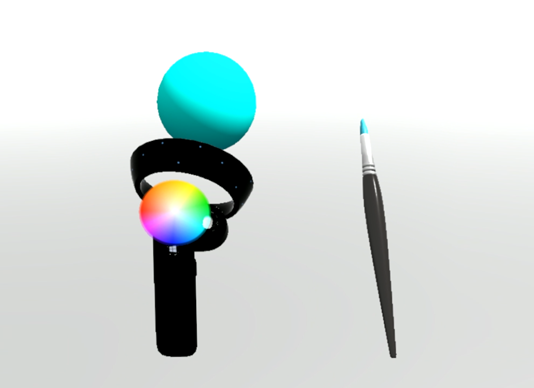
Since ColorPickerWheel inherits AttachToController, it shows Handedness and Element in the Inspector panel. We'll be attaching the UI to the Touchpad element on the left controller.
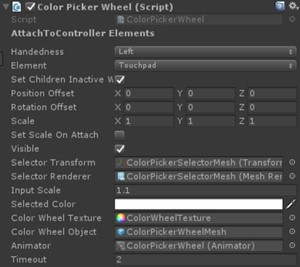
ColorPickerWheel overrides the OnAttachToController and OnDetachFromController to subscribe to the input event which will be used in next chapter for color selection with touchpad input.
public class ColorPickerWheel : AttachToController, IPointerTarget
{
    protected override void OnAttachToController()
    {
        // Subscribe to input now that we're parented under the controller
        InteractionManager.InteractionSourceUpdated += InteractionSourceUpdated;
    }

    protected override void OnDetachFromController()
    {
        Visible = false;

        // Unsubscribe from input now that we've detached from the controller
        InteractionManager.InteractionSourceUpdated -= InteractionSourceUpdated;
    }
    ...
}
- Save the scene and click the play button.
Alternative method for attaching objects to the controllers
We recommend that your scripts inherit from AttachToController and override OnAttachToController. However, this may not always be possible. An alternative is using it as a standalone component. This can be useful when you want to attach an existing prefab to a controller without refactoring your scripts. Simply have your class wait for IsAttached to be set to true before performing any setup. The simplest way to do this is by using a coroutine for 'Start.'
private IEnumerator Start() {
    AttachToController attach = gameObject.GetComponent<AttachToController>();

    while (!attach.IsAttached) {
        yield return null;
    }

    // Perform setup here
}
Chapter 3 - Working with touchpad input
Objectives
- Learn how to get touchpad input data events
- Learn how to use touchpad axis position information for your app experience
Instructions
- In the Hierarchy panel, click ColorPickerWheel
- In the Inspector panel, under Animator, double click ColorPickerWheelController
- You will be able to see Animator tab opened
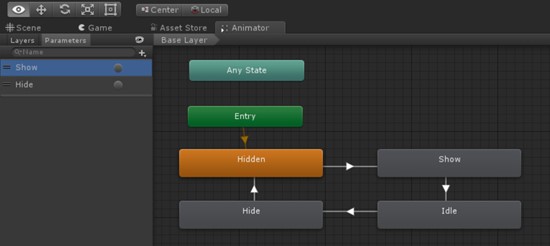
Showing/hiding UI with Unity's Animation controller
To show and hide the ColorPickerWheel UI with animation, we are using Unity's animation system. Setting the ColorPickerWheel's Visible property to true or false triggers Show and Hide animation triggers. Show and Hide parameters are defined in the ColorPickerWheelController animation controller.
Instructions
- In the Hierarchy panel, select ColorPickerWheel prefab
- In the Inspector panel, double click ColorPickerWheel script to see the code in the Visual Studio
ColorPickerWheel script
ColorPickerWheel subscribes to Unity's InteractionSourceUpdated event to listen for touchpad events.
In InteractionSourceUpdated(), the script first checks to ensure that it:
- is actually a touchpad event (obj.state.touchpadTouched)
- originates from the left controller (obj.state.source.handedness)
If both are true, the touchpad position (obj.state.touchpadPosition) is assigned to selectorPosition.
private void InteractionSourceUpdated(InteractionSourceUpdatedEventArgs obj)
{
    if (obj.state.source.handedness == handedness && obj.state.touchpadTouched)
    {
        Visible = true;
        selectorPosition = obj.state.touchpadPosition;
    }
}
In Update(), based on visible property, it triggers Show and Hide animation triggers in the color picker's animator component
if (visible != visibleLastFrame)
{
    if (visible)
    {
        animator.SetTrigger("Show");
    }
    else
    {
        animator.SetTrigger("Hide");
    }
}
In Update(), selectorPosition is used to cast a ray at the color wheel's mesh collider, which returns a UV position. This position can then be used to find the pixel coordinate and color value of the color wheel's texture. This value is accessible to other scripts via the SelectedColor property.

...
    // Clamp selector position to a radius of 1
    Vector3 localPosition = new Vector3(selectorPosition.x * inputScale, 0.15f, selectorPosition.y * inputScale);
    if (localPosition.magnitude > 1)
    {
        localPosition = localPosition.normalized;
    }
    selectorTransform.localPosition = localPosition;

    // Raycast the wheel mesh and get its UV coordinates
    Vector3 raycastStart = selectorTransform.position + selectorTransform.up * 0.15f;
    RaycastHit hit;
    Debug.DrawLine(raycastStart, raycastStart - (selectorTransform.up * 0.25f));

    if (Physics.Raycast(raycastStart, -selectorTransform.up, out hit, 0.25f, 1 << colorWheelObject.layer, QueryTriggerInteraction.Ignore))
    {
        // Get pixel from the color wheel texture using UV coordinates
        Vector2 uv = hit.textureCoord;
        int pixelX = Mathf.FloorToInt(colorWheelTexture.width * uv.x);
        int pixelY = Mathf.FloorToInt(colorWheelTexture.height * uv.y);
        selectedColor = colorWheelTexture.GetPixel(pixelX, pixelY);
        selectedColor.a = 1f;
    }
    // Set the selector's color and blend it with white to make it visible on top of the wheel
    selectorRenderer.material.color = Color.Lerp (selectedColor, Color.white, 0.5f);
}
Chapter 4 - Overriding controller model
Objectives
- Learn how to override the controller model with a custom 3D model.
Instructions
- Click MotionControllers in the Hierarchy panel.
- Click the circle on the right side of the Alternate Right Controller field.
- Type in 'BrushController' and select the prefab from the result. You can find it under Assets/AppPrefabs/BrushController.
- Check Always Use Alternate Right Model
The BrushController prefab does not have to be included in the Hierarchy panel. However, to check out its child components:
- In the Project panel, type in BrushController and drag BrushController prefab into the Hierarchy panel.
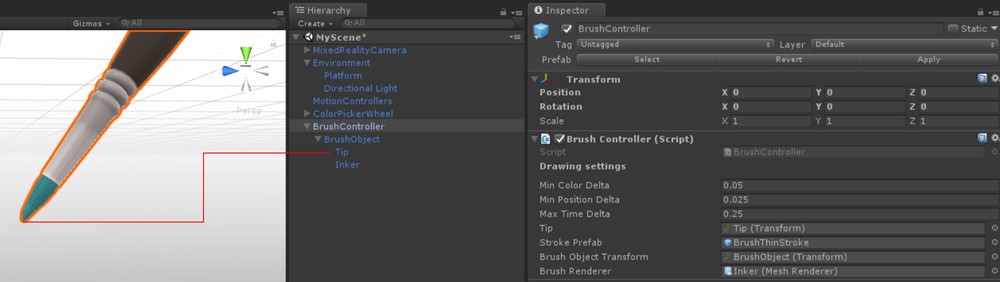
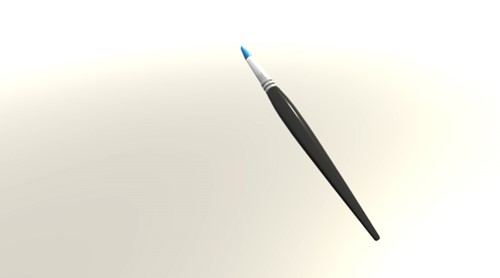
You will find the Tip component in BrushController. We will use its transform to start/stop drawing lines.
- Delete the BrushController from the Hierarchy panel.
- Save the scene and click the play button. You will be able to see the brush model replaced the right-hand motion controller.
Chapter 5 - Painting with Select input
Objectives
- Learn how to use the Select button event to start and stop a line drawing
Instructions
- Search BrushController prefab in the Project panel.
- In the Inspector panel, double click BrushController Script to see the code in Visual Studio
BrushController script
BrushController subscribes to the InteractionManager's InteractionSourcePressed and InteractionSourceReleased events. When InteractionSourcePressed event is triggered, the brush's Draw property is set to true; when InteractionSourceReleased event is triggered, the brush's Draw property is set to false.
private void InteractionSourcePressed(InteractionSourcePressedEventArgs obj)
{
    if (obj.state.source.handedness == InteractionSourceHandedness.Right && obj.pressType == InteractionSourcePressType.Select)
    {
        Draw = true;
    }
}

private void InteractionSourceReleased(InteractionSourceReleasedEventArgs obj)
{
    if (obj.state.source.handedness == InteractionSourceHandedness.Right && obj.pressType == InteractionSourcePressType.Select)
    {
        Draw = false;
    }
}
While Draw is set to true, the brush will generate points in an instantiated Unity LineRenderer. A reference to this prefab is kept in the brush's Stroke Prefab field.
private IEnumerator DrawOverTime()
{
    // Get the position of the tip
    Vector3 lastPointPosition = tip.position;

    ...

    // Create a new brush stroke
    GameObject newStroke = Instantiate(strokePrefab);
    LineRenderer line = newStroke.GetComponent<LineRenderer>();
    newStroke.transform.position = startPosition;
    line.SetPosition(0, tip.position);
    float initialWidth = line.widthMultiplier;

    // Generate points in an instantiated Unity LineRenderer
    while (draw)
    {
        // Move the last point to the draw point position
        line.SetPosition(line.positionCount - 1, tip.position);
        line.material.color = colorPicker.SelectedColor;
        brushRenderer.material.color = colorPicker.SelectedColor;
        lastPointAddedTime = Time.unscaledTime;
        // Adjust the width between 1x and 2x width based on strength of trigger pull
        line.widthMultiplier = Mathf.Lerp(initialWidth, initialWidth * 2, width);

        if (Vector3.Distance(lastPointPosition, tip.position) > minPositionDelta || Time.unscaledTime > lastPointAddedTime + maxTimeDelta)
        {
            // Spawn a new point
            lastPointAddedTime = Time.unscaledTime;
            lastPointPosition = tip.position;
            line.positionCount += 1;
            line.SetPosition(line.positionCount - 1, lastPointPosition);
        }
        yield return null;
    }
}
To use the currently selected color from the color picker wheel UI, BrushController needs to have a reference to the ColorPickerWheel object. Because the BrushController prefab is instantiated at runtime as a replacement controller, any references to objects in the scene will have to be set at runtime. In this case we use GameObject.FindObjectOfType to locate the ColorPickerWheel:
private void OnEnable()
{
    // Locate the ColorPickerWheel
    colorPicker = FindObjectOfType<ColorPickerWheel>();

    // Assign currently selected color to the brush’s material color
    brushRenderer.material.color = colorPicker.SelectedColor;
    ...
}
- Save the scene and click the play button. You will be able to draw the lines and paint using the select button on the right-hand controller.
Chapter 6 - Object spawning with Select input
Objectives
- Learn how to use Select and Grasp button input events
- Learn how to instantiate objects
Instructions
In the Project panel, type ObjectSpawner in the search box. You can also find it under Assets/AppPrefabs/
Drag the ObjectSpawner prefab into the Hierarchy panel.
Click ObjectSpawner in the Hierarchy panel.
ObjectSpawner has a field named Color Source.
From the Hierarchy panel, drag the ColorPickerWheel reference into this field.
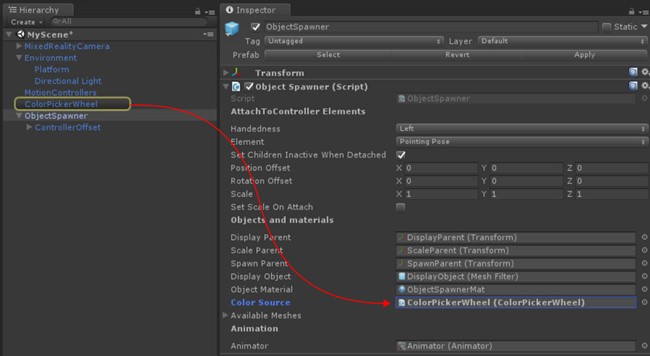
Click the ObjectSpawner prefab in the Hierarchy panel.
In the Inspector panel, double click ObjectSpawner Script to see the code in Visual Studio.
ObjectSpawner script
The ObjectSpawner instantiates copies of a primitive mesh (cube, sphere, cylinder) into the space. When a InteractionSourcePressed is detected it checks the handedness and if it's an InteractionSourcePressType.Grasp or InteractionSourcePressType.Select event.
For a Grasp event, it increments the index of current mesh type (sphere, cube, cylinder)
private void InteractionSourcePressed(InteractionSourcePressedEventArgs obj)
{
    // Check handedness, see if it is left controller
    if (obj.state.source.handedness == handedness)
    {
        switch (obj.pressType)
        {
            // If it is Select button event, spawn object
            case InteractionSourcePressType.Select:
                if (state == StateEnum.Idle)
                {
                    // We've pressed the grasp - enter spawning state
                    state = StateEnum.Spawning;
                    SpawnObject();
                }
                break;

            // If it is Grasp button event
            case InteractionSourcePressType.Grasp:

                // Increment the index of current mesh type (sphere, cube, cylinder)
                meshIndex++;
                if (meshIndex >= NumAvailableMeshes)
                {
                    meshIndex = 0;
                }
                break;

            default:
                break;
        }
    }
}
For a Select event, in SpawnObject(), a new object is instantiated, un-parented and released into the world.
private void SpawnObject()
{
    // Instantiate the spawned object
    GameObject newObject = Instantiate(displayObject.gameObject, spawnParent);
    // Detach the newly spawned object
    newObject.transform.parent = null;
    // Reset the scale transform to 1
    scaleParent.localScale = Vector3.one;
    // Set its material color so its material gets instantiated
    newObject.GetComponent<Renderer>().material.color = colorSource.SelectedColor;
}
The ObjectSpawner uses the ColorPickerWheel to set the color of the display object's material. Spawned objects are given an instance of this material so they will retain their color.
- Save the scene and click the play button.
You will be able to change the objects with the Grasp button and spawn objects with the Select button.
Build and deploy app to Mixed Reality Portal
- In Unity, select File > Build Settings.
- Click Add Open Scenes to add current scene to the Scenes In Build.
- Click Build.
- Create a New Folder named "App".
- Single click the App folder.
- Click Select Folder.
- When Unity is done, a File Explorer window will appear.
- Open the App folder.
- Double click YourSceneName.sln Visual Studio Solution file.
- Using the top toolbar in Visual Studio, change the target from Debug to Release and from ARM to X64.
- Click on the drop-down arrow next to the Device button, and select Local Machine.
- Click Debug -> Start Without debugging in the menu or press Ctrl + F5.
Now the app is built and installed in Mixed Reality Portal. You can launch it again through Start menu in Mixed Reality Portal.
Advanced design - Brush tools with radial layout
In this chapter, you will learn how to replace the default motion controller model with a custom brush tool collection. For your reference, you can find the completed scene MixedReality213Advanced under Scenes folder.
Instructions
In the Project panel, type BrushSelector in the search box . You can also find it under Assets/AppPrefabs/
Drag the BrushSelector prefab into the Hierarchy panel.
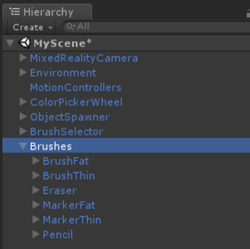
For organization, create an empty GameObject called Brushes
Drag following prefabs from the Project panel into Brushes
- Assets/AppPrefabs/BrushFat
- Assets/AppPrefabs/BrushThin
- Assets/AppPrefabs/Eraser
- Assets/AppPrefabs/MarkerFat
- Assets/AppPrefabs/MarkerThin
- Assets/AppPrefabs/Pencil
Click MotionControllers prefab in the Hierarchy panel.
In the Inspector panel, uncheck Always Use Alternate Right Model on the Motion Controller Visualizer
In the Hierarchy panel, click BrushSelector
BrushSelector has a field named ColorPicker
From the Hierarchy panel, drag the ColorPickerWheel into ColorPicker field in the Inspector panel.
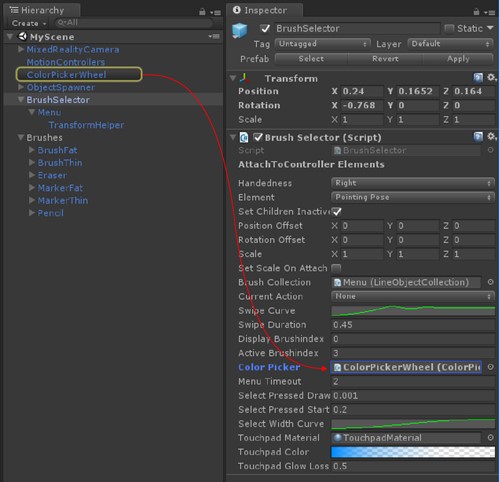
In the Hierarchy panel, under BrushSelector prefab, select the Menu object.
In the Inspector panel, under the LineObjectCollection component, open the Objects array dropdown. You will see 6 empty slots.
From the Hierarchy panel, drag each of the prefabs parented under the Brushes GameObject into these slots in any order. (Make sure you're dragging the prefabs from the scene, not the prefabs in the project folder.)
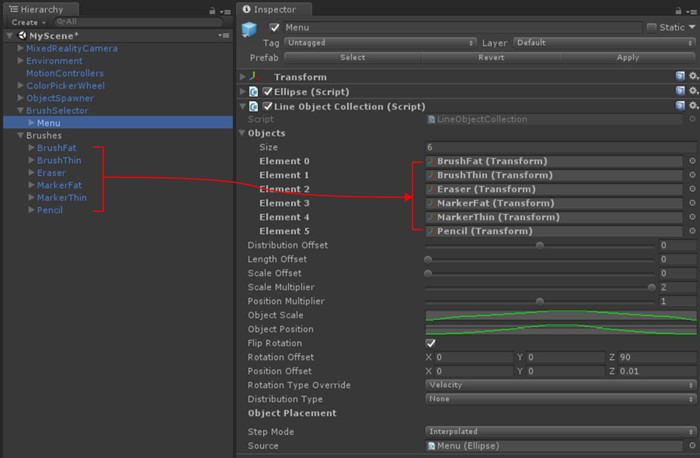
BrushSelector prefab
Since the BrushSelector inherits AttachToController, it shows Handedness and Element options in the Inspector panel. We selected Right and Pointing Pose to attach brush tools to the right hand controller with forward direction.
The BrushSelector makes use of two utilities:
- Ellipse: used to generate points in space along an ellipse shape.
- LineObjectCollection: distributes objects using the points generated by any Line class (eg, Ellipse). This is what we'll be using to place our brushes along the Ellipse shape.
When combined, these utilities can be used to create a radial menu.
LineObjectCollection script
LineObjectCollection has controls for the size, position and rotation of objects distributed along its line. This is useful for creating radial menus like the brush selector. To create the appearance of brushes that scale up from nothing as they approach the center selected position, the ObjectScale curve peaks in the center and tapers off at the edges.
BrushSelector script
In the case of the BrushSelector, we've chosen to use procedural animation. First, brush models are distributed in an ellipse by the LineObjectCollection script. Then, each brush is responsible for maintaining its position in the user's hand based on its DisplayMode value, which changes based on the selection. We chose a procedural approach because of the high probability of brush position transitions being interrupted as the user selects brushes. Mecanim animations can handle interruptions gracefully, but it tends to be more complicated than a simple Lerp operation.
BrushSelector uses a combination of both. When touchpad input is detected, brush options become visible and scale up along the radial menu. After a timeout period (which indicates that the user has made a selection) the brush options scale down again, leaving only the selected brush.
Visualizing touchpad input
Even in cases where the controller model has been completely replaced, it can be helpful to show input on the original model inputs. This helps to ground the user's actions in reality. For the BrushSelector we've chosen to make the touchpad briefly visible when the input is received. This was done by retrieving the Touchpad element from the controller, replacing its material with a custom material, then applying a gradient to that material's color based on the last time touchpad input was received.
protected override void OnAttachToController()
{
    // Turn off the default controller's renderers
    controller.SetRenderersVisible(false);

    // Get the touchpad and assign our custom material to it
    Transform touchpad;
    if (controller.TryGetElement(MotionControllerInfo.ControllerElementEnum.Touchpad, out touchpad))
    {
        touchpadRenderer = touchpad.GetComponentInChildren<MeshRenderer>();
        originalTouchpadMaterial = touchpadRenderer.material;
        touchpadRenderer.material = touchpadMaterial;
        touchpadRenderer.enabled = true;
    }

    // Subscribe to input now that we're parented under the controller
    InteractionManager.InteractionSourceUpdated += InteractionSourceUpdated;
}

private void Update()
{
    ...
    // Update our touchpad material
    Color glowColor = touchpadColor.Evaluate((Time.unscaledTime - touchpadTouchTime) / touchpadGlowLossTime);
    touchpadMaterial.SetColor("_EmissionColor", glowColor);
    touchpadMaterial.SetColor("_Color", glowColor);
    ...
}
Brush tool selection with touchpad input
When the brush selector detects touchpad's pressed input, it checks the position of the input to determine if it was to the left or right.
Stroke thickness with selectPressedAmount
Instead of the InteractionSourcePressType.Select event in the InteractionSourcePressed(), you can get the analog value of the pressed amount through selectPressedAmount. This value can be retrieved in InteractionSourceUpdated().
private void InteractionSourceUpdated(InteractionSourceUpdatedEventArgs obj)
{
    if (obj.state.source.handedness == handedness)
    {
        if (obj.state.touchpadPressed)
        {
            // Check which side we clicked
            if (obj.state.touchpadPosition.x < 0)
            {
                currentAction = SwipeEnum.Left;
            }
            else
            {
                currentAction = SwipeEnum.Right;
            }

            // Ping the touchpad material so it gets bright
            touchpadTouchTime = Time.unscaledTime;
        }

        if (activeBrush != null)
        {
            // If the pressed amount is greater than our threshold, draw
            if (obj.state.selectPressedAmount >= selectPressedDrawThreshold)
            {
                activeBrush.Draw = true;
                activeBrush.Width = ProcessSelectPressedAmount(obj.state.selectPressedAmount);
            }
            else
            {
                // Otherwise, stop drawing
                activeBrush.Draw = false;
                selectPressedSmooth = 0f;
            }
        }
    }
}
Eraser script
Eraser is a special type of brush that overrides the base Brush's DrawOverTime() function. While Draw is true, the eraser checks to see if its tip intersects with any existing brush strokes. If it does, they are added to a queue to be shrunk down and deleted.
Advanced design - Teleportation and locomotion
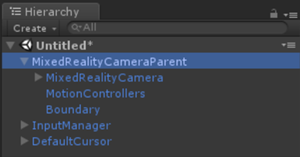
If you want to allow the user to move around the scene with teleportation using thumbstick, use MixedRealityCameraParent instead of MixedRealityCamera. You also need to add InputManager and DefaultCursor. Since MixedRealityCameraParent already includes MotionControllers and Boundary as child components, you should remove existing MotionControllers and Environment prefab.
Instructions
In the Hierarchy panel, delete MixedRealityCamera, Environment and MotionControllers
From the Project panel, search and drag the following prefabs into the Hierarchy panel:
- Assets/AppPrefabs/Input/Prefabs/MixedRealityCameraParent
- Assets/AppPrefabs/Input/Prefabs/InputManager
- Assets/AppPrefabs/Input/Prefabs/Cursor/DefaultCursor
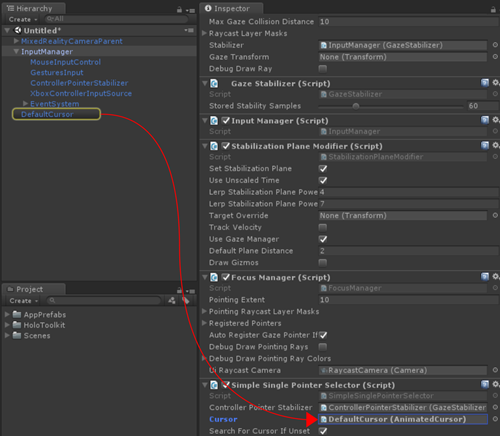
In the Hierarchy panel, click Input Manager
In the Inspector panel, scroll down to the Simple Single Pointer Selector section
From the Hierarchy panel, drag DefaultCursor into Cursor field
Save the scene and click the play button. You will be able to use the thumbstick to rotate left/right or teleport.
The end
And that's the end of this tutorial! You learned:
- How to work with motion controller models in Unity's game mode and runtime.
- How to use different types of button events and their applications.
- How to overlay UI elements on top of the controller or fully customize it.
You are now ready to start creating your own immersive experience with motion controllers!
Completed scenes
- In Unity's Project panel click on the Scenes folder.
- You will find two Unity scenes MixedReality213 and MixedReality213Advanced.
- MixedReality213: Completed scene with single brush
- MixedReality213Advanced: Completed scene with multiple brush with select button's press amount example
See also
Feedback
Coming soon: Throughout 2024 we will be phasing out GitHub Issues as the feedback mechanism for content and replacing it with a new feedback system. For more information see: https://aka.ms/ContentUserFeedback.
Submit and view feedback for