Design your own immersive environments
Note
This is an experimental feature. Give it a try and have fun with it, but don't be surprised if everything doesn't quite work as expected. We're evaluating the viability of this feature and interest in using it, so please tell us about your experience (and any bugs you've found) in the developer forums.
Starting with the Windows 10 April 2018 update, we've enabled an experimental feature that lets you add custom environments to the Places picker (on the Start menu) to use as the Windows Mixed Reality home. Windows Mixed Reality has two default environments, Cliff House and Skyloft, you can choose as your home. Creating custom environments allows you to expand the list with your own creations. We're making this feature available in an early state to evaluate interest from creators and developers. See what kinds of worlds you create and understand how you work with different authoring tools.
When using a custom environment you'll notice that teleporting, interacting with apps, and placing holograms works just like it does in the Cliff House and Skyloft. You can browse the web in a fantasy landscape or fill a futuristic city with holograms - the possibilities are endless!
Device support
| Feature | HoloLens | Immersive headsets |
| Custom home environments | ❌ | ✔️ |
Trying a sample environment
We've created a sample environment that shows off some of the creative possibilities of custom home environments. Follow these steps to try it out:
Download our sample Fantasy Island environment (link points to self-extracting executable).
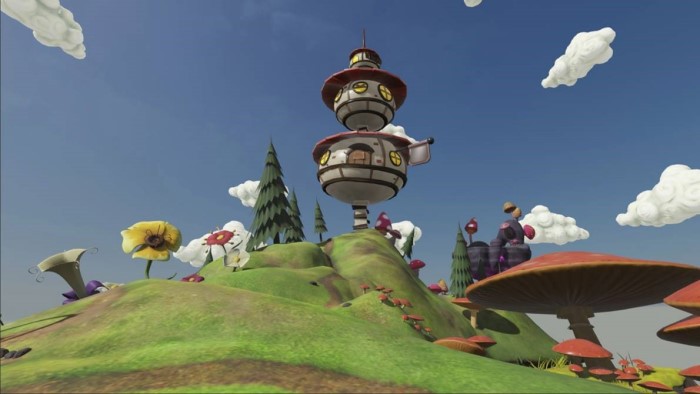
Fantasy Island sample environmentRun the Fantasy_Island.exe file you downloaded.
Note
When attempting to run a .exe file downloaded from the web (like this one), you may encounter a "Windows protected your PC" pop-up. To run Fantasy_Island.exe from this pop-up, select More info and then Run anyway. This security setting is meant to protect you from downloading files you may not want to trust, so please only choose this option when you trust the source of the file.
Open File Explorer and navigate to the environments folder by pasting the following file location in the address bar:
%LOCALAPPDATA%\Packages\EnvironmentsApp_cw5n1h2txyewy\LocalState.Copy the sample environment that you downloaded into this folder.
Restart Mixed Reality Portal to refresh the list of environments in the Places picker.
Put on your headset. Once you're in the home, open the Start menu using the Windows button your controller.
Select the Places icon above the list of pinned apps to choose a home environment.
You'll find the Fantasy Island environment that you downloaded in your list of places. Select Fantasy Island to enter your new custom home environment!
Creating your own custom environment
In addition to using our sample environments, you can export your own custom environments using your favorite 3D editing software.
Modeling guidelines
When modeling your environment, keep the following recommendations in mind so that users spawns in the correct orientation in a believably sized world:
- Users will spawn at 0,0,0 so center your spawn location around the origin.
- Working Units should be set to meters so that assets can be authored at world scale.
- The Up axis should be set to “Y”.
- The asset should face “forward” towards the positive Z axis.
- You don't have to combine all your meshes, but it's recommended if you're targeting resource-constrained devices.
Exporting your environment
Windows Mixed Reality relies on binary glTF (.glb) as the asset delivery format for environments. glTF is a royalty free open standard for 3D asset delivery maintained by the Khronos group. Microsoft’s support for the format across Windows apps and experiences will grow as glTF evolves as an industry standard for interoperable 3D content.
The first step in exporting assets to be used as custom home environments is generating a glTF 2.0 model. The glTF working group maintains a list of supported exporters and converters to create a glTF 2.0 model. To get started, use one of the programs listed on this page to create and export a glTF 2.0 model, or convert an existing model using one of the supported converters.
Environment limits
All environments must be < 256 mbs. Environments larger than 256 mbs will fail to load and fall back to an empty world with just the default skybox surrounding the user. Keep this file size limit in mind when creating your models. Additionally, if you plan to optimize your environment using the WindowsMRAssetConverter as described below, be cognizant that the texture size will increase as the optimizer creates textures that have a larger file size, but load faster.
Optimizing your environment
Windows Mixed Reality supports many optional optimizations that can significantly reduce your environment load times. Pay special attention with environments that have lots of textures, as they'll sometimes time out while loading. In general, we recommend this step for all assets, however, smaller environments with few or low-resolution textures won't always require it.
To make this process easier, we've created the Windows Mixed Reality Asset Converter (available on GitHub) to do your optimizations. This tool uses a set of utilities available in the Microsoft glTF toolkit to optimize any standard 2.0 glTF or.glb by performing an extra texture packing, compression, and resolution down-scaling.
The converter currently supports several flags to tweak the exact behavior of the optimizations. We recommend running with the following flags for best results:
| Flag | Recommended Value(s) | Description |
|---|---|---|
| -max-texture-size | 1024 or 2048 | Tweak the value to improve the quality of the textures, default is 512x512. A larger value will significantly impact the file size of the environment so keep the 256-mb limit in mind |
| -min-version | 1803 | Custom environments are only supported on versions of windows >= 1803. This flag will remove textures for older versions and reduce the file size of the final asset |
For example:
WindowsMRAssetConverter FileToConvert.gltf -max-texture-size 1024 -min-version 1803
Testing your environment
Once you have your final.glb environment, you're ready to test it out in the headset. Start at step 2 in the "Trying a sample environment" section to use your custom environment as the mixed reality home.
Sending feedback
While we're evaluating this experimental feature, we're interested in learning how you're using custom environments, any bugs you may find, and how you like the feature. Share any feedback for creating and using custom home environments in the developer forums.
Troubleshooting and tips
How do I change the name of the environment?
The file name in the environments folder will be used in the Places picker. To change the name of your environment, rename the environment file name, and then restart Mixed Reality Portal.
How do I remove custom environments from my Places picker?
To remove a custom environment, open the environments folder on your PC (%LOCALAPPDATA%\Packages\EnvironmentsApp_cw5n1h2txyewy\LocalState) and delete the environment. Once you restart Mixed Reality Portal, this environment will no longer appear in the Places picker.
How do I default to my favorite custom environment?
You can't currently change the default environment. Each time you restart Mixed Reality Portal, you'll be returned to the Cliff House environment.
I spawn into a blank space
Windows Mixed Reality doesn't support environments that exceed 256 mb. When an environment exceeds this limit, you'll land in the empty sky box with no model.
It takes a long time to load my environment
You can add optional optimizations to your environment to make it load faster. See "Optimizing your environment" for details.
The scale of my environment is incorrect
Windows Mixed Reality translates glTF units to 1 meter when loading environments. If your environment loads up an unexpected scale, double check your exporter to ensure that you're modeling at a 1-meter scale.
The spawn location in my environment is incorrect
The default spawn location is located at 0,0,0 in the environment. It's not currently possible to customize this location, so you must modify the spawn point by exporting your environment with the origin positioned at the spawn point you want.
The audio doesn't sound correct in the environment
When you create your custom environment, it will be using an acoustics rendering simulation that doesn't match the physical space you've created. Sound may come from the wrong directions and may sound muffled.
See also
Feedback
Coming soon: Throughout 2024 we will be phasing out GitHub Issues as the feedback mechanism for content and replacing it with a new feedback system. For more information see: https://aka.ms/ContentUserFeedback.
Submit and view feedback for