Create and manage prompt flow compute sessions in Azure AI Studio
Important
Some of the features described in this article might only be available in preview. This preview is provided without a service-level agreement, and we don't recommend it for production workloads. Certain features might not be supported or might have constrained capabilities. For more information, see Supplemental Terms of Use for Microsoft Azure Previews.
You need a compute session to run prompt flows. Use Azure AI Studio to create and manage prompt flow compute sessions.
A prompt flow compute session has computing resources that are required for the application to run, including a Docker image that contains all necessary dependency packages. In addition to flow execution, Azure AI Studio uses the compute session to ensure the accuracy and functionality of the tools incorporated within the flow when you make updates to the prompt or code content.
Prerequisites
Sign in to Azure AI Studio and select your prompt flow.
Create a compute session
When you start a compute session, you can use the default settings or customize the advanced settings.
Start a compute session with default settings
By default, the compute session uses the environment defined in flow.dag.yaml in the flow folder. It runs on a serverless compute with a virtual machine (VM) size for which you have sufficient quota in your workspace.
- Go to your project in Azure AI Studio.
- From the left pane, select Flows and then select the flow you want to run.
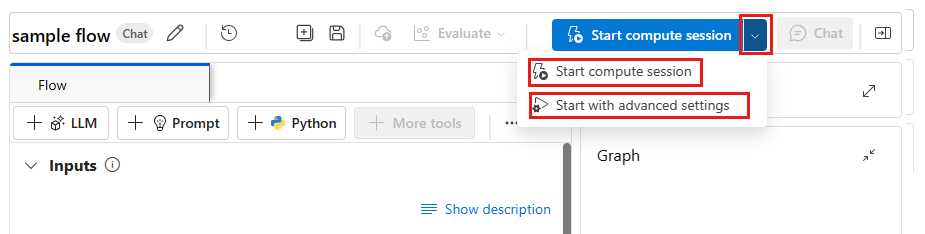
- From the top toolbar of your prompt flow, select Start compute session.
Start a compute session with advanced settings
In the advanced settings, you can select the compute type. You can choose between serverless compute and compute instance.
Go to your project in Azure AI Studio.
From the left pane, select Flows and then select the flow you want to run.
From the top toolbar of your prompt flow, select the dropdown arrow on the right side of the Start compute session button. Select Start with advanced settings to customize the compute session.
You can choose between serverless compute and compute instance.
If you choose serverless compute, you can set following settings:
- Customize the VM size that the compute session uses.
- Customize the idle time, which saves code by deleting the compute session automatically if it isn't in use.
- Set the user-assigned managed identity. The compute session uses this identity to pull a base image and install packages. Make sure that the user-assigned managed identity has Azure Container Registry pull permission.
If you don't set the user-assigned identity, prompt flow uses the user identity by default. Learn more about how to create and update user-assigned identities for a workspace.

If you choose compute instance, you can only set idle shutdown time.
Since this is an existing compute instance, the VM size is fixed and can't change in a compute session side.
The identity used for this compute session also is defined in the compute instance, by default it uses the user identity. Learn more about how to assign identity to compute instance
Idle shutdown time is used to define the life cycle of the compute session. If the compute session is idle for the time you set, it's deleted automatically. If you have idle shutdown enabled on a compute instance, then it shuts down but won't be deleted.

Select Next to specify the base image settings. Use the default base image or provide a custom base image. If you choose a customized base image, provide the image URL and the image tag. Only images in a public docker registry or the Azure Container Registry (ACR) are supported. If you specify an image in the ACR, make sure you (or the user assigned manage identity) have ACR pull permission.
Select Next to review your settings.
Select Apply and start compute session to start the compute session.


Manage a compute session
To manage a compute session, select the Compute session running on the top toolbar of the flow page.:
- Change compute session settings opens the compute session configuration page, where you can define the VM side and the idle time for the compute session.
- Install packages from requirements.txt Opens
requirements.txtin prompt flow UI so you can add packages. - View installed packages shows the packages that are installed in the compute session. It includes the packages baked into base image and packages specified in the
requirements.txtfile in the flow folder. - Reset compute session deletes the current compute session and creates a new one with the same environment. If you encounter a package conflict, you can try this option.
- Stop compute session deletes the current compute session. If there's no active compute session on an underlying serverless compute, the compute resource is also deleted. If the compute session is on a compute instance, stopping the session will allow the instance to become idle.

You can customize the environment that you use to run this flow by adding packages in the requirements.txt file in the flow folder. After you add more packages in this file, choose either of these options:
- Save and install triggers
pip install -r requirements.txtin the flow folder. The process can take a few minutes, depending on the packages that you install. - Save only just saves the
requirements.txtfile. You can install the packages later yourself.

Note
You can change the location and even the file name of requirements.txt, but be sure to also change it in the flow.dag.yaml file in the flow folder.
Don't pin the version of promptflow and promptflow-tools in requirements.txt, because they are already included in the compute session base image.
Add packages in a private feed in Azure DevOps
If you want to use a private feed in Azure DevOps, follow these steps:
Create a user-assigned managed identity and add this identity in the Azure DevOps organization. To learn more, see Use service principals and managed identities.
Note
If the Add Users button isn't visible, you probably don't have the necessary permissions to perform this action.
Add
{private}to your private feed URL. For example, if you want to installtest_packagefromtest_feedin Azure devops, add-i https://{private}@{test_feed_url_in_azure_devops}inrequirements.txt:-i https://{private}@{test_feed_url_in_azure_devops} test_packageSpecify the user-assigned managed identity in Start with advanced settings if the compute session isn't running, or use the Edit button if the compute session is running.


Change the base image
By default, we use the latest prompt flow image as the base image. If you want to use a different base image, you need to build your own base image. The docker image should be built from the prompt flow base image, mcr.microsoft.com/azureml/promptflow/promptflow-runtime:<newest_version>. If possible use the latest version of the base image.
Open the prompt flow.
On the top toolbar, select Raw file mode to enable editing in the file editor.
Open the Files section and select flow.dag.yaml.

Specify your image in the
environmentsection of theflow.dag.yamlfile. For example, to use the image<your-custom-image>, add the following code:environment: image: <your-custom-image> python_requirements_txt: requirements.txt

Upgrade compute instance runtime
If you previously created a compute instance runtime, switch it to a compute session by using the following steps:
Prepare your
requirements.txtfile in the flow folder. See Manage a compute session for more information.If you created a custom environment, get the image from the environment detail page, and specify it in the
flow.dag.yamlfile in the flow folder. To learn more, see Change the base image. Make sure you haveacr pullpermission for the image.You can continue to use the existing compute instance if you would like to manually manage the lifecycle.
Related resources
意見反應
即將登場:在 2024 年,我們將逐步淘汰 GitHub 問題作為內容的意見反應機制,並將它取代為新的意見反應系統。 如需詳細資訊,請參閱:https://aka.ms/ContentUserFeedback。
提交並檢視相關的意見反應