你当前正在访问 Microsoft Azure Global Edition 技术文档网站。 如果需要访问由世纪互联运营的 Microsoft Azure 中国技术文档网站,请访问 https://docs.azure.cn。
使用适用于 Windows VM 的 ARM 模板将来宾 OS 指标发送到 Azure Monitor 指标存储
不会像收集其他平台指标一样自动收集来自 Azure 虚拟机 (VM) 来宾 OS 的性能数据。 安装 Azure Monitor 诊断扩展以将来宾 OS 指标收集到指标数据库中,以便其可以与 Azure Monitor 指标的所有功能一起使用。 这些功能包括准实时警报、图表、路由和来自 REST API 的访问。 本文介绍使用 Azure 资源管理器模板(ARM 模板)将 Windows VM 的来宾 OS 性能指标发送到指标数据库的过程。
注意
有关使用 Azure 门户配置诊断扩展以收集来宾 OS 指标的详细信息,请参阅安装和配置 Windows Azure 诊断 (WAD) 扩展。
如果不熟悉 ARM 模板,请了解模板部署及其结构和语法。
先决条件
- 你的订阅必须已注册到 Microsoft.Insights。
- 需要安装 Azure PowerShell 或 Azure Cloud Shell。
将 Azure Monitor 设置为数据接收器
Azure 诊断扩展使用名为“数据接收器”的功能将指标和日志路由到不同位置。 以下步骤显示如何使用 ARM 模板和 PowerShell 通过新的 Azure Monitor 数据接收器来部署 VM。
ARM 模板
对于本示例,可以使用公开发布的示例模板。 起始模板位于 GitHub 上。
- Azuredeploy.json:用于部署 VM 的预配置 ARM 模板。
- Azuredeploy.parameters.json:用于存储要为 VM 设置的用户名和密码等信息的参数文件。 在部署期间,ARM 模板使用在此文件中设置的参数。
下载这两个文件并在本地保存。
修改 azuredeploy.parameters.json
打开 azuredeploy.parameters.json 文件。
输入 VM 的
adminUsername和adminPassword的值。 这些参数用于对 VM 进行远程访问。 为避免 VM 被劫持,请勿使用此模板中的值。 机器人在 Internet 上扫描公共 GitHub 存储库中的用户名和密码。 它们可能会使用这些默认值测试 VM。为 VM 创建唯一
dnsname。
修改 azuredeploy.json
打开 azuredeploy.json 文件。
输入
storageAccountName后,将存储帐户 ID 添加到模板的variables部分。// Find these lines. "variables": { "storageAccountName": "[concat(uniquestring(resourceGroup().id), 'sawinvm')]", // Add this line directly below. "accountid": "[resourceId('Microsoft.Storage/storageAccounts', variables('storageAccountName'))]",将此托管服务标识 (MSI) 扩展添加到
resources节顶部的模板。 该扩展可确保 Azure Monitor 接受所发出的指标。//Find this code. "resources": [ // Add this code directly below. { "type": "Microsoft.Compute/virtualMachines/extensions", "name": "[concat(variables('vmName'), '/', 'WADExtensionSetup')]", "apiVersion": "2017-12-01", "location": "[resourceGroup().location]", "dependsOn": [ "[concat('Microsoft.Compute/virtualMachines/', variables('vmName'))]" ], "properties": { "publisher": "Microsoft.ManagedIdentity", "type": "ManagedIdentityExtensionForWindows", "typeHandlerVersion": "1.0", "autoUpgradeMinorVersion": true, "settings": { "port": 50342 } } },将
identity配置添加到 VM 资源,以确保 Azure 向 MSI 扩展分配系统标识。 此步骤可确保 VM 可以将有关自身的来宾指标发送到 Azure Monitor。// Find this section "subnet": { "id": "[variables('subnetRef')]" } } } ] } }, { "apiVersion": "2017-03-30", "type": "Microsoft.Compute/virtualMachines", "name": "[variables('vmName')]", "location": "[resourceGroup().location]", // add these 3 lines below "identity": { "type": "SystemAssigned" }, //end of added lines "dependsOn": [ "[resourceId('Microsoft.Storage/storageAccounts/', variables('storageAccountName'))]", "[resourceId('Microsoft.Network/networkInterfaces/', variables('nicName'))]" ], "properties": { "hardwareProfile": { ...添加以下配置以在 Windows VM 上启用诊断扩展。 对于基于资源管理器的简单 VM,可以将扩展配置添加到该 VM 的资源数组。
"sinks": "AzMonSink"行和本节后面相应的"SinksConfig"使扩展能够直接向 Azure Monitor 发出指标。 根据需要任意添加或删除性能计数器。"networkProfile": { "networkInterfaces": [ { "id": "[resourceId('Microsoft.Network/networkInterfaces',variables('nicName'))]" } ] }, "diagnosticsProfile": { "bootDiagnostics": { "enabled": true, "storageUri": "[reference(resourceId('Microsoft.Storage/storageAccounts/', variables('storageAccountName'))).primaryEndpoints.blob]" } } }, //Start of section to add "resources": [ { "type": "Microsoft.Compute/virtualMachines/extensions", "name": "[concat(variables('vmName'), '/', 'Microsoft.Insights.VMDiagnosticsSettings')]", "apiVersion": "2017-12-01", "location": "[resourceGroup().location]", "dependsOn": [ "[concat('Microsoft.Compute/virtualMachines/', variables('vmName'))]" ], "properties": { "publisher": "Microsoft.Azure.Diagnostics", "type": "IaaSDiagnostics", "typeHandlerVersion": "1.12", "autoUpgradeMinorVersion": true, "settings": { "WadCfg": { "DiagnosticMonitorConfiguration": { "overallQuotaInMB": 4096, "DiagnosticInfrastructureLogs": { "scheduledTransferLogLevelFilter": "Error" }, "Directories": { "scheduledTransferPeriod": "PT1M", "IISLogs": { "containerName": "wad-iis-logfiles" }, "FailedRequestLogs": { "containerName": "wad-failedrequestlogs" } }, "PerformanceCounters": { "scheduledTransferPeriod": "PT1M", "sinks": "AzMonSink", "PerformanceCounterConfiguration": [ { "counterSpecifier": "\\Memory\\Available Bytes", "sampleRate": "PT15S" }, { "counterSpecifier": "\\Memory\\% Committed Bytes In Use", "sampleRate": "PT15S" }, { "counterSpecifier": "\\Memory\\Committed Bytes", "sampleRate": "PT15S" } ] }, "WindowsEventLog": { "scheduledTransferPeriod": "PT1M", "DataSource": [ { "name": "Application!*" } ] }, "Logs": { "scheduledTransferPeriod": "PT1M", "scheduledTransferLogLevelFilter": "Error" } }, "SinksConfig": { "Sink": [ { "name" : "AzMonSink", "AzureMonitor" : {} } ] } }, "StorageAccount": "[variables('storageAccountName')]" }, "protectedSettings": { "storageAccountName": "[variables('storageAccountName')]", "storageAccountKey": "[listKeys(variables('accountid'),'2015-06-15').key1]", "storageAccountEndPoint": "https://core.windows.net/" } } } ] //End of section to add保存并关闭这两个文件。
部署 ARM 模板
注意
必须运行 Azure 诊断扩展版本 1.5 或更高版本,并且在 ARM 模板中将 autoUpgradeMinorVersion: 属性设置为 true。 Azure 会在启动 VM 后加载适当的扩展。 如果模板中没有这些设置,请进行更改并重新部署模板。
为部署 ARM 模板,我们使用 Azure PowerShell。
启动 PowerShell。
使用
Login-AzAccount登录到 Azure。使用
Get-AzSubscription获取订阅列表。设置要在其中创建/更新 VM 的订阅:
Select-AzSubscription -SubscriptionName "<Name of the subscription>"若要为部署的 VM 创建新资源组,请运行以下命令:
New-AzResourceGroup -Name "<Name of Resource Group>" -Location "<Azure Region>"注意
运行以下命令,使用 ARM 模板部署 VM。
注意
如果想更新现有 VM,请将 -Mode Incremental 添加到以下命令的末尾。
New-AzResourceGroupDeployment -Name "<NameThisDeployment>" -ResourceGroupName "<Name of the Resource Group>" -TemplateFile "<File path of your Resource Manager template>" -TemplateParameterFile "<File path of your parameters file>"部署成功后,VM 应会显示在 Azure 门户中,并向 Azure Monitor 发出指标。
注意
你可能会遇到与所选
vmSkuSize相关的错误。 如果发生此错误,请返回 azuredeploy.json 文件并更新vmSkuSize参数的默认值。 在这种情况下,建议尝试"Standard_DS1_v2"。
绘制指标图表
登录到 Azure 门户。
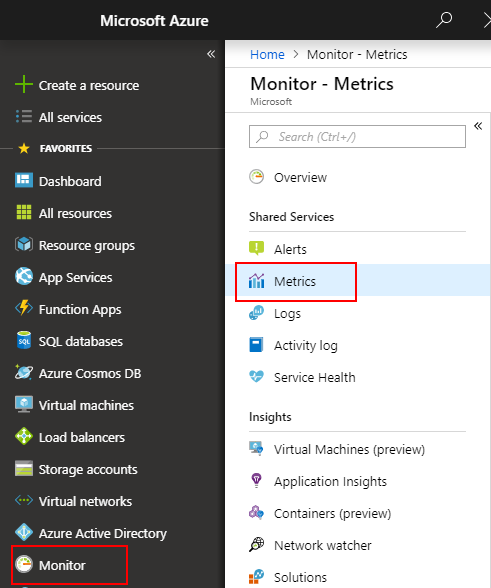
在左侧菜单中,选择“监视”。
在“监视”页上选择“指标” 。
将聚合时限更改为“过去 30 分钟”。
在资源下拉菜单中,选择创建的 VM。 如果未更改模板中的名称,则名称应为“SimpleWinVM2”。
在命名空间下拉列表中,选择“azure.vm.windows.guestmetrics”。
在指标下拉列表中,选择“Memory%Committed Bytes in Use”。

后续步骤
详细了解自定义指标。