你当前正在访问 Microsoft Azure Global Edition 技术文档网站。 如果需要访问由世纪互联运营的 Microsoft Azure 中国技术文档网站,请访问 https://docs.azure.cn。
使用跟进提示创建多个轮次的对话
使用跟进提示和上下文为机器人管理多个回合(称为“多回合”),从一个问题到另一个问题。
若要了解多回合的工作原理,请查看以下演示视频:
注意
QnA Maker 服务将于 2025 年 3 月 31 日停用。 问答功能的较新版本现已作为 Azure AI 语言的一部分提供。 有关语言服务中的问答功能,请参阅问答。 从 2022 年 10 月 1 日开始,你将无法创建新的 QnA Maker 资源。 有关将现有 QnA Maker 知识库迁移到问题解答的信息,请参阅迁移指南。
什么是多回合对话?
不能在单个回合中回答某些问题。 在设计客户端应用程序(聊天机器人)对话时,用户可能会提出需要筛选或优化的问题以确定正确的答案。 可通过向用户显示跟进提示来使对话流经这些问题。
当用户提出问题时,QnA Maker 将返回答案和所有跟进提示。 此响应允许你将后续问题显示为选项。
注意
不会从常见问题解答文档中提取多回合提示。 如果需要多回合提取,请删除将 QnA 对指定为常见问题解答的问号。
使用聊天机器人进行多回合对话的示例
通过多回合功能,聊天机器人可以管理与用户的对话,以确定最终答案,如下图所示:
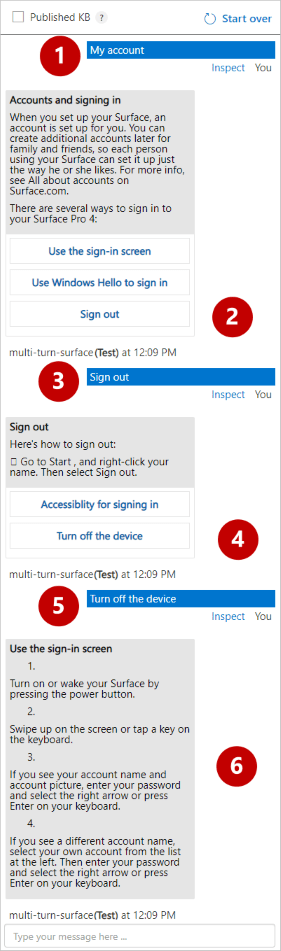
在上图中,用户通过输入“我的帐户”启动了一个对话。 知识库具有三个链接的问答对。 若要优化答案,用户需要选择知识库中的三个选项之一。 问题 (#1) 有三个跟进提示,这些提示在聊天机器人中显示为三个选项 (#2)。
当用户选择某个选项 (#3) 时,将显示优化选项 (#4) 的下一个列表。 在用户确定正确的最终答案 (#6) 之前,此序列将继续使用 (#5)。
在机器人中使用多回合
发布知识库后,可以选择“创建机器人”按,钮以将 QnA Maker 机器人部署到 Azure AI 机器人服务。 提示将显示在已为机器人启用的聊天客户端中。
从文档的结构创建多回合对话
创建知识库时,“填充知识库”部分将显示“允许从 URL、.pdf 或 .docx 文件进行多回合提取”复选框。

选择此选项时,QnA Maker 将提取文档结构中显示的层次结构。 转换层次结构以跟进提示,并将层次结构的根用作父 QnA。 在某些文档中,层次结构的根不包含内容,这或许可以作为答案。 你可以提供“默认答案文本”以用作替代答案文本,从而提取此类层次结构。
只能从 URL、PDF 文件或 DOCX 文件推断出多回合结构。 有关结构的示例,请查看 Microsoft Surface 用户手册 PDF 文件的图像。

构建自己的多回合文档
若要创建多回合文档,请记住以下准则:
使用标题和子标题来表示层次结构。 例如,使用 h1 来表示父 QnA,使用 h2 来表示应用作提示的 QnA。 使用较小的标题大小来表示后续层次结构。 不要使用样式、颜色或一些其他机制来表示文档中的结构,QnA Maker 不会提取多回合提示。
标题的第一个字符必须采用大写形式。
不要以问号
?结束标题。你可以使用示例文档作为创建自己的多回合文档的示例。
将文件添加到多回合 KB
添加分层文档时,QnA Maker 会确定结构中的跟进提示以创建对话流。
- 在 QnA Maker 中,选择在启用了“允许从 URL、.pdf 或 .docx 文件进行多回合提取”的情况下创建的现有知识库。
- 转到“设置”页,选择要添加的文件或 URL。
- 保存并训练知识库。
注意
不支持将已导出的 TSV 或 XLS 多回合知识库文件用作新知识库或空知识库的数据源。 你需要从 QnA Maker 门户的“设置”页中导入该文件类型,以便将已导出的多回合提示添加到知识库。
使用 Create API 创建包含多回合提示的知识库
可以使用 QnA Maker Create API 创建包含多回合提示的知识库。 提示将添加在 context 属性的 prompts 数组中。
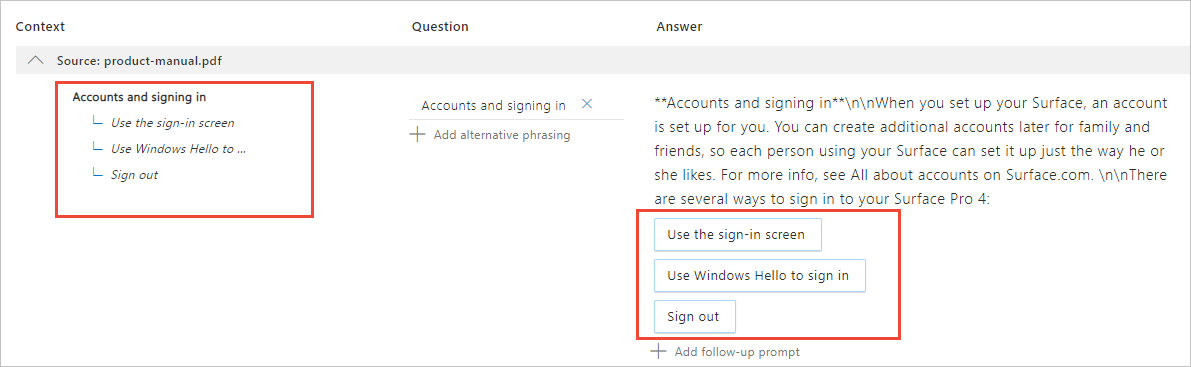
显示具有上下文的问题和答案
将显示的问答对减少到仅具有上下文对话的问答对。
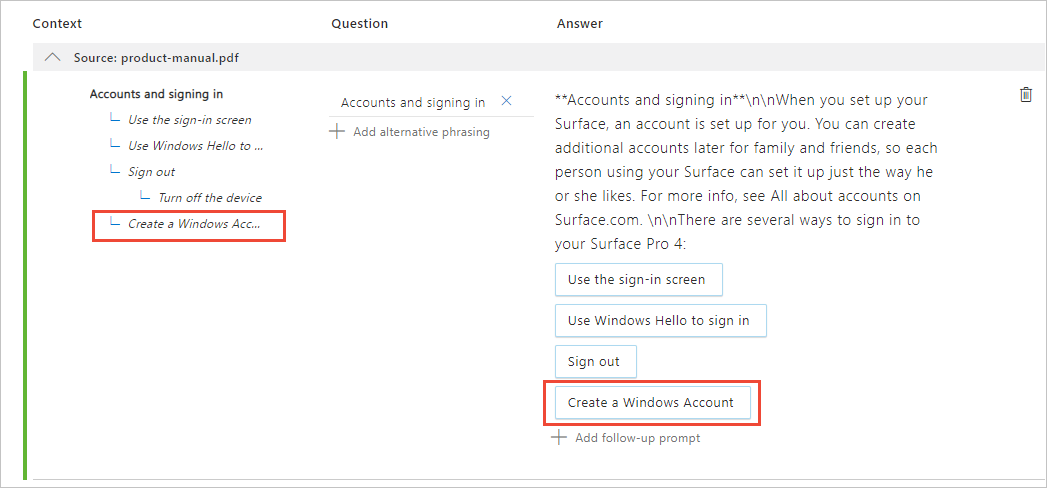
依次选择“视图选项”、“显示上下文”。 列表将显示包含跟进提示的问答对。

多回合上下文显示在第一列中。

在上图中,#1 指示列中的粗体文本,它表示当前问题。 父问题是行中的第一项。 下面的任何问题都是链接的问答对。 可以选择这些项,以便可以立即转到其他上下文项。
添加现有问答对作为跟进提示
原始问题“我的帐户”具有跟进提示,如“帐户和登录”。
将跟进提示添加到当前未链接的现有问答对。 由于问题未链接到任何问答对,因此需要更改当前视图设置。
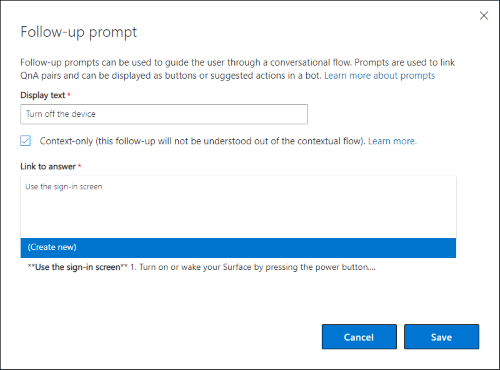
若要将现有问答对作为跟进提示链接,请选择问答对所对应的行。 对于 Surface 手册,搜索“注销”以减少列表。
在“注销”所对应的行中的“答案”列中,选择“添加跟进提示”。
在“跟进提示”弹出窗口的字段中,输入以下值:
字段 值 显示文本 输入“关闭设备”。 这是要在跟进提示中显示的自定义文本。 仅上下文 选中此复选框。 仅当问题指定上下文时,才返回答案。 答案链接 输入“使用登录屏幕”以查找现有问答对。 返回一个匹配项。 选择此答案作为跟进,然后选择“保存”。
添加跟进提示后,在顶部导航栏中选择“保存并训练”。
编辑显示文本
创建跟进提示并将现有问答对输入为“答案链接”后,可以输入新的显示文本。 此文本不会替换现有问题,也不会添加新的替代问题。 它与这些值不同。
若要编辑显示文本,请在“上下文”字段中搜索并选择问题。
在该问题所在的行中,选择“答案”列中的跟进提示。
选择要编辑的显示文本,然后选择“编辑”。

在“跟进提示”弹出窗口中,更改现有显示文本。
编辑完显示文本后,选择“保存”。
在顶部导航栏中,选择“保存并训练”。
添加新的问答对作为跟进提示
在将新的问答对添加到知识库时,每个对都应链接到现有问题作为跟进提示。
在知识库工具栏上,搜索并选择“帐户和登录”的现有问答对。
在此问题所对应的“答案”列中,选择“添加跟进提示”。
在“跟进提示(预览)”下,输入以下值来创建新的跟进提示:
字段 值 显示文本 创建 Windows 帐户。 要在跟进提示中显示的自定义文本。 仅上下文 选中此复选框。 仅当问题指定上下文时,才返回此答案。 答案链接 输入以下文本作为答案:
使用新的或现有的电子邮件帐户创建 Windows 帐户。
保存并训练数据库时,将转换此文本。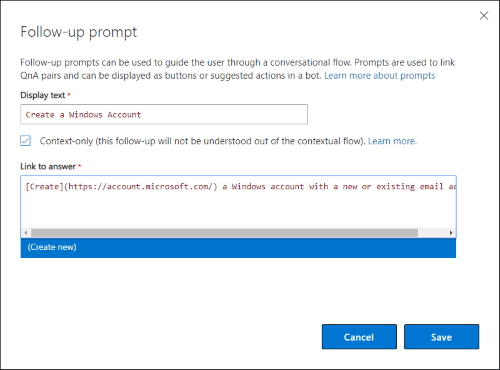
依次选择“新建”、“保存”。
此操作将创建新的问答对,并将所选问题链接为跟进提示。 对于这两个问题,“上下文”列都表示跟进提示关系。
依次选择“视图选项”、“显示上下文(预览)”。
新问题显示了其链接方式。

父问题将新问题显示为其中一个选项。
添加跟进提示后,在顶部导航栏中选择“保存并训练”。

在测试跟进提示期间查看多回合
在“测试”窗格中使用跟进提示测试问题时,响应包括跟进提示。

返回初始答案和跟进提示的 JSON 请求
使用空 context 对象来请求用户问题的答案,并包括跟进提示。
{
  "question": "accounts and signing in",
  "top": 10,
  "userId": "Default",
  "isTest": false,
  "context": {}
}
返回初始答案和跟进提示的 JSON 响应
前面的部分请求了有关“帐户和登录”的答案和跟进提示。 响应包括提示信息(位于 answers[0].context),以及向用户显示的文本。
{
    "answers": [
        {
            "questions": [
                "Accounts and signing in"
            ],
            "answer": "**Accounts and signing in**\n\nWhen you set up your Surface, an account is set up for you. You can create additional accounts later for family and friends, so each person using your Surface can set it up just the way he or she likes. For more info, see All about accounts on Surface.com. \n\nThere are several ways to sign in to your Surface Pro 4: ",
            "score": 100.0,
            "id": 15,
            "source": "product-manual.pdf",
            "metadata": [],
            "context": {
                "isContextOnly": true,
                "prompts": [
                    {
                        "displayOrder": 0,
                        "qnaId": 16,
                        "qna": null,
                        "displayText": "Use the sign-in screen"
                    }
                ]
            }
        },
        {
            "questions": [
                "Sign out"
            ],
            "answer": "**Sign out**\n\nHere's how to sign out: \n\n  Go to Start, and right-click your name. Then select Sign out. ",
            "score": 38.01,
            "id": 18,
            "source": "product-manual.pdf",
            "metadata": [],
            "context": {
                "isContextOnly": true,
                "prompts": [
                    {
                        "displayOrder": 0,
                        "qnaId": 16,
                        "qna": null,
                        "displayText": "Turn off the device"
                    }
                ]
            }
        },
        {
            "questions": [
                "Use the sign-in screen"
            ],
            "answer": "**Use the sign-in screen**\n\n1.  \n\nTurn on or wake your Surface by pressing the power button. \n\n2.  \n\nSwipe up on the screen or tap a key on the keyboard. \n\n3.  \n\nIf you see your account name and account picture, enter your password and select the right arrow or press Enter on your keyboard. \n\n4.  \n\nIf you see a different account name, select your own account from the list at the left. Then enter your password and select the right arrow or press Enter on your keyboard. ",
            "score": 27.53,
            "id": 16,
            "source": "product-manual.pdf",
            "metadata": [],
            "context": {
                "isContextOnly": true,
                "prompts": []
            }
        }
    ]
}
prompts 数组在 displayText 属性和 qnaId 值中提供文本。 你可以将这些答案显示为对话流中的下一个显示选项,然后将选定的 qnaId 返回到以下请求中的 QnA Maker。
返回非初始答案和跟进提示的 JSON 请求
填充 context 对象以包括上一个上下文。
在下面的 JSON 请求中,当前问题是“使用 Windows Hello 登录”,而以前的问题是“帐户和登录”。
{
  "question": "Use Windows Hello to sign in",
  "top": 10,
  "userId": "Default",
  "isTest": false,
  "qnaId": 17,
  "context": {
    "previousQnAId": 15,
    "previousUserQuery": "accounts and signing in"
  }
}
返回非初始答案和跟进提示的 JSON 响应
QnA Maker GenerateAnswer JSON 响应包括 answers 对象中第一项的 context 属性中的跟进提示:
{
    "answers": [
        {
            "questions": [
                "Use Windows Hello to sign in"
            ],
            "answer": "**Use Windows Hello to sign in**\n\nSince Surface Pro 4 has an infrared (IR) camera, you can set up Windows Hello to sign in just by looking at the screen. \n\nIf you have the Surface Pro 4 Type Cover with Fingerprint ID (sold separately), you can set up your Surface sign you in with a touch. \n\nFor more info, see What is Windows Hello? on Windows.com. ",
            "score": 100.0,
            "id": 17,
            "source": "product-manual.pdf",
            "metadata": [],
            "context": {
                "isContextOnly": true,
                "prompts": []
            }
        },
        {
            "questions": [
                "Meet Surface Pro 4"
            ],
            "answer": "**Meet Surface Pro 4**\n\nGet acquainted with the features built in to your Surface Pro 4. \n\nHere's a quick overview of Surface Pro 4 features: \n\n\n\n\n\n\n\nPower button \n\n\n\n\n\nPress the power button to turn your Surface Pro 4 on. You can also use the power button to put it to sleep and wake it when you're ready to start working again. \n\n\n\n\n\n\n\nTouchscreen \n\n\n\n\n\nUse the 12.3" display, with its 3:2 aspect ratio and 2736 x 1824 resolution, to watch HD movies, browse the web, and use your favorite apps. \n\nThe new Surface G5 touch processor provides up to twice the touch accuracy of Surface Pro 3 and lets you use your fingers to select items, zoom in, and move things around. For more info, see Surface touchscreen on Surface.com. \n\n\n\n\n\n\n\nSurface Pen \n\n\n\n\n\nEnjoy a natural writing experience with a pen that feels like an actual pen. Use Surface Pen to launch Cortana in Windows or open OneNote and quickly jot down notes or take screenshots. \n\nSee Using Surface Pen (Surface Pro 4 version) on Surface.com for more info. \n\n\n\n\n\n\n\nKickstand \n\n\n\n\n\nFlip out the kickstand and work or play comfortably at your desk, on the couch, or while giving a hands-free presentation. \n\n\n\n\n\n\n\nWi-Fi and Bluetooth® \n\n\n\n\n\nSurface Pro 4 supports standard Wi-Fi protocols (802.11a/b/g/n/ac) and Bluetooth 4.0. Connect to a wireless network and use Bluetooth devices like mice, printers, and headsets. \n\nFor more info, see Add a Bluetooth device and Connect Surface to a wireless network on Surface.com. \n\n\n\n\n\n\n\nCameras \n\n\n\n\n\nSurface Pro 4 has two cameras for taking photos and recording video: an 8-megapixel rear-facing camera with autofocus and a 5-megapixel, high-resolution, front-facing camera. Both cameras record video in 1080p, with a 16:9 aspect ratio. Privacy lights are located on the right side of both cameras. \n\nSurface Pro 4 also has an infrared (IR) face-detection camera so you can sign in to Windows without typing a password. For more info, see Windows Hello on Surface.com. \n\nFor more camera info, see Take photos and videos with Surface and Using autofocus on Surface 3, Surface Pro 4, and Surface Book on Surface.com. \n\n\n\n\n\n\n\nMicrophones \n\n\n\n\n\nSurface Pro 4 has both a front and a back microphone. Use the front microphone for calls and recordings. Its noise-canceling feature is optimized for use with Skype and Cortana. \n\n\n\n\n\n\n\nStereo speakers \n\n\n\n\n\nStereo front speakers provide an immersive music and movie playback experience. To learn more, see Surface sound, volume, and audio accessories on Surface.com. \n\n\n\n\n",
            "score": 21.92,
            "id": 3,
            "source": "product-manual.pdf",
            "metadata": [],
            "context": {
                "isContextOnly": true,
                "prompts": [
                    {
                        "displayOrder": 0,
                        "qnaId": 4,
                        "qna": null,
                        "displayText": "Ports and connectors"
                    }
                ]
            }
        },
        {
            "questions": [
                "Use the sign-in screen"
            ],
            "answer": "**Use the sign-in screen**\n\n1.  \n\nTurn on or wake your Surface by pressing the power button. \n\n2.  \n\nSwipe up on the screen or tap a key on the keyboard. \n\n3.  \n\nIf you see your account name and account picture, enter your password and select the right arrow or press Enter on your keyboard. \n\n4.  \n\nIf you see a different account name, select your own account from the list at the left. Then enter your password and select the right arrow or press Enter on your keyboard. ",
            "score": 19.04,
            "id": 16,
            "source": "product-manual.pdf",
            "metadata": [],
            "context": {
                "isContextOnly": true,
                "prompts": []
            }
        }
    ]
}
查询具有 QnA Maker ID 的知识库
如果你正在生成自定义应用程序,则在初始问题的响应中,将返回任何后续提示及其关联的 qnaId。 现在,你已拥有 ID,接下来可以在跟进提示的请求正文中传递此 ID。 如果请求正文包含 qnaId 和上下文对象(其中包含以前的 QnA Maker 属性),则 GenerateAnswer 将按 ID 返回确切问题,而不是使用排名算法按问题文本查找答案。
更新 API 支持显示顺序
支持通过更新 API 编辑在 JSON 响应中返回的显示文本和显示顺序。
添加或删除具有更新 API 的多回合提示
你可以使用 QnA Maker 更新 API 添加或删除多回合提示。 提示将添加在 context 属性的 promptsToAdd 数组和 promptsToDelete 数组中。
导出用于版本控制的知识库
QnA Maker 通过在导出文件中包含多回合对话步骤来支持版本控制。
后续步骤
- 详细了解此对话示例中的上下文对话,或详细了解多回合对话的概念机器人设计。