你当前正在访问 Microsoft Azure Global Edition 技术文档网站。 如果需要访问由世纪互联运营的 Microsoft Azure 中国技术文档网站,请访问 https://docs.azure.cn。
如何使用适用于 C# 的语音 SDK 从语音中识别意向
Azure AI 服务语音 SDK 与语言理解服务 (LUIS) 相集成,以提供意向识别。 意向是用户想要做的某件事:预订航班、查看天气预报或拨打电话。 用户可以使用任何普通字词。 LUIS 将用户请求映射到定义的意向。
注意
LUIS 应用程序定义所要识别的意向和实体。 它与使用语音服务的 C# 应用程序不同。 在本文中,“应用”是指 LUIS 应用,“应用程序”是指 C# 代码。
在本指南中,我们将使用语音 SDK 开发一个 C# 控制台应用程序,用于通过设备的麦克风从用户话语中派生意图。 学习如何:
- 创建引用语音 SDK NuGet 包的 Visual Studio 项目
- 创建语音配置并获取意向识别器
- 获取 LUIS 应用的模型并添加所需的意向
- 指定用于语音识别的语言
- 从文件中识别语音
- 使用异步的事件驱动的连续识别
先决条件
在开始阅读本指南之前,请务必准备好以下各项:
- 一个 LUIS 帐户。 可以通过 LUIS 门户免费创建一个帐户。
- Visual Studio 2019(版本不限)。
LUIS 和语音
LUIS 与语音服务集成,可从语音中识别意向。 不需要语音服务订阅,只需要 LUIS。
LUIS 使用两种密钥:
| 密钥类型 | 目的 |
|---|---|
| 创作 | 用于以编程方式创建和修改 LUIS 应用 |
| 预测 | 用于在运行时访问 LUIS 应用程序 |
对于本指南,你需要预测密钥类型。 本指南使用一个示例家庭自动化 LUIS 应用,可以遵循使用预生成的家庭自动化应用快速入门来创建该应用。 如果你已创建自己的 LUIS 应用,可以改用该应用。
当你创建 LUIS 应用时,LUIS 会自动生成一个创作密钥,让你使用文本查询测试该应用。 此密钥不会启用语音服务集成,因此不适用于本指南。 在 Azure 仪表板中创建 LUIS 资源并将其分配给 LUIS 应用。 在本指南中,可以使用免费订阅层。
在 Azure 仪表板中创建 LUIS 资源之后,请登录到 LUIS 门户,在“我的应用”页上选择自己的应用程序,然后切换到应用的“管理”页。 最后,在边栏中选择“Azure 资源”。

在“Azure 资源”页上:
选择密钥旁边的图标将其复制到剪贴板。 (可以使用任一密钥。)
创建项目并添加工作负荷
若要创建 Visual Studio 项目用于 Windows 开发,需要创建项目,安装用于 .NET 桌面开发的 Visual Studio,安装语音 SDK,然后选择目标体系结构。
若要开始,请在 Visual Studio 中创建项目,并确保为 .NET 桌面开发安装了 Visual Studio:
打开 Visual Studio 2019。
在“开始”窗口中,选择“创建新项目”。
在“创建新项目”窗口中,选择“控制台应用(.NET Framework)”,然后选择“下一步”。
在“配置新项目”窗口中的“项目名称”内输入 helloworld,在“位置”中选择或创建目录路径,然后选择“创建”。
在 Visual Studio 菜单栏中,选择“工具”>“获取工具和功能”,这将打开 Visual Studio 安装程序并显示“修改”对话框。
检查“.NET 桌面开发”工作负荷是否可用。 如果尚未安装该工作负荷,请选中它旁边的复选框,然后选择“修改”以启动安装。 下载和安装过程可能需要几分钟。
如果已选中“.NET 桌面开发”旁边的复选框,请选择“关闭”退出对话框。

关闭 Visual Studio 安装程序。
安装语音 SDK
下一步是安装语音 SDK NuGet 包,以便可以在代码中引用它。
在解决方案资源管理器中右键单击“helloworld”项目,然后选择“管理 NuGet 包”显示 NuGet 包管理器。
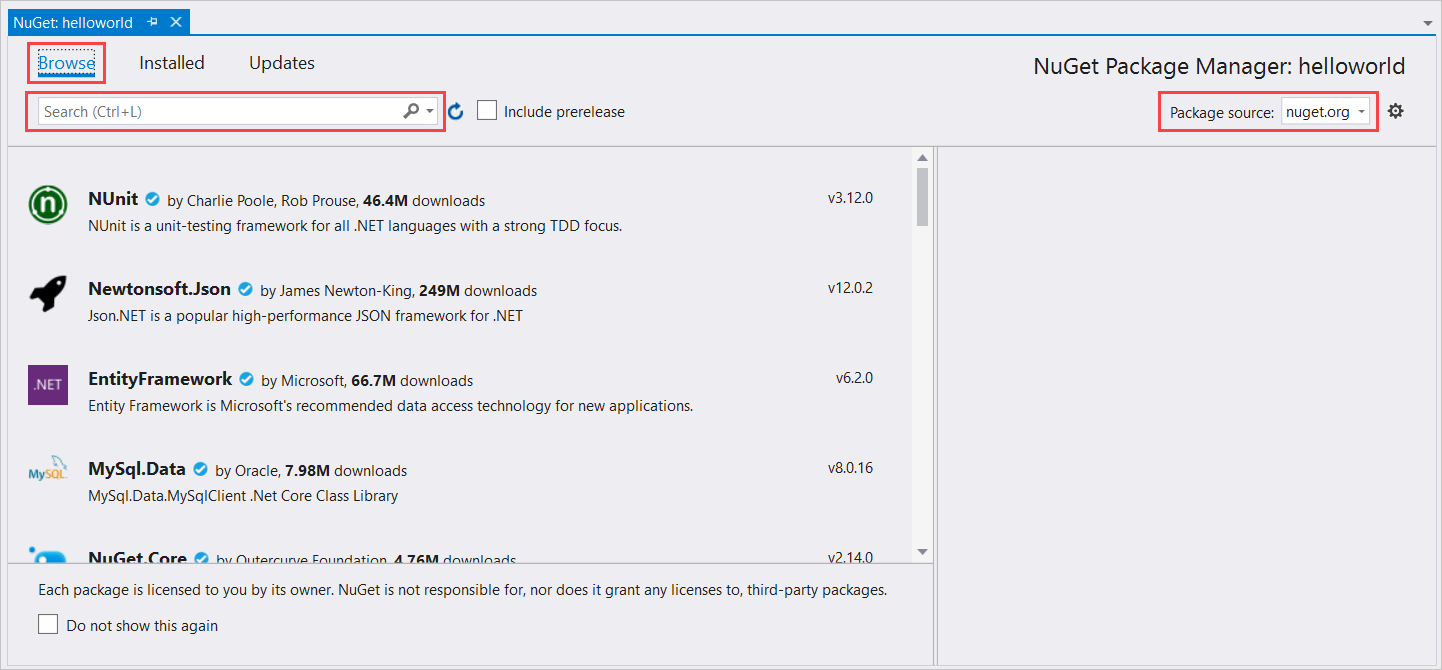
在右上角找到“包源”下拉框,并确保选择了 nuget.org。
在左上角,选择“浏览”。
在搜索框中,键入 Microsoft.CognitiveServices.Speech 并按 Enter。
在搜索结果中选择“Microsoft.CognitiveServices.Speech”包,然后选择“安装”以安装最新稳定版本。

接受所有协议和许可证,开始安装。
安装此包后,“包管理器控制台”窗口中将显示一条确认消息。
选择目标体系结构
现在,若要生成并运行控制台应用程序,请创建与计算机体系结构匹配的平台配置。
在菜单栏中,选择“生成”>“配置管理器” 。 此时将显示“配置管理器”对话框。
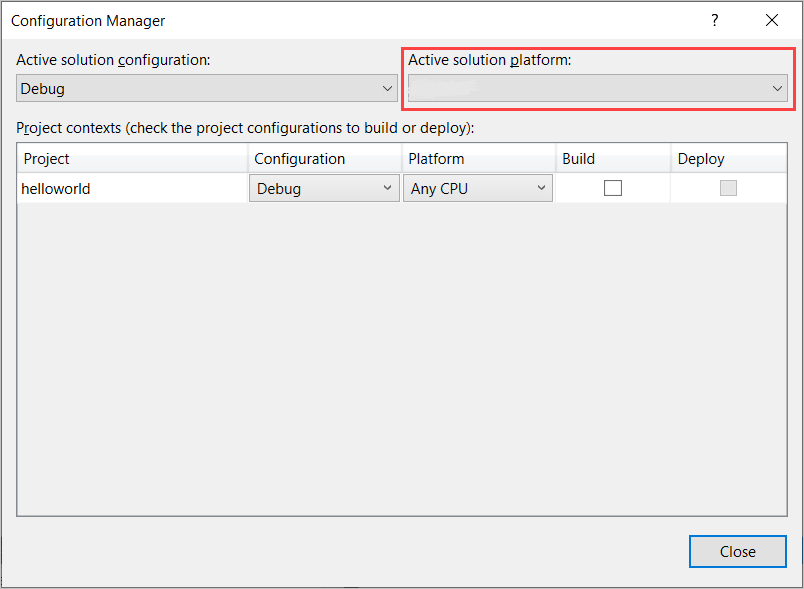
在“活动解决方案平台”下拉框中,选择“新建” 。 此时将显示“新建解决方案平台”对话框。
在“键入或选择新平台”下拉框中:
- 如果运行的是 64 位 Windows,请选择 x64。
- 如果运行的是 32 位 Windows,请选择 x86。
选择“确定”,然后选择“关闭”。
添加代码
接下来,将代码添加到项目。
在“解决方案资源管理器”中,打开文件“Program.cs”。
将该文件开头位置的
using语句块替换为以下声明:using System; using System.Threading.Tasks; using Microsoft.CognitiveServices.Speech; using Microsoft.CognitiveServices.Speech.Audio; using Microsoft.CognitiveServices.Speech.Intent;将提供的
Main()方法替换为以下异步等效项:public static async Task Main() { await RecognizeIntentAsync(); Console.WriteLine("Please press Enter to continue."); Console.ReadLine(); }创建空的异步方法
RecognizeIntentAsync(),如下所示:static async Task RecognizeIntentAsync() { }在此新方法的正文中添加以下代码:
// Creates an instance of a speech config with specified subscription key
// and service region. Note that in contrast to other services supported by
// the Cognitive Services Speech SDK, the Language Understanding service
// requires a specific subscription key from https://www.luis.ai/.
// The Language Understanding service calls the required key 'endpoint key'.
// Once you've obtained it, replace with below with your own Language Understanding subscription key
// and service region (e.g., "westus").
// The default language is "en-us".
var config = SpeechConfig.FromSubscription("YourLanguageUnderstandingSubscriptionKey", "YourLanguageUnderstandingServiceRegion");

// Creates an intent recognizer using microphone as audio input.
using (var recognizer = new IntentRecognizer(config))
{
    // Creates a Language Understanding model using the app id, and adds specific intents from your model
    var model = LanguageUnderstandingModel.FromAppId("YourLanguageUnderstandingAppId");
    recognizer.AddIntent(model, "YourLanguageUnderstandingIntentName1", "id1");
    recognizer.AddIntent(model, "YourLanguageUnderstandingIntentName2", "id2");
    recognizer.AddIntent(model, "YourLanguageUnderstandingIntentName3", "any-IntentId-here");

    // Starts recognizing.
    Console.WriteLine("Say something...");

    // Starts intent recognition, and returns after a single utterance is recognized. The end of a
    // single utterance is determined by listening for silence at the end or until a maximum of 15
    // seconds of audio is processed.  The task returns the recognition text as result.
    // Note: Since RecognizeOnceAsync() returns only a single utterance, it is suitable only for single
    // shot recognition like command or query.
    // For long-running multi-utterance recognition, use StartContinuousRecognitionAsync() instead.
    var result = await recognizer.RecognizeOnceAsync().ConfigureAwait(false);

    // Checks result.
    if (result.Reason == ResultReason.RecognizedIntent)
    {
        Console.WriteLine($"RECOGNIZED: Text={result.Text}");
        Console.WriteLine($"    Intent Id: {result.IntentId}.");
        Console.WriteLine($"    Language Understanding JSON: {result.Properties.GetProperty(PropertyId.LanguageUnderstandingServiceResponse_JsonResult)}.");
    }
    else if (result.Reason == ResultReason.RecognizedSpeech)
    {
        Console.WriteLine($"RECOGNIZED: Text={result.Text}");
        Console.WriteLine($"    Intent not recognized.");
    }
    else if (result.Reason == ResultReason.NoMatch)
    {
        Console.WriteLine($"NOMATCH: Speech could not be recognized.");
    }
    else if (result.Reason == ResultReason.Canceled)
    {
        var cancellation = CancellationDetails.FromResult(result);
        Console.WriteLine($"CANCELED: Reason={cancellation.Reason}");

        if (cancellation.Reason == CancellationReason.Error)
        {
            Console.WriteLine($"CANCELED: ErrorCode={cancellation.ErrorCode}");
            Console.WriteLine($"CANCELED: ErrorDetails={cancellation.ErrorDetails}");
            Console.WriteLine($"CANCELED: Did you update the subscription info?");
        }
    }
}
将此方法中的占位符替换为你的 LUIS 资源密钥、区域和应用 ID,如下所示。
占位符 替换为 YourLanguageUnderstandingSubscriptionKey你的 LUIS 资源密钥。 同样,必须从 Azure 仪表板获取此项。 可以在 LUIS 门户中应用的“Azure 资源”页上(在“管理”下)找到此密钥。 YourLanguageUnderstandingServiceRegionLUIS 资源所在区域的短标识符,例如 westus表示“美国西部”。 请参阅区域。YourLanguageUnderstandingAppIdLUIS 应用 ID。 可以在 LUIS 门户中应用的“设置”页上找到此 ID。
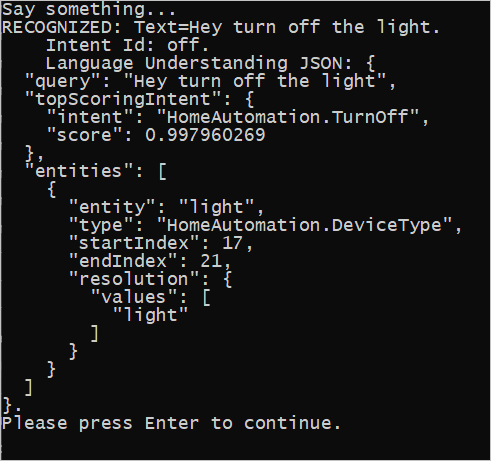
完成这些更改后,可以生成 (Ctrl+Shift+B) 和运行 (F5) 应用程序。 出现提示时,请尝试对着电脑麦克风说出“关灯”。 应用程序会在控制台窗口中显示结果。
以下部分包含代码的讨论。
创建意向识别器
首先,需要基于 LUIS 预测密钥和区域创建语音配置。 可以使用语音配置来创建语音 SDK 的各种功能的识别器。 语音配置提供多种方式用于指定所要使用的资源;此处我们使用了采用资源密钥和区域的 FromSubscription。
注意
使用 LUIS 资源的密钥和区域,而不是语音资源。
接下来,使用 new IntentRecognizer(config) 创建意向识别器。 由于配置已知道要使用哪个资源,因此,在创建识别器时无需再次指定密钥。
导入 LUIS 模型并添加意向
现在,使用 LanguageUnderstandingModel.FromAppId() 从 LUIS 应用导入模型,并添加想要通过识别器的 AddIntent() 方法识别的 LUIS 意向。 这两个步骤会指出用户有可能在其请求中使用的单词,以此提高语音识别的准确性。 如果不需要在应用程序中识别应用的所有意向,则不必要添加这些意向。
若要添加意向,必须提供三个参数:LUIS 模型(命名为 model)、意向名称和意向 ID。 ID 与名称之间的差别如下。
AddIntent() 参数 |
目的 |
|---|---|
intentName |
LUIS 应用中定义的意向的名称。 此值必须与 LUIS 意向名称完全匹配。 |
intentID |
语音 SDK 分配给已识别的意向的 ID。 此值可以是任何内容;不需要对应于 LUIS 应用中定义的意向名称。 例如,如果多个意向由相同的代码处理,则可以对这些意向使用相同的 ID。 |
家庭自动化 LUIS 应用具有两个意向:一个意向是打开设备,另一个意向是关闭设备。 以下代码行将这些意向添加到识别器;请将 RecognizeIntentAsync() 方法中的三个 AddIntent 代码行替换为以下代码。
recognizer.AddIntent(model, "HomeAutomation.TurnOff", "off");
recognizer.AddIntent(model, "HomeAutomation.TurnOn", "on");
也可以使用 AddAllIntents 方法将模型中的所有意向都添加到识别器中,而不是添加单个意向。
开始识别
创建识别器并添加意向后,可以开始识别。 语音 SDK 支持单次识别和连续识别。
| 识别模式 | 要调用的方法 | 结果 |
|---|---|---|
| 单次 | RecognizeOnceAsync() |
返回在一个话语后面识别的意向(如果有)。 |
| 连续 | StartContinuousRecognitionAsync()StopContinuousRecognitionAsync() |
识别多个言语。有可用结果时发出事件(例如 IntermediateResultReceived)。 |
应用程序使用单次模式,因此调用 RecognizeOnceAsync() 开始识别。 结果是包含有关已识别的意向的信息的 IntentRecognitionResult 对象。 使用以下表达式提取 LUIS JSON 响应:
result.Properties.GetProperty(PropertyId.LanguageUnderstandingServiceResponse_JsonResult)
应用程序不会分析 JSON 结果。 它只在控制台窗口中显示 JSON 文本。
指定识别语言
默认情况下,LUIS 可以识别美国英语中的意向 (en-us)。 将区域设置代码分配到语音配置的 SpeechRecognitionLanguage 属性可以识别其他语言的意向。 例如,创建识别器之前在应用程序中添加 config.SpeechRecognitionLanguage = "de-de"; 可以识别德语中的意向。 有关详细信息,请参阅 LUIS 语言支持。
从文件中连续识别
以下代码演示了使用语音 SDK 的其他两项意向识别功能。 第一项功能是连续识别:有可用的结果时,识别器会发出事件(参阅前文)。 这些事件由提供的事件处理程序处理。 使用连续识别时,需要调用识别器的 StartContinuousRecognitionAsync() 方法来开始识别,而不是调用 RecognizeOnceAsync()。
另一项功能是从 WAV 文件中读取包含要处理的语音的音频。 实现涉及到创建音频配置,创建意向识别器时可以使用该配置。 该文件必须是采样率为 16 kHz 的单声道(单音)音频。
若要尝试这些功能,请删除或注释掉 RecognizeIntentAsync() 方法的正文,并将正文替换为以下代码。
// Creates an instance of a speech config with specified subscription key
// and service region. Note that in contrast to other services supported by
// the Cognitive Services Speech SDK, the Language Understanding service
// requires a specific subscription key from https://www.luis.ai/.
// The Language Understanding service calls the required key 'endpoint key'.
// Once you've obtained it, replace with below with your own Language Understanding subscription key
// and service region (e.g., "westus").
var config = SpeechConfig.FromSubscription("YourLanguageUnderstandingSubscriptionKey", "YourLanguageUnderstandingServiceRegion");

// Creates an intent recognizer using file as audio input.
// Replace with your own audio file name.
using (var audioInput = AudioConfig.FromWavFileInput("YourAudioFile.wav"))
{
    using (var recognizer = new IntentRecognizer(config, audioInput))
    {
        // The TaskCompletionSource to stop recognition.
        var stopRecognition = new TaskCompletionSource<int>(TaskCreationOptions.RunContinuationsAsynchronously);

        // Creates a Language Understanding model using the app id, and adds specific intents from your model
        var model = LanguageUnderstandingModel.FromAppId("YourLanguageUnderstandingAppId");
        recognizer.AddIntent(model, "YourLanguageUnderstandingIntentName1", "id1");
        recognizer.AddIntent(model, "YourLanguageUnderstandingIntentName2", "id2");
        recognizer.AddIntent(model, "YourLanguageUnderstandingIntentName3", "any-IntentId-here");

        // Subscribes to events.
        recognizer.Recognizing += (s, e) =>
        {
            Console.WriteLine($"RECOGNIZING: Text={e.Result.Text}");
        };

        recognizer.Recognized += (s, e) =>
        {
            if (e.Result.Reason == ResultReason.RecognizedIntent)
            {
                Console.WriteLine($"RECOGNIZED: Text={e.Result.Text}");
                Console.WriteLine($"    Intent Id: {e.Result.IntentId}.");
                Console.WriteLine($"    Language Understanding JSON: {e.Result.Properties.GetProperty(PropertyId.LanguageUnderstandingServiceResponse_JsonResult)}.");
            }
            else if (e.Result.Reason == ResultReason.RecognizedSpeech)
            {
                Console.WriteLine($"RECOGNIZED: Text={e.Result.Text}");
                Console.WriteLine($"    Intent not recognized.");
            }
            else if (e.Result.Reason == ResultReason.NoMatch)
            {
                Console.WriteLine($"NOMATCH: Speech could not be recognized.");
            }
        };

        recognizer.Canceled += (s, e) =>
        {
            Console.WriteLine($"CANCELED: Reason={e.Reason}");

            if (e.Reason == CancellationReason.Error)
            {
                Console.WriteLine($"CANCELED: ErrorCode={e.ErrorCode}");
                Console.WriteLine($"CANCELED: ErrorDetails={e.ErrorDetails}");
                Console.WriteLine($"CANCELED: Did you update the subscription info?");
            }

            stopRecognition.TrySetResult(0);
        };

        recognizer.SessionStarted += (s, e) =>
        {
            Console.WriteLine("\n    Session started event.");
        };

        recognizer.SessionStopped += (s, e) =>
        {
            Console.WriteLine("\n    Session stopped event.");
            Console.WriteLine("\nStop recognition.");
            stopRecognition.TrySetResult(0);
        };


        // Starts continuous recognition. Uses StopContinuousRecognitionAsync() to stop recognition.
        await recognizer.StartContinuousRecognitionAsync().ConfigureAwait(false);

        // Waits for completion.
        // Use Task.WaitAny to keep the task rooted.
        Task.WaitAny(new[] { stopRecognition.Task });

        // Stops recognition.
        await recognizer.StopContinuousRecognitionAsync().ConfigureAwait(false);
    }
}
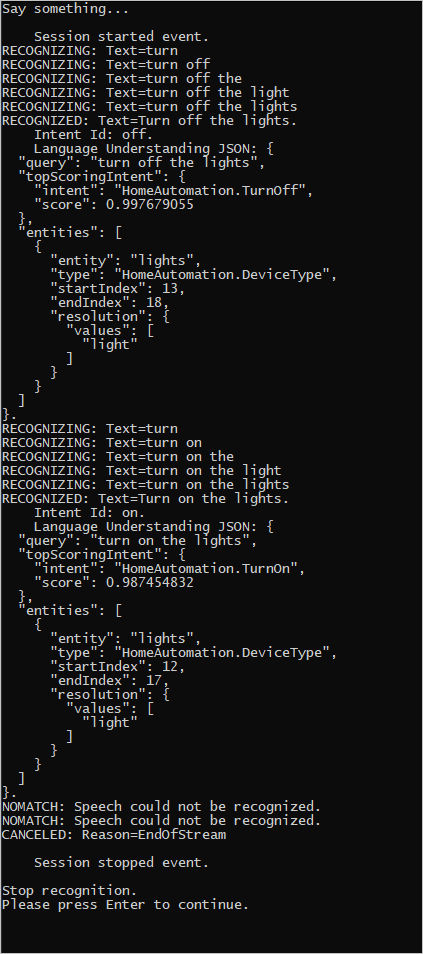
如前所述修改代码以包含 LUIS 预测密钥、区域和应用 ID,并添加家庭自动化意向。 将 whatstheweatherlike.wav 更改为录制的音频文件的名称。 然后生成,将音频文件复制到生成目录,并运行应用程序。
例如,如果你讲出“关灯”,暂停,然后在录制的音频文件中讲出“开灯”,则可能会显示类似于下面的控制台输出:
语音 SDK 团队在一个开源存储库中积极维护大量的示例。 有关示例源代码存储库,请参阅 GitHub 上的 Azure AI 语音 SDK。 其中有适用于 C#、C++、Java、Python、Objective-C、Swift、JavaScript、UWP、Unity 和 Xamarin 的示例。 在 samples/csharp/sharedcontent/console 文件夹中可以找到本文中使用的代码。