你当前正在访问 Microsoft Azure Global Edition 技术文档网站。 如果需要访问由世纪互联运营的 Microsoft Azure 中国技术文档网站,请访问 https://docs.azure.cn。
快速入门:创建和管理访问令牌
访问令牌让 Azure 通信服务 SDK 直接针对 Azure 通信服务作为特定身份进行身份验证。 如果希望用户加入应用程序内的呼叫或聊天会话,则需要创建访问令牌。
在本快速入门中,你将了解如何使用 Azure 通信服务 SDK 来创建标识并管理你的访问令牌。 对于生产用例,我们建议你在服务器端服务上生成访问令牌。
先决条件
设置
添加扩展
使用 az extension 命令为 Azure CLI 添加 Azure 通信服务扩展。
az extension add --name communication
登录 Azure CLI
需要登录到 Azure CLI。 可以从终端运行 az login 命令并提供凭据进行登录。
(可选)使用 Azure CLI 标识操作,而无需传入连接字符串
可以配置 AZURE_COMMUNICATION_CONNECTION_STRING 环境变量来使用 Azure CLI 标识操作,而无需使用 --connection_string 来传入连接字符串。 若要配置环境变量,请打开控制台窗口,然后从以下选项卡中选择操作系统。 将 <yourConnectionString> 替换为实际的连接字符串。
打开控制台窗口并输入以下命令:
setx AZURE_COMMUNICATION_CONNECTION_STRING "<yourConnectionString>"
添加环境变量后,可能需要重启任何正在运行的、需要读取环境变量的程序(包括控制台窗口)。 例如,如果使用 Visual Studio 作为编辑器,请在运行示例之前重启 Visual Studio。
在环境变量中存储你的访问令牌
若要配置环境变量,请打开控制台窗口,然后从以下选项卡中选择操作系统。 将 <yourAccessToken> 替换为你的实际访问令牌。
打开控制台窗口并输入以下命令:
setx AZURE_COMMUNICATION_ACCESS_TOKEN "<yourAccessToken>"
添加环境变量后,可能需要重启任何正在运行的、需要读取环境变量的程序(包括控制台窗口)。 例如,如果使用 Visual Studio 作为编辑器,请在运行示例之前重启 Visual Studio。
Operations
创建标识
若要创建访问令牌,需要一个标识。 为此,Azure 通信服务维护了一个轻量级标识目录。 使用 user create 命令可在目录中创建具有唯一 Id 的新条目。 稍后颁发访问令牌时需要该标识。
az communication identity user create --connection-string "<yourConnectionString>"
- 将
<yourConnectionString>替换为你的连接字符串。
在同一请求中创建标识并颁发访问令牌
运行以下命令创建通信服务标识并为它颁发访问令牌。 scopes 参数定义了一组访问令牌权限和角色。 有关详细信息,请参阅向 Azure 通信服务进行身份验证中列出的支持的操作。
az communication identity token issue --scope chat --connection-string "<yourConnectionString>"
在代码中进行此替换:
- 将
<yourConnectionString>替换为你的连接字符串。
颁发访问令牌
运行以下命令为你的通信服务标识颁发访问令牌。 scopes 参数定义了一组访问令牌权限和角色。 有关详细信息,请参阅向 Azure 通信服务进行身份验证中列出的支持的操作。
az communication identity token issue --scope chat --user "<userId>" --connection-string "<yourConnectionString>"
在代码中进行此替换:
- 将
<yourConnectionString>替换为你的连接字符串。 - 将
<userId>替换为你的 userId。
访问令牌是短期凭据,需要重新颁发。 如果不重新颁发,可能会导致应用程序用户的体验中断。 expires_on 响应属性指示访问令牌的生存期。
颁发具有多个范围的访问令牌
运行以下命令为你的通信服务标识颁发具有多个范围的访问令牌。 scopes 参数定义了一组访问令牌权限和角色。 有关详细信息,请参阅标识模型中受支持的操作列表。
az communication identity token issue --scope chat voip --user "<userId>" --connection-string "<yourConnectionString>"
在代码中进行此替换:
- 将
<yourConnectionString>替换为你的连接字符串。 - 将
<userId>替换为你的 userId。
访问令牌是短期凭据,需要重新颁发。 如果不重新颁发,可能会导致应用程序用户的体验中断。 expires_on 响应属性指示访问令牌的生存期。
将 Teams 用户的 Microsoft Entra 访问令牌交换为通信标识访问令牌
使用 token get-for-teams-user 命令为 Teams 用户颁发可与 Azure 通信服务 SDK 一起使用的访问令牌。
az communication identity token get-for-teams-user --aad-token "<yourAadToken>" --client "<yourAadApplication>" --aad-user "<yourAadUser>" --connection-string "<yourConnectionString>"
在代码中进行此替换:
- 将
<yourConnectionString>替换为你的连接字符串。 - 将
<yourAadUser>替换为 Microsoft Entra userId。 - 将
<yourAadApplication>替换为 Microsoft Entra 应用程序 ID。 - 将
<yourAadToken>替换为 Microsoft Entra 访问令牌。
撤销访问令牌
你有时可能需要显式撤销访问令牌。 例如,当应用程序用户更改了自身用于向你的服务进行身份验证的密码时,你可能要执行此操作。 token revoke 命令使颁发给标识的所有活动访问令牌无效。
az communication identity token revoke --user "<userId>" --connection-string "<yourConnectionString>"
在代码中进行此替换:
- 将
<yourConnectionString>替换为你的连接字符串。 - 将
<userId>替换为你的 userId。
删除标识
当你删除一个标识时,你将撤销所有活动的访问令牌并阻止进一步为该标识颁发访问令牌。 还会删除与该标识关联的所有持久内容。
az communication identity user delete --user "<userId>" --connection-string "<yourConnectionString>"
在代码中进行此替换:
- 将
<yourConnectionString>替换为你的连接字符串。 - 将
<userId>替换为你的 userId。
先决条件
- 具有活动订阅的 Azure 帐户。 免费创建帐户。
- 适用于操作系统的最新 .NET Core SDK 版本。
- 活动的通信服务资源和连接字符串。 创建通信服务资源。
最终代码
在 GitHub 上查找此快速入门的最终代码。
设置你的环境
新建 C# 应用程序
在命令提示符窗口(例如 cmd、PowerShell 或 Bash)中,运行 dotnet new 命令创建名为 AccessTokensQuickstart 的新控制台应用。 此命令将创建包含单个源文件 (Program.cs) 的简单“Hello World”C# 项目。
dotnet new console -o AccessTokensQuickstart
将目录更改为新建的应用文件夹,并使用 dotnet build 命令编译应用程序。
cd AccessTokensQuickstart
dotnet build
应该显示一个简单的“Hello World”输出。 如果显示了以上输出,则你的设置工作正常,你可以开始编写 Azure 通信服务特定的代码。
安装包
仍在应用程序目录中时,使用 dotnet add package 命令安装适用于 .NET 的 Azure 通信服务标识库包。
dotnet add package Azure.Communication.Identity
设置应用框架
在项目目录中执行以下操作:
- 在文本编辑器中,打开“Program.cs” 文件。
- 添加
using指令以包括Azure.Communication.Identity命名空间。 - 更新
Main方法声明以支持异步代码。
若要开始,请运行以下代码:
using System;
using Azure;
using Azure.Core;
using Azure.Communication.Identity;

namespace AccessTokensQuickstart
{
    class Program
    {
        static async System.Threading.Tasks.Task Main(string[] args)
        {
            Console.WriteLine("Azure Communication Services - Access Tokens Quickstart");

            // Quickstart code goes here
        }
    }
}
验证客户端
使用连接字符串初始化 CommunicationIdentityClient。 你添加到 Main 方法中的以下代码将从名为 COMMUNICATION_SERVICES_CONNECTION_STRING 的环境变量中检索资源的连接字符串。
有关详细信息,请参阅创建和管理通信服务资源的“存储连接字符串”部分。
// This code demonstrates how to retrieve your connection string
// from an environment variable.
string connectionString = Environment.GetEnvironmentVariable("COMMUNICATION_SERVICES_CONNECTION_STRING");
var client = new CommunicationIdentityClient(connectionString);
或者,你可以通过运行以下代码来分离终结点和访问密钥:
// This code demonstrates how to fetch your endpoint and access key
// from an environment variable.
string endpoint = Environment.GetEnvironmentVariable("COMMUNICATION_SERVICES_ENDPOINT");
string accessKey = Environment.GetEnvironmentVariable("COMMUNICATION_SERVICES_ACCESSKEY");
var client = new CommunicationIdentityClient(new Uri(endpoint), new AzureKeyCredential(accessKey));
如果已设置 Microsoft Entra 应用程序,则可以使用 Microsoft Entra ID 进行身份验证。
TokenCredential tokenCredential = new DefaultAzureCredential();
var client = new CommunicationIdentityClient(new Uri(endpoint), tokenCredential);
创建标识
若要创建访问令牌,需要一个标识。 为此,Azure 通信服务维护了一个轻量级标识目录。 使用 createUser 方法可在目录中创建具有唯一 Id 的新项。 稍后颁发访问令牌时需要该标识。
var identityResponse = await client.CreateUserAsync();
var identity = identityResponse.Value;
Console.WriteLine($"\nCreated an identity with ID: {identity.Id}");
存储接收到的标识并映射到应用程序的用户(例如,通过将其存储在应用程序服务器数据库中)。
发布访问令牌
拥有通信服务身份后,使用 GetToken 方法为其颁发访问令牌。 scopes 参数定义了一组访问令牌权限和角色。 有关详细信息,请参阅标识模型中受支持的操作列表。 还可以基于 Azure 通信服务标识的字符串表示构造 communicationUser 的一个新实例。
// Issue an access token with a validity of 24 hours and the "voip" scope for an identity
var tokenResponse = await client.GetTokenAsync(identity, scopes: new [] { CommunicationTokenScope.VoIP });

// Get the token from the response
var token =  tokenResponse.Value.Token;
var expiresOn = tokenResponse.Value.ExpiresOn;
Console.WriteLine($"\nIssued an access token with 'voip' scope that expires at {expiresOn}:");
Console.WriteLine(token);
访问令牌是短期凭据,需要重新颁发。 如果不重新颁发,可能会导致应用程序用户的体验中断。 expiresOn 属性指示访问令牌的生存期。
设置自定义令牌过期时间
默认令牌过期时间为 24 小时,但可以通过为可选参数 tokenExpiresIn 提供一个介于一小时到 24 小时之间的值来配置它。 请求新令牌时,建议为令牌过期时间指定通信会话的预期典型时长。
// Issue an access token with a validity of an hour and the "voip" scope for an identity
TimeSpan tokenExpiresIn = TimeSpan.FromHours(1);
CommunicationTokenScope[] scopes = new[] { CommunicationTokenScope.VoIP };
var tokenResponse = await client.GetTokenAsync(identity, scopes, tokenExpiresIn);
在同一请求中创建标识并颁发令牌
可以使用 CreateUserAndTokenAsync 方法来同时创建通信服务标识并为其颁发访问令牌。 scopes 参数定义了一组访问令牌权限和角色。 有关详细信息,请参阅向 Azure 通信服务进行身份验证中列出的支持的操作。
// Issue an identity and an access token with a validity of 24 hours and the "voip" scope for the new identity
var identityAndTokenResponse = await client.CreateUserAndTokenAsync(scopes: new[] { CommunicationTokenScope.VoIP });

// Retrieve the identity, token, and expiration date from the response
var identity = identityAndTokenResponse.Value.User;
var token = identityAndTokenResponse.Value.AccessToken.Token;
var expiresOn = identityAndTokenResponse.Value.AccessToken.ExpiresOn;
Console.WriteLine($"\nCreated an identity with ID: {identity.Id}");
Console.WriteLine($"\nIssued an access token with 'voip' scope that expires at {expiresOn}:");
Console.WriteLine(token);
刷新访问令牌
若要刷新访问令牌,请将 CommunicationUserIdentifier 对象的实例传递到 GetTokenAsync。 如果已存储此 Id 并且需要新建 CommunicationUserIdentifier,可以通过将存储的 Id 传递到 CommunicationUserIdentifier 构造函数中来实现,如下所示:
var identityToRefresh = new CommunicationUserIdentifier(identity.Id);
var tokenResponse = await client.GetTokenAsync(identityToRefresh, scopes: new [] { CommunicationTokenScope.VoIP });
撤销访问令牌
你有时可能需要显式撤销访问令牌。 例如,当应用程序用户更改了自身用于向你的服务进行身份验证的密码时,你可能要执行此操作。 RevokeTokensAsync 方法使颁发给标识的所有活动访问令牌无效。
await client.RevokeTokensAsync(identity);
Console.WriteLine($"\nSuccessfully revoked all access tokens for identity with ID: {identity.Id}");
删除标识
当你删除一个标识时,你将撤销所有活动的访问令牌并阻止进一步为该标识颁发访问令牌。 还会删除与该标识关联的所有持久内容。
await client.DeleteUserAsync(identity);
Console.WriteLine($"\nDeleted the identity with ID: {identity.Id}");
运行代码
完成创建访问令牌后,你可以使用 dotnet run 命令从应用程序目录运行应用程序。
dotnet run
应用的输出描述了每个已完成的操作:
Azure Communication Services - Access Tokens Quickstart

Created an identity with ID: 8:acs:4ccc92c8-9815-4422-bddc-ceea181dc774_00000006-19e0-2727-80f5-8b3a0d003502

Issued an access token with 'voip' scope that expires at 10/11/2022 7:34:29 AM +00:00:
eyJhbGciOiJSUzI1NiIsImtpZCI6IjEwNiIsIng1dCI6Im9QMWFxQnlfR3hZU3pSaXhuQ25zdE5PU2p2cyIsInR5cCI6IkpXVCJ9.eyJza3lwZWlkIjoiYWNzOjAwMDAwMDAwLTAwMDAtMDAwMC0wMDAwLTAwMDAwMDAwMDAwMF8wMDAwMDAwMC0wMDAwLTAwMDAtMDAwMC0wMDAwMDAwMDAwMDAiLCJzY3AiOjE3OTIsImNzaSI6IjE2NjUzODcyNjkiLCJleHAiOjE2NjUzOTA4NjksImFjc1Njb3BlIjoidm9pcCIsInJlc291cmNlSWQiOiIwMDAwMDAwMC0wMDAwLTAwMDAtMDAwMC0wMDAwMDAwMDAwMDAiLCJyZXNvdXJjZUxvY2F0aW9uIjoidW5pdGVkc3RhdGVzIiwiaWF0IjoxNjY1Mzg3MjY5fQ.kTXpQQtY7w6O82kByljZXrKtBvNNOleDE5m06LapzLeoWfRZCCpJQcDzBoLRA146mOhNzLZ0b5WMNTa5tD-0hWCiicDwgKLMASEGY9g0EvNQOidPff47g2hh6yqi9PKiDPp-t5siBMYqA6Nh6CQ-Oeh-35vcRW09VfcqFN38IgSSzJ7QkqBiY_QtfXz-iaj81Td0287KO4U1y2LJIGiyJLWC567F7A_p1sl6NmPKUmvmwM47tyCcQ1r_lfkRdeyDmcrGgY6yyI3XJZQbpxyt2DZqOTSVPB4PuRl7iyXxvppEa4Uo_y_BdMOOWFe6YTRB5O5lhI8m7Tf0LifisxX2sw

Created an identity with ID: 8:acs:4ccc92c8-9815-4422-bddc-ceea181dc774_00000006-1ce9-31b4-54b7-a43a0d006a52

Issued an access token with 'voip' scope that expires at 10/11/2022 7:34:29 AM +00:00:
eyJhbGciOiJSUzI1NiIsImtpZCI6IjEwNiIsIng1dCI6Im9QMWFxQnlfR3hZU3pSaXhuQ25zdE5PU2p2cyIsInR5cCI6IkpXVCJ9.eyJza3lwZWlkIjoiYWNzOjAwMDAwMDAwLTAwMDAtMDAwMC0wMDAwLTAwMDAwMDAwMDAwMF8wMDAwMDAwMC0wMDAwLTAwMDAtMDAwMC0wMDAwMDAwMDAwMDAiLCJzY3AiOjE3OTIsImNzaSI6IjE2NjUzODcyNjkiLCJleHAiOjE2NjUzOTA4NjksImFjc1Njb3BlIjoidm9pcCIsInJlc291cmNlSWQiOiIwMDAwMDAwMC0wMDAwLTAwMDAtMDAwMC0wMDAwMDAwMDAwMDAiLCJyZXNvdXJjZUxvY2F0aW9uIjoidW5pdGVkc3RhdGVzIiwiaWF0IjoxNjY1Mzg3MjY5fQ.kTXpQQtY7w6O82kByljZXrKtBvNNOleDE5m06LapzLeoWfRZCCpJQcDzBoLRA146mOhNzLZ0b5WMNTa5tD-0hWCiicDwgKLMASEGY9g0EvNQOidPff47g2hh6yqi9PKiDPp-t5siBMYqA6Nh6CQ-Oeh-35vcRW09VfcqFN38IgSSzJ7QkqBiY_QtfXz-iaj81Td0287KO4U1y2LJIGiyJLWC567F7A_p1sl6NmPKUmvmwM47tyCcQ1r_lfkRdeyDmcrGgY6yyI3XJZQbpxyt2DZqOTSVPB4PuRl7iyXxvppEa4Uo_y_BdMOOWFe6YTRB5O5lhI8m7Tf0LifisxX2sw

Successfully revoked all access tokens for identity with ID: 8:acs:4ccc92c8-9815-4422-bddc-ceea181dc774_00000006-19e0-2727-80f5-8b3a0d003502

Deleted the identity with ID: 8:acs:4ccc92c8-9815-4422-bddc-ceea181dc774_00000006-19e0-2727-80f5-8b3a0d003502
先决条件
- 具有活动订阅的 Azure 帐户。 免费创建帐户。
- Node.js,活动 LTS 和维护 LTS 版本(建议使用 8.11.1 和 10.14.1)。
- 活动的通信服务资源和连接字符串。 创建通信服务资源。
最终代码
在 GitHub 上查找此快速入门的最终代码。
设置你的环境
创建新的 Node.js 应用程序
在终端或命令提示符窗口中,为你的应用创建一个新目录,然后打开此目录。
mkdir access-tokens-quickstart && cd access-tokens-quickstart
运行 npm init -y 以使用默认设置创建 package.json 文件。
npm init -y
安装包
使用 npm install 命令安装适用于 JavaScript 的 Azure 通信服务标识 SDK。
npm install @azure/communication-identity@latest --save
--save 选项将该库作为 package.json 文件中的依赖项列出。
设置应用框架
在项目目录中创建一个名为
issue-access-token.js的文件,并添加以下代码:const { CommunicationIdentityClient } = require('@azure/communication-identity'); const main = async () => { console.log("Azure Communication Services - Access Tokens Quickstart") // Quickstart code goes here }; main().catch((error) => { console.log("Encountered an error"); console.log(error); })
验证客户端
使用连接字符串实例化 CommunicationIdentityClient。 你添加到 Main 方法中的以下代码将从名为 COMMUNICATION_SERVICES_CONNECTION_STRING 的环境变量中检索资源的连接字符串。
有关详细信息,请参阅创建和管理通信服务资源的“存储连接字符串”部分。
// This code demonstrates how to fetch your connection string
// from an environment variable.
const connectionString = process.env['COMMUNICATION_SERVICES_CONNECTION_STRING'];

// Instantiate the identity client
const identityClient = new CommunicationIdentityClient(connectionString);
或者,你可以通过运行以下代码来分离终结点和访问密钥:
// This code demonstrates how to fetch your endpoint and access key
// from an environment variable.
const endpoint = process.env["COMMUNICATION_SERVICES_ENDPOINT"];
const accessKey = process.env["COMMUNICATION_SERVICES_ACCESSKEY"];

// Create the credential
const tokenCredential = new AzureKeyCredential(accessKey);

// Instantiate the identity client
const identityClient = new CommunicationIdentityClient(endpoint, tokenCredential)
如果已设置 Microsoft Entra 应用程序,则可以使用 Microsoft Entra ID 进行身份验证。
const endpoint = process.env["COMMUNICATION_SERVICES_ENDPOINT"];
const tokenCredential = new DefaultAzureCredential();
const identityClient = new CommunicationIdentityClient(endpoint, tokenCredential);
创建标识
若要创建访问令牌,需要一个标识。 为此,Azure 通信服务维护了一个轻量级标识目录。 使用 createUser 方法可在目录中创建具有唯一 Id 的新项。 稍后颁发访问令牌时需要该标识。
let identityResponse = await identityClient.createUser();
console.log(`\nCreated an identity with ID: ${identityResponse.communicationUserId}`);
存储接收到的标识并映射到应用程序的用户(例如,通过将其存储在应用程序服务器数据库中)。
发布访问令牌
使用 getToken 方法为你的通信服务标识颁发访问令牌。 scopes 参数定义了一组访问令牌权限和角色。 有关详细信息,请参阅标识模型中受支持的操作列表。 还可以基于 Azure 通信服务标识的字符串表示构造 communicationUser 的一个新实例。
// Issue an access token with a validity of 24 hours and the "voip" scope for an identity
let tokenResponse = await identityClient.getToken(identityResponse, ["voip"]);

// Get the token and its expiration date from the response
const { token, expiresOn } = tokenResponse;
console.log(`\nIssued an access token with 'voip' scope that expires at ${expiresOn}:`);
console.log(token);
访问令牌是短期凭据,需要重新颁发。 如果不重新颁发,可能会导致应用程序用户的体验中断。 expiresOn 属性指示访问令牌的生存期。
设置自定义令牌过期时间
默认令牌过期时间为 24 小时(1440 分钟),但可以通过为可选参数 tokenExpiresInMinutes 提供一个介于 60 分钟到 1440 分钟之间的值来配置它。 请求新令牌时,建议为令牌过期时间指定通信会话的预期典型时长。
// Issue an access token with a validity of an hour and the "voip" scope for an identity
const tokenOptions: GetTokenOptions = { tokenExpiresInMinutes: 60 };
let tokenResponse = await identityClient.getToken
(identityResponse, ["voip"], tokenOptions);
在一个方法调用中创建标识并颁发令牌
可以使用 createUserAndToken 方法来同时创建通信服务标识并为其颁发访问令牌。 scopes 参数定义了一组访问令牌权限和角色。 同样,你使用 voip 范围创建标识。
// Issue an identity and an access token with a validity of 24 hours and the "voip" scope for the new identity
let identityTokenResponse = await identityClient.createUserAndToken(["voip"]);

// Get the token, its expiration date, and the user from the response
const { token, expiresOn, user } = identityTokenResponse;
console.log(`\nCreated an identity with ID: ${user.communicationUserId}`);
console.log(`\nIssued an access token with 'voip' scope that expires at ${expiresOn}:`);
console.log(token);
刷新访问令牌
令牌过期后,需要定期刷新令牌。 刷新很容易,只需使用与发行令牌相同的身份再次调用 getToken 即可。 还需要提供已刷新令牌的 scopes。
// Value of identityResponse represents the Azure Communication Services identity stored during identity creation and then used to issue the tokens being refreshed
let refreshedTokenResponse = await identityClient.getToken(identityResponse, ["voip"]);
撤销访问令牌
你有时可能需要撤销访问令牌。 例如,当应用程序用户更改了自身用于向你的服务进行身份验证的密码时,你可能要执行此操作。 revokeTokens 方法使颁发给标识的所有活动访问令牌无效。
await identityClient.revokeTokens(identityResponse);

console.log(`\nSuccessfully revoked all access tokens for identity with ID: ${identityResponse.communicationUserId}`);
删除标识
当你删除一个标识时,你将撤销所有活动的访问令牌并阻止进一步为该标识颁发访问令牌。 还会删除与该标识关联的所有持久内容。
await identityClient.deleteUser(identityResponse);

console.log(`\nDeleted the identity with ID: ${identityResponse.communicationUserId}`);
运行代码
在控制台提示符下,转到包含 issue-access-token.js 文件的目录,然后执行以下 node 命令来运行应用:
node ./issue-access-token.js
应用的输出描述了每个已完成的操作:
Azure Communication Services - Access Tokens Quickstart

Created an identity with ID: 8:acs:4ccc92c8-9815-4422-bddc-ceea181dc774_00000006-19e0-2727-80f5-8b3a0d003502

Issued an access token with 'voip' scope that expires at 2022-10-11T07:34:29.9028648+00:00:
eyJhbGciOiJSUzI1NiIsImtpZCI6IjEwNiIsIng1dCI6Im9QMWFxQnlfR3hZU3pSaXhuQ25zdE5PU2p2cyIsInR5cCI6IkpXVCJ9.eyJza3lwZWlkIjoiYWNzOjAwMDAwMDAwLTAwMDAtMDAwMC0wMDAwLTAwMDAwMDAwMDAwMF8wMDAwMDAwMC0wMDAwLTAwMDAtMDAwMC0wMDAwMDAwMDAwMDAiLCJzY3AiOjE3OTIsImNzaSI6IjE2NjUzODcyNjkiLCJleHAiOjE2NjUzOTA4NjksImFjc1Njb3BlIjoidm9pcCIsInJlc291cmNlSWQiOiIwMDAwMDAwMC0wMDAwLTAwMDAtMDAwMC0wMDAwMDAwMDAwMDAiLCJyZXNvdXJjZUxvY2F0aW9uIjoidW5pdGVkc3RhdGVzIiwiaWF0IjoxNjY1Mzg3MjY5fQ.kTXpQQtY7w6O82kByljZXrKtBvNNOleDE5m06LapzLeoWfRZCCpJQcDzBoLRA146mOhNzLZ0b5WMNTa5tD-0hWCiicDwgKLMASEGY9g0EvNQOidPff47g2hh6yqi9PKiDPp-t5siBMYqA6Nh6CQ-Oeh-35vcRW09VfcqFN38IgSSzJ7QkqBiY_QtfXz-iaj81Td0287KO4U1y2LJIGiyJLWC567F7A_p1sl6NmPKUmvmwM47tyCcQ1r_lfkRdeyDmcrGgY6yyI3XJZQbpxyt2DZqOTSVPB4PuRl7iyXxvppEa4Uo_y_BdMOOWFe6YTRB5O5lhI8m7Tf0LifisxX2sw

Created an identity with ID: 8:acs:4ccc92c8-9815-4422-bddc-ceea181dc774_00000006-1ce9-31b4-54b7-a43a0d006a52

Issued an access token with 'voip' scope that expires at 2022-10-11T07:34:29.9028648+00:00:
eyJhbGciOiJSUzI1NiIsImtpZCI6IjEwNiIsIng1dCI6Im9QMWFxQnlfR3hZU3pSaXhuQ25zdE5PU2p2cyIsInR5cCI6IkpXVCJ9.eyJza3lwZWlkIjoiYWNzOjAwMDAwMDAwLTAwMDAtMDAwMC0wMDAwLTAwMDAwMDAwMDAwMF8wMDAwMDAwMC0wMDAwLTAwMDAtMDAwMC0wMDAwMDAwMDAwMDAiLCJzY3AiOjE3OTIsImNzaSI6IjE2NjUzODcyNjkiLCJleHAiOjE2NjUzOTA4NjksImFjc1Njb3BlIjoidm9pcCIsInJlc291cmNlSWQiOiIwMDAwMDAwMC0wMDAwLTAwMDAtMDAwMC0wMDAwMDAwMDAwMDAiLCJyZXNvdXJjZUxvY2F0aW9uIjoidW5pdGVkc3RhdGVzIiwiaWF0IjoxNjY1Mzg3MjY5fQ.kTXpQQtY7w6O82kByljZXrKtBvNNOleDE5m06LapzLeoWfRZCCpJQcDzBoLRA146mOhNzLZ0b5WMNTa5tD-0hWCiicDwgKLMASEGY9g0EvNQOidPff47g2hh6yqi9PKiDPp-t5siBMYqA6Nh6CQ-Oeh-35vcRW09VfcqFN38IgSSzJ7QkqBiY_QtfXz-iaj81Td0287KO4U1y2LJIGiyJLWC567F7A_p1sl6NmPKUmvmwM47tyCcQ1r_lfkRdeyDmcrGgY6yyI3XJZQbpxyt2DZqOTSVPB4PuRl7iyXxvppEa4Uo_y_BdMOOWFe6YTRB5O5lhI8m7Tf0LifisxX2sw

Successfully revoked all access tokens for identity with ID: 8:acs:4ccc92c8-9815-4422-bddc-ceea181dc774_00000006-19e0-2727-80f5-8b3a0d003502

Deleted the identity with ID: 8:acs:4ccc92c8-9815-4422-bddc-ceea181dc774_00000006-19e0-2727-80f5-8b3a0d003502
先决条件
最终代码
在 GitHub 上查找此快速入门的最终代码。
设置你的环境
创建新的 Python 应用程序
在终端或命令提示符窗口中,为你的应用创建一个新目录,然后打开此目录。
mkdir access-tokens-quickstart && cd access-tokens-quickstart使用文本编辑器在项目根目录中创建名为 issue-access-tokens.py 的文件,并添加程序的结构,包括基本异常处理。 将在以下部分中将此快速入门的所有源代码添加到此文件。
import os
from datetime import timedelta
from azure.communication.identity import CommunicationIdentityClient, CommunicationUserIdentifier

try:
   print("Azure Communication Services - Access Tokens Quickstart")
   # Quickstart code goes here
except Exception as ex:
   print("Exception:")
   print(ex)
安装包
如果你仍在应用程序目录中,可以使用 pip install 命令安装适用于 Python 包的 Azure 通信服务标识 SDK。
pip install azure-communication-identity
验证客户端
使用连接字符串实例化 CommunicationIdentityClient。 你添加到 try 块中的以下代码将从名为 COMMUNICATION_SERVICES_CONNECTION_STRING 的环境变量中检索资源的连接字符串。
有关详细信息,请参阅创建和管理通信服务资源的“存储连接字符串”部分。
# This code demonstrates how to retrieve your connection string
# from an environment variable.
connection_string = os.environ["COMMUNICATION_SERVICES_CONNECTION_STRING"]

# Instantiate the identity client
client = CommunicationIdentityClient.from_connection_string(connection_string)
或者,如果已设置 Microsoft Entra 应用程序,则可以使用 Microsoft Entra ID 进行身份验证。
endpoint = os.environ["COMMUNICATION_SERVICES_ENDPOINT"]
client = CommunicationIdentityClient(endpoint, DefaultAzureCredential())
创建标识
若要创建访问令牌,需要一个标识。 为此,Azure 通信服务维护了一个轻量级标识目录。 使用 create_user 方法可在目录中创建具有唯一 Id 的新项。 稍后颁发访问令牌时需要该标识。
identity = client.create_user()
print("\nCreated an identity with ID: " + identity.properties['id'])
存储接收到的标识并映射到应用程序的用户(例如,通过将其存储在应用程序服务器数据库中)。
发布访问令牌
使用 get_token 方法为你的通信服务标识颁发访问令牌。 scopes 参数定义了一组访问令牌权限和角色。 有关详细信息,请参阅标识模型中受支持的操作列表。 还可以基于 Azure 通信服务标识的字符串表示构造参数 CommunicationUserIdentifier 的一个新实例。
# Issue an access token with a validity of 24 hours and the "voip" scope for an identity
token_result = client.get_token(identity, ["voip"])
print("\nIssued an access token with 'voip' scope that expires at " + token_result.expires_on + ":")
print(token_result.token)
访问令牌是短期凭据,需要重新颁发。 如果不重新颁发,可能会导致应用程序用户的体验中断。 expires_on 响应属性指示访问令牌的生存期。
设置自定义令牌过期时间
默认令牌过期时间为 24 小时,但可以通过为可选参数 token_expires_in 提供一个介于一小时到 24 小时之间的值来配置它。 请求新令牌时,建议为令牌过期时间指定通信会话的预期典型时长。
# Issue an access token with a validity of an hour and the "voip" scope for an identity
token_expires_in = timedelta(hours=1)
token_result = client.get_token(identity, ["voip"], token_expires_in=token_expires_in)
在同一请求中创建标识并颁发访问令牌
可以使用 create_user_and_token 方法来同时创建通信服务标识并为其颁发访问令牌。 scopes 参数定义了一组访问令牌权限和角色。 有关详细信息,请参阅向 Azure 通信服务进行身份验证中列出的支持的操作。
# Issue an identity and an access token with a validity of 24 hours and the "voip" scope for the new identity
identity_token_result = client.create_user_and_token(["voip"])

# Get the token details from the response
identity = identity_token_result[0]
token = identity_token_result[1].token
expires_on = identity_token_result[1].expires_on
print("\nCreated an identity with ID: " + identity.properties['id'])
print("\nIssued an access token with 'voip' scope that expires at " + expires_on + ":")
print(token)
刷新访问令牌
要刷新访问令牌,请使用 CommunicationUserIdentifier 对象通过传入现有身份重新颁发令牌:
# The existingIdentity value represents the Communication Services identity that's stored during identity creation
identity = CommunicationUserIdentifier(existingIdentity)
token_result = client.get_token(identity, ["voip"])
撤销访问令牌
你有时可能需要显式撤销访问令牌。 例如,当应用程序用户更改了自身用于向你的服务进行身份验证的密码时,你可能要执行此操作。 revoke_tokens 方法使颁发给标识的所有活动访问令牌无效。
client.revoke_tokens(identity)
print("\nSuccessfully revoked all access tokens for identity with ID: " + identity.properties['id'])
删除标识
当你删除一个标识时,你将撤销所有活动的访问令牌并阻止进一步为该标识颁发访问令牌。 还会删除与该标识关联的所有持久内容。
client.delete_user(identity)
print("\nDeleted the identity with ID: " + identity.properties['id'])
运行代码
在控制台提示符下,转到包含 issue-access-token.py 文件的目录,然后执行以下 python 命令来运行应用。
python ./issue-access-tokens.py
应用的输出描述了每个已完成的操作:
Azure Communication Services - Access Tokens Quickstart

Created an identity with ID: 8:acs:4ccc92c8-9815-4422-bddc-ceea181dc774_00000006-19e0-2727-80f5-8b3a0d003502

Issued an access token with 'voip' scope that expires at 2022-10-11T07:34:29.9028648+00:00:
eyJhbGciOiJSUzI1NiIsImtpZCI6IjEwNiIsIng1dCI6Im9QMWFxQnlfR3hZU3pSaXhuQ25zdE5PU2p2cyIsInR5cCI6IkpXVCJ9.eyJza3lwZWlkIjoiYWNzOjAwMDAwMDAwLTAwMDAtMDAwMC0wMDAwLTAwMDAwMDAwMDAwMF8wMDAwMDAwMC0wMDAwLTAwMDAtMDAwMC0wMDAwMDAwMDAwMDAiLCJzY3AiOjE3OTIsImNzaSI6IjE2NjUzODcyNjkiLCJleHAiOjE2NjUzOTA4NjksImFjc1Njb3BlIjoidm9pcCIsInJlc291cmNlSWQiOiIwMDAwMDAwMC0wMDAwLTAwMDAtMDAwMC0wMDAwMDAwMDAwMDAiLCJyZXNvdXJjZUxvY2F0aW9uIjoidW5pdGVkc3RhdGVzIiwiaWF0IjoxNjY1Mzg3MjY5fQ.kTXpQQtY7w6O82kByljZXrKtBvNNOleDE5m06LapzLeoWfRZCCpJQcDzBoLRA146mOhNzLZ0b5WMNTa5tD-0hWCiicDwgKLMASEGY9g0EvNQOidPff47g2hh6yqi9PKiDPp-t5siBMYqA6Nh6CQ-Oeh-35vcRW09VfcqFN38IgSSzJ7QkqBiY_QtfXz-iaj81Td0287KO4U1y2LJIGiyJLWC567F7A_p1sl6NmPKUmvmwM47tyCcQ1r_lfkRdeyDmcrGgY6yyI3XJZQbpxyt2DZqOTSVPB4PuRl7iyXxvppEa4Uo_y_BdMOOWFe6YTRB5O5lhI8m7Tf0LifisxX2sw

Created an identity with ID: 8:acs:4ccc92c8-9815-4422-bddc-ceea181dc774_00000006-1ce9-31b4-54b7-a43a0d006a52

Issued an access token with 'voip' scope that expires at 2022-10-11T07:34:29.9028648+00:00:
eyJhbGciOiJSUzI1NiIsImtpZCI6IjEwNiIsIng1dCI6Im9QMWFxQnlfR3hZU3pSaXhuQ25zdE5PU2p2cyIsInR5cCI6IkpXVCJ9.eyJza3lwZWlkIjoiYWNzOjAwMDAwMDAwLTAwMDAtMDAwMC0wMDAwLTAwMDAwMDAwMDAwMF8wMDAwMDAwMC0wMDAwLTAwMDAtMDAwMC0wMDAwMDAwMDAwMDAiLCJzY3AiOjE3OTIsImNzaSI6IjE2NjUzODcyNjkiLCJleHAiOjE2NjUzOTA4NjksImFjc1Njb3BlIjoidm9pcCIsInJlc291cmNlSWQiOiIwMDAwMDAwMC0wMDAwLTAwMDAtMDAwMC0wMDAwMDAwMDAwMDAiLCJyZXNvdXJjZUxvY2F0aW9uIjoidW5pdGVkc3RhdGVzIiwiaWF0IjoxNjY1Mzg3MjY5fQ.kTXpQQtY7w6O82kByljZXrKtBvNNOleDE5m06LapzLeoWfRZCCpJQcDzBoLRA146mOhNzLZ0b5WMNTa5tD-0hWCiicDwgKLMASEGY9g0EvNQOidPff47g2hh6yqi9PKiDPp-t5siBMYqA6Nh6CQ-Oeh-35vcRW09VfcqFN38IgSSzJ7QkqBiY_QtfXz-iaj81Td0287KO4U1y2LJIGiyJLWC567F7A_p1sl6NmPKUmvmwM47tyCcQ1r_lfkRdeyDmcrGgY6yyI3XJZQbpxyt2DZqOTSVPB4PuRl7iyXxvppEa4Uo_y_BdMOOWFe6YTRB5O5lhI8m7Tf0LifisxX2sw

Successfully revoked all access tokens for identity with ID: 8:acs:4ccc92c8-9815-4422-bddc-ceea181dc774_00000006-19e0-2727-80f5-8b3a0d003502

Deleted the identity with ID: 8:acs:4ccc92c8-9815-4422-bddc-ceea181dc774_00000006-19e0-2727-80f5-8b3a0d003502
先决条件
- 具有活动订阅的 Azure 帐户。 免费创建帐户。
- Java 开发工具包 (JDK) 版本 8 或更高版本。
- Apache Maven。
- 活动的通信服务资源和连接字符串。 创建通信服务资源。
最终代码
在 GitHub 上查找此快速入门的最终代码。
设置你的环境
创建新的 Java 应用程序
在终端或命令提示符窗口中,转到要创建 Java 应用程序的目录。 要从 maven-archetype-quickstart 模板生成 Java 项目,请运行以下命令:
mvn archetype:generate -DgroupId=com.communication.quickstart -DartifactId=communication-quickstart -DarchetypeArtifactId=maven-archetype-quickstart -DarchetypeVersion=1.4 -DinteractiveMode=false
你会注意到,generate 任务创建了与 artifactId 名称相同的目录。 在此目录下,src/main/java 目录包含项目源代码,src/test/java 目录包含测试源,pom.xml 文件是项目的项目对象模型 (POM)。 此文件用于项目配置参数。
安装通信服务包
在文本编辑器中打开 pom.xml 文件。 将以下依赖项元素添加到依赖项组:
<dependency>
    <groupId>com.azure</groupId>
    <artifactId>azure-communication-identity</artifactId>
    <version>[1.4.0,)</version>
</dependency>
此代码指示 Maven 安装通信服务标识 SDK,稍后将使用该 SDK。
设置应用框架
在项目目录中执行以下操作:
- 转到 /src/main/java/com/communication/quickstart 目录。
- 在编辑器中打开 App.java 文件。
- 替换
System.out.println("Hello world!");语句。 - 添加
import指令。
使用以下代码以开始执行以下操作:
package com.communication.quickstart;

import com.azure.communication.common.*;
import com.azure.communication.identity.*;
import com.azure.communication.identity.models.*;
import com.azure.core.credential.*;

import java.io.IOException;
import java.time.*;
import java.util.*;

public class App
{
    public static void main( String[] args ) throws IOException
    {
        System.out.println("Azure Communication Services - Access Tokens Quickstart");
        // Quickstart code goes here
    }
}
验证客户端
使用资源的访问密钥和终结点将 CommunicationIdentityClient 实例化。 有关详细信息,请参阅创建和管理通信服务资源的“存储连接字符串”部分。
你还可以用任何实现 com.azure.core.http.HttpClient 接口的自定义 HTTP 客户端对此客户端进行初始化。
在 App.java 文件中,将以下代码添加到 main 方法中:
// You can find your endpoint and access key from your resource in the Azure portal
String endpoint = "https://<RESOURCE_NAME>.communication.azure.com";
String accessKey = "SECRET";

CommunicationIdentityClient communicationIdentityClient = new CommunicationIdentityClientBuilder()
        .endpoint(endpoint)
        .credential(new AzureKeyCredential(accessKey))
        .buildClient();
你可以使用 connectionString() 方法提供整个连接字符串,而不是提供终结点和访问密钥。
// You can find your connection string from your Communication Services resource in the Azure portal
String connectionString = "<connection_string>";

CommunicationIdentityClient communicationIdentityClient = new CommunicationIdentityClientBuilder()
    .connectionString(connectionString)
    .buildClient();
如果已设置 Microsoft Entra 应用程序,则可以使用 Microsoft Entra ID 进行身份验证。
String endpoint = "https://<RESOURCE_NAME>.communication.azure.com";
TokenCredential credential = new DefaultAzureCredentialBuilder().build();

CommunicationIdentityClient communicationIdentityClient = new CommunicationIdentityClientBuilder()
        .endpoint(endpoint)
        .credential(credential)
        .buildClient();
创建标识
若要创建访问令牌,需要一个标识。 为此,Azure 通信服务维护了一个轻量级标识目录。 使用 createUser 方法可在目录中创建具有唯一 Id 的新项。
CommunicationUserIdentifier user = communicationIdentityClient.createUser();
System.out.println("\nCreated an identity with ID: " + user.getId());
稍后颁发访问令牌时需要之前创建的标识。 存储接收到的标识并映射到应用程序的用户(例如,通过将其存储在应用程序服务器数据库中)。
发布访问令牌
使用 getToken 方法为你的通信服务标识颁发访问令牌。 scopes 参数定义了一组访问令牌权限和角色。 有关详细信息,请参阅标识模型中受支持的操作列表。
在以下代码中,使用你在上一步中创建的用户变量来获取令牌。
// Issue an access token with a validity of 24 hours and the "voip" scope for a user identity
List<CommunicationTokenScope> scopes = new ArrayList<>(Arrays.asList(CommunicationTokenScope.VOIP));
AccessToken accessToken = communicationIdentityClient.getToken(user, scopes);
OffsetDateTime expiresAt = accessToken.getExpiresAt();
String token = accessToken.getToken();
System.out.println("\nIssued an access token with 'voip' scope that expires at: " + expiresAt + ": " + token);
访问令牌是短期凭据,需要重新颁发。 如果不重新颁发,可能会导致应用程序用户的体验中断。 expiresAt 属性指示访问令牌的生存期。
设置自定义令牌过期时间
默认令牌过期时间为 24 小时,但可以通过为可选参数 tokenExpiresIn 提供一个介于一小时到 24 小时之间的值来配置它。 请求新令牌时,建议为令牌过期时间指定通信会话的预期典型时长。
// Issue an access token with a validity of an hour and the "voip" scope for a user identity
List<CommunicationTokenScope> scopes = new ArrayList<>(Arrays.asList(CommunicationTokenScope.VOIP));
Duration tokenExpiresIn = Duration.ofHours(1);
AccessToken accessToken = communicationIdentityClient.getToken(user, scopes, tokenExpiresIn);
在一个请求中创建标识并颁发令牌
另外,还可以使用“createUserAndToken”方法以同时在目录中创建一个具有唯一 Id 的新条目,并颁发一个访问令牌。
//Create an identity and issue token with a validity of 24 hours in one call
List<CommunicationTokenScope> scopes = Arrays.asList(CommunicationTokenScope.CHAT);
CommunicationUserIdentifierAndToken result = communicationIdentityClient.createUserAndToken(scopes);
CommunicationUserIdentifier user = result.getUser();
System.out.println("\nCreated a user identity with ID: " + user.getId());
AccessToken accessToken = result.getUserToken();
OffsetDateTime expiresAt = accessToken.getExpiresAt();
String token = accessToken.getToken();
System.out.println("\nIssued an access token with 'chat' scope that expires at: " + expiresAt + ": " + token);
刷新访问令牌
若要刷新访问令牌,请使用 CommunicationUserIdentifier 对象重新颁发:
// existingIdentity represents the Communication Services identity that's stored during identity creation
CommunicationUserIdentifier identity = new CommunicationUserIdentifier(existingIdentity.getId());
AccessToken response = communicationIdentityClient.getToken(identity, scopes);
撤销访问令牌
你有时可能需要显式撤销访问令牌。 例如,当应用程序用户更改了自身用于向你的服务进行身份验证的密码时,你可能要执行此操作。 revokeTokens 方法使特定用户的所有活动访问令牌无效。 在下面的代码中,可以使用以前创建的用户。
communicationIdentityClient.revokeTokens(user);
System.out.println("\nSuccessfully revoked all access tokens for user identity with ID: " + user.getId());
删除标识
当你删除一个标识时,你将撤销所有活动的访问令牌并阻止进一步为该标识颁发访问令牌。 还会删除与该标识关联的所有持久内容。
communicationIdentityClient.deleteUser(user);
System.out.println("\nDeleted the user identity with ID: " + user.getId());
运行代码
转到包含 pom.xml 文件的目录,并使用以下 mvn 命令编译该项目:
mvn compile
然后生成包:
mvn package
运行以下 mvn 命令以执行应用:
mvn exec:java -Dexec.mainClass="com.communication.quickstart.App" -Dexec.cleanupDaemonThreads=false
应用的输出描述了每个已完成的操作:
Azure Communication Services - Access Tokens Quickstart

Created an identity with ID: 8:acs:4ccc92c8-9815-4422-bddc-ceea181dc774_00000006-19e0-2727-80f5-8b3a0d003502

Issued an access token with 'voip' scope that expires at 2022-10-11T07:34:29.902864800Z:
eyJhbGciOiJSUzI1NiIsImtpZCI6IjEwNiIsIng1dCI6Im9QMWFxQnlfR3hZU3pSaXhuQ25zdE5PU2p2cyIsInR5cCI6IkpXVCJ9.eyJza3lwZWlkIjoiYWNzOjAwMDAwMDAwLTAwMDAtMDAwMC0wMDAwLTAwMDAwMDAwMDAwMF8wMDAwMDAwMC0wMDAwLTAwMDAtMDAwMC0wMDAwMDAwMDAwMDAiLCJzY3AiOjE3OTIsImNzaSI6IjE2NjUzODcyNjkiLCJleHAiOjE2NjUzOTA4NjksImFjc1Njb3BlIjoidm9pcCIsInJlc291cmNlSWQiOiIwMDAwMDAwMC0wMDAwLTAwMDAtMDAwMC0wMDAwMDAwMDAwMDAiLCJyZXNvdXJjZUxvY2F0aW9uIjoidW5pdGVkc3RhdGVzIiwiaWF0IjoxNjY1Mzg3MjY5fQ.kTXpQQtY7w6O82kByljZXrKtBvNNOleDE5m06LapzLeoWfRZCCpJQcDzBoLRA146mOhNzLZ0b5WMNTa5tD-0hWCiicDwgKLMASEGY9g0EvNQOidPff47g2hh6yqi9PKiDPp-t5siBMYqA6Nh6CQ-Oeh-35vcRW09VfcqFN38IgSSzJ7QkqBiY_QtfXz-iaj81Td0287KO4U1y2LJIGiyJLWC567F7A_p1sl6NmPKUmvmwM47tyCcQ1r_lfkRdeyDmcrGgY6yyI3XJZQbpxyt2DZqOTSVPB4PuRl7iyXxvppEa4Uo_y_BdMOOWFe6YTRB5O5lhI8m7Tf0LifisxX2sw

Created an identity with ID: 8:acs:4ccc92c8-9815-4422-bddc-ceea181dc774_00000006-1ce9-31b4-54b7-a43a0d006a52

Issued an access token with 'chat' scope that expires at 2022-10-11T07:34:29.902864800Z:
eyJhbGciOiJSUzI1NiIsImtpZCI6IjEwNiIsIng1dCI6Im9QMWFxQnlfR3hZU3pSaXhuQ25zdE5PU2p2cyIsInR5cCI6IkpXVCJ9.eyJza3lwZWlkIjoiYWNzOjAwMDAwMDAwLTAwMDAtMDAwMC0wMDAwLTAwMDAwMDAwMDAwMF8wMDAwMDAwMC0wMDAwLTAwMDAtMDAwMC0wMDAwMDAwMDAwMDAiLCJzY3AiOjE3OTIsImNzaSI6IjE2NjUzODcyNjkiLCJleHAiOjE2NjUzOTA4NjksImFjc1Njb3BlIjoidm9pcCIsInJlc291cmNlSWQiOiIwMDAwMDAwMC0wMDAwLTAwMDAtMDAwMC0wMDAwMDAwMDAwMDAiLCJyZXNvdXJjZUxvY2F0aW9uIjoidW5pdGVkc3RhdGVzIiwiaWF0IjoxNjY1Mzg3MjY5fQ.kTXpQQtY7w6O82kByljZXrKtBvNNOleDE5m06LapzLeoWfRZCCpJQcDzBoLRA146mOhNzLZ0b5WMNTa5tD-0hWCiicDwgKLMASEGY9g0EvNQOidPff47g2hh6yqi9PKiDPp-t5siBMYqA6Nh6CQ-Oeh-35vcRW09VfcqFN38IgSSzJ7QkqBiY_QtfXz-iaj81Td0287KO4U1y2LJIGiyJLWC567F7A_p1sl6NmPKUmvmwM47tyCcQ1r_lfkRdeyDmcrGgY6yyI3XJZQbpxyt2DZqOTSVPB4PuRl7iyXxvppEa4Uo_y_BdMOOWFe6YTRB5O5lhI8m7Tf0LifisxX2sw

Successfully revoked all access tokens for identity with ID: 8:acs:4ccc92c8-9815-4422-bddc-ceea181dc774_00000006-19e0-2727-80f5-8b3a0d003502

Deleted the identity with ID: 8:acs:4ccc92c8-9815-4422-bddc-ceea181dc774_00000006-19e0-2727-80f5-8b3a0d003502
先决条件
- 一个 Azure 通信服务资源
创建访问令牌
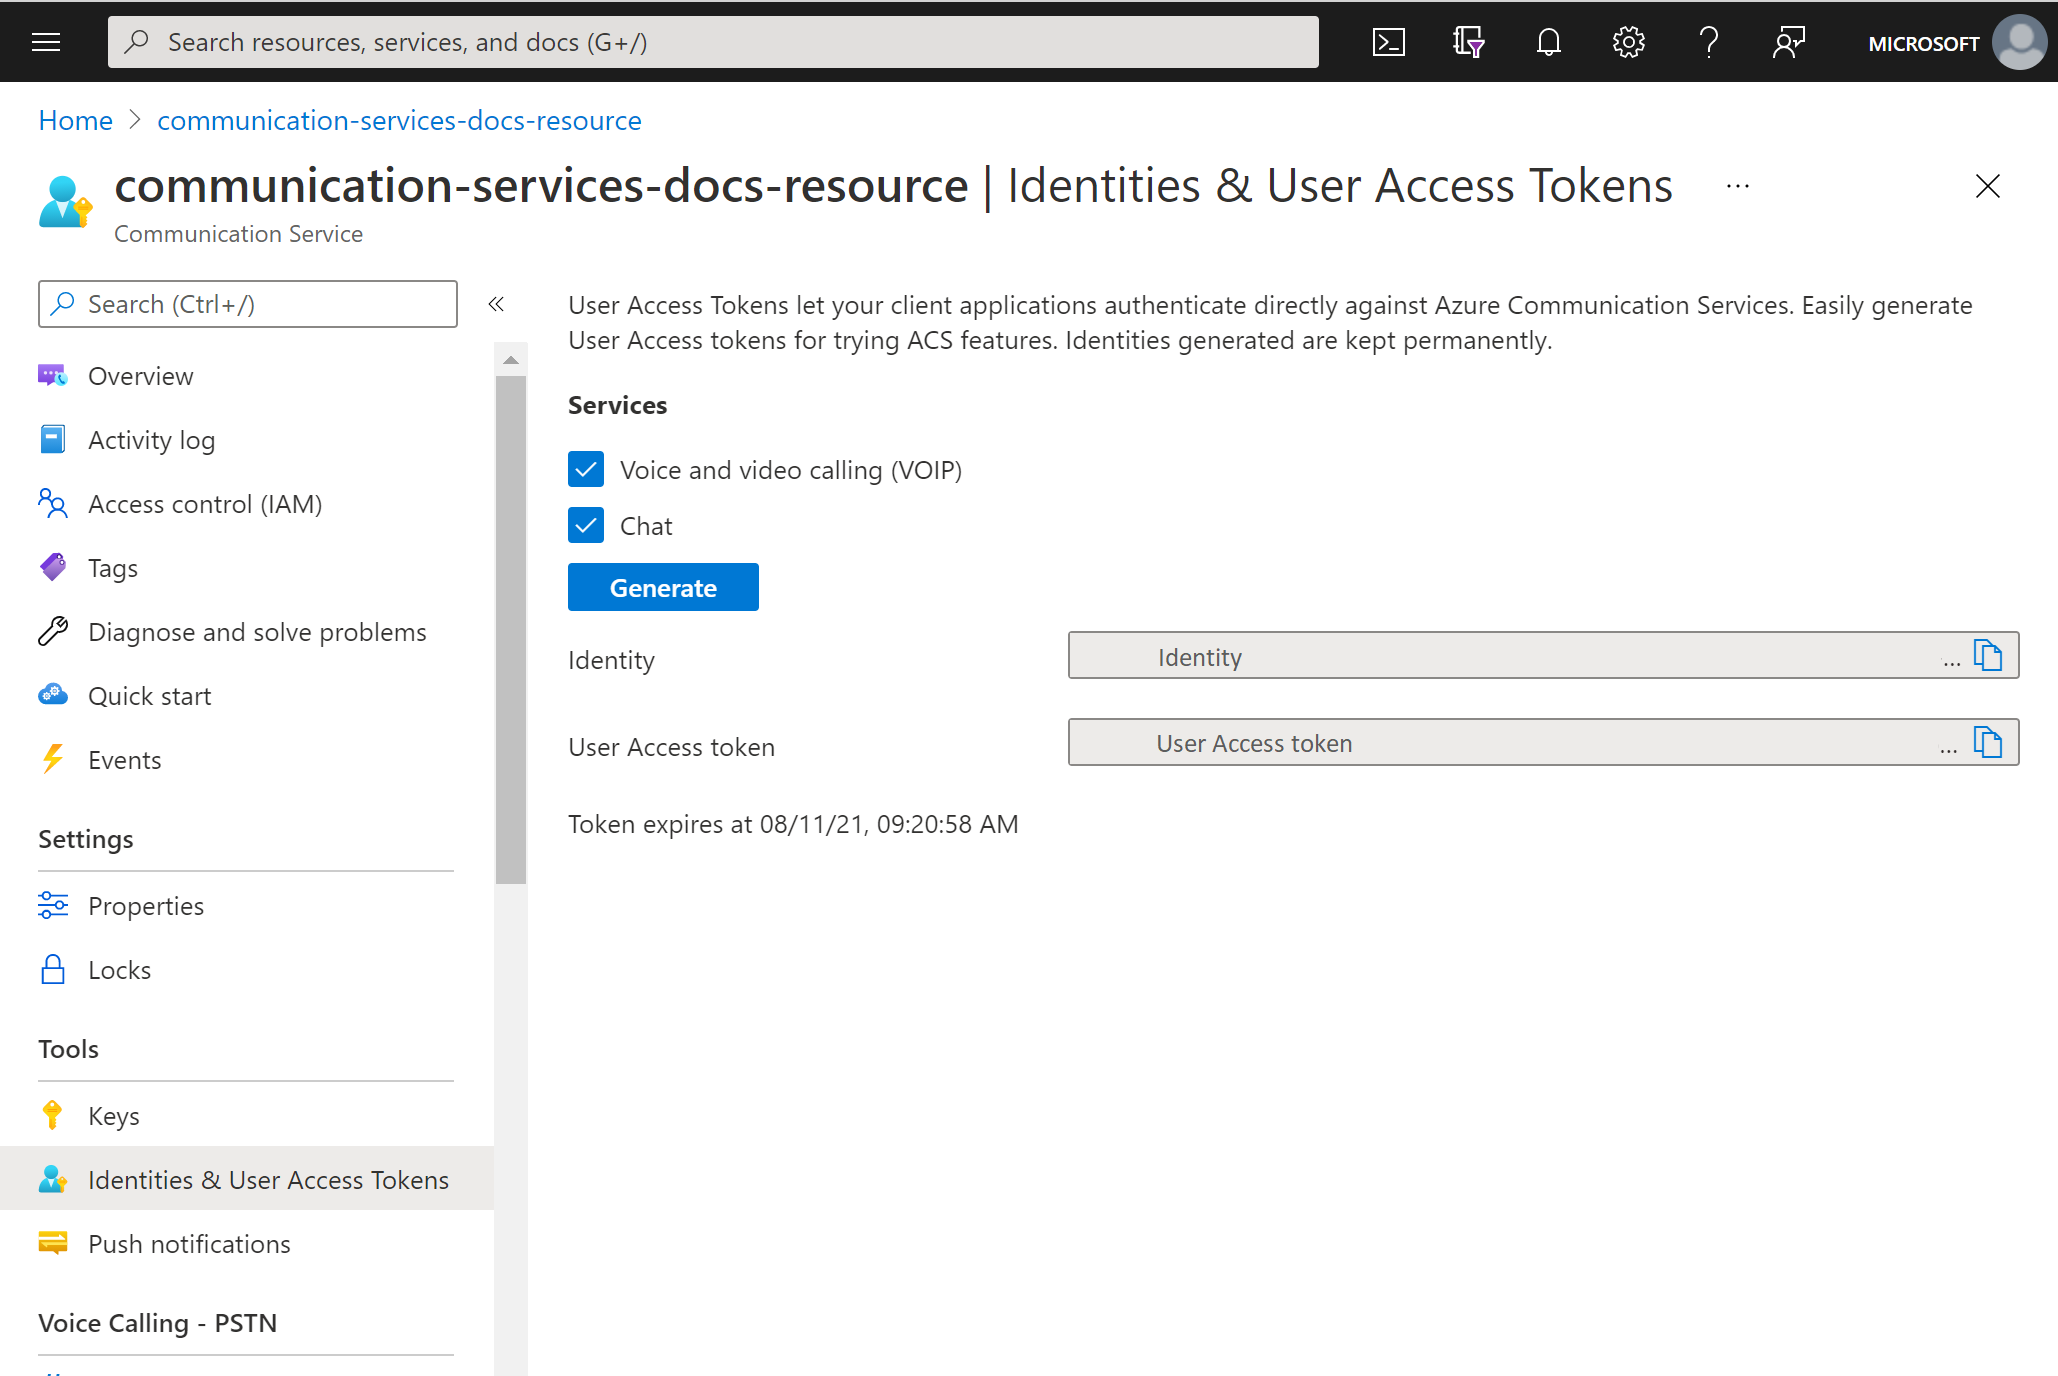
在 Azure 门户中,导航到通信服务资源中的“标识和用户访问令牌”。
选择访问令牌的作用域。 可全部不选,或选择一个、多个。 单击“生成” 。

你会看到生成的标识和对应的用户访问令牌。 可以复制这些字符串,将其用于示例应用和其他测试场景。
先决条件
具备有效订阅的 Azure 帐户,或免费创建一个 Azure 帐户。
有效的 Azure 通信服务资源,或创建一个通信服务资源。
有效的 Azure 逻辑应用资源(逻辑应用),或创建一个包含要使用的触发器的消耗型逻辑应用工作流。 目前,Azure 通信服务标识连接器仅提供操作,因此逻辑应用至少需要一个触发器。
创建用户
使用 Azure 通信服务标识连接器在工作流中添加新步骤,在 Power Automate 中按照这些步骤操作,并在编辑模式下打开 Power Automate 流。
在设计器中,在要添加新操作的步骤下,选择“新建步骤”。 或者,若要在步骤之间添加新操作,请将指针移到这些步骤之间的箭头上方,选择加号 (+),然后选择“添加操作”。
在“选择操作”搜索框中,输入通信服务标识。 从操作列表中,选择“创建用户”。

提供连接字符串。 这可以在 Microsoft Azure 中找到,位于 Azure 通信服务资源左侧菜单“密钥”选项上的“连接字符串”中

提供连接名称
单击“创建”
此操作将输出一个用户 ID,即通信服务用户标识。 此外,如果单击“显示高级选项”并选择令牌范围,该操作还将输出指定范围内的访问令牌及其到期时间。


颁发用户访问令牌
拥有通信服务标识后,可以使用“颁发用户访问令牌”操作来颁发访问令牌。 以下步骤将展示如何:
添加新操作并在搜索框中输入通信服务标识。 从操作列表中,选择“颁发用户访问令牌”。

然后,可以使用上一个创建用户步骤的用户 ID 输出。
指定令牌范围:VoIP 或聊天。 了解有关令牌和身份验证的详细信息。

这将在指定范围内输出访问令牌及其到期时间。
调用用户访问令牌
获得通信服务标识后,可以使用“颁发用户访问令牌”操作来撤销访问令牌。 以下步骤将展示如何:
添加新操作并在搜索框中输入通信服务标识。 从操作列表中,选择“撤销用户访问令牌”。

指定用户 ID

这将撤销指定用户的所有用户访问令牌,此操作没有输出。
删除用户
拥有通信服务标识后,可以使用“颁发用户访问令牌”操作删除访问令牌。 以下步骤将展示如何:
添加新操作并在搜索框中输入通信服务标识。 从操作列表中,选择“删除用户”。

指定用户 ID

这将删除用户并撤销指定用户的所有用户访问令牌,此操作没有输出。
测试逻辑应用
若要手动启动工作流,请在设计器工具栏中选择“运行”。 工作流应创建用户,为该用户颁发访问令牌,然后将其删除并删除该用户。 有关详细信息,请查看如何运行工作流。 可以在工作流成功运行后检查这些操作的输出。
使用标识来获取监视和指标数据
用户 ID 可充当主键,用于获取通过 Azure Monitor 收集的日志和指标。 例如,要查看特定用户所有通话的视图,则可以以将一个或多个特定 Azure 通信服务标识映射到单个用户的方式来设置身份验证。
详细了解身份验证概念,通过 Log Analytics 调用诊断,以及可用的指标。
清理资源
若要清理并删除通信服务订阅,请删除资源或资源组。 删除资源组时也会删除与之关联的任何其他资源: 有关详细信息,请参阅创建和管理通信服务资源的“清理资源”部分。
要清理逻辑应用工作流和相关资源,请参阅如何清理 Azure 逻辑应用资源。
后续步骤
在本快速入门中,你了解了如何使用 Azure 通信服务标识连接器创建用户、删除用户、向用户颁发访问令牌以及删除用户访问令牌。 要了解详细信息,请查看 Azure 通信服务标识连接器文档。
要了解其他连接器如何使用令牌,请查看如何使用 Azure 通信服务从 Power Automate 发送聊天消息。
要详细了解如何使用 Azure 通信服务电子邮件连接器发送电子邮件,请查看使用 Azure 通信服务在 Power Automate 中发送电子邮件。