你当前正在访问 Microsoft Azure Global Edition 技术文档网站。 如果需要访问由世纪互联运营的 Microsoft Azure 中国技术文档网站,请访问 https://docs.azure.cn。
使用 OpenShift Serverless 将应用程序部署到 Azure Red Hat OpenShift
在本文中,你将使用 OpenShift Serverless 将应用程序部署到 Azure Red Hat OpenShift 群集。 OpenShift Serverless 可帮助开发人员部署和运行应用程序,这些应用程序将按需纵向扩展或缩减到零。 这消除了不使用的资源消耗。
应用程序代码可以与适当的运行时一起打包在一个容器中。 无服务器功能将在事件触发应用程序容器时启动它们。 可以通过各种事件触发应用程序:自己的应用程序、多个云服务提供商、服务型软件 (SaaS) 系统和其他服务。
可以使用内置的 OpenShift 接口功能来管理无服务器容器部署的所有方面。 开发人员可以直观地识别推动容器化应用程序启动的事件。 还可以通过多种方式修改事件参数。 OpenShift Serverless 应用程序可与其他 OpenShift 服务(如 OpenShift 管道、服务网格和监视)集成。 这提供了完整的无服务器应用程序开发和部署体验。
开始之前
创建群集
按照教程创建 Azure Red Hat OpenShift 群集操作 如果选择在本地安装并使用命令行接口 (CLI),本教程要求使用 Azure CLI 2.6.0 或更高版本。 运行 az --version 即可查找当前版本。 如果需要进行安装或升级,请参阅安装 Azure CLI。
连接到群集
若要管理 Azure Red Hat OpenShift 群集,需要使用 oc(OpenShift 命令行客户端)。
注意
建议在 Azure Cloud Shell 上安装 OpenShift 命令行,并使用它来执行本文中的所有命令行操作。 从 shell.azure.com 或通过选择以下链接来打开 shell:

按照教程操作,使用 Web 控制台和 OpenShift CLI 安装 CLI、检索群集凭据并连接到群集。
登录后,应会显示一条消息,指示你正在使用 default 项目。
Login successful.

You have access to 61 projects, the list has been suppressed. You can list all projects with 'oc projects'

Using project "default".
安装 Knative 命令行接口 (kn)
从 https://github.com/knative/client/releases/ 下载适用于计算机的命令行接口的最新版本
如果在 Azure Cloud Shell 上运行这些命令,请下载适用于 Linux 的最新 Knative CLI。
cd ~
wget https://github.com/knative/client/releases/download/v0.22.0/kn-linux-amd64

mkdir knative
chmod +x kn-linux-amd64
mv kn-linux-amd64 knative/kn
echo 'export PATH=$PATH:~/knative' >> ~/.bashrc && source ~/.bashrc
打开 OpenShift Web 控制台
通过运行以下脚本查找群集 Web 控制台 URL:
 az aro show \
    --name <cluster name> \
    --resource-group <resource group> \
    --query "consoleProfile.url" -o tsv
应会得到类似于下面的 URL。
https://console-openshift-console.apps.wzy5hg7x.eastus.aroapp.io/
打开 Web 浏览器并打开控制台 URL。 使用 kubeadmin 凭据登录。

安装 OpenShift Serverless 操作器
登录到 OpenShift Web 控制台时,请确认你处于“管理员”视图中。 打开“操作器中心”,然后选择“OpenShift Serverless”操作器。
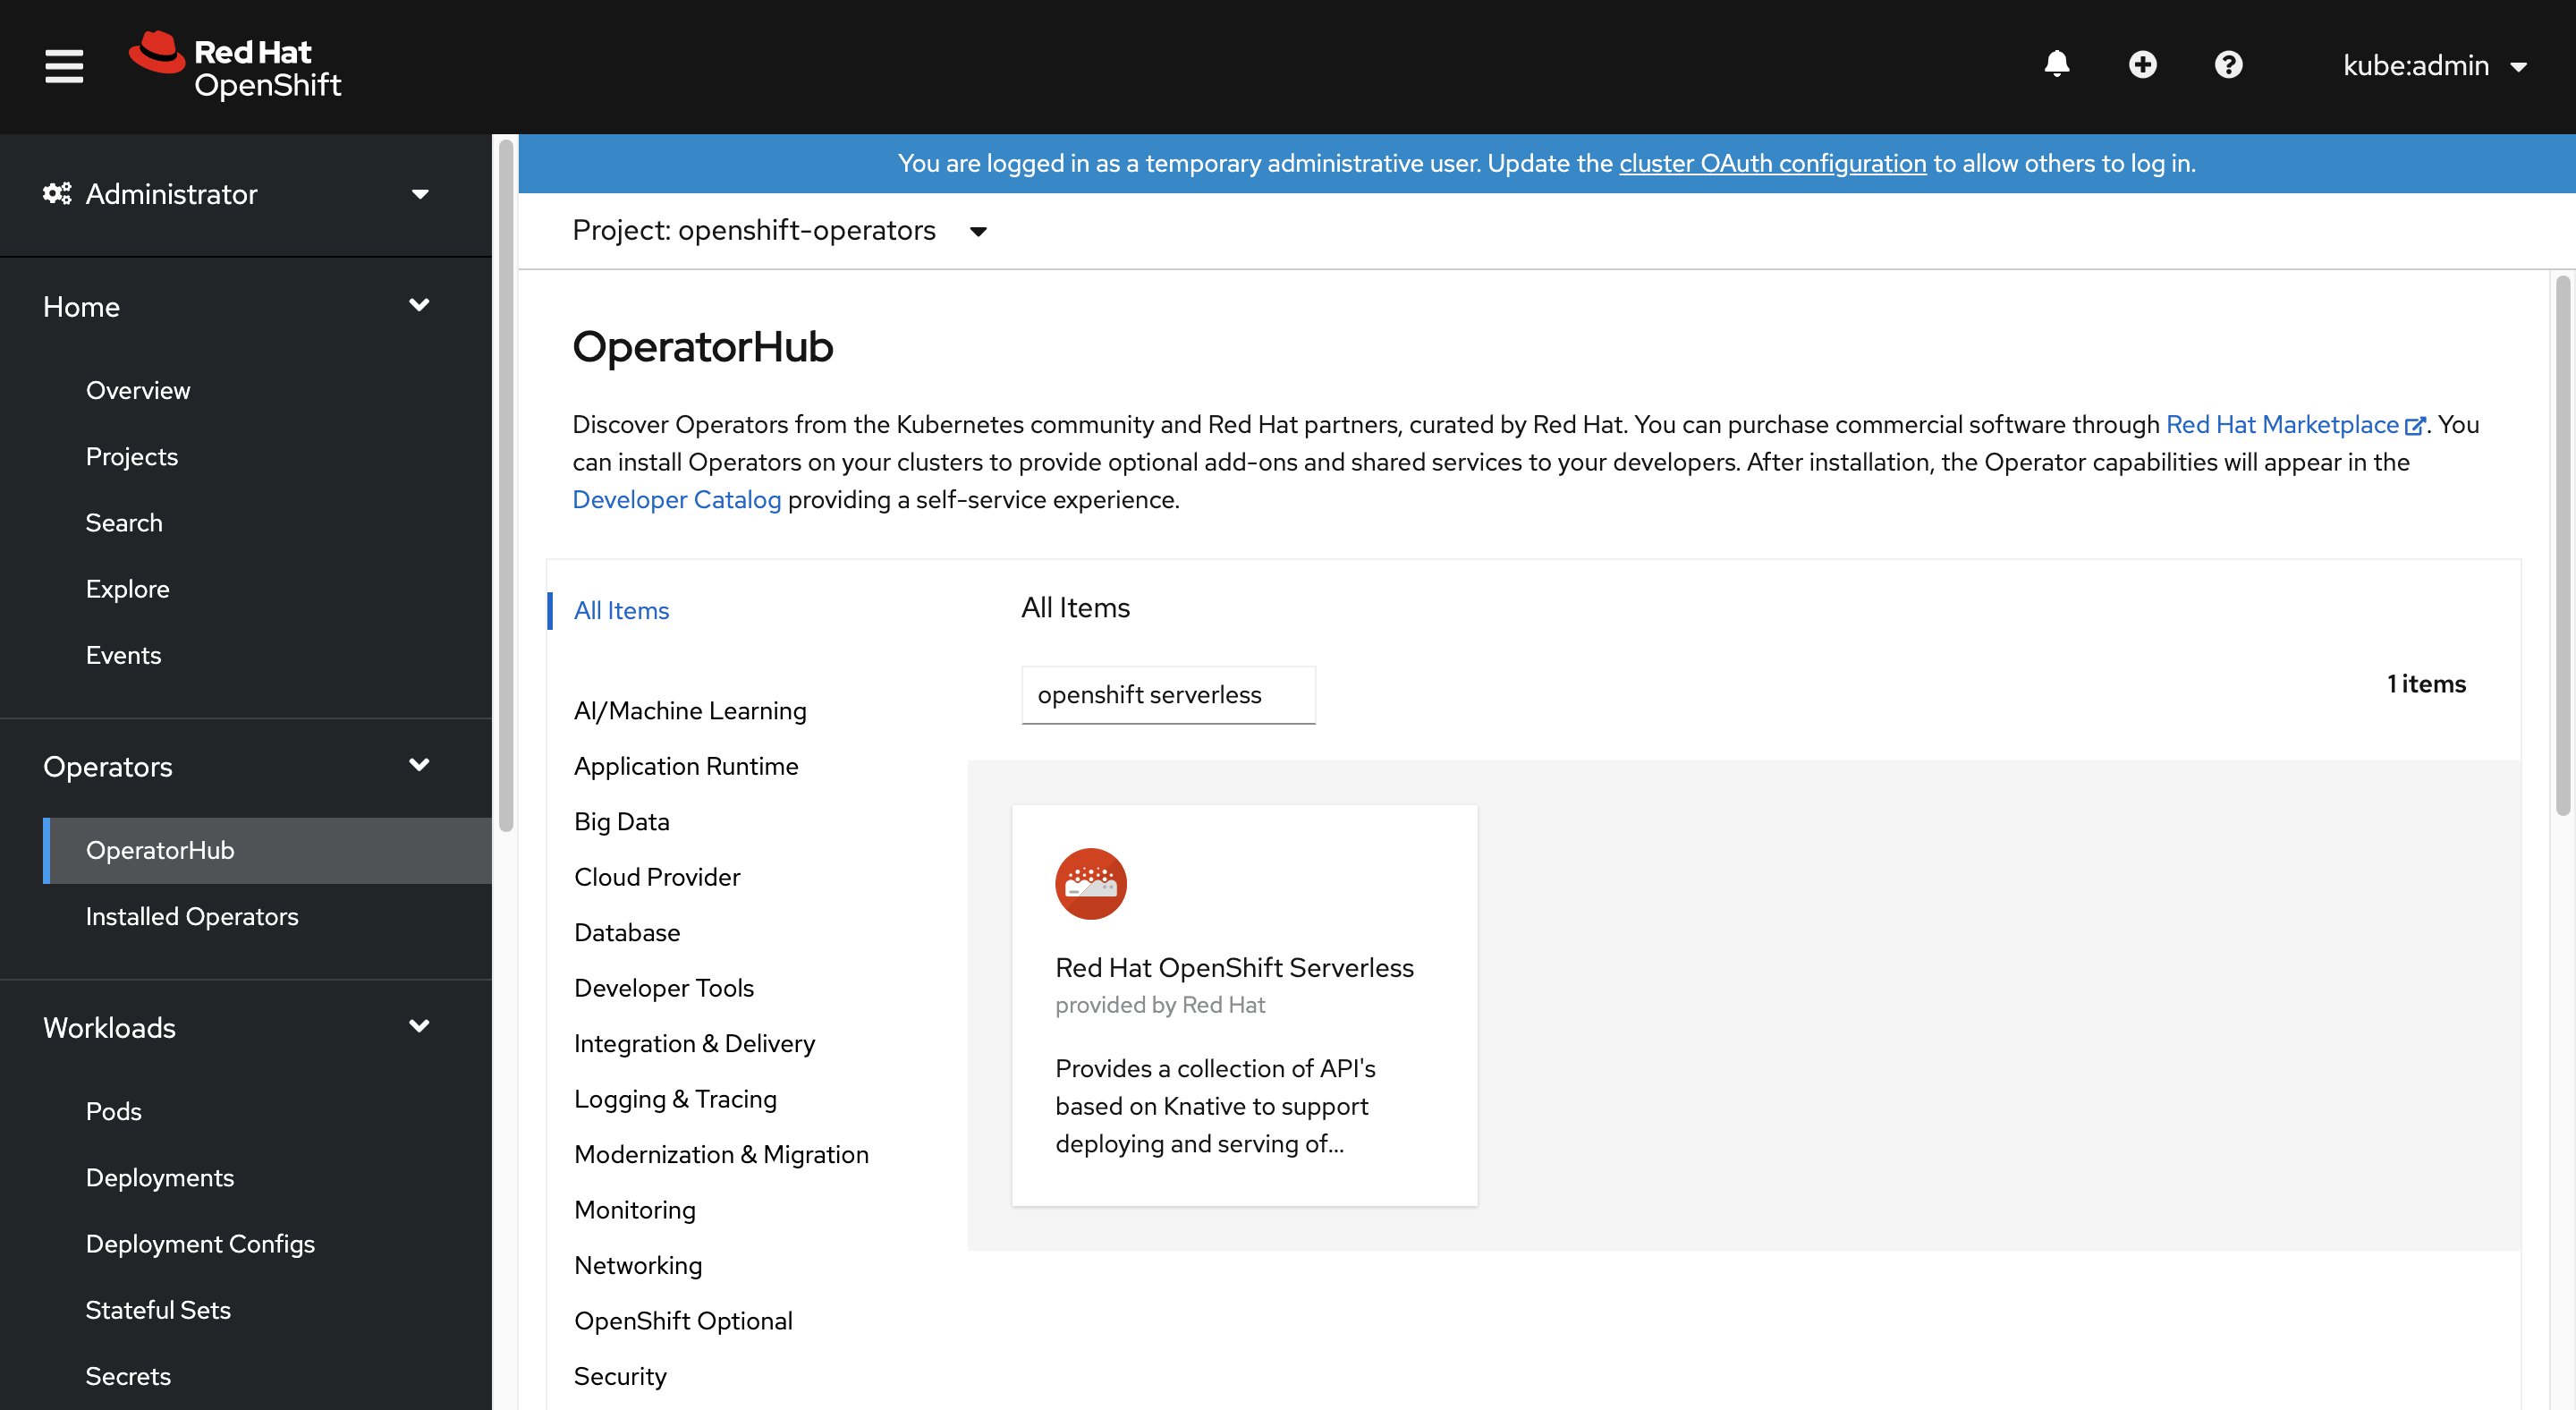
接下来,通过选择“安装”来打开操作器安装页。

为你的 Azure Red Hat OpenShift 群集版本选择适当的更新通道,并将操作器安装到 openshift-serverless 命名空间中。 向下滚动并选择“安装”。

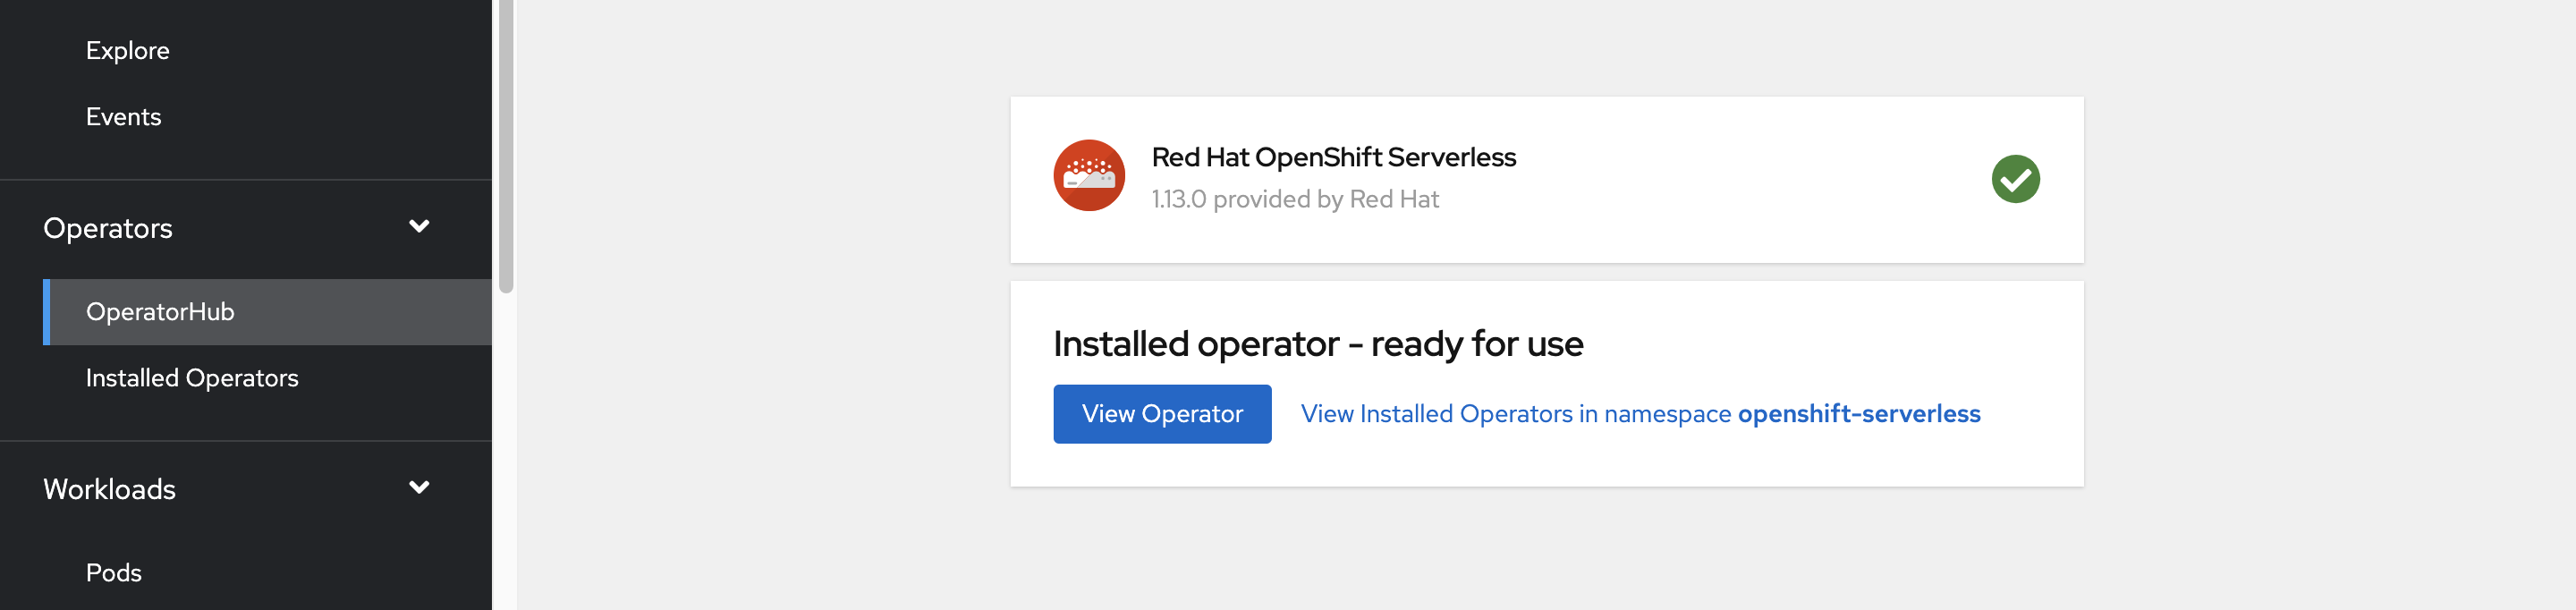
几分钟后,状态页应反映操作器已安装并可供使用。 选择“查看操作器”按钮以继续。
安装 Knative Serving
使用上游 Knative 可以选择在 OpenShift Serverless 上以无服务器方式运行容器。 Knative 扩展 Kubernetes,以提供一组通过无服务器方法部署、运行和管理新式应用程序的组件。
创建 Knative Serving 的实例
在窗口左上角的“项目”列表中选择 knative-server。 然后在“提供的 API”窗格中,选择“Knative 服务”卡内的“创建实例”。

在“创建 Knative 服务”页上,保留所有默认值。 向下滚动并选择“创建”按钮。

当“状态”列显示“就绪”时,将安装 OpenShift Serverless。 现在,你已准备好创建 OpenShift Serverless 项目。

创建无服务器项目
若要创建名为 demoserverless 的新项目,请运行以下命令:
oc new-project demoserverless
输出应如下所示:
Now using project "demoserverless" on server "https://api.wzy5hg7x.eastus.aroapp.io:6443".

You can add applications to this project with the 'new-app' command. For example, build a new example application in Python with the following:

    oc new-app django-psql-example

Or use kubectl to deploy a simple Kubernetes application:

    kubectl create deployment hello-node --image=gcr.io/hello-minikube-zero-install/hello-node
让我们从“管理员”视图切换到“开发人员”视图。 转到左侧菜单中的项目列表,然后选择 demoserverless。 现在位于该项目的“拓扑”页。
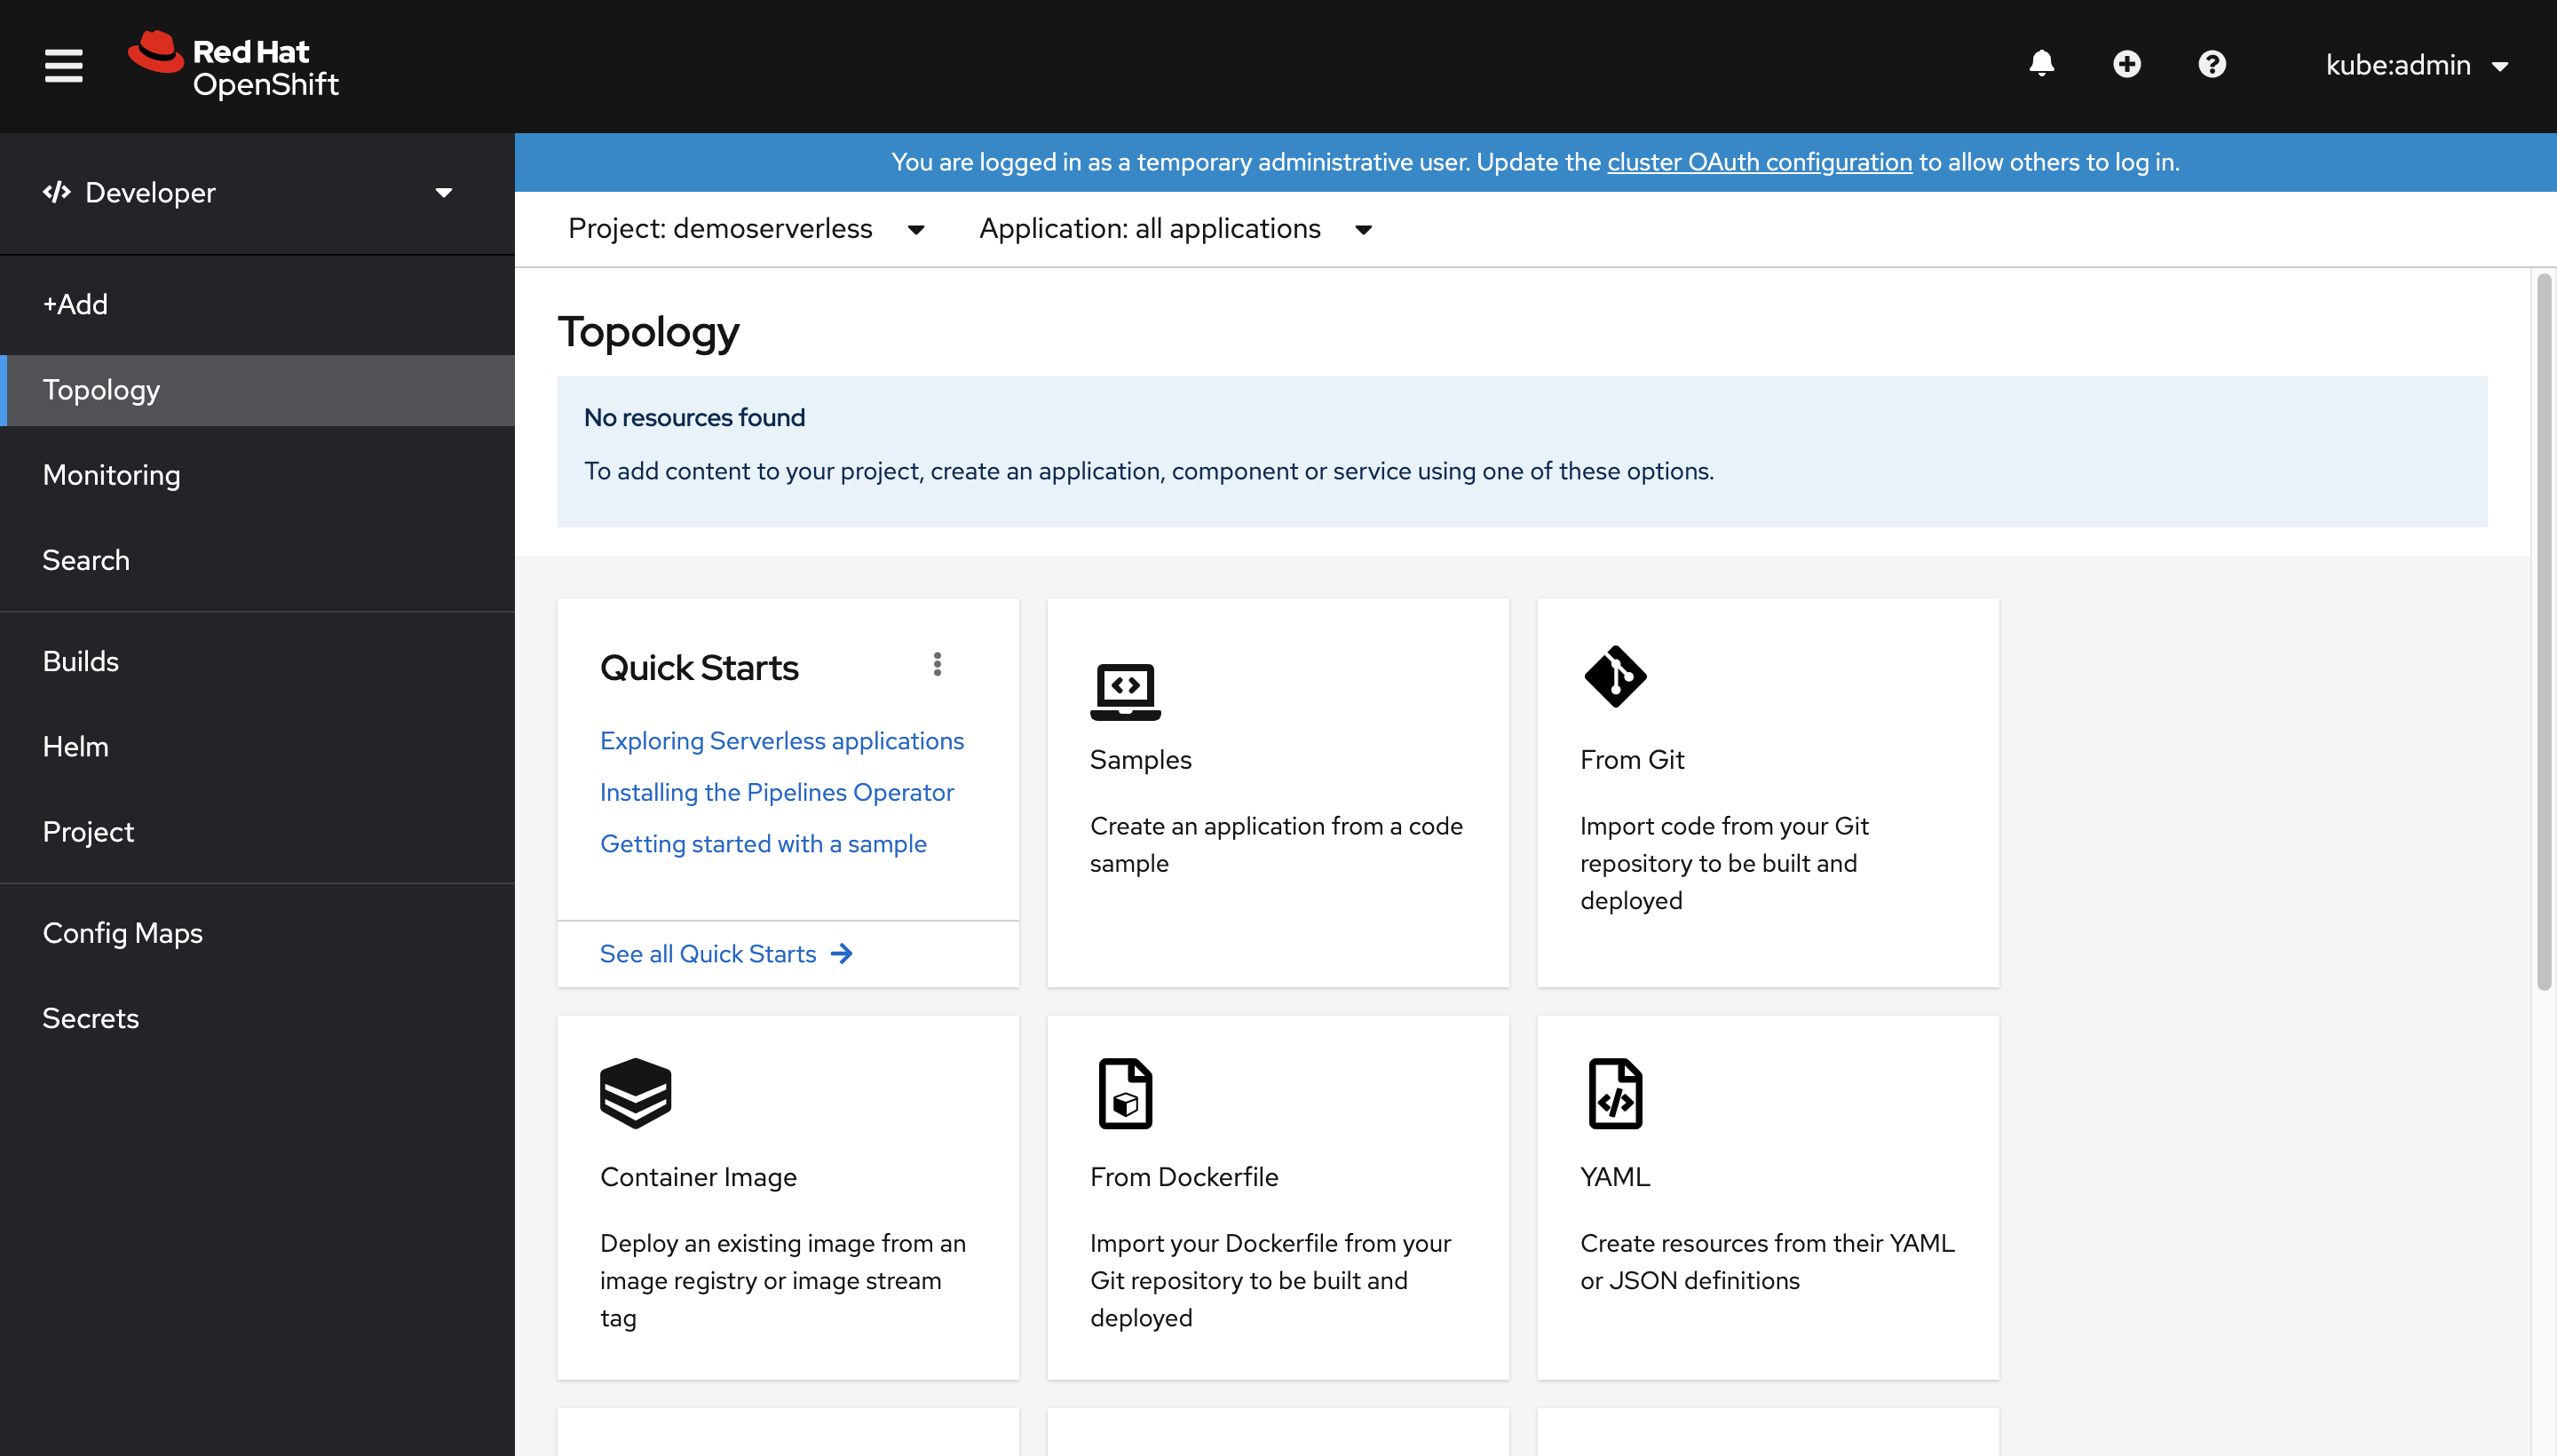
使用 Web 控制台进行部署
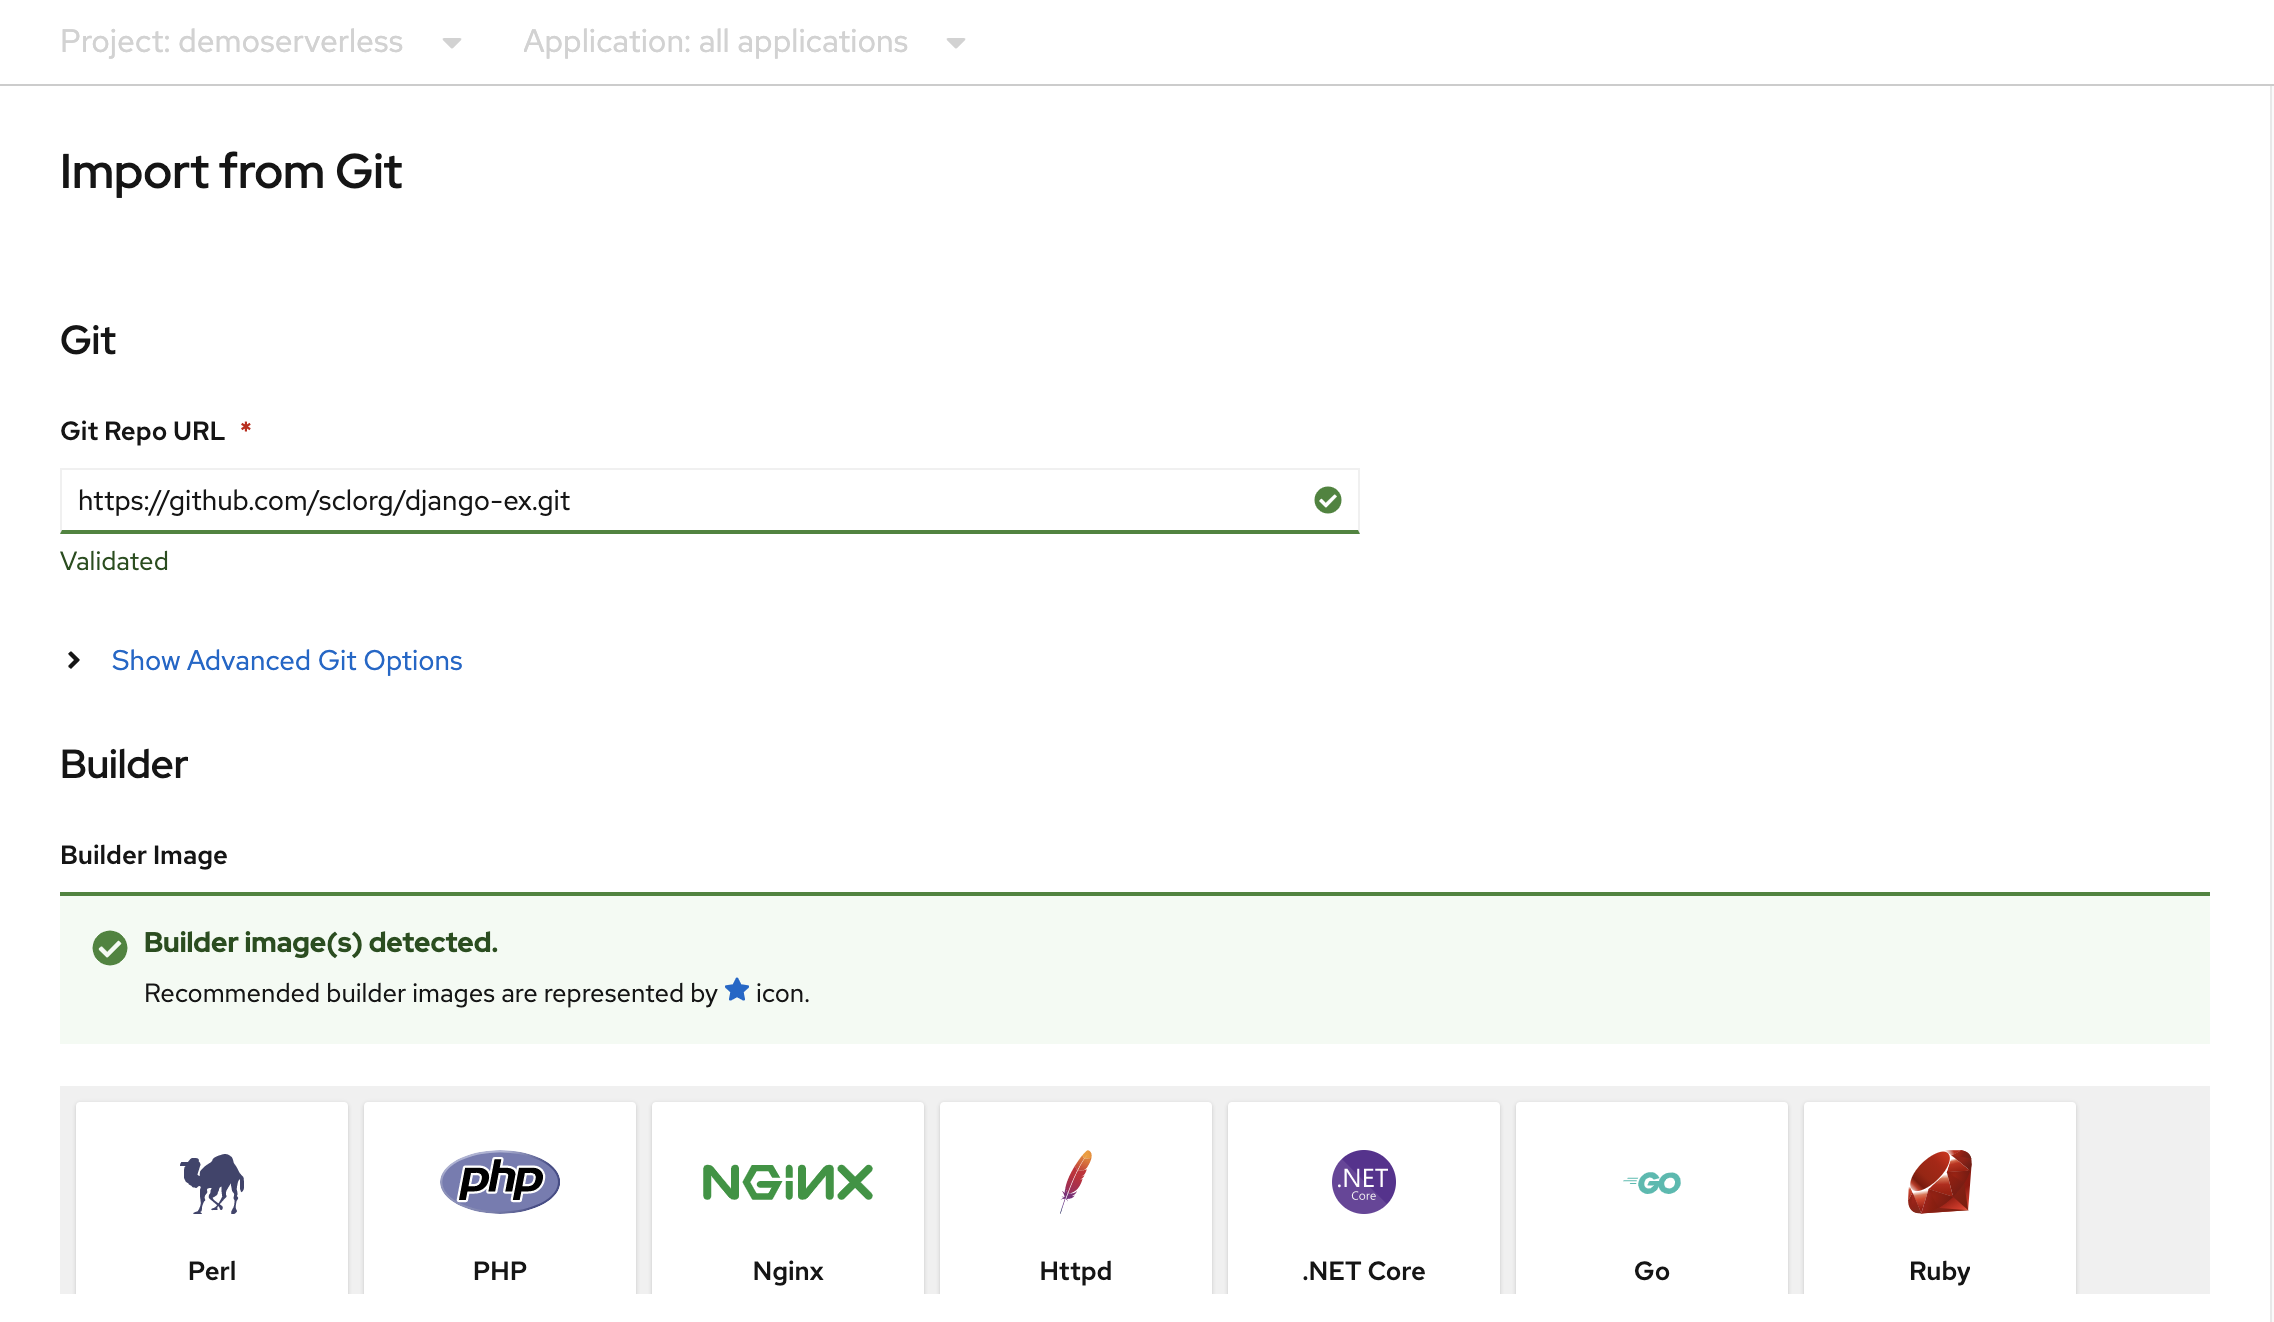
在“拓扑”页上,选择“从 Git”。 在“从 Git 导入”页上,将 https://github.com/sclorg/django-ex.git 用作“Git 存储库 URL”。 示例 Web 应用程序是使用 Python 编程语言实现的。
注意
OpenShift 检测到这是一个 Python 项目,并选择适当的生成器映像。
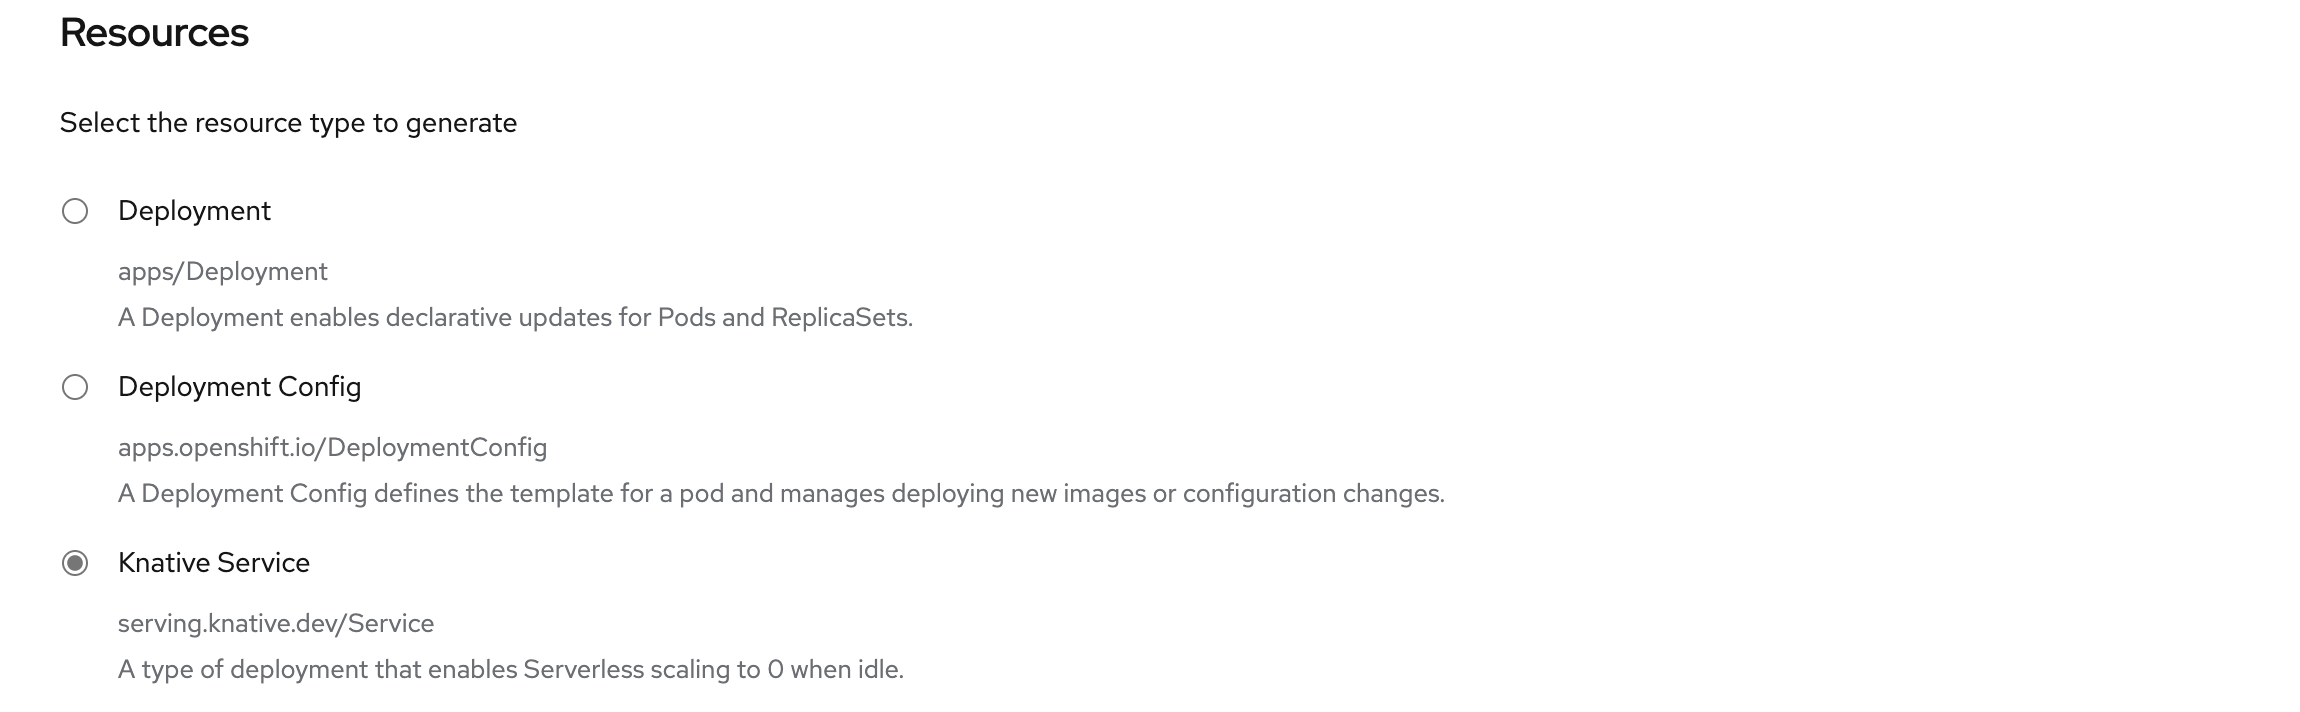
滚动到“资源”,并确认选择“Knative 服务”作为要生成的资源类型。 此操作会创建 Knative 服务,这是使 OpenShift Serverless 在空闲时可以缩减到零的部署类型。
在页面底部,选择“创建”。 这会创建资源来管理应用程序的生成和部署。 然后将重定向到项目的拓扑概述。
拓扑概述提供已部署的应用程序的直观表示形式。 可以看到应用程序整体结构。
等待生成完成。 可能需要几分钟时间。 生成完成后,服务左下角会出现一个绿色复选标记。

查看应用程序规模
在拓扑视图顶部的“显示选项”列表中,选择“Pod 计数”。 等待 Pod 计数纵向缩减到零个 Pod。 纵向缩减可能需要几分钟时间。
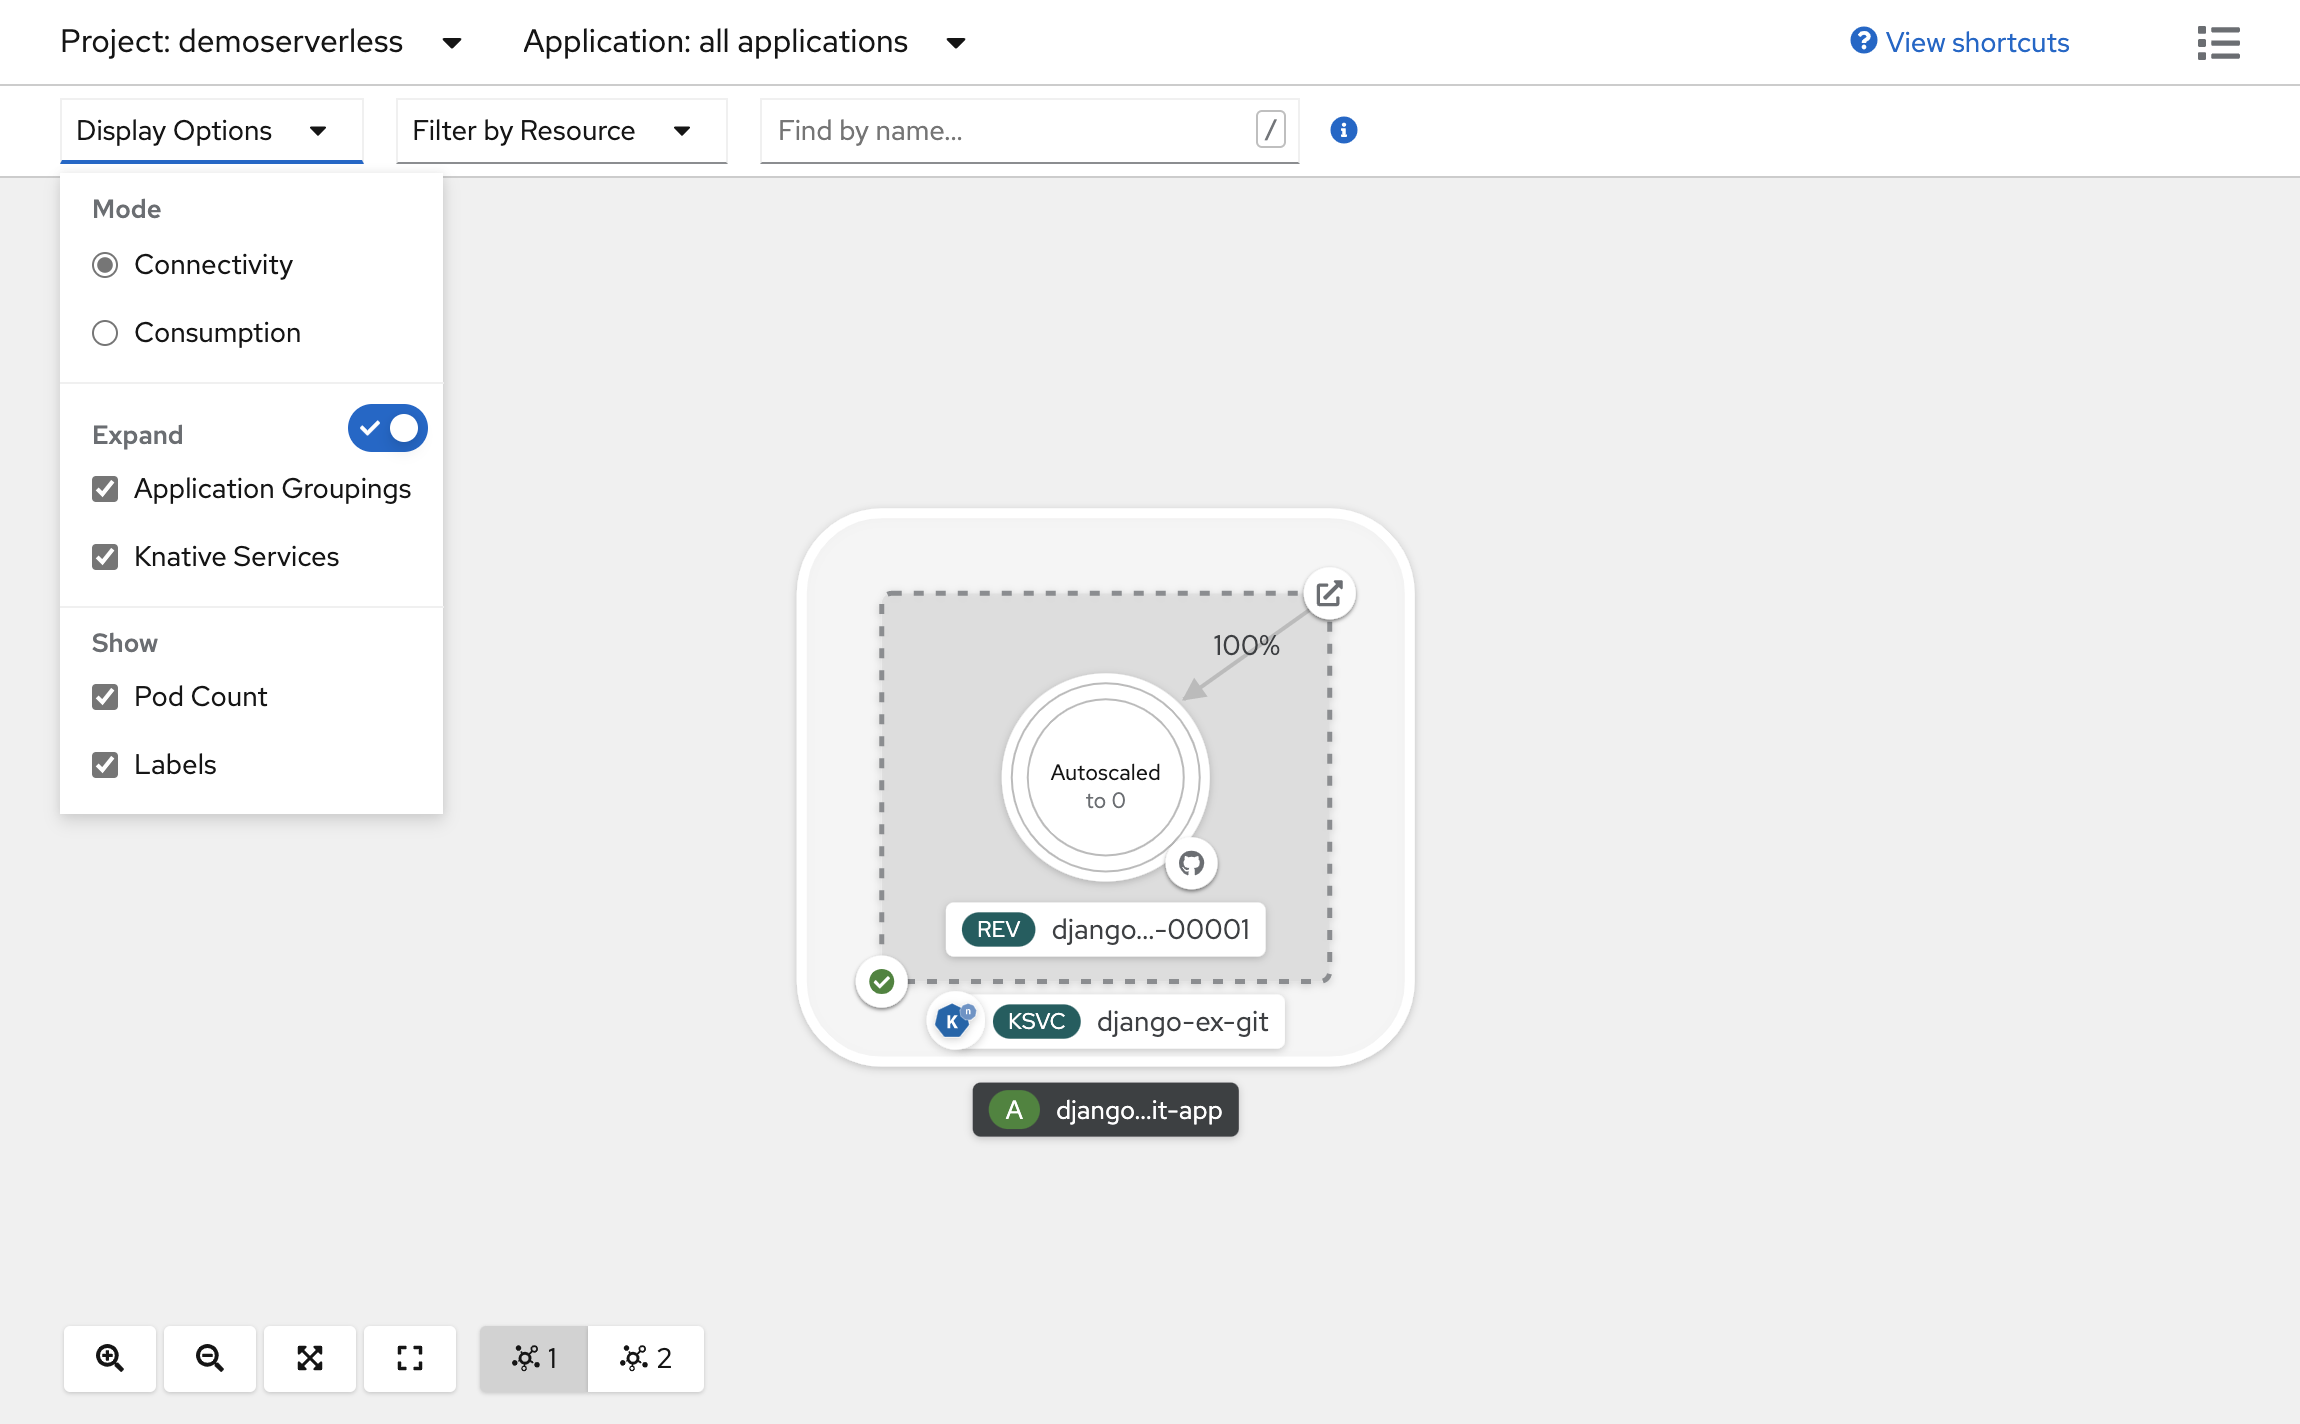
在 Knative 服务面板的右上角,选择“打开 URL”图标。 应用程序会在新浏览器选项卡中打开。关闭该选项卡并返回到拓扑视图。 在此处可以看到应用程序已纵向扩展到一个 Pod,用于容纳你的请求。 几分钟后,应用程序会重新向下缩减到零个 Pod。

强制新修订版本和设置流量分布
Knative 服务允许进行流量映射,这意味着可以将服务的修订版本映射到流量的已分配部分。 每次更新服务配置时,都会创建一个新修订版本。 然后,默认情况下服务路由会将所有流量指向最新的就绪修订版本。 可以通过定义获取部分流量的修订版本来更改此行为。 流量映射还提供了为各个修订版本创建唯一 URL 的选项。
在创建的拓扑中,选择服务中显示的修订版本以查看其详细信息。 Pod 圈下以及详细信息面板顶部的徽章应该是 (REV)。 在侧面板的“资源”选项卡中,向下滚动并选择与服务关联的配置。

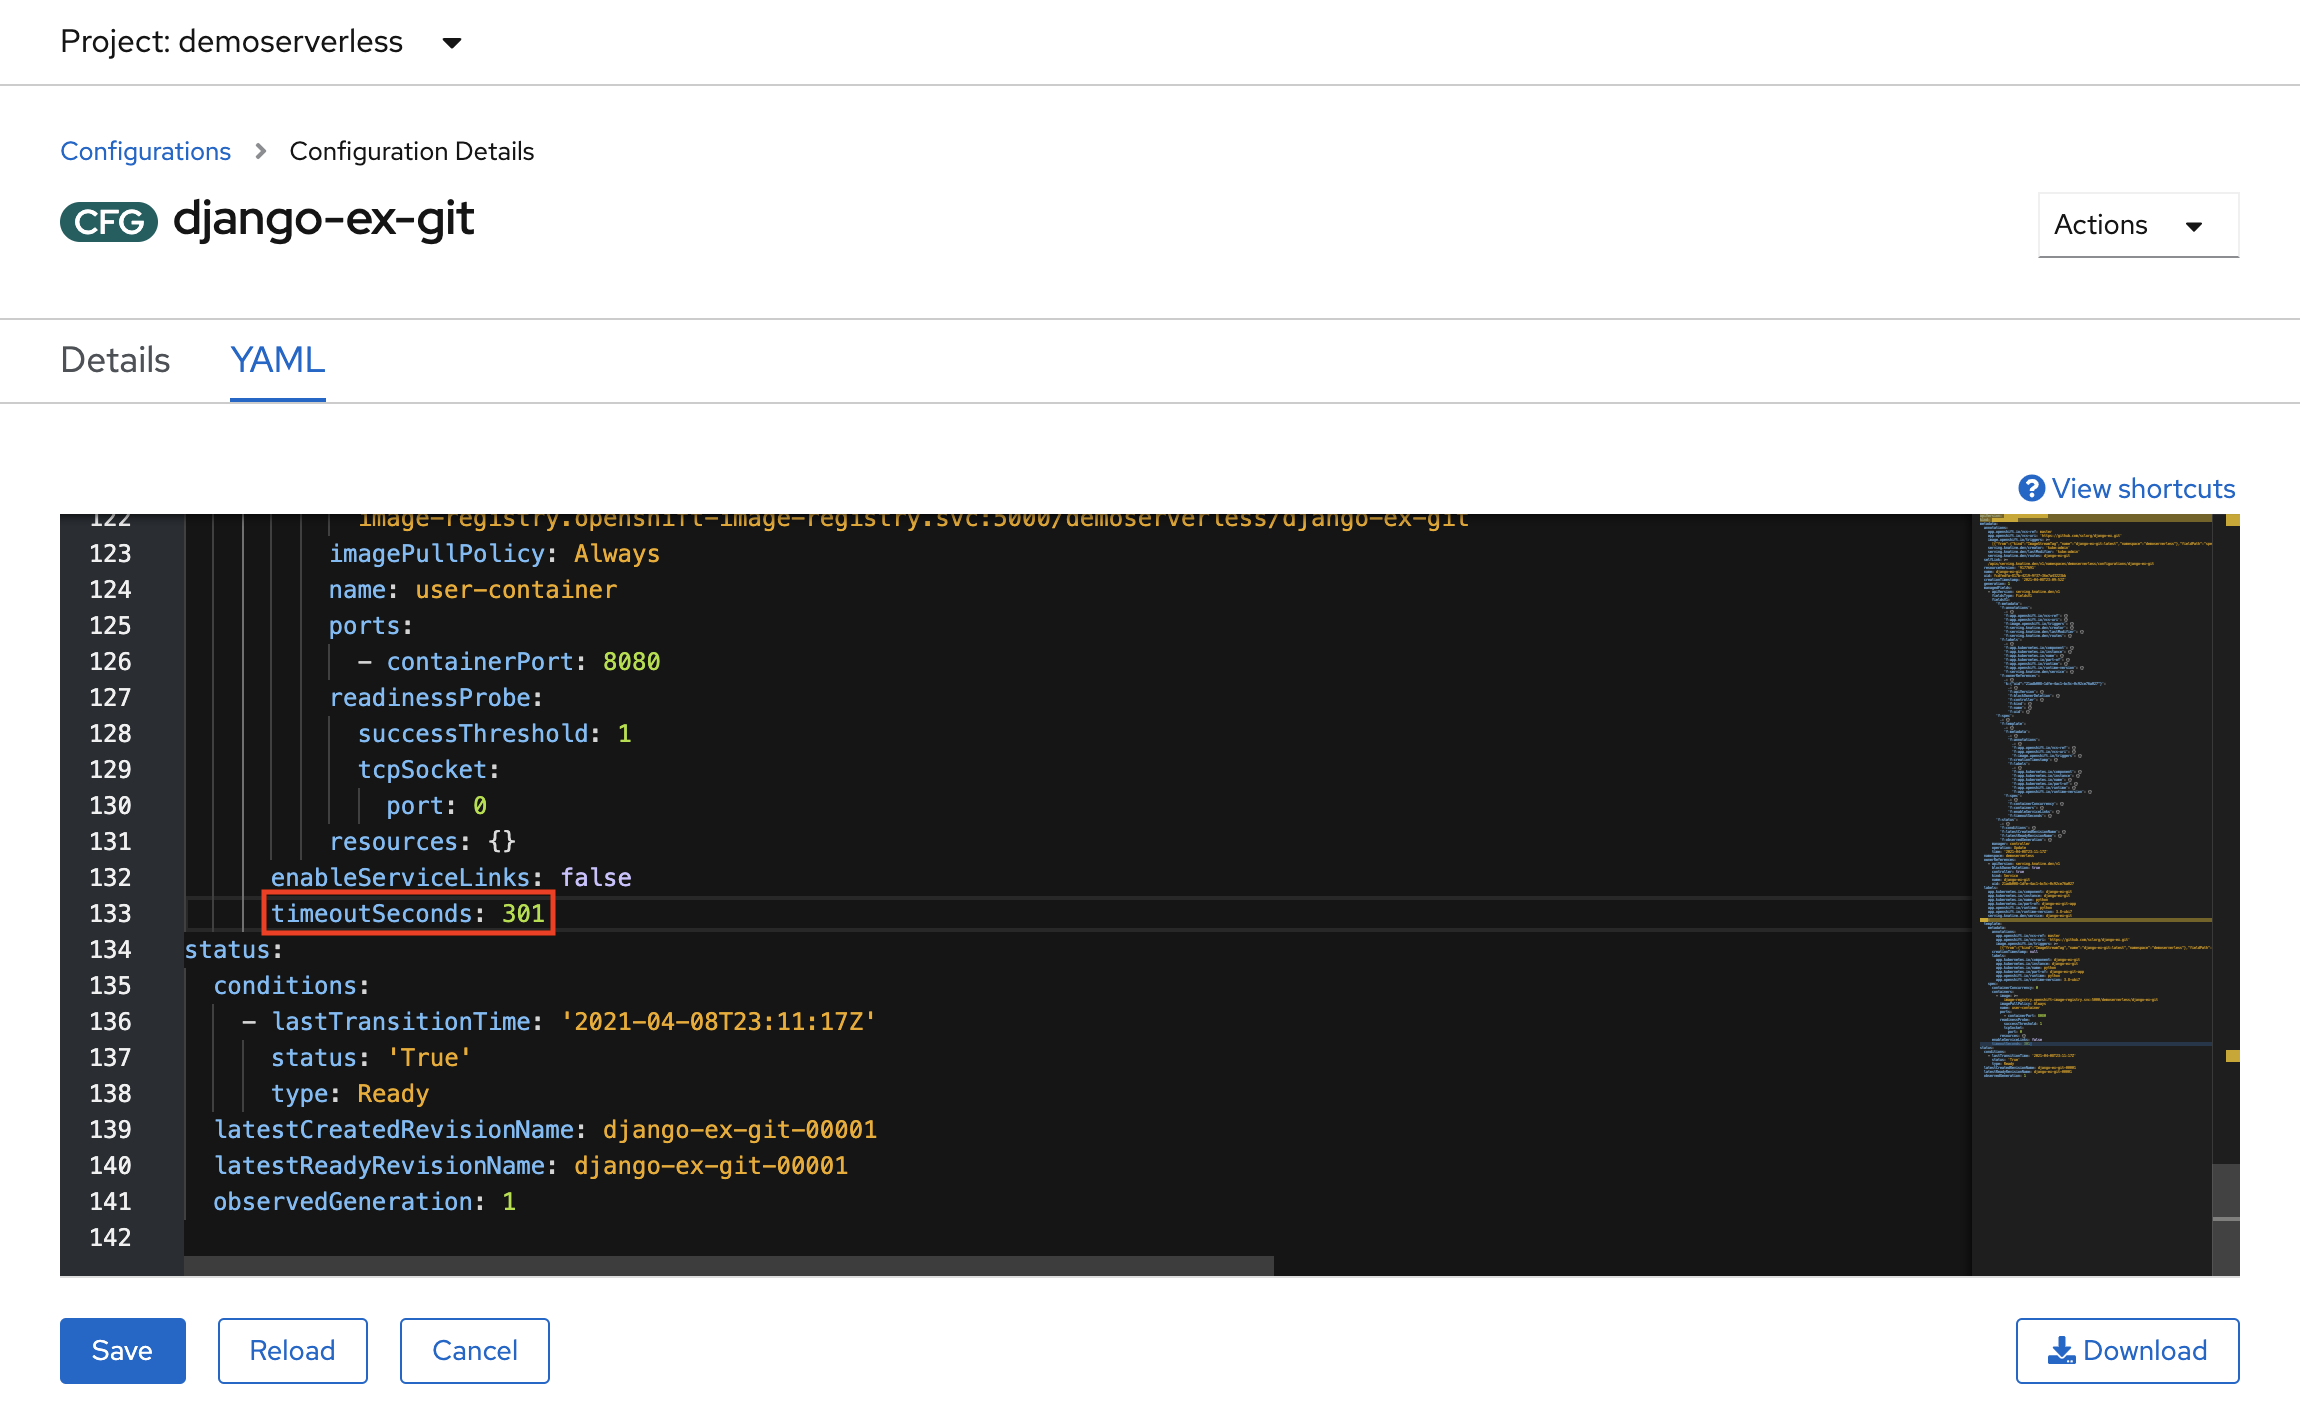
通过切换到“YAML”选项卡并向下滚动以编辑 timeoutSeconds 的值,从而强制进行配置更新。 将值更改为 301。 选择“保存”。 在实际方案中,也可以通过更新容器映像标记来触发配置更新。
返回“拓扑”视图,你会看到已部署了新的修订版本。 选择以锁屏提醒 (KSVC) 结尾的服务,然后选择“设置流量分配”按钮。 现在应该能够在服务中的修订版本之间划分流量。
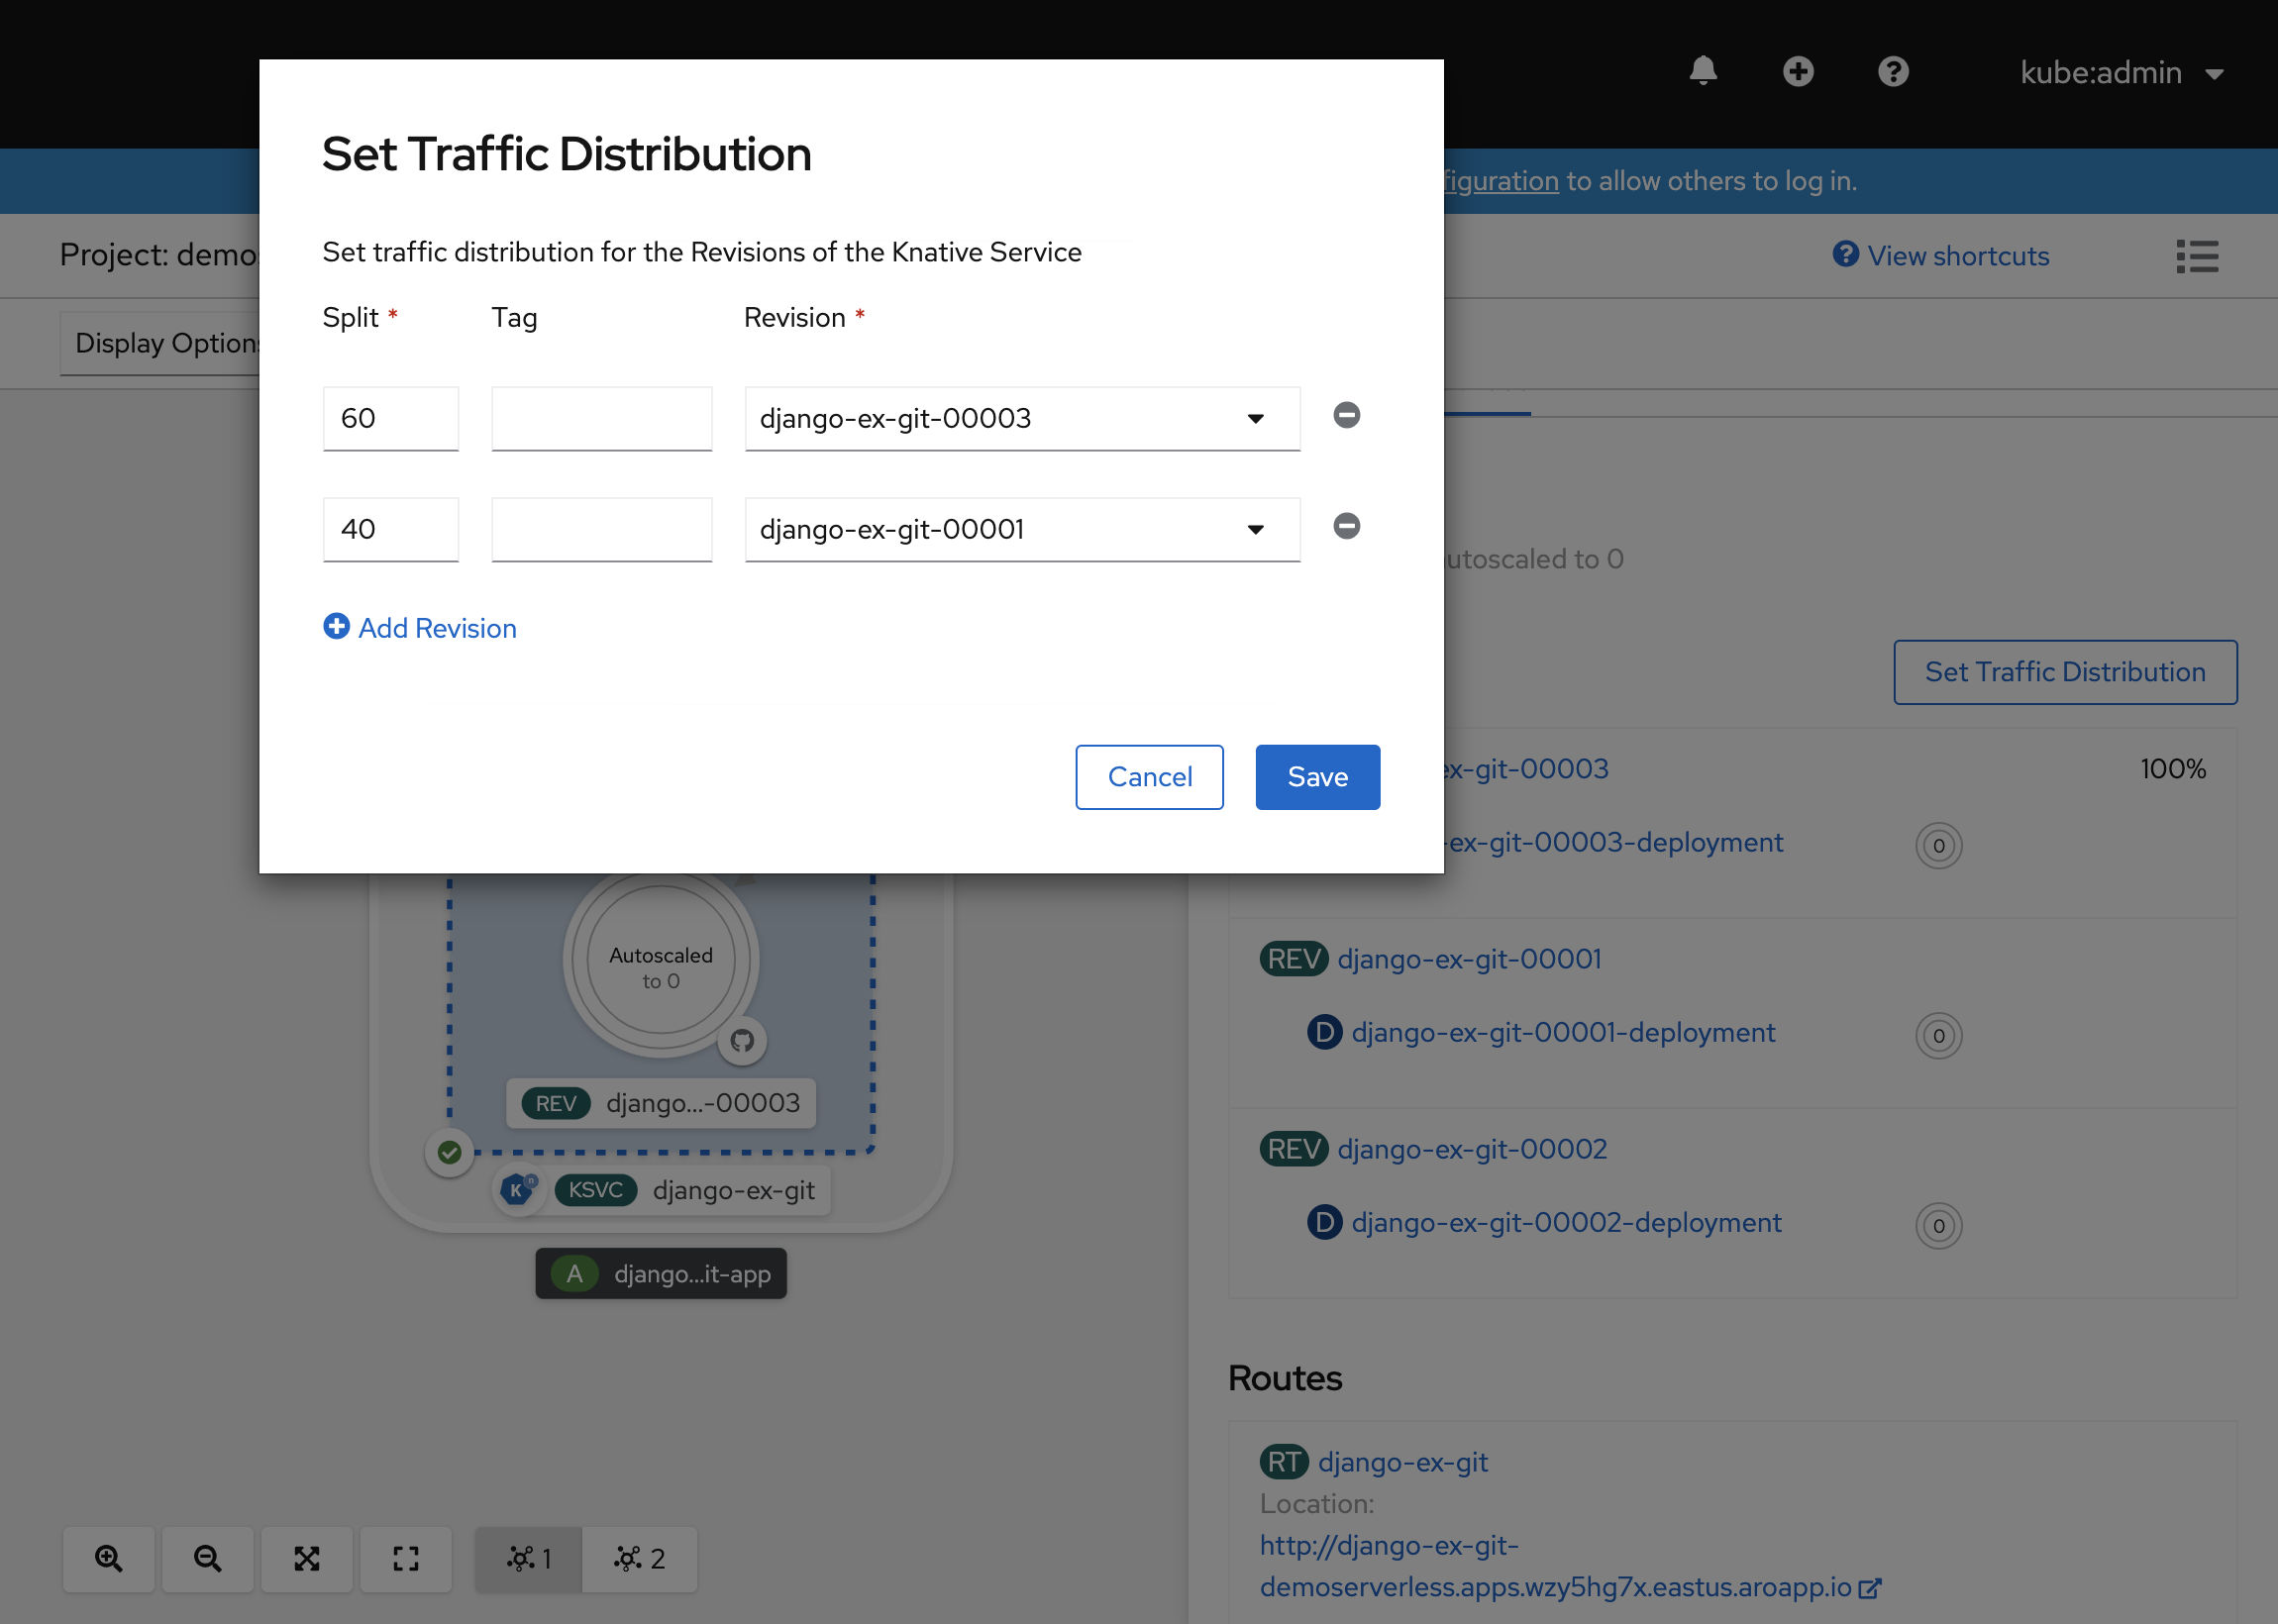
“拓扑”视图现在会显示在修订版本之间分配流量的方式。

使用 Knative 命令行接口 (kn)
在前面的步骤中,已使用 OpenShift Web 控制台创建应用程序并将其部署到 OpenShift Serverless。 由于 OpenShift Serverless 在下面运行 Knative,因此还可以使用 Knative 命令行接口 (kn) 创建 Knative 服务。
注意
如果尚未安装 kn CLI,请确保按照本文先决条件部分中的步骤进行操作。 此外,请确保已使用 OpenShift 命令行接口 oc 登录。
我们将使用已经 quay.io/rhdevelopers/knative-tutorial-greeter 生成的容器映像。
部署服务
若要部署服务,请运行以下命令:
kn service create greeter \
--image quay.io/rhdevelopers/knative-tutorial-greeter:quarkus \
--namespace demoserverless \
--revision-name greeter-v1
将显示如下所示的输出。
Creating service 'greeter' in namespace 'demoserverless':

  0.044s The Route is still working to reflect the latest desired specification.
  0.083s ...
  0.114s Configuration "greeter" is waiting for a Revision to become ready.
 10.420s ...
 10.489s Ingress has not yet been reconciled.
 10.582s Waiting for load balancer to be ready
 10.763s Ready to serve.

Service 'greeter' created to latest revision 'greeter-v1' is available at URL:
http://greeter-demoserverless.apps.wzy5hg7x.eastus.aroapp.io
可以通过运行以下内容来检索项目中的路由列表:
kn route list
你会获取命名空间中的路由列表。 在 Web 浏览器中打开 URL,以查看部署的服务。
NAME      URL                                                            READY
greeter   http://greeter-demoserverless.apps.wzy5hg7x.eastus.aroapp.io   True
部署服务的新修订版本
通过运行以下命令,并通过传递 :latest 映像标记和环境变量 MESSAGE_PREFIX,来部署应用程序的新修订版本:
kn service update greeter \
 --image quay.io/rhdevelopers/knative-tutorial-greeter:latest \
 --namespace demoserverless \
 --env MESSAGE_PREFIX=GreeterV2 \
 --revision-name greeter-v2
你会收到一条确认,指出已部署新的修订版本 greeter-v2。
Updating Service 'greeter' in namespace 'demoserverless':

  5.029s Traffic is not yet migrated to the latest revision.
  5.086s Ingress has not yet been reconciled.
  5.190s Waiting for load balancer to be ready
  5.332s Ready to serve.

Service 'greeter' updated to latest revision 'greeter-v2' is available at URL:
http://greeter-demoserverless.apps.wzy5hg7x.eastus.aroapp.io
若要查看所有修订版本及其流量分配的列表,请运行以下命令:
kn revision list
你将获得类似于以下输出的列表。 请注意,在此实例中,新修订版本接收 100% 的流量。
NAME            SERVICE   TRAFFIC   TAGS   GENERATION   AGE     CONDITIONS   READY   REASON
greeter-v2      greeter   100%             2            90s     3 OK / 4     True
greeter-v1      greeter                    1            5m32s   3 OK / 4     True
蓝/绿部署和 canary 部署
部署新修订版本后,默认情况下会为其分配 100% 的流量。 假设你要实现一个蓝/绿部署策略,你可以在其中快速回滚到较旧版本的应用程序。 Knative 使此策略变得简单。
可以更新服务以创建三个流量标记,同时将100% 的流量分配给它们。
- current:指向当前已部署的版本
- prev:指向上一个版本
- latest:始终指向最新版本
kn service update greeter \
   --tag greeter-v2=current \
   --tag greeter-v1=prev \
   --tag @latest=latest
你会收到类似于下面的确认。
Updating Service 'greeter' in namespace 'demoserverless':

  0.037s Ingress has not yet been reconciled.
  0.121s Waiting for load balancer to be ready
  0.287s Ready to serve.

Service 'greeter' with latest revision 'greeter-v2' (unchanged) is available at URL:
http://greeter-demoserverless.apps.wzy5hg7x.eastus.aroapp.io
使用以下命令列出路由:
kn route describe greeter
你将收到一个输出,其中显示每个标记的 URL 及其流量分配。
Name:       greeter
Namespace:  demoserverless
Age:        10m
URL:        http://greeter-demoserverless.apps.wzy5hg7x.eastus.aroapp.io
Service:    greeter

Traffic Targets:
  100%  @latest (greeter-v2) #latest
        URL:  http://latest-greeter-demoserverless.apps.wzy5hg7x.eastus.aroapp.io
    0%  greeter-v1 #prev
        URL:  http://prev-greeter-demoserverless.apps.wzy5hg7x.eastus.aroapp.io
    0%  greeter-v2 #current
        URL:  http://current-greeter-demoserverless.apps.wzy5hg7x.eastus.aroapp.io

[..]
假设你要快速回滚到上一个版本,则可以更新流量分配,以便将 100% 的流量发送到上一个标记:
kn service update greeter --traffic current=0 --traffic prev=100
使用以下命令列出路由并再次检查:
kn route describe greeter
你会看到一个输出,其中显示 100% 的流量分配会进入上一个版本。
Name:       greeter
Namespace:  demoserverless
Age:        19m
URL:        http://greeter-demoserverless.apps.wzy5hg7x.eastus.aroapp.io
Service:    greeter

Traffic Targets:
    0%  @latest (greeter-v2) #latest
        URL:  http://latest-greeter-demoserverless.apps.wzy5hg7x.eastus.aroapp.io
  100%  greeter-v1 #prev
        URL:  http://prev-greeter-demoserverless.apps.wzy5hg7x.eastus.aroapp.io
    0%  greeter-v2 #current
        URL:  http://current-greeter-demoserverless.apps.wzy5hg7x.eastus.aroapp.io

[..]
操作流量分配,同时在浏览器中刷新主路由(在本例中为 http://greeter-demoserverless.apps.wzy5hg7x.eastus.aroapp.io)。
清理资源
完成应用程序后,可运行以下命令来删除项目:
oc delete project demoserverless
还可按照教程:删除 Azure Red Hat OpenShift 4 群集中的说明删除群集。
后续步骤
在本指南中,你了解了以下内容:
- 安装 OpenShift Serverless 操作器和 Knative Serving
- 使用 Web 控制台部署无服务器项目
- 使用 Knative CLI (kn) 部署无服务器项目
- 使用 Knative CLI (kn) 配置蓝/绿部署和 canary 部署
详细了解如何使用 OpenShift Serverless 在 Azure Red Hat OpenShift 上生成和部署事件驱动的无服务器应用程序,按照 OpenShift Serverless 入门文档和 创建和管理无服务器应用程序文档中的说明操作。