你当前正在访问 Microsoft Azure Global Edition 技术文档网站。 如果需要访问由世纪互联运营的 Microsoft Azure 中国技术文档网站,请访问 https://docs.azure.cn。
快速入门:使用 Azure PowerShell 创建 NAT 网关
在本快速入门中,了解如何通过使用 PowerShell 来创建 NAT 网关。 NAT 网关服务为 Azure 中的虚拟机提供出站连接。

先决条件
具有活动订阅的 Azure 帐户。 免费创建帐户。
Azure Cloud Shell 或 Azure PowerShell。
本快速入门中的步骤在 Azure Cloud Shell 中以交互方式运行 Azure PowerShell cmdlet 命令。 要在 Cloud Shell 中运行命令,请选择代码块右上角的“打开 Cloudshell”。 选择“复制”以复制代码,并将其粘贴到 Cloud Shell 以运行。 也可以从 Azure 门户中运行 Cloud Shell。
也可以在本地安装 Azure PowerShell 以运行 cmdlet。 本文中的示例需要版本 5.4.1 或更高版本的 Azure PowerShell 模块。 运行
Get-Module -ListAvailable Az来查找已安装的版本。 如果需要升级,请参阅更新 Azure PowerShell 模块。
创建资源组
使用 New-AzResourceGroup 创建资源组。 Azure 资源组是在其中部署和管理 Azure 资源的逻辑容器。
以下示例在 eastus2 位置创建名为“test-rg”的资源组:
$rsg = @{
    Name = 'test-rg'
    Location = 'eastus2'
}
New-AzResourceGroup @rsg
创建 NAT 网关
本部分介绍如何创建 NAT 网关和支持资源。
若要访问 Internet,需要提供 NAT 网关的一个或多个公共 IP 地址。 使用 New-AzPublicIpAddress 在 test-rg 中创建名为“public-ip-nat”的公共 IP 地址资源。
使用 New-AzNatGateway 创建全局 Azure NAT 网关。 此命令的结果就是创建名为“nat-gateway”的网关资源,该资源使用公共 IP 地址“public-ip-nat”。 空闲超时设置为 10 分钟。
使用 New-AzVirtualNetwork 在 test-rg 中创建名为“vnet-1”的虚拟网络,并使用 New-AzVirtualNetworkSubnetConfig 创建名为“subnet-1”的子网。 虚拟网络的 IP 地址空间是 10.0.0.0/16。 虚拟网络中的子网是 10.0.0.0/24。
创建名为“bastion”的 Azure Bastion 主机以访问虚拟机。 使用 New-AzBastion 创建堡垒主机。 使用 New-AzPublicIpAddress 为堡垒主机创建公共 IP 地址。
## Create public IP address for NAT gateway ##
$ip = @{
    Name = 'public-ip-nat'
    ResourceGroupName = 'test-rg'
    Location = 'eastus2'
    Sku = 'Standard'
    AllocationMethod = 'Static'
    Zone = 1,2,3
}
$publicIP = New-AzPublicIpAddress @ip

## Create NAT gateway resource ##
$nat = @{
    ResourceGroupName = 'test-rg'
    Name = 'nat-gateway'
    IdleTimeoutInMinutes = '10'
    Sku = 'Standard'
    Location = 'eastus2'
    PublicIpAddress = $publicIP
}
$natGateway = New-AzNatGateway @nat

## Create subnet config and associate NAT gateway to subnet##
$subnet = @{
    Name = 'subnet-1'
    AddressPrefix = '10.0.0.0/24'
    NatGateway = $natGateway
}
$subnetConfig = New-AzVirtualNetworkSubnetConfig @subnet

## Create Azure Bastion subnet. ##
$bastsubnet = @{
    Name = 'AzureBastionSubnet'
    AddressPrefix = '10.0.1.0/26'
}
$bastsubnetConfig = New-AzVirtualNetworkSubnetConfig @bastsubnet

## Create the virtual network ##
$net = @{
    Name = 'vnet-1'
    ResourceGroupName = 'test-rg'
    Location = 'eastus2'
    AddressPrefix = '10.0.0.0/16'
    Subnet = $subnetConfig,$bastsubnetConfig
}
$vnet = New-AzVirtualNetwork @net

## Create public IP address for bastion host. ##
$ip = @{
    Name = 'public-ip'
    ResourceGroupName = 'test-rg'
    Location = 'eastus2'
    Sku = 'Standard'
    AllocationMethod = 'Static'
    Zone = 1,2,3
}
$publicip = New-AzPublicIpAddress @ip

## Create bastion host ##
$bastion = @{
    Name = 'bastion'
    ResourceGroupName = 'test-rg'
    PublicIpAddressRgName = 'test-rg'
    PublicIpAddressName = 'public-ip'
    VirtualNetworkRgName = 'test-rg'
    VirtualNetworkName = 'vnet-1'
    Sku = 'Basic'
}
New-AzBastion @bastion
堡垒主机可能需要几分钟时间才能部署。 在进入下一部分之前,请等待堡垒主机部署完毕。
虚拟机
在本部分中,你将创建虚拟机来测试 NAT 网关并验证出站连接的公共 IP 地址。
使用 New-AzNetworkInterface 创建网络接口。
使用 Get-Credential 设置 VM 的管理员用户名和密码。
使用以下内容创建虚拟机:
# Set the administrator and password for the VMs. ##
$cred = Get-Credential

## Place the virtual network into a variable. ##
$vnet = Get-AzVirtualNetwork -Name 'vnet-1' -ResourceGroupName 'test-rg'

## Create network interface for virtual machine. ##
$nic = @{
    Name = "nic-1"
    ResourceGroupName = 'test-rg'
    Location = 'eastus2'
    Subnet = $vnet.Subnets[0]
}
$nicVM = New-AzNetworkInterface @nic

## Create a virtual machine configuration for VMs ##
$vmsz = @{
    VMName = 'vm-1'
    VMSize = 'Standard_DS1_v2'
}
$vmos = @{
    ComputerName = 'vm-1'
    Credential = $cred
}
$vmimage = @{
    PublisherName = 'Canonical'
    Offer = '0001-com-ubuntu-server-jammy'
    Skus = '22_04-lts-gen2'
    Version = 'latest'
}
$vmConfig = New-AzVMConfig @vmsz `
    | Set-AzVMOperatingSystem @vmos -Linux `
    | Set-AzVMSourceImage @vmimage `
    | Add-AzVMNetworkInterface -Id $nicVM.Id

## Create the virtual machine for VMs ##
$vm = @{
    ResourceGroupName = 'test-rg'
    Location = 'eastus2'
    VM = $vmConfig
}
New-AzVM @vm
请先等待虚拟机创建完成,然后再转到下一部分。
测试 NAT 网关
在本部分中,你将测试 NAT 网关。 首先,你会发现 NAT 网关的公共 IP。 然后连接到测试虚拟机,并通过 NAT 网关验证出站连接。
登录 Azure 门户。
在门户顶部的搜索框中,输入“公共 IP”。 在搜索结果中,选择“公共 IP 地址”。
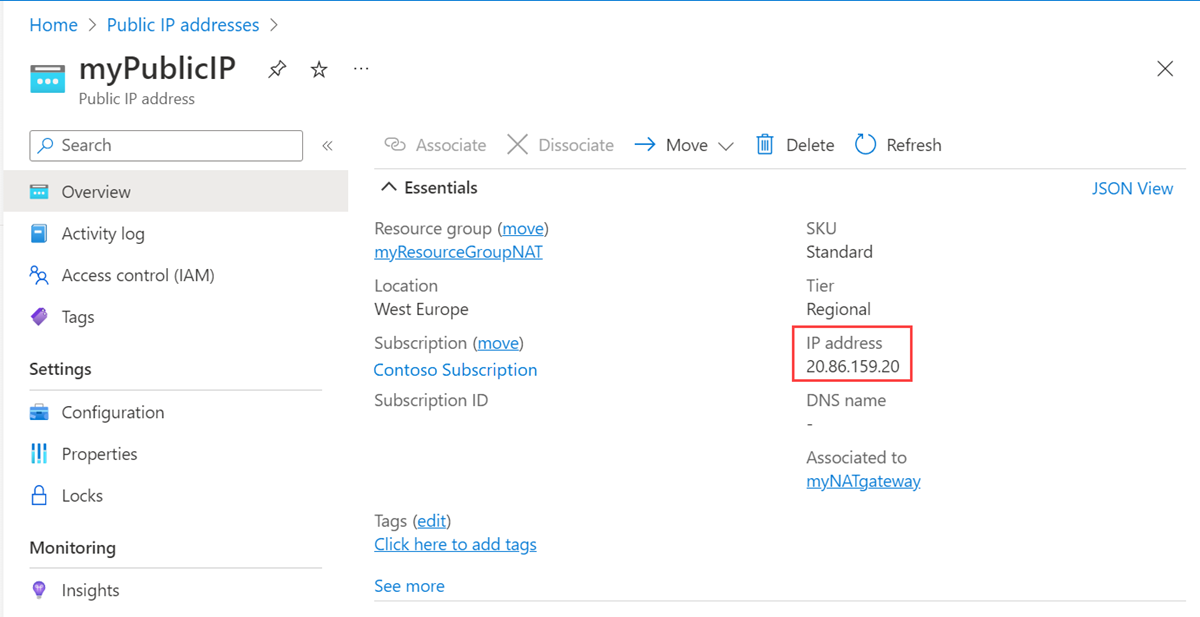
选择“public-ip-nat”。
记下公共 IP 地址:
在门户顶部的搜索框中,输入“虚拟机”。 在搜索结果中,选择“虚拟机”。
选择 vm-1。
在“概述”页面上,选择“连接”,然后选择“Bastion”。
选择“使用 Bastion”。
输入在 VM 创建过程中输入的用户名和密码。 选择“连接”。
在 bash 提示符下,输入以下命令:
curl ifconfig.me验证命令返回的 IP 地址是否与 NAT 网关的公共 IP 地址匹配。
azureuser@vm-1:~$ curl ifconfig.me
20.7.200.36
清理资源
如果你不打算继续使用此应用程序,请按以下步骤删除虚拟网络、虚拟机和 NAT 网关:
Remove-AzResourceGroup -Name 'test-rg' -Force
后续步骤
有关 Azure NAT 网关的详细信息,请参阅: