Drawing 对象概述
本主题介绍 Drawing 对象,并介绍如何使用它们高效地绘制形状、位图、文本和媒体。 创建剪贴画、使用 DrawingBrush 画图或使用 Visual 对象时,可使用 Drawing 对象。
什么是 Drawing 对象
Drawing 对象描述可见内容,如形状、位图、视频或文本行。 不同类型的图形描述不同类型的内容。 下面是不同类型图形对象的列表。
GeometryDrawing - 绘制形状。
ImageDrawing - 绘制图像。
GlyphRunDrawing - 绘制文本。
VideoDrawing - 播放音频或视频文件。
DrawingGroup - 绘制其他图形。 使用绘图组将其他绘图合并到单个复合绘图。
Drawing 对象具有多种功能;使用 Drawing 对象的方式有很多。
可通过使用 DrawingImage 和 Image 控件将其显示为图像。
可将它与 DrawingBrush 结合使用来绘制对象,如 Page 的 Background。
可使用它描述 DrawingVisual 的外观。
可使用它枚举 Visual 的内容。
WPF 提供能够绘制形状、位图、文本和媒体的其他对象类型。 例如,还可以使用 Shape 对象绘制形状,而 MediaElement 控件提供了向应用程序添加视频的另一种方法。 那么,何时应使用 Drawing 对象? 当可以牺牲框架级别功能来获得性能优势或需要 Freezable 功能时。 由于 Drawing 对象缺乏对布局、输入和焦点的支持,因此它们提供性能优势,这使它们非常适合用于描述背景、剪贴画和使用 Visual 对象的低级别绘图。
由于它们是 Freezable 类型的对象,因此 Drawing 对象获得多个特殊功能,包括以下几项:它们可以声明为资源、在多个对象之间共享、变为只读以提高性能、克隆以及变为线程安全。 有关 Freezable 对象提供的不同功能的详细信息,请参阅 Freezable 对象概述。
绘制形状
若要绘制形状,可使用 GeometryDrawing。 几何绘图的 Geometry 属性描述要绘制的形状,它的 Brush 属性描述应如何绘制形状内部,而它的 Pen 属性描述应如何绘制其轮廓。
以下示例使用 GeometryDrawing 绘制形状。 该形状由一个 GeometryGroup 和两个 EllipseGeometry 对象描述。 形状的内部涂有 LinearGradientBrush,其轮廓用 BlackPen 绘制。
此示例创建以下 GeometryDrawing。

一个 GeometryDrawing
//
// Create the Geometry to draw.
//
GeometryGroup ellipses = new GeometryGroup();
ellipses.Children.Add(
    new EllipseGeometry(new Point(50,50), 45, 20)
    );
ellipses.Children.Add(
    new EllipseGeometry(new Point(50, 50), 20, 45)
    );

//
// Create a GeometryDrawing.
//
GeometryDrawing aGeometryDrawing = new GeometryDrawing();
aGeometryDrawing.Geometry = ellipses;

// Paint the drawing with a gradient.
aGeometryDrawing.Brush =
    new LinearGradientBrush(
        Colors.Blue,
        Color.FromRgb(204,204,255),
        new Point(0,0),
        new Point(1,1));

// Outline the drawing with a solid color.
aGeometryDrawing.Pen = new Pen(Brushes.Black, 10);
<GeometryDrawing>
  <GeometryDrawing.Geometry>

    <!-- Create a composite shape. -->
    <GeometryGroup>
      <EllipseGeometry Center="50,50" RadiusX="45" RadiusY="20" />
      <EllipseGeometry Center="50,50" RadiusX="20" RadiusY="45" />
    </GeometryGroup>
  </GeometryDrawing.Geometry>
  <GeometryDrawing.Brush>

    <!-- Paint the drawing with a gradient. -->
    <LinearGradientBrush>
      <GradientStop Offset="0.0" Color="Blue" />
      <GradientStop Offset="1.0" Color="#CCCCFF" />
    </LinearGradientBrush>
  </GeometryDrawing.Brush>
  <GeometryDrawing.Pen>

    <!-- Outline the drawing with a solid color. -->
    <Pen Thickness="10" Brush="Black" />
  </GeometryDrawing.Pen>
</GeometryDrawing>
有关完整示例,请参阅创建 GeometryDrawing。
其他 Geometry 类(如 PathGeometry)支持通过创建曲线和弧线来创建更复杂的形状。 有关 Geometry 对象的详细信息,请参阅 Geometry 概述。
有关不使用 Drawing 对象绘制形状的其他方法的详细信息,请参阅 WPF 中的形状和基本绘图概述。
绘制图像
若要绘制图像,可使用 ImageDrawing。 ImageDrawing 对象的 ImageSource 属性描述要绘制的图像,而它的 Rect 属性定义绘制图像的区域。
以下示例将在一个矩形的 (75,75) 处绘制一个 100 x 100 像素的图像。 下图显示了此示例创建的 ImageDrawing。 添加了灰色边框以显示 ImageDrawing 的边界。
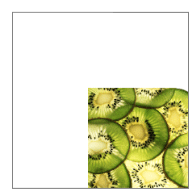
100 x 100 的 ImageDrawing
// Create a 100 by 100 image with an upper-left point of (75,75).
ImageDrawing bigKiwi = new ImageDrawing();
bigKiwi.Rect = new Rect(75, 75, 100, 100);
bigKiwi.ImageSource = new BitmapImage(
    new Uri(@"sampleImages\kiwi.png", UriKind.Relative));
<!-- The Rect property specifies that the image only fill a 100 by 100
     rectangular area. -->
<ImageDrawing Rect="75,75,100,100" ImageSource="sampleImages\kiwi.png"/>
有关图像的详细信息,请参阅图像处理概述。
播放媒体(仅代码)
注意
尽管可以在 Extensible Application Markup Language (XAML) 中声明 VideoDrawing,但只能使用代码加载并播放其媒体。 若要在 Extensible Application Markup Language (XAML) 中播放视频,请改用 MediaElement。
若要播放音频或视频文件,请使用 VideoDrawing 和 MediaPlayer。 加载并播放媒体有两种方法。 第一种方法是使用 MediaPlayer 和 VideoDrawing,第二种方法是创建自己的 MediaTimeline 来与 MediaPlayer 和 VideoDrawing 结合使用。
注意
当媒体随应用程序一起分发时,无法像图像那样将媒体文件用作项目资源。 在项目文件中,必须将媒体类型设置为 Content,并将 CopyToOutputDirectory 设置为 PreserveNewest 或 Always。
若要在不创建自己的 MediaTimeline 的情况下播放媒体,请执行以下步骤。
创建 MediaPlayer 对象。
MediaPlayer player = new MediaPlayer();使用 Open 方法加载媒体文件。
player.Open(new Uri(@"sampleMedia\xbox.wmv", UriKind.Relative));创建 VideoDrawing。
VideoDrawing aVideoDrawing = new VideoDrawing();通过设置 VideoDrawing 的 Rect 属性来指定绘制媒体的大小和位置。
aVideoDrawing.Rect = new Rect(0, 0, 100, 100);使用创建的 MediaPlayer 来设置 VideoDrawing 的 Player 属性。
aVideoDrawing.Player = player;使用 MediaPlayer 的 Play 方法开始播放媒体。
// Play the video once.
player.Play();
以下示例使用 VideoDrawing 和 MediaPlayer 播放一次视频文件。
//
// Create a VideoDrawing.
//
MediaPlayer player = new MediaPlayer();

player.Open(new Uri(@"sampleMedia\xbox.wmv", UriKind.Relative));

VideoDrawing aVideoDrawing = new VideoDrawing();

aVideoDrawing.Rect = new Rect(0, 0, 100, 100);

aVideoDrawing.Player = player;

// Play the video once.
player.Play();
若要获得对媒体的额外计时控制,请将 MediaTimeline 与 MediaPlayer 和 VideoDrawing 对象结合使用。 使用 MediaTimeline,可以指定视频是否重复。 若要将 MediaTimeline 与 VideoDrawing 结合使用,请执行以下步骤:
声明 MediaTimeline 并设置其计时行为。
// Create a MediaTimeline.
MediaTimeline mTimeline =
    new MediaTimeline(new Uri(@"sampleMedia\xbox.wmv", UriKind.Relative));

// Set the timeline to repeat.
mTimeline.RepeatBehavior = RepeatBehavior.Forever;
根据 MediaTimeline 创建 MediaClock。
// Create a clock from the MediaTimeline.
MediaClock mClock = mTimeline.CreateClock();
创建 MediaPlayer 并使用 MediaClock 设置其 Clock 属性。
MediaPlayer repeatingVideoDrawingPlayer = new MediaPlayer();
repeatingVideoDrawingPlayer.Clock = mClock;
创建 VideoDrawing 并将 MediaPlayer 分配给 VideoDrawing 的 Player 属性。
VideoDrawing repeatingVideoDrawing = new VideoDrawing();
repeatingVideoDrawing.Rect = new Rect(150, 0, 100, 100);
repeatingVideoDrawing.Player = repeatingVideoDrawingPlayer;
以下示例将 MediaTimeline 与 MediaPlayer 和 VideoDrawing 结合使用,以重复播放视频。
//
// Create a VideoDrawing that repeats.
//

// Create a MediaTimeline.
MediaTimeline mTimeline =
    new MediaTimeline(new Uri(@"sampleMedia\xbox.wmv", UriKind.Relative));

// Set the timeline to repeat.
mTimeline.RepeatBehavior = RepeatBehavior.Forever;

// Create a clock from the MediaTimeline.
MediaClock mClock = mTimeline.CreateClock();

MediaPlayer repeatingVideoDrawingPlayer = new MediaPlayer();
repeatingVideoDrawingPlayer.Clock = mClock;

VideoDrawing repeatingVideoDrawing = new VideoDrawing();
repeatingVideoDrawing.Rect = new Rect(150, 0, 100, 100);
repeatingVideoDrawing.Player = repeatingVideoDrawingPlayer;
请注意,在使用 MediaTimeline 时,使用从 MediaClock 的 Controller 属性返回的交互式 ClockController 控制媒体播放,而不是使用 MediaPlayer 的交互式方法。
绘制文本
若要绘制文本,可使用 GlyphRunDrawing 和 GlyphRun。 以下示例使用 GlyphRunDrawing 绘制文本“Hello World”。
GlyphRun theGlyphRun = new GlyphRun(
    new GlyphTypeface(new Uri(@"C:\WINDOWS\Fonts\TIMES.TTF")),
    0,
    false,
    13.333333333333334,
    new ushort[]{43, 72, 79, 79, 82, 3, 58, 82, 85, 79, 71},
    new Point(0, 12.29),
    new double[]{
        9.62666666666667, 7.41333333333333, 2.96,
        2.96, 7.41333333333333, 3.70666666666667,
        12.5866666666667, 7.41333333333333,
        4.44, 2.96, 7.41333333333333},
    null,
    null,
    null,
    null,
    null,
    null

    );

GlyphRunDrawing gDrawing = new GlyphRunDrawing(Brushes.Black, theGlyphRun);
<GlyphRunDrawing ForegroundBrush="Black">
  <GlyphRunDrawing.GlyphRun>
    <GlyphRun
      CaretStops="{x:Null}"
      ClusterMap="{x:Null}"
      IsSideways="False"
      GlyphOffsets="{x:Null}"
      GlyphIndices="43 72 79 79 82 3 58 82 85 79 71"
      BaselineOrigin="0,12.29"
      FontRenderingEmSize="13.333333333333334"
      DeviceFontName="{x:Null}"
      AdvanceWidths="9.62666666666667 7.41333333333333 2.96 2.96 7.41333333333333 3.70666666666667 12.5866666666667 7.41333333333333 4.44 2.96 7.41333333333333"
      BidiLevel="0">
      <GlyphRun.GlyphTypeface>
        <GlyphTypeface FontUri="C:\WINDOWS\Fonts\TIMES.TTF" />
      </GlyphRun.GlyphTypeface>
    </GlyphRun>
  </GlyphRunDrawing.GlyphRun>
</GlyphRunDrawing>
GlyphRun 是适用于固定格式文档呈现和打印方案的低级别对象。 若要将文本绘制到屏幕,一种更简单的方法是使用 Label 或 TextBlock。 有关 GlyphRun 的详细信息,请参阅 GlyphRun 对象和 Glyphs 元素简介概述。
复合绘图
使用 DrawingGroup,可将多个绘图组合成单个复合绘图。 通过使用 DrawingGroup,可将形状、图像和文本组合成单个 Drawing 对象。
以下示例使用 DrawingGroup 将两个 GeometryDrawing 对象和一个 ImageDrawing 对象组合起来。 本示例生成以下输出。
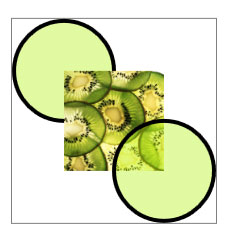
复合绘图
//
// Create three drawings.
//
GeometryDrawing ellipseDrawing =
    new GeometryDrawing(
        new SolidColorBrush(Color.FromArgb(102, 181, 243, 20)),
        new Pen(Brushes.Black, 4),
        new EllipseGeometry(new Point(50,50), 50, 50)
    );

ImageDrawing kiwiPictureDrawing =
    new ImageDrawing(
        new BitmapImage(new Uri(@"sampleImages\kiwi.png", UriKind.Relative)),
        new Rect(50,50,100,100));

GeometryDrawing ellipseDrawing2 =
    new GeometryDrawing(
        new SolidColorBrush(Color.FromArgb(102,181,243,20)),
        new Pen(Brushes.Black, 4),
        new EllipseGeometry(new Point(150, 150), 50, 50)
    );

// Create a DrawingGroup to contain the drawings.
DrawingGroup aDrawingGroup = new DrawingGroup();
aDrawingGroup.Children.Add(ellipseDrawing);
aDrawingGroup.Children.Add(kiwiPictureDrawing);
aDrawingGroup.Children.Add(ellipseDrawing2);
<DrawingGroup>

  <GeometryDrawing Brush="#66B5F314">
    <GeometryDrawing.Geometry>
      <EllipseGeometry Center="50,50" RadiusX="50"  RadiusY="50"/>
    </GeometryDrawing.Geometry>
    <GeometryDrawing.Pen>
      <Pen Brush="Black" Thickness="4" />
    </GeometryDrawing.Pen>
  </GeometryDrawing>
  <ImageDrawing ImageSource="sampleImages\kiwi.png" Rect="50,50,100,100"/>
  <GeometryDrawing Brush="#66B5F314">
    <GeometryDrawing.Geometry>
      <EllipseGeometry Center="150,150" RadiusX="50"  RadiusY="50"/>
    </GeometryDrawing.Geometry>
    <GeometryDrawing.Pen>
      <Pen Brush="Black" Thickness="4" />
    </GeometryDrawing.Pen>
  </GeometryDrawing>
</DrawingGroup>
使用 DrawingGroup,还可以向其内容应用不透明蒙板、转换、位图效果和其他操作。 DrawingGroup 操作按以下顺序应用:OpacityMask、Opacity、BitmapEffect、ClipGeometry、GuidelineSet,最后是 Transform。
下图显示应用 DrawingGroup 操作的顺序。

DrawingGroup 操作的顺序
下表介绍可用于操作 DrawingGroup 对象内容的属性。
| properties | 说明 | 图示 |
|---|---|---|
| OpacityMask | 更改 DrawingGroup 内容选定部分的不透明度。 有关示例,请参阅如何:控制绘图的不透明度。 | 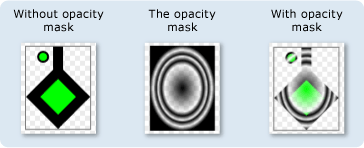 |
| Opacity | 统一更改 DrawingGroup 内容的不透明度。 使用此属性使 Drawing 透明或部分透明。 有关示例,请参阅如何:向绘图应用不透明蒙板。 | 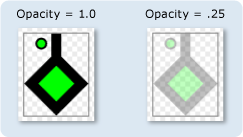 |
| BitmapEffect | 将 BitmapEffect 应用于 DrawingGroup 内容。 有关示例,请参阅如何:向绘图应用 BitmapEffect。 | 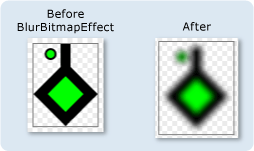 |
| ClipGeometry | 将 DrawingGroup 内容剪裁到使用 Geometry 描述的区域。 有关示例,请参阅如何:剪裁绘图。 | 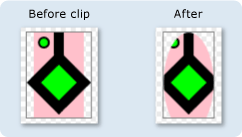 |
| GuidelineSet | 根据指定的基准将与设备无关的像素与设备像素对齐。 此属性对于确保细节丰富的图形在低 DPI 屏幕上清晰地呈现很有用。 有关示例,请参阅向绘图应用 GuidelineSet。 |  |
| Transform | 转换 DrawingGroup 内容。 有关示例,请参阅如何:向绘图应用转换。 | 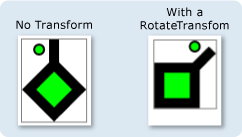 |
将绘图显示为图像
若要显示带有 Image 控件的 Drawing,请将 DrawingImage 用作 Image 控件的 Source,并将 DrawingImage 对象的 DrawingImage.Drawing 属性设置为要显示的绘图。
以下示例使用 DrawingImage 和 Image 控件来显示 GeometryDrawing。 本示例生成以下输出。

一个 DrawingImage
using System;
using System.Windows;
using System.Windows.Controls;
using System.Windows.Media;
using System.Windows.Media.Animation;
using System.Windows.Shapes;

namespace SDKSample
{
    public class DrawingImageExample : Page
    {

        public DrawingImageExample()
        {

            //
            // Create the Geometry to draw.
            //
            GeometryGroup ellipses = new GeometryGroup();
            ellipses.Children.Add(
                new EllipseGeometry(new Point(50,50), 45, 20)
                );
            ellipses.Children.Add(
                new EllipseGeometry(new Point(50, 50), 20, 45)
                );

            //
            // Create a GeometryDrawing.
            //
            GeometryDrawing aGeometryDrawing = new GeometryDrawing();
            aGeometryDrawing.Geometry = ellipses;

            // Paint the drawing with a gradient.
            aGeometryDrawing.Brush =
                new LinearGradientBrush(
                    Colors.Blue,
                    Color.FromRgb(204,204,255),
                    new Point(0,0),
                    new Point(1,1));

            // Outline the drawing with a solid color.
            aGeometryDrawing.Pen = new Pen(Brushes.Black, 10);

            //
            // Use a DrawingImage and an Image control
            // to display the drawing.
            //
            DrawingImage geometryImage = new DrawingImage(aGeometryDrawing);

            // Freeze the DrawingImage for performance benefits.
            geometryImage.Freeze();

            Image anImage = new Image();
            anImage.Source = geometryImage;
            anImage.HorizontalAlignment = HorizontalAlignment.Left;

            //
            // Place the image inside a border and
            // add it to the page.
            //
            Border exampleBorder = new Border();
            exampleBorder.Child = anImage;
            exampleBorder.BorderBrush = Brushes.Gray;
            exampleBorder.BorderThickness = new Thickness(1);
            exampleBorder.HorizontalAlignment = HorizontalAlignment.Left;
            exampleBorder.VerticalAlignment = VerticalAlignment.Top;
            exampleBorder.Margin = new Thickness(10);

            this.Margin = new Thickness(20);
            this.Background = Brushes.White;
            this.Content = exampleBorder;
        }
    }
}
<Page
  xmlns="http://schemas.microsoft.com/winfx/2006/xaml/presentation"
  xmlns:x="http://schemas.microsoft.com/winfx/2006/xaml"
  xmlns:PresentationOptions="http://schemas.microsoft.com/winfx/2006/xaml/presentation/options"
  xmlns:mc="http://schemas.openxmlformats.org/markup-compatibility/2006"
  mc:Ignorable="PresentationOptions"
  Background="White" Margin="20">

  <Border BorderBrush="Gray" BorderThickness="1"
    HorizontalAlignment="Left" VerticalAlignment="Top"
    Margin="10">

    <!-- This image uses a Drawing object for its source. -->
    <Image>
      <Image.Source>
        <DrawingImage PresentationOptions:Freeze="True">
          <DrawingImage.Drawing>
            <GeometryDrawing>
              <GeometryDrawing.Geometry>
                <GeometryGroup>
                  <EllipseGeometry Center="50,50" RadiusX="45" RadiusY="20" />
                  <EllipseGeometry Center="50,50" RadiusX="20" RadiusY="45" />
                </GeometryGroup>
              </GeometryDrawing.Geometry>
              <GeometryDrawing.Brush>
                <LinearGradientBrush>
                  <GradientStop Offset="0.0" Color="Blue" />
                  <GradientStop Offset="1.0" Color="#CCCCFF" />
                </LinearGradientBrush>
              </GeometryDrawing.Brush>
              <GeometryDrawing.Pen>
                <Pen Thickness="10" Brush="Black" />
              </GeometryDrawing.Pen>
            </GeometryDrawing>
          </DrawingImage.Drawing>
        </DrawingImage>
      </Image.Source>
    </Image>
  </Border>

</Page>
使用 Drawing 绘制对象
DrawingBrush 是一种使用 Drawing 对象绘制区域的画笔类型。 几乎可以使用它绘制任何带有绘图的图形对象。 DrawingBrush 的 Drawing 属性描述了它的 Drawing。 若要使用 DrawingBrush 呈现 Drawing,请使用画笔的 Drawing 属性将其添加到画笔,并使用画笔绘制图形对象,例如控件或面板。
以下示例使用 DrawingBrush 借助从 GeometryDrawing 创建的图案绘制 Rectangle 的 Fill。 本示例生成以下输出。
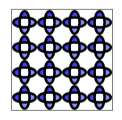
与 DrawingBrush 结合使用的 GeometryDrawing
using System;
using System.Windows;
using System.Windows.Controls;
using System.Windows.Media;
using System.Windows.Media.Animation;
using System.Windows.Shapes;

namespace SDKSample
{
    public class DrawingBrushExample : Page
    {

        public DrawingBrushExample()
        {

            //
            // Create the Geometry to draw.
            //
            GeometryGroup ellipses = new GeometryGroup();
            ellipses.Children.Add(
                new EllipseGeometry(new Point(50,50), 45, 20)
                );
            ellipses.Children.Add(
                new EllipseGeometry(new Point(50, 50), 20, 45)
                );

            //
            // Create a GeometryDrawing.
            //
            GeometryDrawing aGeometryDrawing = new GeometryDrawing();
            aGeometryDrawing.Geometry = ellipses;

            // Paint the drawing with a gradient.
            aGeometryDrawing.Brush =
                new LinearGradientBrush(
                    Colors.Blue,
                    Color.FromRgb(204,204,255),
                    new Point(0,0),
                    new Point(1,1));

            // Outline the drawing with a solid color.
            aGeometryDrawing.Pen = new Pen(Brushes.Black, 10);

            DrawingBrush patternBrush = new DrawingBrush(aGeometryDrawing);
            patternBrush.Viewport = new Rect(0, 0, 0.25, 0.25);
            patternBrush.TileMode = TileMode.Tile;
            patternBrush.Freeze();

            //
            // Create an object to paint.
            //
            Rectangle paintedRectangle = new Rectangle();
            paintedRectangle.Width = 100;
            paintedRectangle.Height = 100;
            paintedRectangle.Fill = patternBrush;

            //
            // Place the image inside a border and
            // add it to the page.
            //
            Border exampleBorder = new Border();
            exampleBorder.Child = paintedRectangle;
            exampleBorder.BorderBrush = Brushes.Gray;
            exampleBorder.BorderThickness = new Thickness(1);
            exampleBorder.HorizontalAlignment = HorizontalAlignment.Left;
            exampleBorder.VerticalAlignment = VerticalAlignment.Top;
            exampleBorder.Margin = new Thickness(10);

            this.Margin = new Thickness(20);
            this.Background = Brushes.White;
            this.Content = exampleBorder;
        }
    }
}
<Page
  xmlns="http://schemas.microsoft.com/winfx/2006/xaml/presentation"
  xmlns:x="http://schemas.microsoft.com/winfx/2006/xaml"
  xmlns:PresentationOptions="http://schemas.microsoft.com/winfx/2006/xaml/presentation/options"
  xmlns:mc="http://schemas.openxmlformats.org/markup-compatibility/2006"
  mc:Ignorable="PresentationOptions"
  Margin="20" Background="White">

  <Border BorderBrush="Gray" BorderThickness="1"
    HorizontalAlignment="Left" VerticalAlignment="Top"
    Margin="10">
    <Rectangle Width="100" Height="100">
      <Rectangle.Fill>
        <DrawingBrush PresentationOptions:Freeze="True"
                      Viewport="0,0,0.25,0.25" TileMode="Tile">
          <DrawingBrush.Drawing>
            <GeometryDrawing>
              <GeometryDrawing.Geometry>
                <GeometryGroup>
                  <EllipseGeometry Center="50,50" RadiusX="45" RadiusY="20" />
                  <EllipseGeometry Center="50,50" RadiusX="20" RadiusY="45" />
                </GeometryGroup>
              </GeometryDrawing.Geometry>
              <GeometryDrawing.Brush>
                <LinearGradientBrush>
                  <GradientStop Offset="0.0" Color="Blue" />
                  <GradientStop Offset="1.0" Color="#CCCCFF" />
                </LinearGradientBrush>
              </GeometryDrawing.Brush>
              <GeometryDrawing.Pen>
                <Pen Thickness="10" Brush="Black" />
              </GeometryDrawing.Pen>
            </GeometryDrawing>
          </DrawingBrush.Drawing>
        </DrawingBrush>
      </Rectangle.Fill>

    </Rectangle>
  </Border>


</Page>
DrawingBrush 类提供用于拉伸和平铺其内容的各种选项。 有关 DrawingBrush 的详细信息,请参阅使用图像、绘图和视觉对象进行绘制概述。
使用视觉对象呈现绘图
DrawingVisual 是一种旨在呈现绘图的视觉对象类型。 对于希望生成高度自定义的图形环境的开发者来说,可以选择直接在视觉对象层上工作,但在本概述中不作介绍。 有关详细信息,请参阅使用 DrawingVisual 对象概述。
DrawingContext 对象
借助 DrawingContext 类,可以使用可视化内容填充 Visual 或 Drawing。 许多此类低级别图形对象使用 DrawingContext,因为它非常高效地描述了图形内容。
尽管 DrawingContext 绘制方法看起来类似于 System.Drawing.Graphics 类型的绘制方法,但它们实际上截然不同。 DrawingContext 用于保留模式图形系统,而 System.Drawing.Graphics 类型用于即时模式图形系统。 使用 DrawingContext 对象的绘制命令时,实际上是在存储一组呈现指令(尽管具体的存储机制取决于提供 DrawingContext 的对象类型),供图形系统以后使用,而非实时绘制到屏幕。 有关 Windows Presentation Foundation (WPF) 图形系统工作原理的详细信息,请参阅 WPF 图形呈现概述。
你永远不会直接实例化 DrawingContext;但可以通过某些方法(如 DrawingGroup.Open 和 DrawingVisual.RenderOpen)获取绘图上下文。
枚举 Visual 的内容
此外,Drawing 对象还提供用于枚举 Visual 内容的对象模型。
以下示例使用 GetDrawing 方法检索 Visual 的 DrawingGroup 值并枚举它。
public void RetrieveDrawing(Visual v)
{
    DrawingGroup drawingGroup = VisualTreeHelper.GetDrawing(v);
    EnumDrawingGroup(drawingGroup);
}

// Enumerate the drawings in the DrawingGroup.
public void EnumDrawingGroup(DrawingGroup drawingGroup)
{
    DrawingCollection dc = drawingGroup.Children;

    // Enumerate the drawings in the DrawingCollection.
    foreach (Drawing drawing in dc)
    {
        // If the drawing is a DrawingGroup, call the function recursively.
        if (drawing is DrawingGroup group)
        {
            EnumDrawingGroup(group);
        }
        else if (drawing is GeometryDrawing)
        {
            // Perform action based on drawing type.
        }
        else if (drawing is ImageDrawing)
        {
            // Perform action based on drawing type.
        }
        else if (drawing is GlyphRunDrawing)
        {
            // Perform action based on drawing type.
        }
        else if (drawing is VideoDrawing)
        {
            // Perform action based on drawing type.
        }
    }
}
另请参阅
反馈
即将发布:在整个 2024 年,我们将逐步淘汰作为内容反馈机制的“GitHub 问题”,并将其取代为新的反馈系统。 有关详细信息,请参阅:https://aka.ms/ContentUserFeedback。
提交和查看相关反馈
