使用 XML 清单创建外接程序命令
加载项命令提供了使用执行操作的特定 UI 元素来自定义默认的 Office 用户界面 (UI) 的简单方法。 有关外接程序命令的简介,请参阅 外接程序命令。
本文介绍如何编辑 XML 清单以定义外接程序命令,以及如何为 函数命令创建代码。
提示
有关如何使用 Microsoft 365 的统一清单创建外接程序命令的说明,请参阅 使用 Microsoft 365 的统一清单创建外接程序命令。
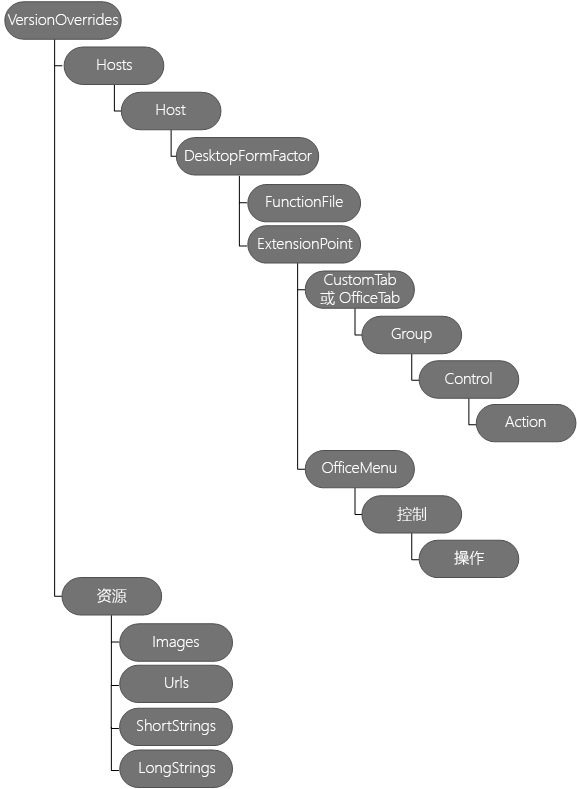
下图显示了用来定义外接程序命令的元素的层次结构。 本文将具体介绍这些元素。
示例命令
Yo Office 创建的所有任务窗格加载项都具有外接程序命令。 它们包含外接程序命令 (按钮) 以显示任务窗格。 按照某个快速入门(例如 生成 Excel 任务窗格加载项)生成这些项目。 确保已阅读 加载项命令 以了解命令功能。
加载项命令的重要部分
以下步骤说明如何将外接程序命令添加到现有外接程序。
步骤 1:添加 VersionOverrides 元素
<VersionOverrides> 元素是包含外接程序命令定义的根元素。 有关有效属性和含义的详细信息,请参阅 清单中的版本替代。
以下示例显示了 <VersionOverrides> 元素及其子元素。
<OfficeApp>
...
  <VersionOverrides xmlns="http://schemas.microsoft.com/office/taskpaneappversionoverrides" xsi:type="VersionOverridesV1_0">
    <Requirements>
      <!-- add information about requirement sets -->
    </Requirements>
    <Hosts>
      <Host xsi:type="Workbook">
        <!-- add information about form factors -->
      </Host>
    </Hosts>
    <Resources>
      <!-- add information about resources -->
    </Resources>
  </VersionOverrides>
...
</OfficeApp>
步骤 2:添加 Hosts、Host 和 DesktopFormFactor 元素
Hosts<> 元素包含一个或多个 <Host> 元素。 <Host> 元素指定特定的 Office 应用程序。 <Host> 元素包含子元素,这些元素指定要在该 Office 应用程序中安装外接程序后显示的外接程序命令。 若要在两个或多个不同的 Office 应用程序中显示相同的外接程序命令,必须在每个 <主机>中复制子元素。
<DesktopFormFactor> 元素指定在 Office web 版、Windows 和 Mac 中运行的加载项的设置。
以下示例显示了 <Hosts>、 <Host> 和 <DesktopFormFactor> 元素。
<OfficeApp>
...
  <VersionOverrides xmlns="http://schemas.microsoft.com/office/taskpaneappversionoverrides" xsi:type="VersionOverridesV1_0">
  ...
    <Hosts>
      <Host xsi:type="Workbook">
        <DesktopFormFactor>

              <!-- information about FunctionFile and ExtensionPoint -->

        </DesktopFormFactor>
      </Host>
    </Hosts>
  ...
  </VersionOverrides>
...
</OfficeApp>
步骤 3:添加 FunctionFile 元素
<FunctionFile> 元素指定包含当外接程序命令使用 ExecuteFunction 操作时要运行的 JavaScript 代码的文件。 FunctionFile<> 元素的 resid 属性设置为 HTML 文件,其中包含外接程序命令所需的所有 JavaScript 文件。 You can't link directly to a JavaScript file. You can only link to an HTML file. 文件名在 Resources> 元素中<指定为 <Url> 元素。
注意
Yo Office 项目使用 Webpack 来避免手动将 JavaScript 添加到 HTML。
下面是 FunctionFile> 元素的示例<。
<DesktopFormFactor>
    <FunctionFile resid="Commands.Url" />
    <ExtensionPoint xsi:type="PrimaryCommandSurface">
      <!-- information about this extension point -->
    </ExtensionPoint>

    <!-- You can define more than one ExtensionPoint element as needed -->
</DesktopFormFactor>
重要
在外接程序命令逻辑运行之前,必须初始化 Office.js。 有关详细信息,请参阅 初始化 Office 外接程序。
Outlook 通知
当外接程序需要提供状态更新(例如进度指示器或错误消息)时,它必须通过 通知 API 来执行此操作。 还必须在清单节点中指定的 FunctionFile 单独 HTML 文件中定义通知处理。
步骤 4:添加 ExtensionPoint 元素
<ExtensionPoint> 元素定义外接程序命令在 Office UI 中的显示位置。
以下示例演示如何将 <ExtensionPoint> 元素与 PrimaryCommandSurface 和 ContextMenu 属性值一起使用,以及应与每个元素一起使用的子元素。
重要
对于包含 ID 属性的元素,请务必提供唯一的 ID。 建议将公司名称与 ID 结合使用。 例如,请使用以下格式:<CustomTab id="mycompanyname.mygroupname">。
<ExtensionPoint xsi:type="PrimaryCommandSurface">
  <CustomTab id="Contoso Tab">
  <!-- If you want to use a default tab that comes with Office, remove the above CustomTab element, and then uncomment the following OfficeTab element -->
  <!-- <OfficeTab id="TabData"> -->
    <Label resid="residLabel4" />
    <Group id="Group1Id12">
      <Label resid="residLabel4" />
      <Icon>
        <bt:Image size="16" resid="icon1_32x32" />
        <bt:Image size="32" resid="icon1_32x32" />
        <bt:Image size="80" resid="icon1_32x32" />
      </Icon>
      <Tooltip resid="residToolTip" />
      <Control xsi:type="Button" id="Button1Id1">

        <!-- information about the control -->
      </Control>
      <!-- other controls, as needed -->
    </Group>
  </CustomTab>
</ExtensionPoint>
<ExtensionPoint xsi:type="ContextMenu">
  <OfficeMenu id="ContextMenuCell">
    <Control xsi:type="Menu" id="ContextMenu2">
            <!-- information about the control -->
    </Control>
    <!-- other controls, as needed -->
  </OfficeMenu>
</ExtensionPoint>
步骤 5:添加控件元素
<Control> 元素定义命令的可用图面 (按钮、菜单等) 以及与它关联的操作。
按钮控件
按钮 控件 在用户选择时执行单个操作。 它可以执行 JavaScript 函数或显示任务窗格。 以下示例演示了如何定义两种按钮。 第一个按钮在不显示 UI 的情况下运行 JavaScript 函数,第二个按钮显示任务窗格。 在 <Control> 元素中:
- type 属性是必需的,并且必须设置为 Button。
- Control> 元素的<id 属性是最多 125 个字符的字符串。
<!-- Define a control that calls a JavaScript function. -->
<Control xsi:type="Button" id="Button1Id1">
  <Label resid="residLabel" />
  <Tooltip resid="residToolTip" />
  <Supertip>
    <Title resid="residLabel" />
    <Description resid="residToolTip" />
  </Supertip>
  <Icon>
    <bt:Image size="16" resid="icon1_32x32" />
    <bt:Image size="32" resid="icon1_32x32" />
    <bt:Image size="80" resid="icon1_32x32" />
  </Icon>
  <Action xsi:type="ExecuteFunction">
    <FunctionName>highlightSelection</FunctionName>
  </Action>
</Control>

<!-- Define a control that shows a task pane. -->
<Control xsi:type="Button" id="Button2Id1">
  <Label resid="residLabel2" />
  <Tooltip resid="residToolTip" />
  <Supertip>
    <Title resid="residLabel" />
    <Description resid="residToolTip" />
  </Supertip>
  <Icon>
    <bt:Image size="16" resid="icon2_32x32" />
    <bt:Image size="32" resid="icon2_32x32" />
    <bt:Image size="80" resid="icon2_32x32" />
  </Icon>
  <Action xsi:type="ShowTaskpane">
    <SourceLocation resid="residUnitConverterUrl" />
  </Action>
</Control>
以下代码显示了 FunctionName> 使用<的示例函数。 请注意对 的 event.completed调用。 这表示你已成功处理事件。 当某个函数被多次调用时(例如在同一外接程序命令上进行多次单击),所有事件将自动排队。 第一个事件将自动运行,而其他事件仍保持在队列中。 当函数调用 event.completed时,将运行对该函数的下一个排队调用。 必须实现 event.completed,否则函数不会运行。
// Initialize the Office Add-in.
Office.onReady(() => {
  // If needed, Office.js is ready to be called
});

// The command function.
async function highlightSelection(event) {

    // Implement your custom code here. The following code is a simple Excel example.
    try {
          await Excel.run(async (context) => {
              const range = context.workbook.getSelectedRange();
              range.format.fill.color = "yellow";
              await context.sync();
          });
      } catch (error) {
          // Note: In a production add-in, notify the user through your add-in's UI.
          console.error(error);
      }

    // Calling event.completed is required. event.completed lets the platform know that processing has completed.
    event.completed();
}

// You must register the function with the following line.
Office.actions.associate("highlightSelection", highlightSelection);
菜单控件
菜单控件可与 PrimaryCommandSurface 或 ContextMenu 一起使用,并定义:
- 根级别菜单项。
- 子菜单项的列表。
当与 PrimaryCommandSurface 一起使用时,根菜单项将显示为功能区上的按钮。 选择此按钮时,子菜单显示为下拉列表。 与 ContextMenu 结合使用时,将在上下文菜单上插入包含子菜单的菜单项。 在这两种情况中,单个子菜单项均可以执行 JavaScript 函数或显示任务窗格。 这一次仅支持子菜单的一个级别。
下面的示例演示如何定义具有两个子菜单项的菜单项。 第一个子菜单项显示任务窗格,而第二个子菜单项运行 JavaScript 函数。 在 <Control> 元素中:
- xsi:type 属性是必需的,并且必须设置为 Menu。
- id 属性是一个最多为 125 个字符的字符串。
<Control xsi:type="Menu" id="TestMenu2">
  <Label resid="residLabel3" />
  <Tooltip resid="residToolTip" />
  <Supertip>
    <Title resid="residLabel" />
    <Description resid="residToolTip" />
  </Supertip>
  <Icon>
    <bt:Image size="16" resid="icon1_32x32" />
    <bt:Image size="32" resid="icon1_32x32" />
    <bt:Image size="80" resid="icon1_32x32" />
  </Icon>
  <Items>
    <Item id="showGallery2">
      <Label resid="residLabel3"/>
      <Supertip>
        <Title resid="residLabel" />
        <Description resid="residToolTip" />
      </Supertip>
      <Icon>
        <bt:Image size="16" resid="icon1_32x32" />
        <bt:Image size="32" resid="icon1_32x32" />
        <bt:Image size="80" resid="icon1_32x32" />
      </Icon>
      <Action xsi:type="ShowTaskpane">
        <TaskpaneId>MyTaskPaneID1</TaskpaneId>
        <SourceLocation resid="residUnitConverterUrl" />
      </Action>
    </Item>
    <Item id="showGallery3">
      <Label resid="residLabel5"/>
      <Supertip>
        <Title resid="residLabel" />
        <Description resid="residToolTip" />
      </Supertip>
      <Icon>
        <bt:Image size="16" resid="icon4_32x32" />
        <bt:Image size="32" resid="icon4_32x32" />
        <bt:Image size="80" resid="icon4_32x32" />
      </Icon>
      <Action xsi:type="ExecuteFunction">
        <FunctionName>getButton</FunctionName>
      </Action>
    </Item>
  </Items>
</Control>
步骤 6:添加 Resources 元素
Resources<> 元素包含 VersionOverrides> 元素的不同子元素<使用的资源。 这些资源包括图标、字符串和 URL。 清单中的元素可以通过引用资源的 id 来使用此资源。 使用 id 有助于使清单保持有序状态,尤其是当多个区域设置拥有不同的资源版本时。 一个 id 最多可包含 32 个字符。
下面演示了如何使用 <Resources> 元素的示例。 每个资源可以有一个或多个 <Override> 子元素 ,用于为特定区域设置定义不同的资源。
<Resources>
  <bt:Images>
    <bt:Image id="icon1_16x16" DefaultValue="https://www.contoso.com/Images/icon_default.png">
      <bt:Override Locale="ja-jp" Value="https://www.contoso.com/Images/ja-jp16-icon_default.png" />
    </bt:Image>
    <bt:Image id="icon1_32x32" DefaultValue="https://www.contoso.com/Images/icon_default.png">
      <bt:Override Locale="ja-jp" Value="https://www.contoso.com/Images/ja-jp32-icon_default.png" />
    </bt:Image>
    <bt:Image id="icon1_80x80" DefaultValue="https://www.contoso.com/Images/icon_default.png">
      <bt:Override Locale="ja-jp" Value="https://www.contoso.com/Images/ja-jp80-icon_default.png" />
    </bt:Image>
  </bt:Images>
  <bt:Urls>
    <bt:Url id="residDesktopFuncUrl" DefaultValue="https://www.contoso.com/Pages/Home.aspx">
      <bt:Override Locale="ja-jp" Value="https://www.contoso.com/Pages/Home.aspx" />
    </bt:Url>
  </bt:Urls>
  <bt:ShortStrings>
    <bt:String id="residLabel" DefaultValue="GetData">
      <bt:Override Locale="ja-jp" Value="JA-JP-GetData" />
    </bt:String>
  </bt:ShortStrings>
  <bt:LongStrings>
    <bt:String id="residToolTip" DefaultValue="Get data for your document.">
      <bt:Override Locale="ja-jp" Value="JA-JP - Get data for your document." />
    </bt:String>
  </bt:LongStrings>
</Resources>
注意
必须为 Image> 和 Url 元素中的所有< URL 使用安全套接字层 (SSL) 。><
Outlook 支持说明
以下 Outlook 版本中提供了加载项命令。
- Windows 版 Outlook 2013 或更高版本
- Mac 版 Outlook 2016 或更高版本
- iOS 版 Outlook
- Android 版 Outlook
- 适用于 Exchange 2016 或更高版本的 Outlook 网页版
- 适用于 Microsoft 365 和 Outlook.com 的Outlook 网页版
- 新的 Windows 版 Outlook (预览版)
需要安装累积更新 5,Exchange 2016 才支持加载项命令。
如果外接程序使用 XML 清单,则外接程序命令仅适用于不使用 ItemHasAttachment、ItemHasKnownEntity 或 ItemHasRegularExpressionMatch 规则 来限制其激活的项目类型的外接程序。 但是, 上下文加载项 可以根据当前选择的项目是邮件还是约会来显示不同的命令,并且可以选择在阅读或撰写方案中显示。 如可能,使用外接程序命令将是最佳做法。
另请参阅
反馈
即将发布:在整个 2024 年,我们将逐步淘汰作为内容反馈机制的“GitHub 问题”,并将其取代为新的反馈系统。 有关详细信息,请参阅:https://aka.ms/ContentUserFeedback。
提交和查看相关反馈