Tutorial: Open a project from a repo
Applies to: ![]() Visual Studio
Visual Studio ![]() Visual Studio for Mac
Visual Studio for Mac
Note
This article applies to Visual Studio 2017. If you're looking for the latest Visual Studio documentation, see Visual Studio documentation. We recommend upgrading to the latest version of Visual Studio. Download it here
In this tutorial, you'll use Visual Studio to connect to a repository for the first time, clone it, and then open a project from it.
If you haven't already installed Visual Studio, go to the Visual Studio downloads page to install it for free.
Open a project from a GitHub repo with Visual Studio 2017
Open Visual Studio 2017.
From the top menu bar, select File > Open > Open from Source Control.
The Team Explorer - Connect pane opens.
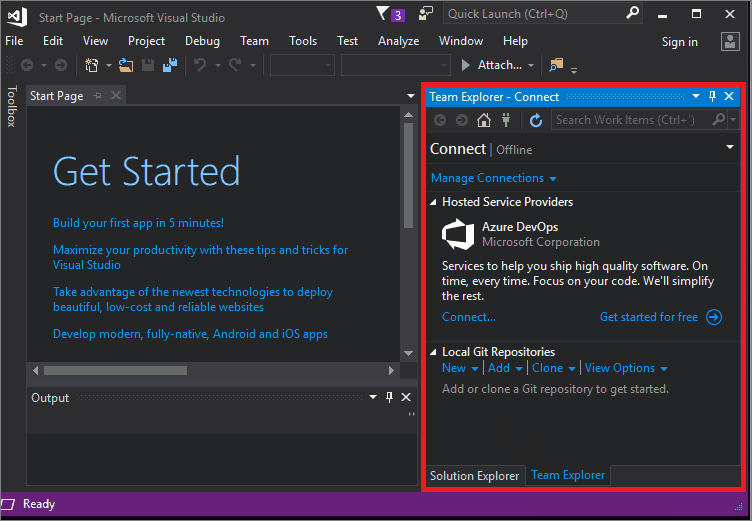
In the Local Git Repositories section, select Clone.

In the box that says Enter the URL of a Git repo to clone, type or paste the URL for your repo, and then press Enter. (You might receive a prompt to sign in to GitHub.)
After Visual Studio clones your repo, Team Explorer closes and Solution Explorer opens. A message appears that says Click on Solutions and Folders above to view a list of Solutions. Choose Solutions and Folders.

If you have a solution file available, it appears in the "Solutions and Folders" fly-out menu. Choose it, and Visual Studio opens your solution.
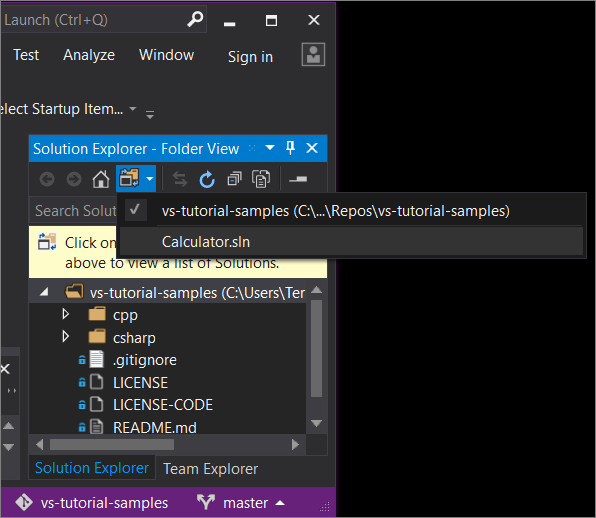
If you do not have a solution file (specifically, an .sln file) in your repo, the fly-out menu says, "No Solutions Found." However, you can double-click any file from the folder menu to open it in the Visual Studio code editor.
Review your work
View the following animation to check the work that you completed in the previous section.
Open a project from an Azure DevOps repo with Visual Studio 2017
Open Visual Studio 2017.
From the top menu bar, select File > Open > Open from Source Control.
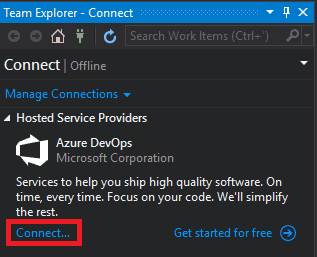
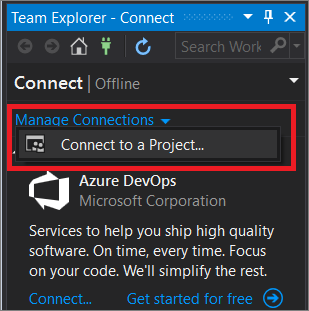
The Team Explorer - Connect pane opens.
Here are two ways to connect to your Azure DevOps repo:
In the Hosted Service Providers section, select Connect....
In the Manage Connections drop-down list, select Connect to a Project....
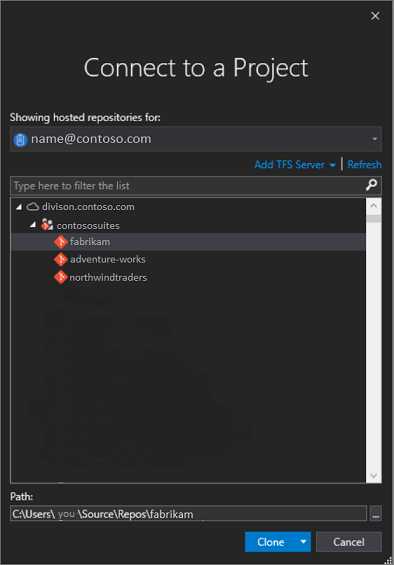
In the Connect to a Project dialog box, choose the repo that you want to connect to, and then select Clone.
Note
What you see in the list box depends on the Azure DevOps repositories that you have access to.
After Visual Studio clones your repo, Team Explorer closes and Solution Explorer opens. A message appears that says Click on Solutions and Folders above to view a list of Solutions. Choose Solutions and Folders.

A solution file (specifically, an .sln file), appears in the "Solutions and Folders" fly-out menu. Choose it, and Visual Studio opens your solution.
If you do not have a solution file in your repo, the fly-out menu says, "No Solutions Found". However, you can double-click any file from the folder menu to open it in the Visual Studio code editor.
Next steps
Feel free to dive into any of the following language-specific tutorials:
- Visual Studio tutorials | C#
- Visual Studio tutorials | Visual Basic
- Visual Studio tutorials | C++
- Visual Studio tutorials | Python
- Visual Studio tutorials | JavaScript, TypeScript, and Node.js