了解 SharePoint Server 2013 中的多重租用
適用於: 2013
2013  2019 Subscription Edition SharePoint in Microsoft 365
本文說明與 SharePoint Server 2013 中多租使用者相關的元件和服務,並提供架構、安全性、操作和管理指引,協助服務提供者瞭解 SharePoint Server 2013 中的多租使用者,以規劃、設計、建置及管理多租使用者 SharePoint Server 2013 裝載平臺。
注意事項
具有 Viva Engage 整合的 Microsoft OneDrive 不適用於內部部署的多租使用者或分割服務應用程式。
開始之前
SharePoint Server 2013 中的多重租用簡介
什麼是多重租用?
在我們介紹 SharePoint Server 2013 中的多租使用者功能之前,您應該先瞭解多租使用者的一般概念及其相關特性。 瞭解多租使用者及其相關特性,可協助您針對規劃、設計、操作及管理多租使用者 SharePoint Server 2013 裝載平臺做出適當的決策。
多租使用者是指管理及分割月台數據的能力,或是共用服務或軟體以容納多個租使用者的能力。 此功能與執行服務的多個實例或設定個別硬體相反。 在 Microsoft 產品和技術中,服務的多重租用會建立伺服器陣列資源最大化的主控環境。 在了解裝載環境之前,請務必先瞭解服務架構。
啟用 SharePoint Server 2013 中多重租用的重要元件和服務
本節說明啟用 SharePoint Server 2013 中多重租用的重要元件和服務。
Web 應用程式
SharePoint 2013 Web 應用程式包含一個 Internet Information Services (IIS) 網站,做為所建立網站集合之管理和安全的邏輯單位。 每個 Web 應用程式都是以使用唯一或共用應用程式集區的不同 IIS 網站來呈現。 建立 Web 應用程式時,也可以建立內容資料庫,以及定義用來連線至資料庫的驗證方法。
主機命名型網站集合
主機命名型網站集合可讓您指派專屬 DNS 名稱給網站集合。 例如,您可以將它們的位址寫成 http://TeamA.contoso.com and http://TeamB.fabrikam.com。 此布建可讓您在相同的 Web 應用程式中部署許多使用唯一 DNS 名稱的網站。 它也可讓服務提供者將環境延伸到許多客戶。 如果您不使用主機名網站集合,SharePoint Web 應用程式會包含許多路徑型網站集合,這些網站集合共用相同的主機名 (DNS 名稱) 。 例如,小組 A 具有位址為共用 https://contoso.com/sites/teamA 的網站集合,而小組 B 具有位址為 https://fabrikam.com/sites/teamB 的網站集合。
主機命名型網站集合基本上是延伸多重租用環境的唯一方法,並提供所使用 URL 命名空間的最大彈性。 如果使用具有多租用戶的路徑型網站,將會快速到達受控路徑的軟體界限。
如需如何為 SharePoint Server 2013 規劃主機名網站集合的詳細資訊,請參閱 主機名網站集合架構和部署 (SharePoint 2013) 。
服務群組 (Proxy 群組)
服務群組也稱為 Proxy 群組,是選取供 Web 應用程式使用的服務應用程式群組。
除非在建立服務應用程式時指定另一個群組,否則預設群組中預設會包括所有服務應用程式。 您隨時都可以新增和移除預設群組中的服務應用程式。 建立 Web 應用程式時,您可以選取預設群組,也可以建立一組自訂的服務。 只選取想要 Web 應用程式使用的服務應用程式,即可建立一組自訂的服務。
自定義群組無法跨多個 Web 應用程式重複使用。 每次您在建立 Web 應用程式時選取 [自定義] 時,只會針對您要建立的 Web 應用程式選取服務。
服務 Proxy
建立服務應用程式時,同時會建立服務應用程式的 Proxy。 Proxy 是將 Web 應用程式連線至服務應用程式的虛擬實體。 Proxy 會列在 SharePoint 管理中心網站 的 [管理服務應用程式] 頁面中。
如果您使用 管理中心 或 SharePoint 2016 產品設定精靈 建立服務應用程式,則會自動建立 Proxy。 如果您使用 Microsoft PowerShell 來建立服務應用程式,Proxy 不一定會自動建立,而且必須使用 Microsoft PowerShell 來建立。
部分 Proxy 可能包括可變更的設定。 例如,如果 Web 應用程式連線至 Managed Metadata 服務的多個執行個體,則您必須指出連線至主要服務應用程式 (其主控公司分類) 的 Proxy。 使用多租使用者時,這些設定會移至租用戶層級設定。
服務應用程式
服務應用程式是指定服務及其安全性與管理組態的邏輯表示法,可定義其作業行為。 範例包括 Managed Metadata 和 User Profiles。 不同的服務應用程式會以不同的方式實作,而此彈性會影響多租使用者解決方案的設計。
若要判定 SharePoint Server 2013 中可用的服務應用程式清單以及其在 SharePoint 版本 (含多重租用功能) 中的可用性,請參閱 給主機服務提供者的 SharePoint Server 2013 一般指引中的 服務和功能 一節。
功能套件和授權
SharePoint 中的功能套件是將一組網站範圍或 Web 範圍功能群組在一起的方式。 一旦將 SharePoint 功能分組,就可以與租使用者) (的網站訂用帳戶相關聯。 該網站訂閱 (承租人) 中的所有網站集合都只能使用屬於功能套件一部分的網站範圍或 Web 範圍功能。 此功能可讓服務提供者根據不同組的功能來提供分層服務方案。
在 SharePoint Server 2013 中,已新增一項功能,以根據使用者指派不同的 SharePoint 授權。 它也開啟執行階段的 SharePoint 授權檢查。 這項功能可讓服務提供者在整個簡化的部署模型中建置不同的服務供應專案,提供更大的彈性。 在舊版 SharePoint 中,服務提供者必須為每個 SharePoint 版本建置不同的 SharePoint 部署模型。 如需 SharePoint 功能的詳細資訊,請參閱下列文章的 跨內部部署解決方案的 SharePoint 功能可用性 一節: SharePoint 服務描述。
資訊版權管理
SharePoint Server 2013 中的資訊版權管理整合新增多重租用支援,其啟用管理承租人層級資訊版權管理設定的能力。
架構設計考量
本節說明架構多重租用 SharePoint Server 2013 環境的各種考量。 如本文件前面所述,多重租用在架構和設計 SharePoint Server 2013 環境時需要考慮一些唯一特性。 您需要根據需求來衡量那些因素,以便制定適當決策。
了解 SharePoint Server 2013 的界限及限制
了解 SharePoint Server 2013 的軟體界限和限制,可協助您做出正確的決策,以選取多重租用 SharePoint 環境的適當架構。 如需內容資料庫和網站集合套用至 SharePoint Server 2013 多租用戶環境之主要界限和限制的詳細資訊,請參閱 SharePoint Server 2016 的軟體界限和限制 和 SharePoint Server 2016 的軟體界限和限制。
共用伺服器陣列與專用伺服器陣列
使用共用伺服器陣列在單一 Web 應用程式上主控多承租人網站集合,所提供的延展性優於每個承租人都使用專用 Web 應用程式。
只有在需要滿足隔離需求時,每個客戶才需要使用專用 Web 應用程式和應用程式集區。
不允許將完全信任的程式代碼部署至網站。
不允許影響共用資源的自定義專案,例如 web.config 檔案。
使用主機命名型網站集合,在整個 Web 應用程式中建立多個根層級網站集合 (網域命名型網站)。
一個 Web 應用程式與多個 Web 應用程式
針對需要進行影響資源之自訂的承租人,請使用專用 Web 應用程式,而資源是在 Web 應用程式中共用 (例如 web.config 檔案)。
在單一伺服器陣列中合併多個承租人時,請針對所有已驗證內容使用專用 SharePoint Web 應用程式,並針對所有匿名內容使用不同的專用 Web 應用程式。 對於具有這兩種內容類型的租使用者,此方法將需要兩個不同的訂用帳戶標識碼。 此方法也會簡化授權。
部分 SharePoint 功能繫結至 Web 應用程式層級 (例如「自助網站集合架設」設定)。 開啟它之後,相同 Web 應用程式下的所有承租人都將可以建立網站集合。
單一伺服器陣列環境設計
在租用戶數據和管理隔離的多組織裝載環境中,分割和共用服務的設定非常重要。 此範例提供分割服務的實際實作,也提供如何部署客戶網站的建議。
此範例詳述可用來將客戶網站部署至伺服器陣列的下列方式:
專用應用程式集區和 Web 應用程式
共用應用程式集區和專用 Web 應用程式
共用 Web 應用程式
已驗證網站
未驗證網站
只有在需要滿足隔離需求時,每個客戶才需要使用專用應用程式集區。 針對需要進行影響資源之自訂的承租人,請使用專用 Web 應用程式,而資源是在 Web 應用程式中共用 (例如 web.config 檔案)。
在單一 Web 應用程式中合併多個承租人時,請針對所有已驗證內容使用專用 Web 應用程式,並針對所有匿名內容使用不同的專用 Web 應用程式。 對於具有這兩種內容類型的租使用者,此方法將需要兩個不同的訂用帳戶標識碼。 此方法也可簡化授權。
不允許在網站中部署完全信任程式碼。
不允許影響共用資源 (例如 web.config 檔案) 的自訂。
在下列範例 (已驗證網站) 中,每個公司都會使用不同的主機命名型網站集合。 公司 C 包括兩個不同的主機命名型網站集合。 在每個最上層主機命名型網站集合下,受管理路徑是用來建立網站之最上層網站集合的第二層 (例如小組網站、我的網站、已發佈內部網路內容或不同的部門網站)。
分層環境設計
如前所述,規劃多承租人 SharePoint Server 2013 主控平台時需要考慮許多事項,其中這些因素是成本、簡化管理、資源隔離、效能和延展性。
隨著客戶群規模日益成長,您會發現很難符合單一環境中所有客戶的所有需求。 此時,為了讓那些因素取得平衡,就需要進行特定取捨。
如果是這種情況,則可能會想要考慮使用的替代方式就是分層環境設計,其中有多個 SharePoint 環境符合您客戶的各種需要。 每個環境都著重在服務方案的不同層面,例如,低成本、高密度、更高的資源隔離,以及成本較高的更佳服務品質 (QoS) 等。
此分層環境設計方式可以提供不同的服務等級協定供客戶使用。 因此,您可以為更多客戶提供服務、簡化管理和作業、降低管理成本,以及提升利潤率。
安全考量
本節討論規劃和設計多承租人 SharePoint Server 2013 主控平台的各種安全考量。 從此時開始,任何討論人員選擇器設定的章節,例如組織單位 (OU) 一節,都只能在沒有進一步自定義 Windows 驗證 的情況下運作。
SharePoint Server 2013 支援下列驗證類型的許多驗證方法和驗證提供者:
Windows 驗證
表單型驗證
SAML Token 型驗證
Windows 驗證類型利用現有的 Windows 驗證提供者及 Windows 網域環境用來驗證連線用戶端之認證的驗證通訊協定。 宣告型驗證和傳統模式都會使用 Windows 驗證 方法,包括:
NTLM
Kerberos
摘要
基本
表單型驗證 (FBA) 是宣告式身分識別管理系統,以 ASP.NET 成員資格與角色提供者驗證為基礎。 表單型驗證可以針對儲存在驗證提供者的認證使用,例如:
Active Directory Domain Services (AD DS)
資料庫 (例如 SQL Server 資料庫)
輕量型目錄存取通訊協定 (LDAP) 資料存放區 (例如 Novell eDirectory、Novell Directory Services (NDS) 或 Sun ONE)
表單型驗證會根據使用者以登入表單形式 (通常為網頁) 輸入的認證來驗證使用者。 未經驗證的要求會重新導向至登入頁面,使用者必須在該頁面提供有效認證再送出表單。 系統會發出驗證要求的 Cookie,包含用於重新建立較新要求之身分識別的金鑰。
若要使用表單型驗證,針對不是以 Windows 為基礎的身分識別管理系統或外部的身分識別管理系統來驗證使用者,您必須在數個 web.config 檔案中註冊成員資格提供者和角色管理員。 SharePoint Server 2013 使用標準 ASP.NET 角色管理員介面,收集目前使用者的群組資訊。 SharePoint Server 2013 的授權程序會將每一個 ASP.NET 角色視為一個網域群組。 在 web.config 檔案登錄角色管理員的方法,與登錄用於驗證之成員資格提供者的方法完全相同。
若要從管理中心網站管理成員資格使用者或角色,您必須在 web.config 檔案中為管理中心網站登錄成員資格提供者及角色管理員。 您還必須在主控內容之 Web 應用程式的 web.config 檔案以及 Security Token Service 的 web.config 檔案中登錄成員資格提供者及角色管理員。
SharePoint Server 2013 中的 SAML 令牌型驗證會使用 SAML 1.1 通訊協定和 WS-Federation 被動要求者設定檔 (WS-F PRP) 。 無論是您自己的內部環境或合作夥伴環境,它都需要與宣告型環境的系統管理員協調。 如果您使用 Active Directory 同盟服務 (AD FS) 2.0,您會有 SAML 令牌型驗證環境。
針對使用宣告式驗證的 Web 應用程式,人員選擇是 SharePoint Server 2013 內提供的一種控制項。 人員選擇控制項使用宣告提供者來列出、解析、搜尋以及判斷使用者、群組和宣告的「好記」顯示。 如需人員選擇器設定的詳細資訊,請參閱 人員 選擇器和宣告提供者概觀。
Zones represent different logical paths to gain access to the same sites in a web application. Each web application can include as many as five zones. When you create a web application, Central Administration creates the zone named Default. 若要建立更多區域,請擴充 Web 應用程式,然後選取其中一個其餘區域名稱: 內部網路、 外部網路、 因特網或 自定義。
組織單位
組織單位 (OU) 組織 Active Directory 環境中的使用者和電腦物件。 基於主控目的,則能以如下圖所示組織組織單位結構。
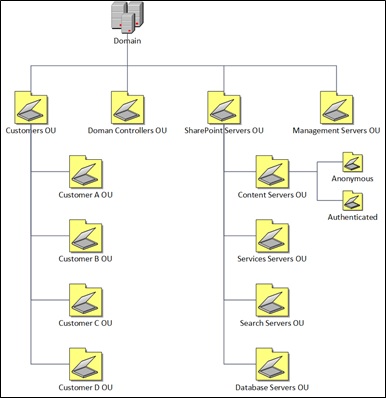
您至少會想要將群組原則連結至網域根目錄、網域控制器 OU、SharePoint Server OU 和客戶 OU。
網域根目錄
套用至整個網域的安全性已套用到網域原則。 這些設定包含在套用至整個網域的群組原則物件 (GPO) 中。
網域控制器 OU
網域控制器保留組織中的最機密資料 (即控制安全設定本身的資料)。 此層級所套用的 GPO 是用來設定和保護網域中的網域控制器。
SharePoint Server OU
SharePoint 伺服器具有的唯一 角色未包括在目錄的其他伺服器中。 將這些伺服器放在其專屬 OU,可將唯一原則套用至這些伺服器。 它們也可以與目錄中的其他伺服器隔離。 需要建立不同 GPO (例如匿名存取內容伺服器與已驗證內容伺服器) 時,可以建立子 OU。
客戶 OU
這個最上層 OU 可隔離所有使用者帳戶與目錄的其餘部分。 OU 的下一個層級包含客戶 OU。 每個客戶都有一個 OU。 此 OU 可讓客戶的所有使用者帳戶和電腦帳戶與其他客戶的帳戶隔離。 此外,此 OU 結構是支援多租使用者部署中使用者配置檔同步處理的必要結構。
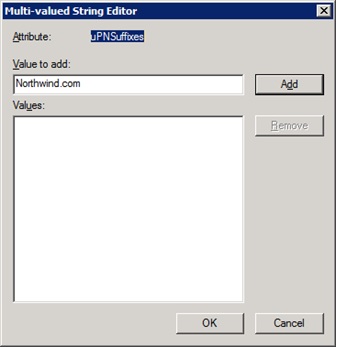
若要讓使用者看到登入自己的自定義網域,請使用 Active Directory 服務介面編輯器 (ADSI 編輯) 或其他 AD 工具來編輯每個客戶 OU 的 uPNSuffixes 屬性,如下圖所示。
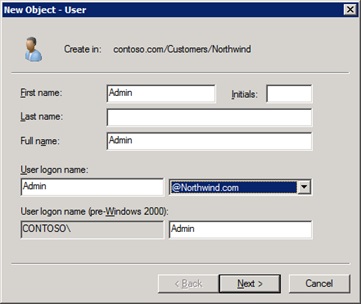
設定客戶 OU 的 uPNSuffixes 屬性之後,它的值將可以與該客戶 OU 內的使用者帳戶相關聯 (如下圖所示)。
使用者驗證
User authentication is the validation of a user's identity against an authentication provider, which is a directory or database that contains the user's credentials and can confirm the user submitted them correctly. An example of an authentication provider is Active Directory Domain Services (AD DS). 驗證提供者的其他常見名稱是 使用者目錄 和 屬性存放區。
驗證方法是帳戶認證與宣告使用者身分識別之其他資訊的特定交換。 驗證方法的結果是驗證提供者驗證使用者的證明,通常使用包含宣告的 Token 格式。
驗證類型是根據一或多個驗證提供者驗證認證的特定方式,有時會使用業界標準通訊協定。 一種驗證類型可以使用多種驗證方法。
確認使用者身分識別之後,授權程序即可決定使用者所能存取的網站、內容及其他功能。
規劃使用者驗證類型和方法時應該決定下列事項:
每個 Web 應用程式和區域的使用者驗證類型和方法。
支援決定使用之驗證類型和方法所需的驗證基礎結構。
如何將目前使用傳統模式驗證的 Web 應用程式和區域移轉為使用宣告式驗證。
Active Directory Federation Services (AD FS)
SharePoint Server 2013 支援宣告式驗證。 Active Directory Federation Services (AD FS) 可以設定成做為 SharePoint Server 2013 Web 應用程式的身分識別提供者 Security Token Service (IP-STS)。 在此設定中,AD FS 發出包含宣告的 SAML 安全性 Token,讓用戶端電腦可以存取使用宣告式驗證的 Web 應用程式。 您可以使用 AD FS 替代的識別提供者。 但是必須支援 WS-Federation 標準。 同時,使用 AD FS 設定,需要有自訂程式碼。
如需如何使用 AD FS for SharePoint Server 2013 設定 SAML 型宣告驗證的詳細資訊,請參閱 在 SharePoint Server 中使用 AD FS 設定 SAML 型宣告驗證。
管理和作業考量
本節討論多承租人 SharePoint Server 2013 環境的各種管理和作業考量。
容量管理
因為內容及使用不會停歇,所以「內容管理」這項程序也會持續不斷地進行。 您必須規劃成長與變更,讓 SharePoint Server 2013 環境能夠一直提供有效率的商務方案。 如需 SharePoint Server 2013 中容量管理的詳細資訊,請參閱 SharePoint Server 2013 的容量管理和大小調整概觀。
應用程式管理
SharePoint 應用程式有新方法可以將特定的資料或功能傳送給 SharePoint 網站。 SharePoint 相關應用程式是一支小型的獨立應用程式,用法十分簡單,可以滿足某些特殊使用者或商務的需求。 網站擁有者可以在公用的 SharePoint 市集或組織內容的應用程式目錄探索及下載 SharePoint 應用程式,再將其安裝到自己的 SharePoint 網站。 這些 SharePoint 應用程式集結了多項網路功能,可以讓 SharePoint Server 2013 如虎添翼。 它們不會取代自定義或增加 SharePoint 網站的 SharePoint 功能和解決方案套件。 不同於需要伺服器陣列或網站集合管理員安裝的功能與解決方案,SharePoint 應用程式是獨立的應用程式,網站擁有者只需要將其加入 SharePoint 網站即可。 SharePoint 應用程式的流程十分簡單,網站擁有者可以安裝、升級及取消安裝。
SharePoint Server 2013 中的 App Management Service 具有多重租用功能。 大部分應用程式設定和管理功能是透過承租人管理網站公開,並允許每個承租人管理員設定其個別設定。
備份與還原
在多承租人 SharePoint Server 2013 主控平台上執行與承租人無關的備份和還原作業時,您可以遵循在 SharePoint Server 2013 環境上執行備份和還原作業的一般指引,請參閱SharePoint Server 的備份與還原。
請注意,在 SharePoint Server 2013 中,Workflow 平台與 SharePoint 平台不同。 因此,Workflow Manager 上的備份和還原作業應該與 SharePoint 備份和還原作業一致,確保兩者同步。 如需如何規劃工作流程 Service Manager 備份和還原作業的詳細指引,請參閱 工作流程管理員 1.0 中的災害復原和範圍還原
在多承租人 SharePoint Server 2013 主控平台上執行承租人特定備份和還原作業時,您可能需要將下列具有承租人功能的元件與另一個元件同步:服務應用程式、工作流程、內容資料庫和網站集合。
服務應用程式
以分割模式設定的服務應用程式會有一或多個含有承租人特定資料的相關聯資料庫。 同時在應用程式和資料庫層級對這些服務應用程式執行一般備份和還原作業時,具有有限的命令,可對這些服務應用程式或其資料庫執行承租人特定詳細備份和還原作業。
服務應用程式考量
App Management Service
App Management Service 是用於管理 SharePoint Server 2013 中所引進 SharePoint 相關應用程式 功能的服務應用程式。 SharePoint 應用程式有新方法可以將特定的資料或功能傳送給 SharePoint 網站。 SharePoint 相關應用程式是一支小型的獨立應用程式,用法十分簡單,可以滿足某些特殊使用者或商務的需求。 應用程式管理服務不支持數據分割模式,不過它是原生網站訂用帳戶感知。 在多承租人 SharePoint 環境中,大部分 App Management 功能 (即 [管理 應用程式目錄]、[管理應用程式授權]、[應用程式權限] 等) 的取得是使用承租人管理網站。
下圖顯示承租人管理網站上的應用程式管理。

Business Data Connectivity Service
以分割模式設定之後,Business Data Connectivity Service 的所有設定都會移到承租人管理。 不過,租使用者管理網站範本不包含此頁面的連結,您可以使用擴充租使用者管理網站範本一節中的自定義技術來新增此頁面
Secure Store Service
以分割模式設定之後,加密金鑰的產生還是會透過管理中心或 Windows PowerShell 執行伺服器陣列層級設定。 Secure Store Service 設定的其餘部分會移到承租人管理。 不過,租使用者管理網站範本不包含此頁面的連結,您可以使用擴充租使用者管理網站範本一節中的自定義技術來新增此頁面。
Managed Metadata Service
以分割模式設定之後,所有設定都會移到承租人管理,而且預設會啟用內容類型發佈。
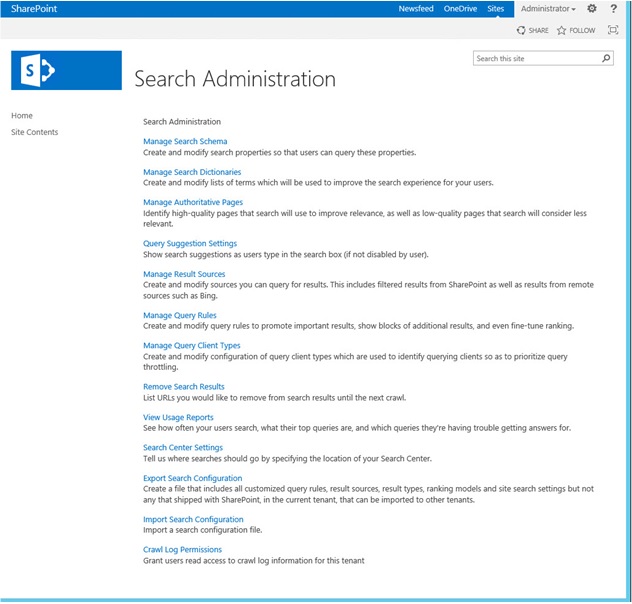
Search Service
承租人管理網站中會公開許多承租人特定搜尋設定相關功能 (如下圖所示)。
注意事項
許多 *。EnterpriseSearch* Microsoft PowerShell Cmdlet 現在具有數據分割感知,可用來自動化租使用者管理網站中公開的部分設定和管理功能。
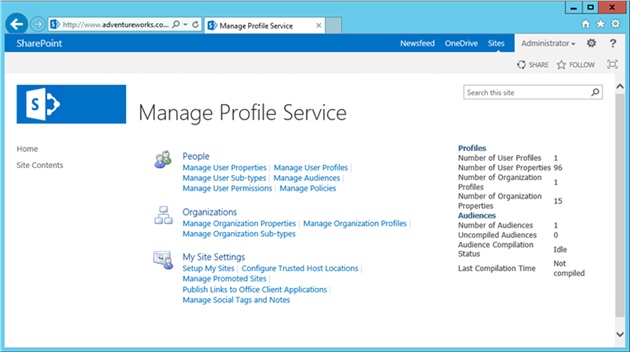
User Profile Service
大量的設定元素會移到承租人管理,不過,Profile Synchronization 的大部分設定都會保持在伺服器陣列層級,而且適用於所有承租人 (如下圖所示)。
工作流程
如前所述,在 SharePoint Server 2013 中,Workflow 平台與 SharePoint 平台不同。 Workflow 平台本身使用一或多個資料庫。 您可以對這些資料庫執行一般資料庫層級備份和還原作業時,沒有命令或公用程式可以對這些 Workflow 資料庫執行承租人特定備份和還原作業。
內容資料庫
如果承租人具有一或多個專用內容資料庫的專用使用權,則您可以對這些資料庫執行一般資料庫層級備份和還原作業。
注意事項
[!附註] 使用標準產品功能 (例如,自助網站架設) 無法達成具有一或多個專用內容資料庫的專用使用權。 這是符合特定服務層級方案時需要自訂的範例。
下列 Microsoft PowerShell 指令碼顯示如何對租用戶內容資料庫執行初始備份動作。
Add-PSSnapin microsoft.sharepoint.powershell -ea SilentlyContinue
Backup-SPFarm -Directory "c:\backups\alpha" -Item "HostingFarm_Content_Hosting" -BackupMethod Full
Write-Host "Tenant Content Database Backup Script Completed!"
The following Windows PowerShell script shows how to perform a restore operation on a tenant site collection:
Add-PSSnapin microsoft.sharepoint.powershell -ea SilentlyContinue
Restore-SPFarm -Directory "c:\backups\alpha" -Item "HostingFarm_Content_Hosting" -RestoreMethod Overwrite
Write-Host "Tenant Content Database Restore Script Completed!"
網站集合
您可以對承租人網站集合執行特定備份和還原作業。 您選擇使用的工具取決於網站集合本身的大小。 Microsoft PowerShell Cmdlet 是小到中型網站集合的適當選擇。
下列 Microsoft PowerShell 指令碼顯示如何對租用戶網站集合執行備份動作。
Add-PSSnapin microsoft.sharepoint.powershell -ea SilentlyContinue
Backup-SPSite -Identity "http://alpha.contoso.com" -Path "c:\backups\alpha\root.bak" -UseSqlSnapshot
Write-Host "Tenant Site Collection Backup Script Completed!"
The following script shows how to perform a restore operation on a tenant site collection:
Add-PSSnapin microsoft.sharepoint.powershell -ea SilentlyContinue
Restore-SPSite -Identity "http://alpha.contoso.com" -Path "c:\backups\alpha\root.bak" -DatabaseServer "SQLServer01" -DatabaseName "HostingFarm_Content_Hosting" -HostHeaderWebApplication "http://$ENV:COMPUTERNAME" -GradualDelete - Confirm: $false -Force
Write-Host "Tenant Site Collection Restore Script Completed!"
監視
有許多工具可讓您監視 SharePoint Server 2013 和疑難排解問題。 不同的工具針對環境的不同方面,不過其中有許多重疊的部分。 請仔細思考哪些工具可以徹底發揮監視的用途。 如需如何規劃 SharePoint Server 2013 監視的詳細指引,請參閱 規劃 SharePoint Server 中的監視。
功能套件管理
如前所述,功能套件可用於將不同的功能分組,以及建立它們與網站訂閱 (即承租人) 的關聯性。 該網站訂閱 (承租人) 中的所有網站集合都只能使用屬於功能套件一部分的網站範圍或 Web 範圍功能。 此功能可讓服務提供者根據不同組的功能來提供分層服務方案。 建立的功能套件是使用 New-SPSiteSubscriptionFeaturePack Cmdlet 來建立功能套件容器,以及使用 Add-SPSiteSubscriptionFeaturePackMember Cmdlet 將個別功能新增至該容器。
下列 Microsoft PowerShell 指令碼顯示如何建立可代表 SharePoint Foundation 2013 功能的承租人層級功能套件,以及在伺服器陣列屬性包中儲存功能套件 ID。
注意事項
必須要有 Subscription Settings Service 應用程式,才能執行與功能套件搭配使用的指令碼。
<#
   Feature Packs.ps1
    Creates a new Feature Pack comprised of SharePoint Foundation 2013 Features
    Adds the Feature Pack ID with a friendly name to the Farm's Property Bag for future use.

#>
asnp Microsoft.SharePoint.PowerShell
# Create an alias for Add-SPSiteSubscriptionFeaturePackMember
Set-Alias AddFeature Add-SPSiteSubscriptionFeaturePackMember
# create a new feature pack, and store it in the Farm's Property Bag
$ffp = New-SPSiteSubscriptionFeaturePack
$farm = Get-SPFarm
$farm.Properties.Add("Foundation_FeaturePack", $ffp.Id);
$farm.Update();
# add foundation features to the feature pack
# web scoped features...
AddFeature -identity $ffp -FeatureDefinition  XmlFormLibrary
AddFeature -identity $ffp -FeatureDefinition  LinksList
AddFeature -identity $ffp -FeatureDefinition  WorkflowProcessList
AddFeature -identity $ffp -FeatureDefinition  GridList
AddFeature -identity $ffp -FeatureDefinition  WorkflowHistoryList
AddFeature -identity $ffp -FeatureDefinition  TeamCollab
AddFeature -identity $ffp -FeatureDefinition  GanttTasksList
AddFeature -identity $ffp -FeatureDefinition  PictureLibrary
AddFeature -identity $ffp -FeatureDefinition  IssuesList
AddFeature -identity $ffp -FeatureDefinition  DiscussionsList
AddFeature -identity $ffp -FeatureDefinition  ContactsList
AddFeature -identity $ffp -FeatureDefinition  ExternalList
AddFeature -identity $ffp -FeatureDefinition  TasksList
AddFeature -identity $ffp -FeatureDefinition  WebPageLibrary
AddFeature -identity $ffp -FeatureDefinition  AnnouncementsList
AddFeature -identity $ffp -FeatureDefinition  WikiPageHomePage
AddFeature -identity $ffp -FeatureDefinition  CustomList
AddFeature -identity $ffp -FeatureDefinition  DocumentLibrary
AddFeature -identity $ffp -FeatureDefinition  SurveysList
AddFeature -identity $ffp -FeatureDefinition  EventsList
AddFeature -identity $ffp -FeatureDefinition  DataSourceLibrary
AddFeature -identity $ffp -FeatureDefinition  NoCodeWorkflowLibrary
AddFeature -identity $ffp -FeatureDefinition  OsrvLinks
AddFeature -identity $ffp -FeatureDefinition  FCGroupsList
AddFeature -identity $ffp -FeatureDefinition  TenantAdminBDC
AddFeature -identity $ffp -FeatureDefinition  OssNavigation
AddFeature -identity $ffp -FeatureDefinition  IMEDicList
AddFeature -identity $ffp -FeatureDefinition  CallTrackList
AddFeature -identity $ffp -FeatureDefinition  SSSvcAdmin
AddFeature -identity $ffp -FeatureDefinition  MpsWebParts
AddFeature -identity $ffp -FeatureDefinition  GBWWebParts
AddFeature -identity $ffp -FeatureDefinition  FacilityList
AddFeature -identity $ffp -FeatureDefinition  ScheduleList
AddFeature -identity $ffp -FeatureDefinition  ObaProfilePages
AddFeature -identity $ffp -FeatureDefinition  GBWProvision
AddFeature -identity $ffp -FeatureDefinition  OSSSearchSearchCenterUrlFeature
AddFeature -identity $ffp -FeatureDefinition  WikiWelcome
AddFeature -identity $ffp -FeatureDefinition  MaintenanceLogs
AddFeature -identity $ffp -FeatureDefinition  TenantAdminLinks
AddFeature -identity $ffp -FeatureDefinition  HolidaysList
AddFeature -identity $ffp -FeatureDefinition  GroupWork
AddFeature -identity $ffp -FeatureDefinition  WhereaboutsList
AddFeature -identity $ffp -FeatureDefinition  CirculationList
AddFeature -identity $ffp -FeatureDefinition  TenantAdminSecureStore
AddFeature -identity $ffp -FeatureDefinition  SearchAdminWebParts
AddFeature -identity $ffp -FeatureDefinition  ObaSimpleSolution
AddFeature -identity $ffp -FeatureDefinition  TimecardList
AddFeature -identity $ffp -FeatureDefinition  WhatsNewList
AddFeature -identity $ffp -FeatureDefinition  MobilityRedirect
AddFeature -identity $ffp -FeatureDefinition  AdminLinks
AddFeature -identity $ffp -FeatureDefinition  SearchCenterLiteFiles
AddFeature -identity $ffp -FeatureDefinition  CorporateCatalog
AddFeature -identity $ffp -FeatureDefinition  BlogContent
AddFeature -identity $ffp -FeatureDefinition  PromotedLinksList
AddFeature -identity $ffp -FeatureDefinition  AppLockdown
AddFeature -identity $ffp -FeatureDefinition  AppRequestsList
AddFeature -identity $ffp -FeatureDefinition  SearchCenterUpgrade
AddFeature -identity $ffp -FeatureDefinition  SearchConfigFields
AddFeature -identity $ffp -FeatureDefinition  PhonePNSubscriber
AddFeature -identity $ffp -FeatureDefinition  SearchConfigContentType
AddFeature -identity $ffp -FeatureDefinition  GettingStarted
AddFeature -identity $ffp -FeatureDefinition  GettingStartedWithAppCatalogSite
AddFeature -identity $ffp -FeatureDefinition  ExternalSubscription
AddFeature -identity $ffp -FeatureDefinition  SearchCenterFiles
AddFeature -identity $ffp -FeatureDefinition  BcsEvents
AddFeature -identity $ffp -FeatureDefinition  OfficeExtensionCatalog
AddFeature -identity $ffp -FeatureDefinition  MDSFeature
AddFeature -identity $ffp -FeatureDefinition  TenantSearchAdmin
AddFeature -identity $ffp -FeatureDefinition  SiteAssets
AddFeature -identity $ffp -FeatureDefinition  PremiumSearchVerticals
AddFeature -identity $ffp -FeatureDefinition  AccessRequests
AddFeature -identity $ffp -FeatureDefinition  SearchConfigList
AddFeature -identity $ffp -FeatureDefinition  ReportAndDataSearch
AddFeature -identity $ffp -FeatureDefinition  MBrowserRedirect
AddFeature -identity $ffp -FeatureDefinition  BlogHomePage
AddFeature -identity $ffp -FeatureDefinition  SearchConfigListTemplate
AddFeature -identity $ffp -FeatureDefinition  SiteNotebook
AddFeature -identity $ffp -FeatureDefinition  HierarchyTasksList
AddFeature -identity $ffp -FeatureDefinition  BlogSiteTemplate
AddFeature -identity $ffp -FeatureDefinition  SearchCenterLiteUpgrade
# Site Scoped features...
AddFeature -identity $ffp -FeatureDefinition  BasicWebParts
AddFeature -identity $ffp -FeatureDefinition  OSSSearchEndUserHelpFeature
AddFeature -identity $ffp -FeatureDefinition  HelpLibrary
AddFeature -identity $ffp -FeatureDefinition  OfficeWebApps
AddFeature -identity $ffp -FeatureDefinition  WordServerViewing
AddFeature -identity $ffp -FeatureDefinition  OnenoteServerViewing
AddFeature -identity $ffp -FeatureDefinition  SiteHelp
AddFeature -identity $ffp -FeatureDefinition  ctypes
AddFeature -identity $ffp -FeatureDefinition  OSSSearchSearchCenterUrlSiteFeature
AddFeature -identity $ffp -FeatureDefinition  OpenInClient
AddFeature -identity $ffp -FeatureDefinition  ExcelServerEdit
AddFeature -identity $ffp -FeatureDefinition  AdminReportCore
AddFeature -identity $ffp -FeatureDefinition  fields
AddFeature -identity $ffp -FeatureDefinition  SearchServerWizardFeature
AddFeature -identity $ffp -FeatureDefinition  OSearchHealthReports
AddFeature -identity $ffp -FeatureDefinition  SearchWebParts
AddFeature -identity $ffp -FeatureDefinition  IssueTrackingWorkflow
AddFeature -identity $ffp -FeatureDefinition  ShareWithEveryone
AddFeature -identity $ffp -FeatureDefinition  MonitoredApps
AddFeature -identity $ffp -FeatureDefinition  SearchTaxonomyRefinementWebParts
AddFeature -identity $ffp -FeatureDefinition  SearchTaxonomyRefinementWebPartsHtml
AddFeature -identity $ffp -FeatureDefinition  SearchMaster
AddFeature -identity $ffp -FeatureDefinition  EnableAppSideLoading
AddFeature -identity $ffp -FeatureDefinition  Developer
AddFeature -identity $ffp -FeatureDefinition  AutohostedAppLicensing
AddFeature -identity $ffp -FeatureDefinition  AppRegistration
Write-Host "Feature Pack Created! " + $ffp.ID
授權管理
在 SharePoint Server 2013 中,已新增授權管理功能。 伺服器陣列管理員現在可以將授權指派給使用者並啟用執行階段授權檢查。 使用此新功能,即可確保只有具有適當授權的使用者才能使用特定功能。 此功能也會簡化部署模型,因為您不再需要為 SharePoint Server 標準和企業版建置不同的伺服器陣列。
使用者授權是藉由將宣告對應至已知類型的授權來指派。 例如,假設宣告是 Active Directory 網域服務 (AD DS) 安全性群組。 藉由將 ContosoFinanceDept 安全組對應至企業授權,您可以有效地將企業授權指派給該群組的所有成員。 登入 SharePoint Server 的使用者會被指派宣告。 SharePoint Server 會檢查使用者的宣告以判斷其授權,如果用戶沒有使用特定功能的授權,SharePoint 會在運行時間封鎖該功能的存取。
這個 SharePoint Server 2013 授權實作方式是透過使用新的 Microsoft PowerShell Cmdlet 來管理。 SharePoint Server 預設停用授權。 不過,管理員可以選擇使用 Microsoft PowerShell 來開啟它。 如需如何在 SharePoint Server 2013 中設定授權的詳細資訊,請參閱 在 SharePoint Server 中設定授權。
生命週期管理
此白皮書概述設計多承租人 SharePoint 2013 方案時的重要基礎結構考量,而且提供作業生命週期整體管理重要設定的基準指令碼。 例如,自定義租使用者管理、取消布建訂用帳戶、封存、使用者管理、自助式密碼重設和配額,都是需要更多 Windows PowerShell 和自定義工作組合才能提供完整服務供應專案的常見區域。 每個服務提供者在此領域中都會有不同的需求,確保這些需求是基礎結構平臺初始範圍和設計工作的一部分非常重要。
安裝和設定
本節概述安裝和設定多承租人主控 SharePoint Server 2013 平台的一般步驟。
致謝
本節提供詳細資料,並包含示範如何建立和設定各種元件的 PowerShell 指令碼。 提供這些腳本是為了示範多租用戶的設定需求,因此不代表最佳的布建順序,不過它們可以作為開發您自定義端對端腳本解決方案的基礎。
下列子區段中所包含的 Microsoft PowerShell 腳本是 (以整個或部分) 的 Microsoft PowerShell 腳本為基礎, ( () http://www.harbar.net ,並經由他的同意在此重現。 如需 有關一般 Harbar 原始工作的詳細資訊,請參閱下列檔:
提供的 PowerShell 指令碼包括多個變數,您應該可以修改這些變數以符合環境。
部署範例
本節提供使用名為網站集合的主機和主機標頭受控路徑的單一裝載 Web 應用程式的部署範例。 為了簡單起見,它會部署在單一伺服器上。 此部署範例是 SharePoint 2013 多租使用者的預期設計模型,可擴充至服務實例角色在多部電腦間清楚表達的部署。 此部署範例針對 Web 應用程式使用 HTTP。 在實際部署中,應該使用 SSL 來保護與 SharePoint 應用程式和其他 OAuth2 相關服務 (例如 Workflow Manager) 搭配使用之登入、內容和授權 Token 的 SSL。
DNS 設定
因為主機命名型網站集合將用於多承租人 SharePoint 環境,所以您必須根據計畫來設定 DNS (亦即,建立適當的 DNS 記錄等)。 如需如何為 SharePoint Server 2013 規劃主機名網站集合的詳細指引,請參閱 主機命名網站集合架構和部署 (SharePoint 2013) 。
如果您也想要支援 SharePoint 應用程式,則也必須設定 DNS 支援您的環境。 如需如何為 SharePoint Server 2013 設定應用程式環境的詳細資訊,請參閱設定 SharePoint Server 應用程式的環境。
Active Directory 設定
如前所述,若要支援 SharePoint 中的多重租用,必須建立階層組織單位結構正確地建構 Active Directory 以支援每個訂閱的 User Profile Synchronization。 您也需要為環境建立適當的服務帳戶。 如需如何為 SharePoint Server 2013 規劃服務帳戶的詳細資訊,請參閱 規劃 SharePoint Server 中的系統管理與服務帳戶。 在此部署範例中,使用下列三個服務帳戶:
SPFarm - SharePoint 伺服器陣列帳戶
SPServices - 裝載服務應用程式端點的應用程式集區身分識別
SPContent - 裝載內容 Web 應用程式的應用程式集區身分識別
SharePoint 伺服器陣列 建立和設定
下列 Microsoft PowerShell 指令碼顯示如何建立 SharePoint 伺服器陣列。
<#
    1. Farm Creation.ps1
    Creates a new SharePoint Farm
    Creates Central Administration on Port 8080
    Update initial variables as needed to reflect your environment
    Script will prompt for the password of the farm account
#>
asnp Microsoft.SharePoint.PowerShell
$databaseServer = "SQLSP1"
$configDatabase = "HostingFarm_Config"
$adminContentDB = "HostingFarm_Content_Admin"
$passphrase = "Password1"
$farmAccountName = "FABRIKAM\spfarm"

$farmAccount = Get-Credential $farmAccountName
$passphrase = (ConvertTo-SecureString $passphrase -AsPlainText -force)
Write-Host "Creating Configuration Database and Central Admin Content Database..."
New-SPConfigurationDatabase -DatabaseServer $databaseServer -DatabaseName $configDatabase `
    -AdministrationContentDatabaseName $adminContentDB `
    -Passphrase $passphrase -FarmCredentials $farmAccount

$spfarm = Get-SPFarm -ErrorAction SilentlyContinue -ErrorVariable err
if ($spfarm -eq $null -or $err) {
   throw "Unable to verify farm creation."
}
Write-Host "ACLing SharePoint Resources..."
Initialize-SPResourceSecurity
Write-Host "Installing Services ..."
Install-SPService
Write-Host "Installing Features..."
Install-SPFeature -AllExistingFeatures
Write-Host "Creating Central Administration..."
New-SPCentralAdministration -Port 8080 -WindowsAuthProvider NTLM
Write-Host "Installing Help..."
Install-SPHelpCollection -All
Write-Host "Installing Application Content..."
Install-SPApplicationContent
Write-Host "Farm Creation Done!"
Proxy 群組、主控 Web 應用程式和受管理路徑
一開始,系統會為裝載內容 Web 應用程式的應用程式集區建立受控帳戶。 接著會建立後接 Web 應用程式的新 Proxy 群組。 最後,設定 Web 應用程式以允許架設自助網站以及建立共用受管理路徑。 請務必在主控 Web 應用程式中建立「根」網站集合,即使使用者無法存取此網站集合也一般。 此「根」網站集合是 SharePoint 2013 可支援性和正確操作行為的必要專案。
注意事項
此範例針對 Web 應用程式使用 HTTP。
<#
2. Proxy Group, Web Application & Farm Settings.ps1
Creates a new Managed Account
Creates a new Proxy Group
Creates a new Web Application for HNSC, in a new Application Pool, in the new Proxy Group
Creates an empty root Site Collection
Enables Self Service Site Creation
Creates Managed Paths for HNSC
Update initial variables as needed to reflect your environment
Update the Managed Paths section to use the paths you need
Script will prompt for the password of the App Pool account used for the Web App
You will need to configure the SSL certificate manually or via IIS PowerShell
#>
asnp Microsoft.SharePoint.PowerShell
## UPDATE THESE VARS ##
$waAppPoolUserName = "FABRIKAM\spcontent"
$waAppPoolName = "SharePoint Hosting"
$proxyGroupName = "Hosting Proxy Group"
$waUrl = "http://$ENV:COMPUTERNAME"
$webAppName = "SharePoint Hosting"
$contentDBName = "HostingFarm_Content_Hosting"
$ownerEmail = "administrator@contoso.com"
$ownerAlias = "FABRIKAM\administrator"
## END VARS ##
# Create Managed Account
Write-Host "Please supply the password for the $waAppPoolUserName Account..."
$appPoolCred = Get-Credential $waAppPoolUserName
Write-Host "Creating Managed Account..."
$waAppPoolAccount = New-SPManagedAccount -Credential $appPoolCred
# Create a new Proxy Group
Write-Host "Creating Proxy Group..."
$proxyGroup = New-SPServiceApplicationProxyGroup -Name $proxyGroupName
# Create a new Web App in the new Proxy Group using Windows Claims on Port 80 with no host header
Write-Host "Creating Web Application..."
# SSL example, not used
#$webApp = New-SPWebApplication -ApplicationPool $waAppPoolName -ApplicationPoolAccount $waAppPoolAccount -Name $webAppName -Port 443 -SecureSocketsLayer:$true -AuthenticationProvider (New-SPAuthenticationProvider) -DatabaseName $contentDBName -ServiceApplicationProxyGroup $proxyGroup
# following line is to use port 80
$webApp = New-SPWebApplication -ApplicationPool $waAppPoolName -ApplicationPoolAccount $waAppPoolAccount -Name $webAppName -Port 80 -AuthenticationProvider (New-SPAuthenticationProvider) -DatabaseName $contentDBName -ServiceApplicationProxyGroup $proxyGroup
# Create a empty root Site Collection, required for support and SSSC
Write-Host "Creating empty root Site Collection..."
New-SPSite -Url $waUrl -owneralias $ownerAlias -ownerEmail $ownerEmail
# Enable Self Service Site Creation
Write-Host "Enabling Self Service Site Creation..."
$webApp.SelfServiceSiteCreationEnabled = $true
$webApp.RequireContactForSelfServiceSiteCreation = $false
$webApp.Update()
# Create Managed Paths for all 2013 Tenancy capabilities (remove the ones you don't want)
# the default /sites path is removed to prevent creation of sites from CA
Write-Host "Creating HNSC Managed Paths..."
Remove-SPManagedPath "sites" -WebApplication $webApp -Confirm:$false
New-SPManagedPath "admin" -HostHeader -Explicit # Tenant Administration
New-SPManagedPath "apps" -HostHeader -Explicit # App Catalog
New-SPManagedPath "cthub" -HostHeader -Explicit # Content Type Hub
New-SPManagedPath "my" -HostHeader -Explicit # MySite Host
New-SPManagedPath "my/sites" -HostHeader # MySites
New-SPManagedPath "edisc" -HostHeader -Explicit # E-Discovery Hub
Write-Host "Proxy Group and Web Application done!"
非分割服務
在這個階段,可以建立非數據分割的服務應用程式。 伺服器陣列中需要這些服務應用程式才能進行一般作業 (例如,State Service) ,或不需要分割以支援多租使用者,因為它們不會儲存任何數據。 若要這樣做,需要另一個受管理的帳戶,然後依序建立每個服務應用程式。
下列 Microsoft PowerShell 指令碼顯示如何建立非分割服務應用程式。
<#
    3. Non Partitioned Services.ps1
    Creates a new Managed Account
    Creates a new Service Application Pool

    Starts the Service Instances for and creates non partitioned Service Applications and Proxies:
        State Service
        Usage and Health Data Collection Service
        Subscription Settings Service
        App Management Service
        Work Management Service
    ...in the new Proxy Group
    Adds any configured Workflow Service Proxy to the new Proxy Group
    Update initial variables as needed to reflect your environment
    Script will prompt for the password of the Service Application Pool account

#>
asnp Microsoft.SharePoint.PowerShell
## UPDATE THESE VARS ##
$proxyGroupName = "Hosting Proxy Group"
$saAppPoolName = "SharePoint Web Services Default"
$saAppPoolUserName = "FABRIKAM\spservices"
# Service Application and DB names
$stateName = "State Service"
$stateDBName = "HostingFarm_StateService"
$usageName = "Usage and Health Data Collection Service"
$usageDBName = "HostingFarm_Usage"
$subsName = "Subscription Settings Service"
$subsDBName = "HostingFarm_SubscriptionSettings"
$appsName = "App Management Service"
$appsDBName = "HostingFarm_AppManagement"
$wmsName = "Work Management Service"
$pasName = "PowerPoint Automation Service"
## END VARS ##
# Create Managed Account and App Pool for Service App Endpoints
Write-Host "Please supply the password for the $saAppPoolUserName Account..."
$appPoolCred = Get-Credential $saAppPoolUserName
Write-Host "Creating Managed Account..."
$saAppPoolAccount = New-SPManagedAccount -Credential $appPoolCred
Write-Host "Creating Service Application Pool..."
$saAppPool = New-SPServiceApplicationPool -Name $saAppPoolName -Account $saAppPoolAccount
# Grab the Proxy Group
$proxyGroup = Get-SPServiceApplicationProxyGroup $proxyGroupName
# Create State Service Application and Proxy, add to Proxy Group
Write-Host "Creating $stateName Application and Proxy..."
$stateDB = New-SPStateServiceDatabase -Name $stateDBName
$state = New-SPStateServiceApplication -Name $stateName -Database $stateDB
$proxy = New-SPStateServiceApplicationProxy -Name "$stateName Proxy" -ServiceApplication $state
$proxyGroup | Add-SPServiceApplicationProxyGroupMember -Member $proxy
# Create Usage Service Application and Proxy, add to Proxy Group, and provision it's Proxy
Write-Host "Creating $usageName Application and Proxy..."
$serviceInstance = Get-SPUsageService
New-SPUsageApplication -Name $usageName -DatabaseName $usageDBName -UsageService $serviceInstance
$proxy = Get-SPServiceApplicationProxy | ? { $_.TypeName -eq "Usage and Health Data Collection Proxy" }
$proxyGroup | Add-SPServiceApplicationProxyGroupMember -Member $proxy
$proxy.Provision();
# Start the Subscription Settings Service Instance, create the Service Application and Proxy, add to Proxy Group
Write-Host "Creating $subsName Application and Proxy..."
Get-SPServiceInstance | where { $_.TypeName -eq "Microsoft SharePoint Foundation Subscription Settings Service" } | Start-SPServiceInstance
$subs = New-SPSubscriptionSettingsServiceApplication -ApplicationPool $saAppPool -Name $subsName -DatabaseName $subsDBName
$proxy = New-SPSubscriptionSettingsServiceApplicationProxy -ServiceApplication $subs
$proxyGroup | Add-SPServiceApplicationProxyGroupMember -Member $proxy
# Start the App Management Service Instance, create the  Service Application and Proxy, add to Proxy Group
Write-Host "Creating $appsName Application and Proxy..."
Get-SPServiceInstance | where { $_.TypeName -eq "App Management Service"} | Start-SPServiceInstance
$apps = New-SPAppManagementServiceApplication -ApplicationPool $saAppPool -Name $appsName -DatabaseName $appsDBName
$proxy = New-SPAppManagementServiceApplicationProxy -ServiceApplication $apps -Name "$appsName Proxy"
$proxyGroup | Add-SPServiceApplicationProxyGroupMember -Member $proxy
# Start the Work Management Service Instance, create the Service Application and Proxy, add to Proxy Group
Write-Host "Creating $wmsName Application and Proxy..."
Get-SPServiceInstance | ? { $_.TypeName -eq "Work Management Service" } | Start-SPServiceInstance
$wms = New-SPWorkManagementServiceApplication -ApplicationPool $saAppPool -Name $wmsName
$proxy = New-SPWorkManagementServiceApplicationProxy -ServiceApplication $wms -Name "$wmsName Proxy"
$proxyGroup | Add-SPServiceApplicationProxyGroupMember -Member $proxy
# Start the PowerPoint Automation Service Instance, create the Service Application and Proxy, add to Proxy Group
Write-Host "Creating $pasName Application and Proxy..."
Get-SPServiceInstance | ? { $_.TypeName -eq "PowerPoint Conversion Service" } | Start-SPServiceInstance
$pas = New-SPPowerPointConversionServiceApplication -ApplicationPool $saAppPool -Name $pasName
$proxy = New-SPPowerPointConversionServiceApplicationProxy -ServiceApplication $pas -Name "$pasName Proxy"
$proxyGroup | Add-SPServiceApplicationProxyGroupMember -Member $proxy
# Adds any Workflow Service proxy to the Proxy Group (if it exists)
$wfProxy = Get-SPServiceApplicationProxy | ? {$_.TypeName -like "*Workflow Service*" }
if ($wfProxy -ne $null) {
    Write-Host "Adding Workflow Service Proxy to Proxy Group..."
    # should probably remove from the default group as well
    Add-SPServiceApplicationProxyGroupMember -Identity $proxyGroup -Member $wfProxy
}
Write-Host "Non Partitioned Service Applications done!"
分割服務應用程式的建立和設定
下列各節說明建立及設定支援數據分割的每個服務應用程式所需的 Microsoft PowerShell 程式。 相同的一般模式適用於每個服務應用程式,但搜尋和使用者配置檔除外。 不過,與服務應用程式 Proxy 相關的差異會有些許不同。
Business Data Connectivity Service
下列 Microsoft PowerShell 指令碼顯示如何以分割模式建立 Business Data Connectivity Service 應用程式,以及將它新增至自訂服務 Proxy 群組。
$proxyGroupName = "Hosting Proxy Group"
$saAppPoolName = "SharePoint Web Services Default"
$bcsName = "Business Data Connectivity Service"
$bcsDBName = "HostingFarm_BusinessDataConnectivity"
# Grab the Service Application Pool and Proxy Group
Write-Host "Getting Service Application Pool and Proxy Group..."
$saAppPool = $saAppPoolName | Get-SPServiceApplicationPool
$proxyGroup = Get-SPServiceApplicationProxyGroup $proxyGroupName
# Start Business Data Connectivity Service Instance, create the Service Application and Proxy, add to Proxy Group
Write-Host "Creating $bcsName Application and Proxy..."
Get-SPServiceInstance | ? { $_.TypeName -eq "Business Data Connectivity Service" } | Start-SPServiceInstance
$bcs = New-SPBusinessDataCatalogServiceApplication -PartitionMode -Name $bcsName -ApplicationPool $saAppPool -DatabaseName $bcsDBName
$proxy = Get-SPServiceApplicationProxy | ? { $_.Name -eq "$bcsName" }
$proxyGroup | Add-SPServiceApplicationProxyGroupMember -Member $proxy
Managed Metadata Service
下列 Microsoft PowerShell 指令碼顯示如何以分割模式建立 Managed Metadata Service 應用程式,以及將它新增至自訂服務 Proxy 群組。
$proxyGroupName = "Hosting Proxy Group"
$saAppPoolName = "SharePoint Web Services Default"
$mmsName = "Managed Metadata Service"
$mmsDBName = "HostingFarm_ManagedMetadata"
# Grab the Service Application Pool and Proxy Group
Write-Host "Getting Service Application Pool and Proxy Group..."
$saAppPool = $saAppPoolName | Get-SPServiceApplicationPool
$proxyGroup = Get-SPServiceApplicationProxyGroup $proxyGroupName
# Start the Managed Metadata Service Instance, create the Service Application and Proxy, add to Proxy Group
Write-Host "Creating $mmsName Application and Proxy..."
Get-SPServiceInstance | ? { $_.TypeName -eq "Managed Metadata Web Service" } | Start-SPServiceInstance
$mms = New-SPMetadataServiceApplication -PartitionMode -Name $mmsName -ApplicationPool $saAppPool -DatabaseName $mmsDBName
$proxy = New-SPMetadataServiceApplicationProxy -PartitionMode -Name "$mmsName Proxy" -ServiceApplication $mms
$proxyGroup | Add-SPServiceApplicationProxyGroupMember -Member $proxy
Machine Translation Service
Machine Translation Service 支援多重租用,方法是以分割模式建立其服務應用程式。 沒有租使用者特定的設定,而且服務是在伺服器數位級管理。 其資料庫有效地做為佇列,因此,而且具有分割/承租人功能。
下列 Microsoft PowerShell 指令碼顯示如何以分割模式建立 Machine Translation Service 應用程式。
$proxyGroupName = "Hosting Proxy Group"
$saAppPoolName = "SharePoint Web Services Default"
$mtsName = "Machine Translation Service"
$mtsDBName = "HostingFarm_MachineTranslation"
# Grab the Service Application Pool and Proxy Group
Write-Host "Getting Service Application Pool and Proxy Group..."
$saAppPool = $saAppPoolName | Get-SPServiceApplicationPool
$proxyGroup = Get-SPServiceApplicationProxyGroup $proxyGroupName
# Start Machine Translation Service Instance, create the Service Application and Proxy, add to Proxy Group
Write-Host "Creating $mtsName Application & proxy..."
Get-SPServiceInstance | ? { $_.TypeName -eq "Machine Translation Service" } | Start-SPServiceInstance
$mts = New-SPTranslationServiceApplication -PartitionMode -Name $mtsName -ApplicationPool $saAppPool -DatabaseName $mtsDBName
Get-SPServiceApplicationProxy | ? {$_.Name -eq $mtsName} | Remove-SPServiceApplicationProxy -Confirm:$false
$proxy = New-SPTranslationServiceApplicationProxy -PartitionMode -Name "$mtsName Proxy" -ServiceApplication $mts
$proxyGroup | Add-SPServiceApplicationProxyGroupMember -Member $proxy
Secure Store Service
以分割模式設定之後,加密金鑰的產生還是會透過管理中心或 Windows PowerShell 執行伺服器陣列層級設定。 Secure Store Service 設定的其餘部分會移到承租人管理。 不過,租使用者管理網站範本不包含此頁面的連結,您可以使用擴充租使用者管理網站範本一節中的自定義技術來新增此頁面。
下列 Microsoft PowerShell 指令碼顯示如何以分割模式建立 Secure Store Service 應用程式,以及將它新增至自訂服務 Proxy 群組。
$proxyGroupName = "Hosting Proxy Group"
$saAppPoolName = "SharePoint Web Services Default"
$sssName = "Secure Store Service"
$sssDBName = "HostingFarm_SecureStore"
$sssAuditing = $false
$sssSharing = $false
$sssAuditLogMaxSize = ""
# Grab the Service Application Pool and Proxy Group
Write-Host "Getting Service Application Pool and Proxy Group..."
$saAppPool = $saAppPoolName | Get-SPServiceApplicationPool
$proxyGroup = Get-SPServiceApplicationProxyGroup $proxyGroupName
# Start Secure Store Service Instance, create the Service Application and Proxy, add to Proxy Group
Write-Host "Creating $sssName Application & Proxy..."
Get-SPServiceInstance | ? { $_.TypeName -eq "Secure Store Service" } | Start-SPServiceInstance
$sss = New-SPSecureStoreServiceApplication -PartitionMode -Name $sssName -ApplicationPool $saAppPool -DatabaseName $sssDBName -auditingEnabled:$sssAuditing -AuditlogMaxSize $sssAuditLogMaxSize -Sharing:$sssSharing
$proxy = New-SPSecureStoreServiceApplicationProxy -Name "$sssName Proxy" -ServiceApplication $sss
$proxyGroup | Add-SPServiceApplicationProxyGroupMember -Member $proxy
搜尋服務
下列 Microsoft PowerShell 指令碼顯示如何以分割模式建立 Search Service 應用程式。
注意事項
此服務應用程式的指令碼使用 Partitioned 參數,而非 PartitionMode 參數。
$proxyGroupName = "Hosting Proxy Group"
$saAppPoolName = "SharePoint Web Services Default"
$searchServerName = "$ENV:COMPUTERNAME"
$searchName = "Search Service"
$searchDBName = "HostingFarm_Search"
# Grab the Service Application Pool and Proxy Group
Write-Host "Getting Service Application Pool and Proxy Group..."
$saAppPool = $saAppPoolName | Get-SPServiceApplicationPool
$proxyGroup = Get-SPServiceApplicationProxyGroup $proxyGroupName
# Start Search Service Instances, create the Service Application and Proxy, add to Proxy Group, configure Topology
Write-Host "Starting Search Service Instances..."
Start-SPEnterpriseSearchServiceInstance $searchServerName
Start-SPEnterpriseSearchQueryAndSiteSettingsServiceInstance $searchServerName
Write-Host "Creating Search Service Application and Proxy..."
$search = New-SPEnterpriseSearchServiceApplication -Partitioned -Name $searchName -ApplicationPool $saAppPool -DatabaseName $searchDBName
$proxy = New-SPEnterpriseSearchServiceApplicationProxy -Partitioned -Name "$searchName Proxy" -SearchApplication $search
$proxyGroup | Add-SPServiceApplicationProxyGroupMember -Member $proxy
# Clone the default Topology (which is empty) and create a new one and then activate it
Write-Host "Configuring Search Component Topology..."
$clone = $search.ActiveTopology.Clone()
$searchServiceInstance = Get-SPEnterpriseSearchServiceInstance
New-SPEnterpriseSearchAdminComponent -SearchTopology $clone -SearchServiceInstance $searchServiceInstance
New-SPEnterpriseSearchContentProcessingComponent -SearchTopology $clone -SearchServiceInstance $searchServiceInstance
New-SPEnterpriseSearchAnalyticsProcessingComponent -SearchTopology $clone -SearchServiceInstance $searchServiceInstance
New-SPEnterpriseSearchCrawlComponent -SearchTopology $clone -SearchServiceInstance $searchServiceInstance
New-SPEnterpriseSearchIndexComponent -SearchTopology $clone -SearchServiceInstance $searchServiceInstance
New-SPEnterpriseSearchQueryProcessingComponent -SearchTopology $clone -SearchServiceInstance $searchServiceInstance
$clone.Activate()
Write-Host "Search complete!"
Word Automation Services
Word Automation Services 服務應用程式支援分割模式。 沒有 Cmdlet 可用來建立 Proxy。
下列 Microsoft PowerShell 指令碼顯示如何以分割模式建立 Word Automation Services 服務應用程式。
$proxyGroupName = "Hosting Proxy Group"
$saAppPoolName = "SharePoint Web Services Default"
$wasName = "Word Automation Service"
$wasDBName = "HostingFarm_WordAutomation"
# Grab the Service Application Pool and Proxy Group
Write-Host "Getting Service Application Pool and Proxy Group..."
$saAppPool = $saAppPoolName | Get-SPServiceApplicationPool
$proxyGroup = Get-SPServiceApplicationProxyGroup $proxyGroupName
# Start Word Automation Service Instance, create the Service Application and Proxy, add to Proxy Group
Write-Host "Creating $wasName Application & Proxy..."
Get-SPServiceInstance | ? { $_.TypeName -eq "Word Automation Services" } | Start-SPServiceInstance
$was = New-SPWordConversionServiceApplication -PartitionMode -Name $wasName -ApplicationPool $saAppPool -DatabaseName $wasDBName
# we cannot change the name of this proxy as there is no New-SPWordConversionServiceApplicationProxy
$proxy = Get-SPServiceApplicationProxy | ? { $_.Name -eq $wasName }
$proxyGroup | Add-SPServiceApplicationProxyGroupMember -Member $proxy
User Profile Service
如果未以 SharePoint 伺服器陣列帳戶的身分執行 Windows PowerShell,則以分割模式佈建時需要使用 PowerShell 建立 User Profile Service 十分具有挑戰。 為了解決此挑戰,為了成功啟動使用者配置檔同步處理服務,我們使用 Start-Process Cmdlet,並模擬以伺服器數位帳戶執行腳本。
需要兩個指令碼:第一個指令碼會建立 UPA,第二個指令碼則呼叫第一個指令碼。
下列 Microsoft PowerShell 腳本示範如何在數據分割模式中建立 User Profile Service 應用程式,並將其新增至自定義服務 Proxy 群組...
注意事項
[!附註] 不 應該直接執行此指令碼,否則會無法啟動 User Profile Synchronization Service 執行個體。 此指令碼應該儲存在本機以及其記下的位置中。
<#
partitionedUPAcreation.ps1
External dependency to create UPA under farm account creds
#>
asnp Microsoft.SharePoint.PowerShell
$proxyGroupName = "Hosting Proxy Group"
$saAppPoolName = "SharePoint Web Services Default"
$upaName = "User Profile Service"
$upaProfileDBName = "HostingFarm_UserProfile_Profile"
$upaSocialDBName = "HostingFarm_UserProfile_Social"
$upaSyncDBName = "HostingFarm_UserProfile_Sync"
# Grab the Proxy Group
$proxyGroup = Get-SPServiceApplicationProxyGroup -Identity $mtProxyName
# Grab the Appplication Pool for Service Application Endpoint
$saAppPool = Get-SPServiceApplicationPool $saAppPoolName
<# Creates UPA Service Application & Proxy, and User Profile Service Instance
If omitted, -ProfileSyncDBServer, -SocialDBServer & -ProfileDBServer are the SharePoint Default DB Server
If omitted, -SyncInstanceMachine is the local machine
#>
Write-Host "Creating $upaName Application & Proxy..."
$upa = New-SPProfileServiceApplication -PartitionMode -Name $upaName -ApplicationPool $saAppPoolName -ProfileDBName $upaProfileDBName -SocialDBName $upaSocialDBName -ProfileSyncDBName $upaSyncDBName
$proxy = New-SPProfileServiceApplicationProxy -PartitionMode -Name "$upaName Proxy" -ServiceApplication $upa
$proxyGroup | Add-SPServiceApplicationProxyGroupMember -Member $proxy
# Check it worked
Get-SPServiceApplication | ? {$_.Name -eq $upaName}
下面的第二個指令碼執行呼叫 UPA 建立指令碼以及啟動必要服務執行個體的必要工作。 應該更新 $upaScriptFile 變數中的 UPA 建立指令碼位置。 此外,在 UPA 上設定了一些必要的許可權。
$proxyGroupName = "Hosting Proxy Group"
$saAppPoolName = "SharePoint Web Services Default"
$upaScriptfile = "c:\partitionedUPAcreation.ps1"
$upaName = "User Profile Service"
$user = "FABRIKAM\Administrator"
$serviceUser = "FABRIKAM\spservices"
# Grab the Service Application Pool and Proxy Group
Write-Host "Getting Service Application Pool and Proxy Group..."
$saAppPool = $saAppPoolName | Get-SPServiceApplicationPool
$proxyGroup = Get-SPServiceApplicationProxyGroup $proxyGroupName
# Start User Profile Service Instance
Write-Host "Starting User Profile Service Instance..."
Get-SPServiceInstance | ? { $_.TypeName -eq "User Profile Service" } | Start-SPServiceInstance
Write-Host "Restarting SPTimerV4..."
Restart-Service SPTimerV4
# Grab the Farm Account credentials
Write-Host "Please enter the Farm Account Password:"
$farmAcct = (Get-SPFarm).DefaultServiceAccount
$cred = Get-Credential $farmAcct.Name
# Create a new process to initiate User Profile Service Application creation under UAC elevation
Write-Host "Creating new process for UPA creation..."
Start-Process $PSHOME\powershell.exe -Credential $cred -ArgumentList "-Command Start-Process $PSHOME\powershell.exe -ArgumentList `"'$upaScriptfile'`" -Verb Runas" -Wait
Get-Date
Write-Host "UPA Created!"
# Start the User Profile Synchronization Service Instance
Write-Host "Starting the UPS Service Instance..."
Get-Date
$upa = Get-SPServiceApplication | where-object {$_.Name -eq $upaName}
$upsInstanceName = "User Profile Synchronization Service"
[String]$password = [Runtime.InteropServices.Marshal]::PtrToStringAuto([Runtime.InteropServices.Marshal]::SecureStringToBSTR($cred.Password));
Get-SPServiceInstance | where-object {$_.TypeName -eq $upsInstanceName} | % {
    $_.Status = [Microsoft.SharePoint.Administration.SPObjectStatus]::Provisioning
    $_.IsProvisioned = $false
    $_.UserProfileApplicationGuid = $upa.Id
    $_.Update()
    $upa.SetSynchronizationMachine($_.Server.Address, $_.Id, $cred.UserName, $password) # this can cause update conflicts
    Start-SPServiceInstance $_
}
Write-Host "Waiting on $upsInstanceName to provision..."
Write-Host "Baseline time is 130 seconds"
[int]$time = 0
$ups = Get-SPServiceInstance | where-object {$_.TypeName -eq $upsInstanceName}
while(-not ($ups.Status -eq "Online")){
   sleep 10;
    Write-Host "Still waiting... ($time seconds elapsed)"
    $ups = Get-SPServiceInstance | where-object {$_.TypeName -eq $upsInstanceName}
    $time = $time + 10
  }
Write-Host "$upsInstanceName provisioned, it took $time seconds."
Get-Date
Write-Host "UPS Service Instance Started"
# UPA Settings and Permissions, do this after UPS SI Started and Get it again to prevent update conflicts
Write-Host "Configuring NETBios Domain Names and UPA Permissions..."
$upa = Get-SPServiceApplication | where-object {$_.Name -eq $upaName}
$upa.NetBIOSDomainNamesEnabled=1
$upa.Update()
function Grant-ServiceAppPermission($app, $user, $perm, $admin) {
    $sec = $app | Get-SPServiceApplicationSecurity -Admin:$admin
    $claim = New-SPClaimsPrincipal -Identity $user -IdentityType WindowsSamAccountName
    $sec | Grant-SPObjectSecurity -Principal $claim -Rights $perm
    $app | Set-SPServiceApplicationSecurity -ObjectSecurity $sec -Admin:$admin
}
Grant-ServiceAppPermission $upa $user "Full Control" $false
Grant-ServiceAppPermission $upa $serviceUser "Full Control" $false
資訊版權管理設定
您可以使用 SharePoint 管理中心網站或更新的 Microsoft PowerShell Cmdlet 來開啟多租使用者的資訊版權管理支援。
使用 管理中心 開啟資訊版權管理
檢查執行此程序的使用者帳戶是否為「伺服器陣列管理員」SharePoint 群組與執行管理中心之電腦的管理員群組的成員。
從管理中心網站移至 [安全性]。
在 [安全性] 頁面上,移至 [設定資訊版權管理]。
在 [資訊版權管理] 頁面上,按一下 [使用此 RMS 伺服器]。
請務必勾選 [在多承租人設定中核取此方塊,允許承租人設定承租人等級的 IRM 設定]核取方塊。
使用 Microsoft PowerShell 開啟資訊版權管理
- 確認您具備下列成員身分:
SQL Server 執行個體上的 securityadmin 固定伺服器角色。
所有要更新之資料庫上的 db_owner 固定資料庫角色。
您執行 PowerShell Cmdlet 之伺服器上的系統管理員群組。
系統管理員可以使用 Add-SPShellAdmin Cmdlet 授與使用 SharePoint Server 2013 Cmdlet 的權限。
注意事項
[!附註] 如果您不具備上述權限,請連絡安裝程式系統管理員或 SQL Server 系統管理員要求權限。 如需 PowerShell 許可權的詳細資訊,請參閱 Add-SPShellAdmin。
開啟 [SharePoint 管理命令介面]。
在 PowerShell 命令提示字元中,輸入下列命令:
Set-SPIRMSettings -IrmEnabled -UseActiveDirectoryDiscovery -SubscriptionScopeSettingsEnabled
承租人管理網站內沒有 IRM 的內建設定選項。 若要套用設定,請使用 Set-SPSiteSubscriptionIRMConfig Cmdlet (如下列指令碼所示):
$subscription=Get-SPSiteSubscription "http://www.contoso.com"
Set-SPSiteSubscriptionIRMConfig -identity $subscription -IrmEnabled -CertificateServerUrl "http://rms.contoso.com"
這類設定會在租使用者布建過程中執行。
承租人佈建和管理
本節說明佈建承租人以及自訂多承租人環境的程序和方式。
承租人佈建
若要建立承租人,請依照表格中的步驟進行。
| Tasks |
Steps |
|---|---|
| 1. 建立網站訂閱。 |
在 Microsoft PowerShell 命令提示字元處,輸入下列語法:$sub = New-SPSiteSubscription |
| 2. 將功能套件指派給網站訂閱,以及使用人員選擇來設定自訂 OU。 |
在 Microsoft PowerShell 命令提示字元處,輸入下列語法:Set-SPSiteSubscriptionConfig -id $sub -FeaturePack $customerFeatures -UserAccountDirectoryPath "OU=$customerName,OU=Customers,DC=contoso,DC=com" |
| 3. 建立要指派給網站訂閱的一或多個網站集合。 |
在 Microsoft PowerShell 命令提示字元處,輸入下列語法:Write-Host "Creating Member Site..." New-SPSite -url "http://$customerName.contoso.com" -SiteSubscription $sub -HostHeaderWebApplication $webApp -owneralias $customerTenantAdmin -owneremail $customerTenantAdminEmail -template sts#0 -ContentDatabase $contentDBName``````# create Tenant Admin site Write-Host "Creating Tenant Admin site..." New-SPSite -url "http://$customerName.contoso.com/admin" -SiteSubscription $sub -HostHeaderWebApplication $webApp -owneralias $customerTenantAdmin -owneremail $customerTenantAdminEmail -template tenantadmin#0 -AdministrationSiteType TenantAdministration -ContentDatabase $contentDBName``````Write-Host "Creating My Site Host..." New-SPSite -url "http://$customerName.contoso.com/mysites" -SiteSubscription $sub -HostHeaderWebApplication $webApp -owneralias $customerTenantAdmin -owneremail $customerTenantAdminEmail -template SPSMSITEHOST#0 -ContentDatabase $contentDBName |
下列 PowerShell 指令碼顯示如何建立使用 TENANTADMIN#0 範本的承租人管理網站。 如果租用戶設定為使用企業功能套件,Microsoft PowerShell 腳本會執行更多作業,也就是建立「我的網站」集合。
Add-PSSnapin Microsoft.SharePoint.Powershell -EA 0

# farm details (update to reflect your environment)
$hostingMainURL = "http://$ENV:COMPUTERNAME"
$upaProxyName = "Tenant User Profile Service Proxy"
$mmsProxyName = "Tenant Managed Metadata Service"
$contentDBName = "HostingFarm_Content_Hosting"
$farm = Get-SPFarm
$foundationFeaturePack = $farm.Properties.Foundation_FeaturePack
#$standardFeaturePack = $farm.Properties.Standard_FeaturePack
#$enterpriseFeaturePack = $farm.Properties.Enterprise_FeaturePack
# tenant-specific information (vary by tenant)
$customerName = "Customer A"
$customerTenantAdmin = "CONTOSO\customerA-Admin"
$customerTenantAdminEmail = "admin@customerA.com"
$customerFeatures = $enterpriseFeatures
# Note:
# this script assumes that the Content Web App and necessary Managed Paths exist.
# grab the web app
$webApp = Get-SPWebApplication $hostingMainURL

# create new Site Subscription
Write-Host "Creating Site Subscription..."
$sub = New-SPSiteSubscription

# assign feature pack and set the OU to be used by the People
Write-Host "Assigning Feature Pack and configuring People Picker..."
Set-SPSiteSubscriptionConfig -id $sub -FeaturePack $customerFeatures -UserAccountDirectoryPath "OU=$customerName,OU=Customers,DC=contoso,DC=com"

# create the "main" member site (we need a site at the root to use Host Headers and Managed Paths in the following cmdlets)
Write-Host "Creating Member Site..."
New-SPSite -url "http://$customerName.contoso.com" -SiteSubscription $sub -HostHeaderWebApplication $webApp -owneralias $customerTenantAdmin -owneremail $customerTenantAdminEmail -template sts#0 -ContentDatabase $contentDBName

# create Tenant Admin site
Write-Host "Creating Tenant Admin site..."
New-SPSite -url "http://$customerName.contoso.com/admin" -SiteSubscription $sub -HostHeaderWebApplication $webApp -owneralias $customerTenantAdmin -owneremail $customerTenantAdminEmail -template tenantadmin#0 -AdministrationSiteType TenantAdministration -ContentDatabase $contentDBName

# everything else needs standard
if (!($customerFeatures -eq $foundationFeatures))
{
    Write-Host "Tenant has SharePoint Server features"
    # create a mysite host
    Write-Host "Creating My Site Host..."
    New-SPSite -url "http://$customerName.contoso.com/mysites" -SiteSubscription $sub -HostHeaderWebApplication $webApp -owneralias $customerTenantAdmin -owneremail $customerTenantAdminEmail -template SPSMSITEHOST#0 -ContentDatabase $contentDBName
    # configure the MySites host, MySites path, Naming Resolution and Profile Sync OU for the Subscription
    Write-Host "Configuring Tenant Profile Config..."
    $upaProxy = Get-SPServiceApplicationProxy | where-object {$_.DisplayName -eq $upaProxyName}
    Add-SPSiteSubscriptionProfileConfig -id $sub -SynchronizationOU $customerName -MySiteHostLocation "http://$customerName.contoso.com/mysites" -MySiteManagedPath "/mysites/personal" -SiteNamingConflictResolution "None" -ProfileServiceApplicationProxy $upaProxy

    # create a site for the Content Type Gallery
    Write-Host "Creating Content Type Gallery..."
    New-SPSite -url "http://$customerName.contoso.com/cthub" -SiteSubscription $sub -HostHeaderWebApplication $webApp -owneralias $customerTenantAdmin -owneremail $customerTenantAdminEmail -template sts#0 -ContentDatabase $contentDBName

    # configure the Content Type Gallery for the Subscription
    Write-Host "Configuring Tenant Content Type Gallery..."
    $mmsProxy = Get-SPServiceApplicationProxy | where-object {$_.DisplayName -eq $mmsProxyName}
    # ContentTypeHub feature activation may fail - if so activate manually
    Set-SPSiteSubscriptionMetadataConfig -identity $sub -serviceProxy $mmsProxy -huburi "http://$customerName.contoso.com/cthub" -SyndicationErrorReportEnabled
    Write-Host "Activating Content Type Hub..."
    Enable-SPFeature -Identity ContentTypeHub -url "http://$customerName.contoso.com/cthub"
}

Write-Host "Tenant Provisioning Script Completed!"
您可以進一步自定義此方法,以包含其他租用戶設定,例如工作流程、應用程式和 IRM。 這類腳本會封裝成函式或自定義 Cmdlet,以便在未來的租用戶中重複執行。
Workflow Service
SharePoint Server 2013 為工作流程帶來主要進展,包括完整宣告撰寫、REST 及服務匯流排傳訊、彈入延展性及受管理的服務可靠性等企業功能。 SharePoint 2013 可以使用以 .NET Framework 4.5 之 Windows Workflow Foundation 元件為基礎的新工作流程服務。 新的服務稱為 工作流程管理員,其設計目的是要在企業中扮演重要角色。
只有在下載並安裝新的 Workflow Manager Service,並設定它與 SharePoint Server 2013 伺服器陣列通訊之後,您與您的工具才能使用 SharePoint 2013 Workflow 平台。 如需如何安裝和設定 sharePoint 2013 工作流程管理員 服務的詳細資訊,請參閱安裝和設定 SharePoint Server 的工作流程。
若要設定 Workflow Service,請使用 Register-SPWorkflowService Cmdlet,以向處於分割模式的 Workflow Service Manager 登錄伺服器陣列。 在執行此伺服器陣列註冊時,請使用 SPSite 參數從您的伺服器陣列傳遞任何現有租用戶網站集合的URL,並使用 ScopeName 參數來定義伺服器數位的具名工作流程範圍。
下列 Windows PowerShell 指令碼顯示如何向處於分割模式的 Workflow Service Manager 登錄 SharePoint 伺服器陣列。
Add-PSSnapin microsoft.sharepoint.powershell -ea SilentlyContinue
# Register the Farm with the Workflow Service and create a workflow scope
# Note: any tenant site will suffice
Register-SPWorkflowService -SPSite "http://tenant.contoso.com" -WorkflowHostUri "http://WFSvr01:12291" -PartitionMode -AllowOAuthHttp -Force -ScopeName "HostingFarm"

Write-Host "Farm Workflow Registration Script Completed!"
若要啟用 SharePoint Workflow 的特定承租人,您必須設定工作流程服務 Proxy。 在執行此設定時,取得租使用者根網站集合的參考,並向工作流程服務 Proxy 註冊。
下列 PowerShell 指令碼顯示如何啟用 SharePoint Workflow 的租用戶。
Add-PSSnapin microsoft.sharepoint.powershell -ea SilentlyContinue
#Get the Workflow Service Application Proxy
$wfProxy  = Get-SPWorkflowServiceApplicationProxy
#Create a credential object
$user = New-Object System.Net.NetworkCredential ("domain\Admin", "Password")
#Get the SPSite object of the root site collection of the tenant
$site = Get-SPSite http://tenant.domain.com
#Set the Workflow address for the tenant site (reference our workflow scope)
$wfProxy.SetWorkflowServiceAddress($site,"http://WFSvr01:12291/HostingFarm")
#Register the proxy with tenant site collection
$wfProxy.Register($site,$user)
#Connect the tenant site collection to the proxy
$wfProxy.Connect($site)
Write-Host "Tenant Workflow Registration Script Completed!"
將租用戶設定為使用工作流程 Service Manager 之後,您就可以使用 SharePoint Designer 使用 SharePoint 2013 工作流程選項來建立工作流程,如下圖所示。
![此圖顯示 SharePoint Designer 中的 [SharePoint 2013 工作流程] 選項](../sharepointserver/media/workflow_tenant.jpg)
擴充承租人管理網站範本
新增或移除連結
使用 [自訂動作定義結構描述],新增和移除承租人管理網站之主要頁面上的連結。
下列功能定義顯示如何新增群組、數個連結,以及移除 [管理網站集合] 頁面的連結。
<Elements xmlns="http://schemas.microsoft.com/sharepoint/">
  <CustomActionGroup
       Id="TenantAdmin_HostingUserAccounts"
       Location="Microsoft.SharePoint.TenantAdministration"
       Title="User Accounts"
       Sequence="90"
       ImageUrl="_layouts/images/SiteSettings_UsersAndPermissions_48x48.png">
    <UrlAction
        Url="" />
  </CustomActionGroup>
  <CustomAction
      Id="TenantAdmin_HostingUserAccounts_AddUser"
      GroupId="TenantAdmin_HostingUserAccounts"
      Location="Microsoft.SharePoint.TenantAdministration"
      Sequence="10"
      Title="Create User">
    <UrlAction
        Url="_layouts/UserAccountsWebParts/UA_AddUsers.aspx" />
  </CustomAction>
  <CustomAction
      Id="TenantAdmin_HostingUserAccounts_ManageUsers"
      GroupId="TenantAdmin_HostingUserAccounts"
      Location="Microsoft.SharePoint.TenantAdministration"
      Sequence="30"
      Title="Manage Users">
    <UrlAction
        Url="_layouts/UserAccountsWebParts/UA_ManageUsers.aspx" />
  </CustomAction>
  <HideCustomAction
    GroupId = "TenantAdmin_Sites"
    HideActionId = "TenantAdmin_Sites_ManageSiteCollections"
    Location="Microsoft.SharePoint.TenantAdministration" />
</Elements>
如需自定義動作的詳細資訊,例如內建連結的預設標識符,請參閱 自定義動作定義架構。
自訂功能區
使用 [伺服器] 功能區 XML 和 ECMAScript (JavaScript、JScript),可以自訂 SharePoint Server 2013 中的 [伺服器] 功能區。 XML 定義功能區上的控制項。 ECMAScript 執行頁面上或頁面上物件的動作。 您可以使用存在於 SharePoint FoundationECMAScript 物件模型或內建 ECMAScript 函數中的 ECMAScript。 您也可以將專屬 ECMAScript 新增至頁面,並使用它與功能區互動。
自訂 [伺服器] 功能區時,您可以新增、取代以及移除控制項、群組和索引標籤。 功能區自訂是使用功能中的 [伺服器] 功能區 XML 所定義,而且可以部署於方案套件 (.wsp 檔案) 中。 可以使用 RegistrationId 和 RegistrationType 屬性,將功能區自訂的範圍設為特定清單類型。 也可以在 Feature.xml 檔案中使用 Scope 屬性,將自訂的範圍設為網站或特定 Web 應用程式。
下列 XML 顯示如何取代 [管理網站集合] 頁面上 [磁碟配額] 按鈕的功能。
<Elements xmlns="http://schemas.microsoft.com/sharepoint/" >
  <CustomAction Id="Ribbon.Library.Actions.ReplacementButton"
      Location="CommandUI.Ribbon"
      Title="Replace a Ribbon Button">
    <CommandUIExtension>
      <CommandUIDefinitions>
        <CommandUIDefinition
          Location="Ribbon.SiteCollections.Manage.DiskQuota">
          <Button Id="Ribbon.SiteCollections.Manage.DiskQuota.Replacement"
            Command="ReplacementButtonCommand"
            Image32by32="/_layouts/1033/images/formatmap32x32.png?vk=4536"
                  Image32by32Left="-256"
                  Image32by32Top="-224"
            LabelText="Disk Quota"
            TemplateAlias="o1" />
        </CommandUIDefinition>
      </CommandUIDefinitions>
      <CommandUIHandlers>
        <CommandUIHandler
          Command="ReplacementButtonCommand"
          CommandAction="javascript:
         function demoCallback(dialogResult, returnValue)
          {
          }
              var options = {
                url: 'HostingTenantAdmin/DiskQuota.aspx',
                tite: 'Manage Disk Quota',
                allowMaximize: true,
                showClose: true,
                width: 610,
                height: 450,
            dialogReturnValueCallback: demoCallback  };
              SP.UI.ModalDialog.showModalDialog(options);" />
      </CommandUIHandlers>
    </CommandUIExtension>
  </CustomAction>
</Elements>
如需如何自定義伺服器功能區的詳細資訊,請參閱 自定義伺服器功能區。
使用自訂屬性擴充網站訂閱
Site Subscription Service 應用程式可以儲存管理自訂屬性和承租人自訂屬性。 支援的屬性類型包括下列值:
string
int
long
bool
Guid
DateTime
您可以使用自訂屬性來擴充承租人管理功能 (例如承租人配額管理)。
下列 PowerShell 指令碼顯示如何存取自訂屬性。
Add-PSSnapin microsoft.sharepoint.powershell -ea SilentlyContinue
#-----------------------------------------------------
# Load Assemblies
#-----------------------------------------------------
[void] [Reflection.Assembly]::Load("Microsoft.SharePoint, Version=14.0.0.0, Culture=neutral, PublicKeyToken=71e9bce111e9429c")
#-----------------------------------------------------
# Functions
#-----------------------------------------------------
function GetSPSiteSubscription([string]$url)
{
    [Microsoft.SharePoint.SPSiteSubscription]$sub = Get-SPSiteSubscription $url;

    return $sub;
}
function GetSiteSubAdminProperties([string]$url)
{
    [Microsoft.SharePoint.SPSiteSubscription]$sub = GetSPSiteSubscription -url $url;
    [Microsoft.SharePoint.SPSiteSubscriptionSettingsManager] $manager =  [Microsoft.SharePoint.SPSiteSubscriptionSettingsManager]::Local;
    if ($manager -eq $null)
    {
        throw("Bad Manager!");
    }
    [Microsoft.SharePoint.SPSiteSubscriptionPropertyCollection]$props = $manager.GetAdminProperties($sub);
    if ($props -eq $null)
    {
        throw("Bad Props!");
    }
    return $props;
}
function AddOrSetSiteSubAdminProperty([string]$url, [string]$theKey, $theValue)
{
    [Microsoft.SharePoint.SPSiteSubscription]$sub = GetSPSiteSubscription -url $url;
    [Microsoft.SharePoint.SPSiteSubscriptionSettingsManager] $manager =  [Microsoft.SharePoint.SPSiteSubscriptionSettingsManager]::Local;
    if ($manager -eq $null)
    {
        throw("Bad Manager!");
    }
    [Microsoft.SharePoint.SPSiteSubscriptionPropertyCollection]$props = $manager.GetAdminProperties($sub);
    if ($props -eq $null)
    {
        throw("Bad Props!");
    }
    if ($props.ContainsKey($theKey) -eq $true)
    {
        $props.SetValue($theKey, $theValue);
    }
    else
    {
        $props.Add($theKey, $theValue);
    }
    $props.Update();
}
function GetSiteSubAdminProperty([string]$url, [string]$theKey)
{
    [Microsoft.SharePoint.SPSiteSubscription]$sub = GetSPSiteSubscription -url $url;
    [Microsoft.SharePoint.SPSiteSubscriptionSettingsManager] $manager =  [Microsoft.SharePoint.SPSiteSubscriptionSettingsManager]::Local;
    if ($manager -eq $null)
    {
        throw("Bad Manager!");
    }
    [Microsoft.SharePoint.SPSiteSubscriptionPropertyCollection]$props = $manager.GetAdminProperties($sub);
    if ($props -eq $null)
    {
        throw("Bad Props!");
    }
    $theValue = "";
    if ($props.ContainsKey($theKey) -eq $true)
    {
        foreach ($prop in $props)
        {
            if ($prop.Key -eq $theKey)
            {
                $theValue = $prop.Value;
                break;
            }
        }
        return $theValue;
    }
    else
    {
        return $null;
    }
}
function RemoveSiteSubAdminProperty([string]$url, [string]$theKey)
{
    [Microsoft.SharePoint.SPSiteSubscription]$sub = GetSPSiteSubscription -url $url;
    [Microsoft.SharePoint.SPSiteSubscriptionSettingsManager] $manager =  [Microsoft.SharePoint.SPSiteSubscriptionSettingsManager]::Local;
    if ($manager -eq $null)
    {
        throw("Bad Manager!");
    }
    [Microsoft.SharePoint.SPSiteSubscriptionPropertyCollection]$props = $manager.GetAdminProperties($sub);
    if ($props -eq $null)
    {
        throw("Bad Props!");
    }
    if ($props.ContainsKey($theKey) -eq $true)
    {
        $props.Remove($theKey);
        $props.Update();
    }
}
function GetSiteSubTenantProperties($url)
{
    [Microsoft.SharePoint.SPSiteSubscription]$sub = GetSPSiteSubscription -url $url;
    [Microsoft.SharePoint.SPSiteSubscriptionSettingsManager] $manager =  [Microsoft.SharePoint.SPSiteSubscriptionSettingsManager]::Local;
    if ($manager -eq $null)
    {
        throw("Bad Manager!");
    }

    [Microsoft.SharePoint.SPSiteSubscriptionPropertyCollection]$props = $manager.GetProperties($sub);
    if ($props -eq $null)
    {
        throw("Bad Props!");
    }
    return $props;
}
function AddOrSetSiteSubTenantProperty([string]$url, [string]$theKey, $theValue)
{
    [Microsoft.SharePoint.SPSiteSubscription]$sub = GetSPSiteSubscription -url $url;
    [Microsoft.SharePoint.SPSiteSubscriptionSettingsManager] $manager =  [Microsoft.SharePoint.SPSiteSubscriptionSettingsManager]::Local;
    if ($manager -eq $null)
    {
        throw("Bad Manager!");
    }
    [Microsoft.SharePoint.SPSiteSubscriptionPropertyCollection]$props = $manager.GetProperties($sub);
    if ($props -eq $null)
    {
        throw("Bad Props!");
    }
    if ($props.ContainsKey($theKey) -eq $true)
    {
        $props.SetValue($theKey, $theValue);
    }
    else
    {
        $props.Add($theKey, $theValue);
    }
    $props.Update();
}
function GetSiteSubTenantProperty([string]$url, [string]$theKey)
{
    [Microsoft.SharePoint.SPSiteSubscription]$sub = GetSPSiteSubscription -url $url;
    [Microsoft.SharePoint.SPSiteSubscriptionSettingsManager] $manager =  [Microsoft.SharePoint.SPSiteSubscriptionSettingsManager]::Local;
    if ($manager -eq $null)
    {
        throw("Bad Manager!");
    }
    [Microsoft.SharePoint.SPSiteSubscriptionPropertyCollection]$props = $manager.GetProperties($sub);
    if ($props -eq $null)
    {
        throw("Bad Props!");
    }
    $theValue = "";
    if ($props.ContainsKey($theKey) -eq $true)
    {
        foreach ($prop in $props)
        {
            if ($prop.Key -eq $theKey)
            {
                $theValue = $prop.Value;
                break;
            }
        }
        return $theValue;
    }
    else
    {
        return $null;
    }
}
function RemoveSiteSubTenantProperty([string]$url, [string]$theKey)
{
    [Microsoft.SharePoint.SPSiteSubscription]$sub = GetSPSiteSubscription -url $url;
    [Microsoft.SharePoint.SPSiteSubscriptionSettingsManager] $manager =  [Microsoft.SharePoint.SPSiteSubscriptionSettingsManager]::Local;
    if ($manager -eq $null)
    {
        throw("Bad Manager!");
    }
    [Microsoft.SharePoint.SPSiteSubscriptionPropertyCollection]$props = $manager.GetProperties($sub);
    if ($props -eq $null)
    {
        throw("Bad Props!");
    }
    if ($props.ContainsKey($theKey) -eq $true)
    {
        $props.Remove($theKey);
        $props.Update();
    }