開始使用 React Native 用戶端 SDK
重要
Visual Studio App Center 已排定於 2025 年 3 月 31 日淘汰。 雖然您可以繼續使用 Visual Studio App Center,直到完全淘汰為止,但有數個建議的替代方案可以考慮移轉至。
在您遵循設定 CodePush 帳戶的一般用途「使用者入門」指示之後,您就可以從應用程式的根目錄中執行下列命令,開始在 React Native 應用程式中整合 CodePush:
npm install --save react-native-code-push
如同所有其他 React Native 外掛程式,iOS 和 Android 的整合體驗不同,因此請根據您針對應用程式的目標平臺 () 遵循設定步驟。 請注意,如果您以這兩個平臺為目標,建議您為每個平臺建立個別的 CodePush 應用程式。
如果您想要查看其他專案如何與 CodePush 整合,請參閱社群所提供的 範例應用程式。 此外,如果您想要熟悉 CodePush + React Native,請參閱 Bilal Budhani 和 Deepak Sisodiya 所產生的入門影片。
重要
本指南假設您已使用 react-native init 命令來初始化 React Native 專案。 自 2017 年 3 月起,命令create-react-native-app也可用來初始化 React Native 專案。 如果使用此命令,請在專案的主目錄中執行 npm run eject ,以取得類似所建立專案 react-native init 的專案。
iOS 設定
擁有 CodePush 外掛程式之後,您必須將其整合到 React Native 應用程式的 Xcode 專案,並正確設定它。
React Native 0.60 版和更新版本的外掛程式安裝和設定, (iOS)
執行
cd ios && pod install && cd ..以安裝所有必要的CocoaPods相依性。開啟
AppDelegate.m檔案,並新增 CodePush 標頭的匯入語句:#import <CodePush/CodePush.h>尋找下列程式代碼行,以設定用於生產版本之網橋的來源 URL:
return [[NSBundle mainBundle] URLForResource:@"main" withExtension:@"jsbundle"];將它取代為下列這一行:
return [CodePush bundleURL];這項變更會將您的應用程式設定為一律載入您應用程式 JS 套件組合的最新版本。 在第一次啟動時,這會對應至使用應用程式編譯的檔案。 不過,透過 CodePush 推送更新之後,這會傳回最近安裝之更新的位置。
注意
方法
bundleURL假設您的應用程式 JS 套件組合名為main.jsbundle。 如果您已將應用程式設定為使用不同的檔名,請呼叫bundleURLForResource:方法 (假設您改用.jsbundle擴展名) 或bundleURLForResource:withExtension:方法,以覆寫該默認行為。一般而言,您只會想要使用 CodePush 來解決發行組建內的 JS 套件組合位置。 建議您使用
DEBUG處理器前宏,根據您要偵錯的方式,使用 packager 伺服器和 CodePush 動態切換。 這可讓您更輕鬆地在生產環境中取得所需的正確行為,同時仍會在偵錯時間使用 Chrome Dev Tools、即時重載等。您的
sourceURLForBridge方法看起來應該像這樣:- (NSURL *)sourceURLForBridge:(RCTBridge *)bridge { #if DEBUG return [[RCTBundleURLProvider sharedSettings] jsBundleURLForBundleRoot:@"index" fallbackResource:nil]; #else return [CodePush bundleURL]; #endif }將部署金鑰新增至
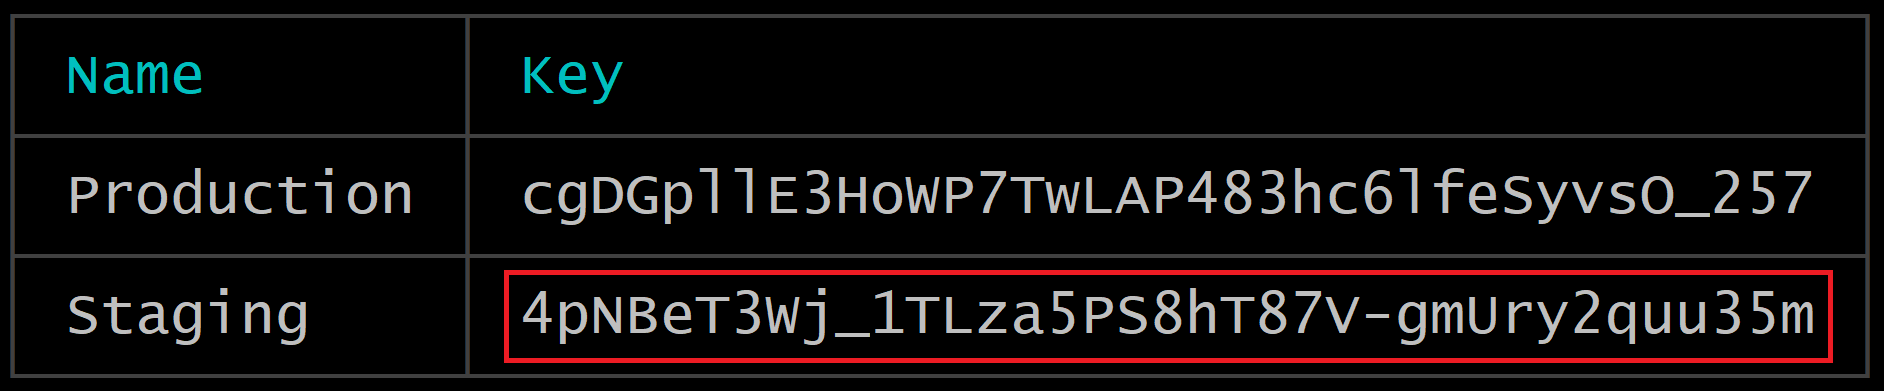
Info.plist:若要讓 CodePush 運行時間知道它應該查詢更新的部署,請開啟應用程式的Info.plist檔案,然後新增名為CodePushDeploymentKey的新專案,其值為您要針對應用程式部署的索引鍵 (,例如應用程式部署的索引鍵StagingFooBar) 。 若要擷取此值,您可以移至 AppCenter 儀錶板上的 [散發 UI],或使用appcenter codepush deployment list --app <ownerName>/<appName> -kCodePush CLI (-k旗標執行,因為預設不會顯示索引鍵) ,並複製對應至您想要使用之部署的數據行值Deployment Key, (請參閱下方) 。 使用部署的名稱 (,例如預備) 將無法運作。 該「易記名稱」僅適用於來自 CLI 的已驗證管理使用方式,而不是用於應用程式內的公用取用。
若要有效地使用
Staging與 CodePush 應用程式一起建立的 和Production部署,請參閱下面的 多部署測試 檔,再實際將應用程式的 CodePush 使用方式移至生產環境。注意
如果您需要動態使用不同的部署,您也可以使用 Code-Push 選項覆寫 JS 程式代碼中的部署密鑰*
React Native 低於 0.60 (iOS) 的外掛程式安裝
為了盡可能容納許多開發人員喜好設定,CodePush 外掛程式支援透過三種機制進行 iOS 安裝:
RNPM - React Native 套件管理員 (RNPM) 是一項絕佳的工具,可為 React Native 外掛程式提供最簡單的安裝體驗。 如果您已經使用它,或想要使用它,建議您使用此方法。
CocoaPods - 如果您要建置內嵌 React Native 的原生 iOS 應用程式,或偏好使用 CocoaPods,建議您使用我們隨附的 Podspec 檔案作為外掛程式的一部分。
「手動」 - 如果您不想依賴任何其他工具,或有一些額外的安裝步驟 (這是) 一次性的事,請遵循此方法。
iOS 外掛程式安裝 (- RNPM)
自 React Native v0.27 起,
rnpm link已合併至 React Native CLI。 請執行:react-native link react-native-code-push如果您的應用程式使用低於 v0.27 的 React Native 版本,請執行下列命令:
rnpm link react-native-code-push注意
如果您尚未安裝 RNPM,您可以執行
npm i -g rnpm上述命令,然後執行上述命令。 如果您已安裝 RNPM,請確定您有 v1.9.0+ 可受益於此步驟安裝。系統會提示您輸入要使用的部署金鑰。 如果您還沒有此值,您可以執行
appcenter codepush deployment list -a <ownerName>/<appName> --displayKeys來擷取此值,或者您可以按兩下 [) ],然後選擇忽略此值 (<ENTER>稍後再新增。 若要開始使用,建議您使用您的Staging部署密鑰,以便測試 CodePush 端對端。
外掛程式安裝 (iOS - CocoaPods)
將 React Native 和 CodePush 外掛程式相依性新增至您的
Podfile,指向 NPM 已安裝模組的路徑# React Native requirements pod 'React', :path => '../node_modules/react-native', :subspecs => [ 'Core', 'CxxBridge', # Include this for RN >= 0.47 'DevSupport', # Include this to enable In-App Devmenu if RN >= 0.43 'RCTText', 'RCTNetwork', 'RCTWebSocket', # Needed for debugging 'RCTAnimation', # Needed for FlatList and animations running on native UI thread # Add any other subspecs you want to use in your project ] # Explicitly include Yoga if you're using RN >= 0.42.0 pod 'yoga', :path => '../node_modules/react-native/ReactCommon/yoga' pod 'DoubleConversion', :podspec => '../node_modules/react-native/third-party-podspecs/DoubleConversion.podspec' pod 'glog', :podspec => '../node_modules/react-native/third-party-podspecs/glog.podspec' pod 'Folly', :podspec => '../node_modules/react-native/third-party-podspecs/Folly.podspec' # CodePush plugin dependency pod 'CodePush', :path => '../node_modules/react-native-code-push'注意
相依性的檔案路徑必須相對於應用程式
Podfile的位置。注意
項目
JWT的連結庫必須是 3.0.x 版或更高版本pod install執行
注意
CodePush .podspec 相依於 React Pod,因此為了確保它可以正確使用應用程式所建置 React Native 版本,請務必在應用程式的 Podfile 中定義React相依性,如 React Native 整合檔中所述。
iOS 外掛程式安裝 (- 手動)
開啟應用程式的 Xcode 專案
CodePush.xcodeproj在目錄內node_modules/react-native-code-push/ios尋找檔案 (或node_modules/react-native-code-pushfor <=1.7.3-beta安裝) ,然後將它拖曳到LibrariesXcode 中的節點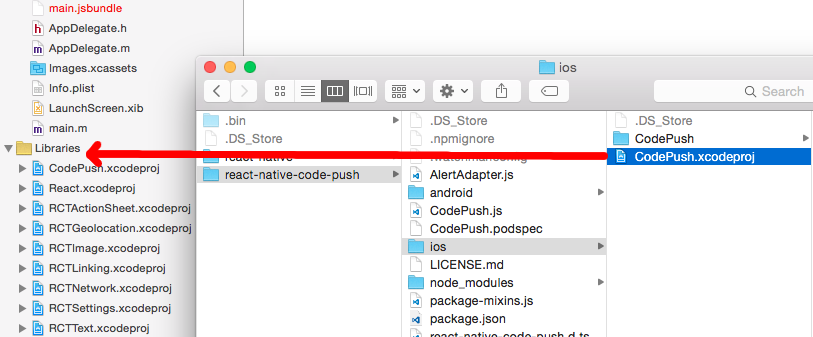
在 Xcode 中選取項目節點,然後選取項目組態的 [建置階段] 索引卷標。
從
Libraries/CodePush.xcodeproj/Products拖libCodePush.a曳至專案 [建置階段] 設定的 [鏈接二進位檔與連結庫] 區段。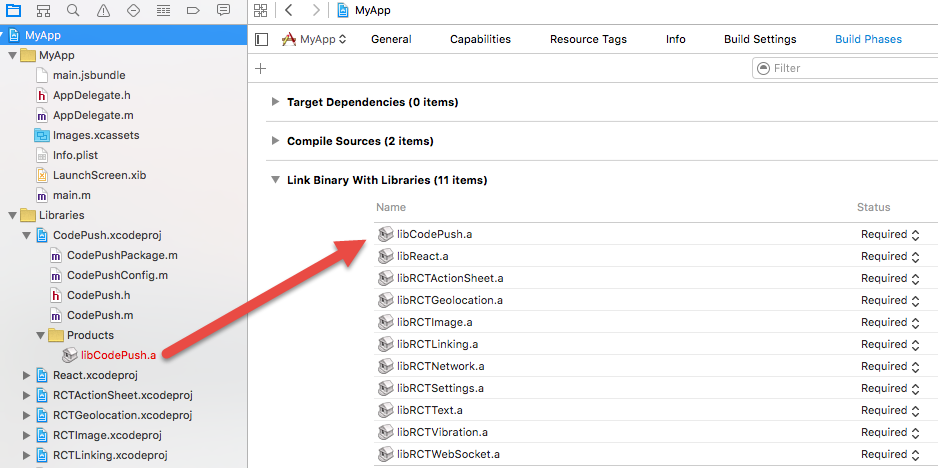
按兩下 [連結二進位檔與連結庫] 清單下方的加號,然後選取節點下方的連結
libz.tbdiOS 9.1庫。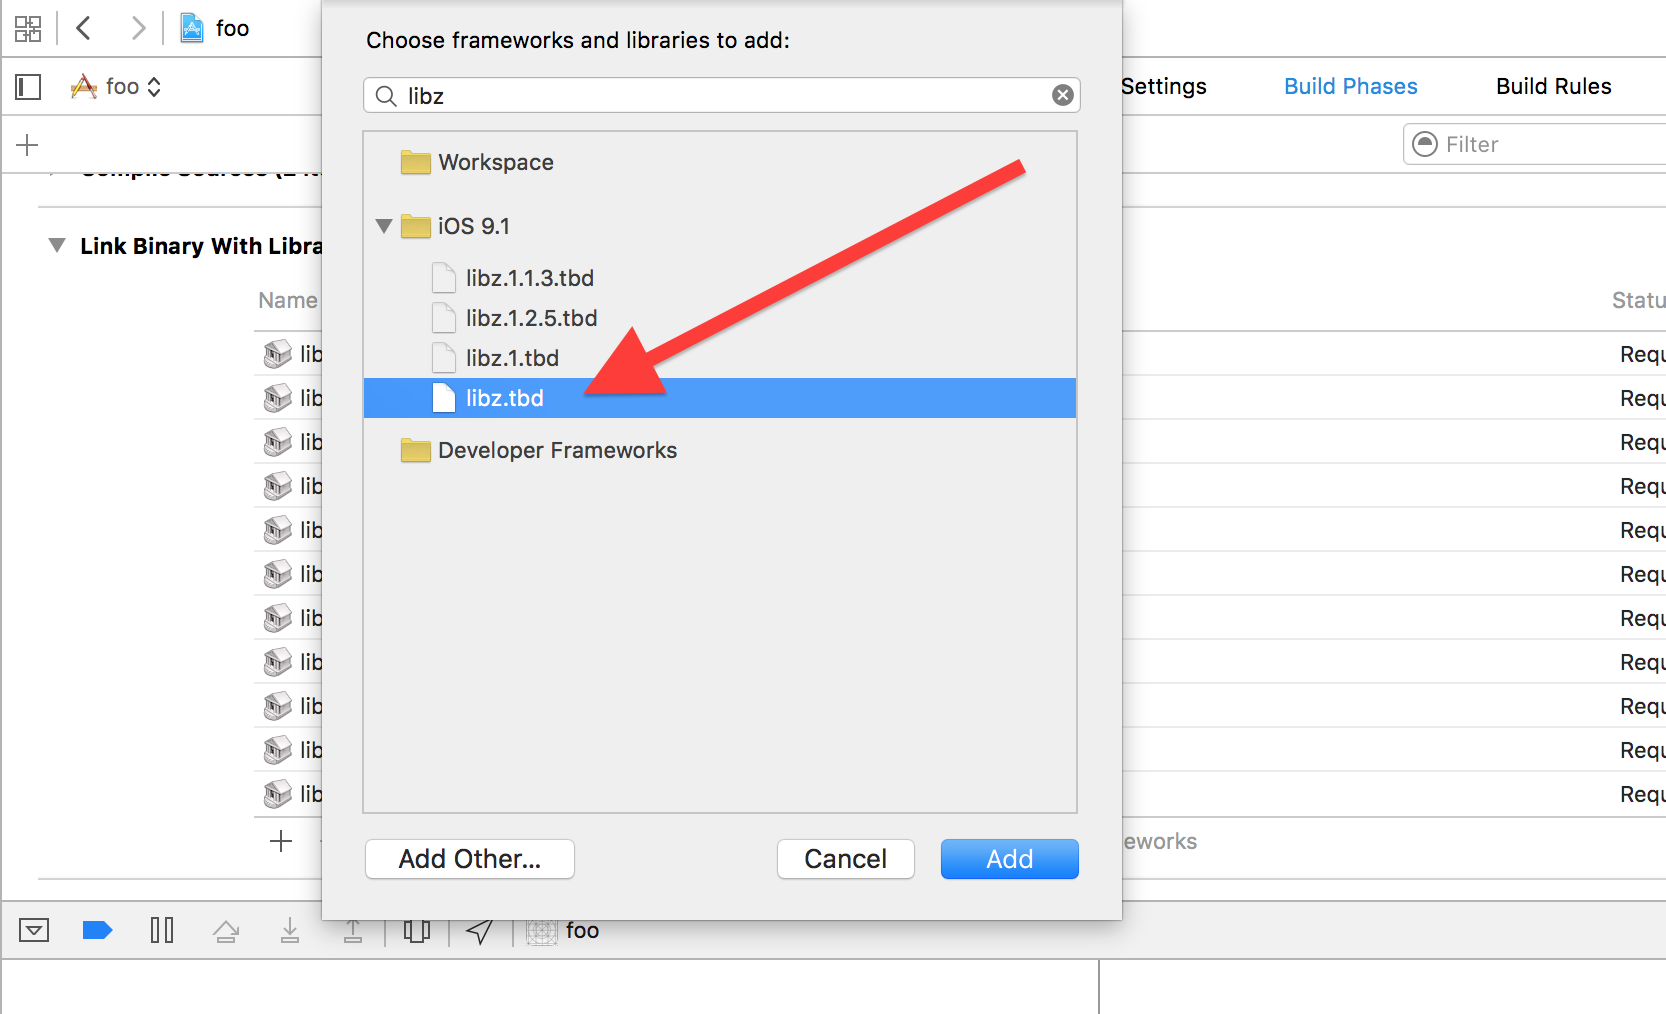
注意
或者,如果您想要的話,您可以將 旗標新增
-lz至Other Linker Flags區段中的Build Settings欄位Linking。
React Native 低於 0.60 (iOS) 的外掛程式元件元件
注意
如果您使用 RNPM 或 react-native link 自動連結外掛程式,這些步驟已經為您完成,因此您可以略過本節。
設定 Xcode 專案以建置/連結 CodePush 外掛程式之後,您必須設定應用程式來檢查 CodePush 以取得 JS 套件組合的位置,因為它負責將它與發行至 CodePush 伺服器的更新進行同步處理。 若要這樣做,請遵循下列步驟:
開啟 AppDelegate.m 檔案,然後新增 CodePush 標頭的匯入語句:
#import <CodePush/CodePush.h>
針對 React Native 0.59 - 0.59.10:
尋找下列程式代碼行,以設定用於生產版本之網橋的來源 URL:
return [[NSBundle mainBundle] URLForResource:@"main" withExtension:@"jsbundle"];將它取代為下列這一行:
return [CodePush bundleURL];
針對 React Native 0.58 和以下版本:
尋找下列程式代碼行,它會從生產版本的應用程式二進位檔載入您的 JS 套件組合:
jsCodeLocation = [[RCTBundleURLProvider sharedSettings] jsBundleURLForBundleRoot:@"index" fallbackResource:nil];將它取代為下列這一行:
jsCodeLocation = [CodePush bundleURL];
這項變更會將您的應用程式設定為一律載入您應用程式 JS 套件組合的最新版本。 在第一次啟動時,這會對應至使用應用程式編譯的檔案。 不過,透過 CodePush 推送更新之後,這會傳回最近安裝之更新的位置。
注意
方法 bundleURL 假設您的應用程式 JS 套件組合名為 main.jsbundle。 如果您已將應用程式設定為使用不同的檔名,請呼叫 bundleURLForResource: 方法 (假設您改用 .jsbundle 擴展名) 或 bundleURLForResource:withExtension: 方法,以覆寫該默認行為。
一般而言,您只會想要使用 CodePush 來解決發行組建內的 JS 套件組合位置。 建議您使用 DEBUG 處理器前宏,根據您要偵錯的方式,使用 packager 伺服器和 CodePush 動態切換。 這可讓您更輕鬆地在生產環境中取得所需的正確行為,同時仍會在偵錯時間使用 Chrome Dev Tools、即時重載等。
針對 React Native 0.59 - 0.59.10:
- (NSURL *)sourceURLForBridge:(RCTBridge *)bridge
{
  #if DEBUG
    return [[RCTBundleURLProvider sharedSettings] jsBundleURLForBundleRoot:@"index" fallbackResource:nil];
  #else
    return [CodePush bundleURL];
  #endif
}
針對 React Native 0.58 和以下版本:
NSURL *jsCodeLocation;

#ifdef DEBUG
    jsCodeLocation = [[RCTBundleURLProvider sharedSettings] jsBundleURLForBundleRoot:@"index" fallbackResource:nil];
#else
    jsCodeLocation = [CodePush bundleURL];
#endif
若要讓 CodePush 執行時間知道它應該查詢更新的部署,請開啟專案的 Info.plist 檔案,並新增名為 CodePushDeploymentKey的新專案,其值為您要針對應用程式部署設定此應用程式的索引鍵 (,例如應用程式部署FooBar的索引鍵 Staging) 。 您可以在 CodePush CLI 中執行 appcenter codepush deployment list -a <ownerName>/<appName> --displayKeys ,並複製對應至您想要使用之部署的數據 Deployment Key 行值,以擷取此值 () 如下) 。 使用部署的名稱 (,例如 Staging) 將無法運作。 該「易記名稱」僅適用於 CLI 的已驗證管理使用方式,而不是用於應用程式內的公用取用。
若要有效地使用與 CodePush 應用程式一起建立的 Staging 和 Production 部署,請參閱下面的 多部署測試 檔,再實際將應用程式的 CodePush 使用量移至生產環境。
iOS) (HTTP 例外狀況網域組態
CodePush 外掛程式會對下列網域提出 HTTPS 要求:
- codepush.appcenter.ms
- codepush.blob.core.windows.net
- codepushupdates.azureedge.net
如果您想要變更上述任何網域的預設 HTTP 安全性設定,請在專案的 Info.plist 檔案內定義 NSAppTransportSecurity (ATS) 組態:
<plist version="1.0">
  <dict>
    <!-- ...other configs... -->

    <key>NSAppTransportSecurity</key>
    <dict>
      <key>NSExceptionDomains</key>
      <dict>
        <key>codepush.appcenter.ms</key>
        <dict><!-- read the ATS Apple Docs for available options --></dict>
      </dict>
    </dict>

    <!-- ...other configs... -->
  </dict>
</plist>
執行任何動作之前,請先參閱 Apple 檔 。
iOS) (程式代碼簽署設定
您可以在發行期間自行簽署套件組合,並在安裝更新之前驗證其簽章。 如需程式代碼簽署的詳細資訊,請參閱相關的程式 代碼推送檔一節。
若要設定公鑰以進行套件組合驗證,您必須使用公鑰內容的名稱CodePushPublicKey和字串值,在中Info.plist新增記錄。 範例:
<plist version="1.0">
  <dict>
    <!-- ...other configs... -->

    <key>CodePushPublicKey</key>
        <string>-----BEGIN PUBLIC KEY-----
MFwwDQYJKoZIhvcNAQEBBQADSwAwSAJBANkWYydPuyOumR/sn2agNBVDnzyRpM16NAUpYPGxNgjSEp0etkDNgzzdzyvyl+OsAGBYF3jCxYOXozum+uV5hQECAwEAAQ==
-----END PUBLIC KEY-----</string>

    <!-- ...other configs... -->
  </dict>
</plist>
Android 安裝程式
若要將 CodePush 整合到 Android 專案中,請執行下列步驟:
外掛程式安裝 (Android)
(Android) React Native 0.60 版和更新版本的外掛程式安裝和組態
android/settings.gradle在您的檔案中,進行下列新增:include ':app', ':react-native-code-push' project(':react-native-code-push').projectDir = new File(rootProject.projectDir, '../node_modules/react-native-code-push/android/app')android/app/build.gradle在您的檔案中codepush.gradle,將檔案新增為額外的建置工作定義:... apply from: "../../node_modules/react-native-code-push/android/codepush.gradle" ...MainApplication.java更新 (,或者MainApplicationReactNativeHost.java如果您使用 React Native 0.68 - 0.70) 檔案,透過下列變更使用 CodePush:... // 1. Import the plugin class. import com.microsoft.codepush.react.CodePush; public class MainApplication extends Application implements ReactApplication { private final ReactNativeHost mReactNativeHost = new ReactNativeHost(this) { ... // 2. Override the getJSBundleFile method to let // the CodePush runtime determine where to get the JS // bundle location from on each app start @Override protected String getJSBundleFile() { return CodePush.getJSBundleFile(); } }; }將部署金鑰新增至
strings.xml:若要讓 CodePush 執行時間知道它應該查詢更新的部署,請開啟應用程式的
strings.xml檔案,並新增名為 的新CodePushDeploymentKey字串,其值為您要針對此應用程式設定此應用程式的索引鍵,例如應用程式部署FooBar的索引鍵Staging() 。 若要擷取此值,您可以在 App Center CLI 中執行appcenter codepush deployment list -a <ownerName>/<appName> -k, (-k旗標是必要的,因為預設不會) 顯示索引鍵,並且複製對應至您想要使用之部署的數據Key行值 (,請參閱下方) 。 使用部署的名稱 (,例如預備) 將無法運作。 「易記名稱」僅適用於來自 CLI 的已驗證管理使用方式,而不是用於應用程式內的公用取用。若要有效地使用與 CodePush 應用程式一起建立的
Staging和Production部署,請參閱下面的 多部署測試 檔,再實際將應用程式的 CodePush 使用量移至生產環境。您的
strings.xml檔案看起來應該像這樣:<resources> <string name="app_name">AppName</string> <string moduleConfig="true" name="CodePushDeploymentKey">DeploymentKey</string> </resources>注意
如果您需要動態使用不同的部署,您也可以使用程式代碼推送選項在 JS 程式代碼中覆寫部署密鑰*
React Native 低於 0.60 (Android) 的外掛程式安裝
為了盡可能容納許多開發人員喜好設定,CodePush 外掛程式透過兩種機制支援 Android 安裝:
RNPM - React Native 套件管理員 (RNPM) 是一項絕佳的工具,可提供 React Native 外掛程式最簡單的安裝體驗。 如果您已經使用它,或想要使用它,建議您使用此方法。
「手動」 - 如果您不想依賴任何其他工具,或有一些額外的安裝步驟, (這是) 一次性的事,請繼續進行此方法。
注意
由於程式代碼從 React Native 存放庫變更,如果您安裝的 React Native 版本範圍從 0.29 到 0.32,建議您遵循手動步驟來正確設定。
外掛程式安裝 (Android - RNPM)
自 React Native v0.27 起,
rnpm link已合併至 React Native CLI。 請執行:react-native link react-native-code-push如果您的應用程式使用低於 v0.27 的 React Native 版本,請執行下一個命令:
rnpm link react-native-code-push注意
如果您尚未安裝 RNPM,您可以執行
npm i -g rnpm並執行上述命令來執行此動作。如果您使用 RNPM >=1.6.0,系統會提示您輸入要使用的部署密鑰。 如果您還沒有此值,您可以執行
appcenter codepush deployment list -a <ownerName>/<appName> --displayKeys來擷取此值,或者您可以按兩下<ENTER>) ,並在稍後新增它,選擇忽略它 (。 若要開始使用,建議您使用部署Staging密鑰,以便測試 CodePush 端對端。
這是使用 RNPM 進行安裝! 請繼續前往 [ 外掛程式組態 ] 區段,以完成設定。
外掛程式安裝 (Android - 手動)
android/settings.gradle在您的檔案中,進行下列新增:include ':app', ':react-native-code-push' project(':react-native-code-push').projectDir = new File(rootProject.projectDir, '../node_modules/react-native-code-push/android/app')在您的
android/app/build.gradle檔案中:react-native-code-push,將專案新增為編譯時間相依性:... dependencies { ... compile project(':react-native-code-push') }android/app/build.gradle在您的檔案中codepush.gradle,將檔案新增為額外的建置工作定義:... apply from: "../../node_modules/react-native-code-push/android/codepush.gradle" ...
React Native 低於 0.60 (Android) 的外掛程式元件元件
注意
如果您使用 RNPM 或 react-native link 自動連結外掛程式,這些步驟已經為您完成,因此您可以略過本節。
安裝外掛程式並同步處理 Android Studio 專案與 Gradle 之後,您必須設定應用程式來檢查 CodePush 以取得 JS 套件組合的位置,因為它會「控制」管理目前和所有未來的版本。 作法如下:
針對 React Native >= v0.29
如果您要將 CodePush 整合到 React Native 應用程式,請執行下列步驟:
透過下列變更更新檔案 MainApplication.java 以使用 CodePush:
...
// 1. Import the plugin class.
import com.microsoft.codepush.react.CodePush;

public class MainApplication extends Application implements ReactApplication {

    private final ReactNativeHost mReactNativeHost = new ReactNativeHost(this) {
        ...
        // 2. Override the getJSBundleFile method to let
        // the CodePush runtime determine where to get the JS
        // bundle location from on each app start
        @Override
        protected String getJSBundleFile() {
            return CodePush.getJSBundleFile();
        }

        @Override
        protected List<ReactPackage> getPackages() {
            // 3. Instantiate an instance of the CodePush runtime and add it to the list of
            // existing packages, specifying the right deployment key. If you don't already
            // have it, you can run "appcenter codepush deployment list -a <ownerName>/<appName> --displayKeys" to retrieve your key.
            return Arrays.<ReactPackage>asList(
                new MainReactPackage(),
                new CodePush("deployment-key-here", MainApplication.this, BuildConfig.DEBUG)
            );
        }
    };
}
如果您要將 React Native 整合到現有的原生應用程式,請執行下列步驟:
更新 MyReactActivity.java (應用程式) 檔案中可能會以不同方式命名,以透過下列變更使用 CodePush:
...
// 1. Import the plugin class.
import com.microsoft.codepush.react.CodePush;

public class MyReactActivity extends Activity {
    private ReactRootView mReactRootView;
    private ReactInstanceManager mReactInstanceManager;

    @Override
    protected void onCreate(Bundle savedInstanceState) {
        ...
        mReactInstanceManager = ReactInstanceManager.builder()
                // ...
                // Add CodePush package
                .addPackage(new CodePush("deployment-key-here", getApplicationContext(), BuildConfig.DEBUG))
                // Get the JS Bundle File via CodePush
                .setJSBundleFile(CodePush.getJSBundleFile())
                // ...

                .build();
        mReactRootView.startReactApplication(mReactInstanceManager, "MyReactNativeApp", null);

        setContentView(mReactRootView);
    }

    ...
}
針對 React Native v0.19 - v0.28
透過下列變更 更新MainActivity.java 檔案以使用 CodePush:
...
// 1. Import the plugin class (if you used RNPM to install the plugin, this
// should already be done for you automatically so you can skip this step).
import com.microsoft.codepush.react.CodePush;

public class MainActivity extends ReactActivity {
    // 2. Override the getJSBundleFile method to let
    // the CodePush runtime determine where to get the JS
    // bundle location from on each app start
    @Override
    protected String getJSBundleFile() {
        return CodePush.getJSBundleFile();
    }

    @Override
    protected List<ReactPackage> getPackages() {
        // 3. Instantiate an instance of the CodePush runtime and add it to the list of
        // existing packages, specifying the right deployment key. If you don't already
        // have it, you can run "appcenter codepush deployment list -a <ownerName>/<appName> --displayKeys" to retrieve your key.
        return Arrays.<ReactPackage>asList(
            new MainReactPackage(),
            new CodePush("deployment-key-here", this, BuildConfig.DEBUG)
        );
    }

    ...
}
背景 React 實例
注意
只有在您明確啟動 React Native 實例時,才Activity需要本節,例如,從原生推播通知接收者) 內啟動 (。 在這些情況下,必須告知 CodePush 如何尋找您的 React Native 實例。
若要更新/重新啟動您的 React Native 實例,必須先設定 CodePush,ReactInstanceHolder才能嘗試在背景中重新啟動實例。 這是在您的 Application 實作中完成的。
針對 React Native >= v0.29
透過下列變更更新檔案 MainApplication.java 以使用 CodePush:
...
// 1. Declare your ReactNativeHost to extend ReactInstanceHolder. ReactInstanceHolder is a subset of ReactNativeHost, so no additional implementation is needed.
import com.microsoft.codepush.react.ReactInstanceHolder;

public class MyReactNativeHost extends ReactNativeHost implements ReactInstanceHolder {
  // ... usual overrides
}

// 2. Provide your ReactNativeHost to CodePush.

public class MainApplication extends Application implements ReactApplication {

   private final MyReactNativeHost mReactNativeHost = new MyReactNativeHost(this);

   @Override
   public void onCreate() {
     CodePush.setReactInstanceHolder(mReactNativeHost);
     super.onCreate();
  }
}
針對 React Native v0.19 - v0.28
在 v0.29 之前,React Native 未提供ReactNativeHost抽象概念。 如果您要啟動背景實例,您可能已經建置自己的實體,現在應該實作 ReactInstanceHolder。 完成後:
// 1. Provide your ReactInstanceHolder to CodePush.

public class MainApplication extends Application {

   @Override
   public void onCreate() {
     // ... initialize your instance holder
     CodePush.setReactInstanceHolder(myInstanceHolder);
     super.onCreate();
  }
}
若要有效地使用與 CodePush 應用程式一起建立的 Staging 和 Production 部署,請參閱下面的 多部署測試 檔,再實際將應用程式的 CodePush 使用量移至生產環境。
Android) 程式代碼簽署設定 (
從 CLI 2.1.0 版開始,您可以在發行期間自行簽署套件組合,並在安裝更新之前驗證其簽章。 如需程式代碼簽署的詳細資訊,請參閱相關的程式 代碼推送檔一節。 若要使用公鑰進行程式碼簽署,請執行下列步驟:
CodePushPublicKey將字串專案新增至 /path_to_your_app/android/app/src/main/res/values/strings.xml。 看起來可能像這樣:
<resources>
   <string name="app_name">my_app</string>
   <string name="CodePushPublicKey">-----BEGIN PUBLIC KEY-----
MIIBIjANBgkqhkiG9w0BAQEFAAOCAQ8AMIIBCgKCAQEAtPSR9lkGzZ4FR0lxF+ZA
P6jJ8+Xi5L601BPN4QESoRVSrJM08roOCVrs4qoYqYJy3Of2cQWvNBEh8ti3FhHu
tiuLFpNdfzM4DjAw0Ti5hOTfTixqVBXTJPYpSjDh7K6tUvp9MV0l5q/Ps3se1vud
M1/X6g54lIX/QoEXTdMgR+SKXvlUIC13T7GkDHT6Z4RlwxkWkOmf2tGguRcEBL6j
ww7w/3g0kWILz7nNPtXyDhIB9WLH7MKSJWdVCZm+cAqabUfpCFo7sHiyHLnUxcVY
OTw3sz9ceaci7z2r8SZdsfjyjiDJrq69eWtvKVUpredy9HtyALtNuLjDITahdh8A
zwIDAQAB
-----END PUBLIC KEY-----</string>
</resources>
針對 React Native <= v0.60,您應該使用下列其中一種方法,將 CodePush 實例設定為使用此參數
使用建構函式
new CodePush(
    "deployment-key",
    getApplicationContext(),
    BuildConfig.DEBUG,
    R.string.CodePushPublicKey)
使用產生器
new CodePushBuilder("deployment-key-here",getApplicationContext())
   .setIsDebugMode(BuildConfig.DEBUG)
   .setPublicKeyResourceDescriptor(R.string.CodePushPublicKey)
   .build()
Windows 設定
取得 CodePush 外掛程式之後,您必須將其整合到 React Native 應用程式的 Visual Studio 專案中,並正確設定。 若要這麼做,遵循下列步驟:
React Native 0.63.6 版和更新版本的外掛程式安裝和設定, (Windows)
外掛程式安裝 (Windows-npx)
下載外掛程式之後,請在應用程式的根目錄中執行 npx react-native autolink-windows ,以自動將 CodePush c++ 專案新增至應用程式的 Windows 方案檔。
Windows) 外掛程式元件組態 (
將位於 的下列檔案取代為
windows/<app name>位於 此存放庫中的 CodePushDemoAppCpp 範例應用程式中的Examples/CodePushDemoAppCpp/windows/CodePushDemoAppCpp檔案:- app.h
- app.cpp
- app.xaml
在上述檔案中,以應用程式名稱取代的任何發生方式
CodePushDemoAppCpp在 中,將應用程式的應用程式版本和部署金鑰輸入至
configMap應用程式OnLaunched方法App.cpp頂端的物件:
//...
void App::OnLaunched(activation::LaunchActivatedEventArgs const& e)
{
    winrt::Microsoft::CodePush::ReactNative::CodePushConfig::SetHost(Host());
    auto configMap{ winrt::single_threaded_map<hstring, hstring>() };
    configMap.Insert(L"appVersion", L"1.0.0");
    configMap.Insert(L"deploymentKey", L"<app deployment key>");
    winrt::Microsoft::CodePush::ReactNative::CodePushConfig::Init(configMap);
//...
}
//...
React Native 低於 0.60 (Windows) 的外掛程式安裝和組態
Windows) (外掛程式安裝
開啟位於您應用程式內的Visual Studio解決方案
windows-legacy\<AppName>\<AppName>.sln以滑鼠右鍵按兩下視窗中的方案節點
Solution Explorer,然後選取選單Add -> Existing Project...項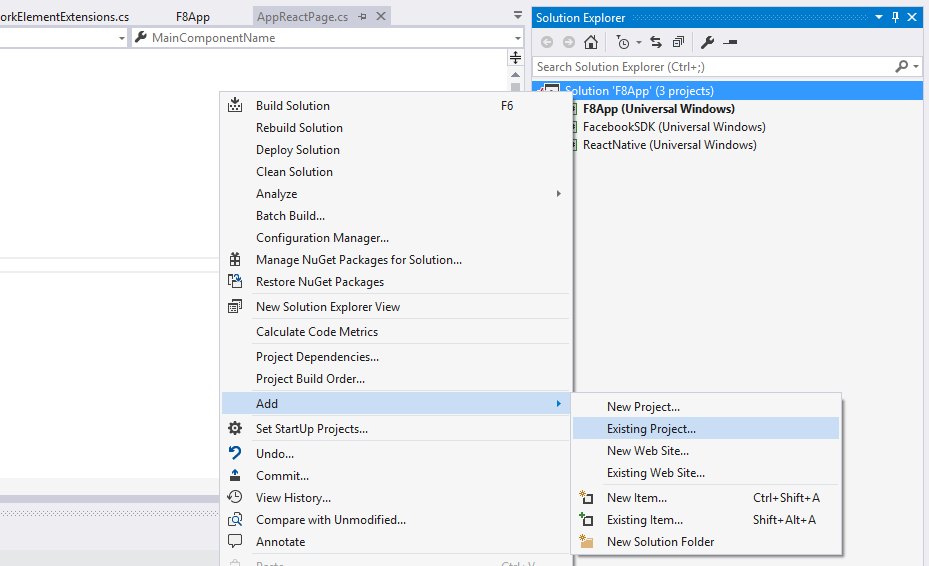
流覽至
node_modules\react-native-code-push\windows目錄,選取檔案,然後按下OKSolution Explorer回到 ,以滑鼠右鍵按下以您的應用程式命名的項目節點,然後選取Add -> Reference...功能表項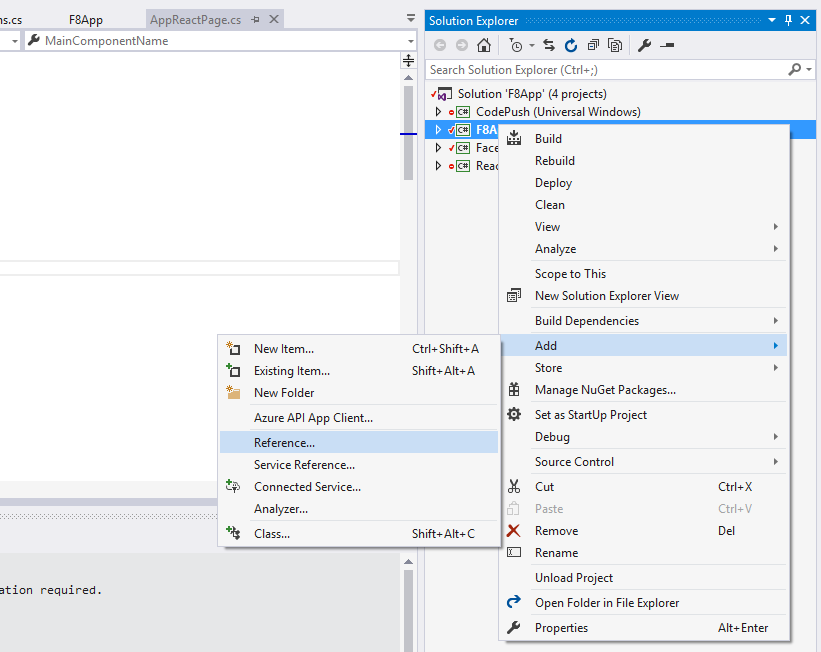
Projects選取左側的索引標籤,檢查CodePush專案,然後按兩下OK
Windows) 外掛程式元件組態 (
安裝外掛程式之後,您必須將應用程式設定為檢查 CodePush 以取得 JS 套件組合的位置,因為它會「控制」管理目前和所有未來的版本。 若要這樣做,請透過下列變更更新 AppReactPage.cs 檔案以使用 CodePush:
...
// 1. Import the CodePush namespace
using CodePush.ReactNative;
...
class AppReactPage : ReactPage
{
    // 2. Declare a private instance variable for the CodePushModule instance.
    private CodePushReactPackage codePushReactPackage;

    // 3. Update the JavaScriptBundleFile property to initialize the CodePush runtime,
    // specifying the right deployment key, then use it to return the bundle URL from
    // CodePush instead of statically from the binary. If you don't already have your
    // deployment key, you can run "appcenter codepush deployment list -a <ownerName>/<appName> --displayKeys" to retrieve it.
    public override string JavaScriptBundleFile
    {
        get
        {
            codePushReactPackage = new CodePushReactPackage("deployment-key-here", this);
            return codePushReactPackage.GetJavaScriptBundleFile();
        }
    }

    // 4. Add the codePushReactPackage instance to the list of existing packages.
    public override List<IReactPackage> Packages
    {
        get
        {
            return new List<IReactPackage>
            {
                new MainReactPackage(),
                ...
                codePushReactPackage
            };
        }
    }
    ...
}