教學課程:實作繼承 - ASP.NET MVC 搭配 EF Core
在上一個教學課程中,您已處理並行存取例外狀況。 本教學課程將示範如何在資料模型中實作繼承。
在物件導向程式設計中,您可以使用繼承,以便重複使用程式碼。 在本教學課程中,您將變更 Instructor 和 Student 類別,讓它們衍生自 Person 基底類別,而此基底類別包含講師和學生通用的屬性,例如 LastName。 您不會新增或變更任何網頁,但是您將變更一些程式碼,這些變更將會自動反映在資料庫中。
在本教學課程中,您已:
- 將繼承對應至資料庫
- 建立 Person 類別
- 更新 Instructor 和 Student
- 將 Person 新增至模型
- 建立及更新移轉
- 測試實作
必要條件
將繼承對應至資料庫
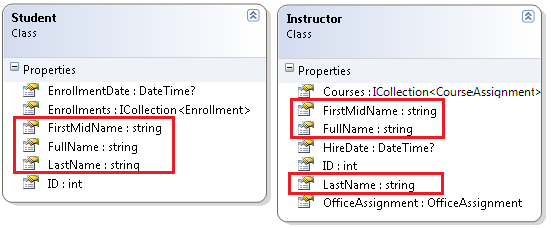
School 資料模型中的 Instructor 和 Student 類別有數個完全相同的屬性:
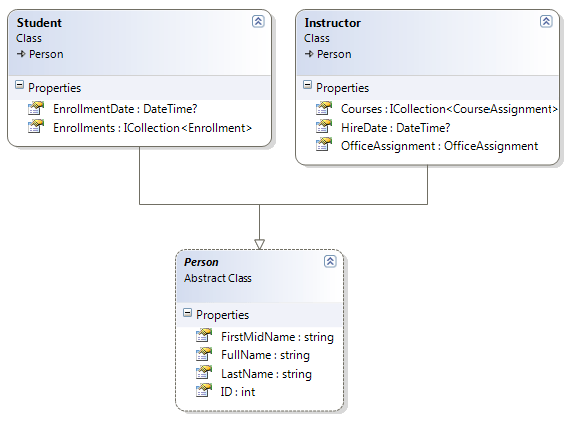
假設您想要針對 Instructor 和 Student 實體所共用的屬性消除多餘的程式碼。 或者,您想要撰寫服務,以便用來格式化名稱,而無需在意名稱是來自講師還是學生。 您可以建立只包含這些共用屬性的 Person 基底類別,然後使 Instructor 和 Student 類別繼承自該基底類別,如下圖所示:
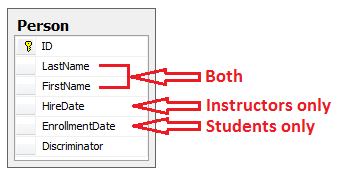
有幾種方式可以在資料庫中表示此繼承結構。 您擁有的 Person 資料表可能在單一資料表中同時包含學生和講師的資訊。 有些資料行僅適用於講師 (HireDate),有些只適用於學生 (EnrollmentDate),有些則兩者通用 (LastName、FirstName)。 一般而言,您必須有指出每個資料列代表哪種類型的鑑別子資料行。 例如,鑑別子資料行的 "Instructor" 代表講師,而 "Student" 代表學生。
從單一資料庫資料表產生實體繼承結構的這種模式稱為一階層一表 (TPH) 繼承。
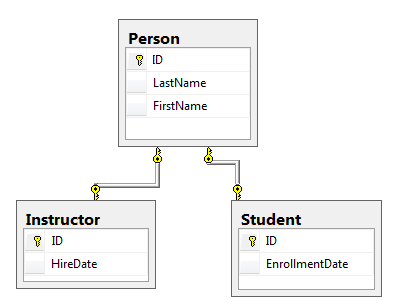
替代方法是讓資料庫看起來更像繼承結構。 比方說,您可以只在 Person 資料表中包含名稱欄位,而在個別的 Instructor 和 Student 資料表中包含日期欄位。
警告
EF Core 3.x 不支援一類一表 (TPT),但已在 EF Core 5.0 中實作。
針對每個實體類別建立資料庫資料表的這種模式稱為一類一表 (TPT) 繼承。
還有另一個選項是將所有的非抽象類型對應至個別資料表。 類別的所有屬性 (包括繼承的屬性) 都會對應至對應資料表的資料行。 此模式稱為一具象類別一表 (TPC) 繼承。 如果您如先前所示實作 Person、Student 和 Instructor 類別的 TPC 繼承,則 Student 和 Instructor 資料表在實作繼承之後看起來與以前相同。
比起 TPT 繼承模式,TPC 和 TPH 繼承模式通常會提供更好的效能,因為 TPT 模式可能會導致複雜的聯結查詢。
本教學課程將示範如何實作 TPH 繼承。 TPH 是 Entity Framework Core 支援的唯一繼承模式。 您要做的是建立 Person 類別、變更 Instructor 和 Student 類別以衍生自 Person、將新類別新增至 DbContext,以及建立移轉。
提示
在進行下列變更之前,請考慮儲存專案的複本。 那麼,當您遇到問題而需要從新開始時,就可以輕鬆地從儲存的專案開始,而不是還原本教學課程完成的步驟或回到整個系列的開頭。
建立 Person 類別
在 Models 資料夾中,建立 Person.cs,並以下列程式碼取代範本程式碼:
using System.ComponentModel.DataAnnotations;
using System.ComponentModel.DataAnnotations.Schema;

namespace ContosoUniversity.Models
{
    public abstract class Person
    {
        public int ID { get; set; }

        [Required]
        [StringLength(50)]
        [Display(Name = "Last Name")]
        public string LastName { get; set; }
        [Required]
        [StringLength(50, ErrorMessage = "First name cannot be longer than 50 characters.")]
        [Column("FirstName")]
        [Display(Name = "First Name")]
        public string FirstMidName { get; set; }

        [Display(Name = "Full Name")]
        public string FullName
        {
            get
            {
                return LastName + ", " + FirstMidName;
            }
        }
    }
}
更新 Instructor 和 Student
在 Instructor.cs 中,從 Person 類別衍生 Instructor 類別,並移除索引鍵和名稱欄位。 程式碼看起來應該如下列範例所示:
using System;
using System.Collections.Generic;
using System.ComponentModel.DataAnnotations;
using System.ComponentModel.DataAnnotations.Schema;

namespace ContosoUniversity.Models
{
    public class Instructor : Person
    {
        [DataType(DataType.Date)]
        [DisplayFormat(DataFormatString = "{0:yyyy-MM-dd}", ApplyFormatInEditMode = true)]
        [Display(Name = "Hire Date")]
        public DateTime HireDate { get; set; }

        public ICollection<CourseAssignment> CourseAssignments { get; set; }
        public OfficeAssignment OfficeAssignment { get; set; }
    }
}
在 Student.cs 中進行相同的變更。
using System;
using System.Collections.Generic;
using System.ComponentModel.DataAnnotations;
using System.ComponentModel.DataAnnotations.Schema;

namespace ContosoUniversity.Models
{
    public class Student : Person
    {
        [DataType(DataType.Date)]
        [DisplayFormat(DataFormatString = "{0:yyyy-MM-dd}", ApplyFormatInEditMode = true)]
        [Display(Name = "Enrollment Date")]
        public DateTime EnrollmentDate { get; set; }


        public ICollection<Enrollment> Enrollments { get; set; }
    }
}
將 Person 新增至模型
將 Person 實體型別新增至 SchoolContext.cs。 新增的行已醒目提示。
using ContosoUniversity.Models;
using Microsoft.EntityFrameworkCore;

namespace ContosoUniversity.Data
{
    public class SchoolContext : DbContext
    {
        public SchoolContext(DbContextOptions<SchoolContext> options) : base(options)
        {
        }

        public DbSet<Course> Courses { get; set; }
        public DbSet<Enrollment> Enrollments { get; set; }
        public DbSet<Student> Students { get; set; }
        public DbSet<Department> Departments { get; set; }
        public DbSet<Instructor> Instructors { get; set; }
        public DbSet<OfficeAssignment> OfficeAssignments { get; set; }
        public DbSet<CourseAssignment> CourseAssignments { get; set; }
        public DbSet<Person> People { get; set; }

        protected override void OnModelCreating(ModelBuilder modelBuilder)
        {
            modelBuilder.Entity<Course>().ToTable("Course");
            modelBuilder.Entity<Enrollment>().ToTable("Enrollment");
            modelBuilder.Entity<Student>().ToTable("Student");
            modelBuilder.Entity<Department>().ToTable("Department");
            modelBuilder.Entity<Instructor>().ToTable("Instructor");
            modelBuilder.Entity<OfficeAssignment>().ToTable("OfficeAssignment");
            modelBuilder.Entity<CourseAssignment>().ToTable("CourseAssignment");
            modelBuilder.Entity<Person>().ToTable("Person");

            modelBuilder.Entity<CourseAssignment>()
                .HasKey(c => new { c.CourseID, c.InstructorID });
        }
    }
}
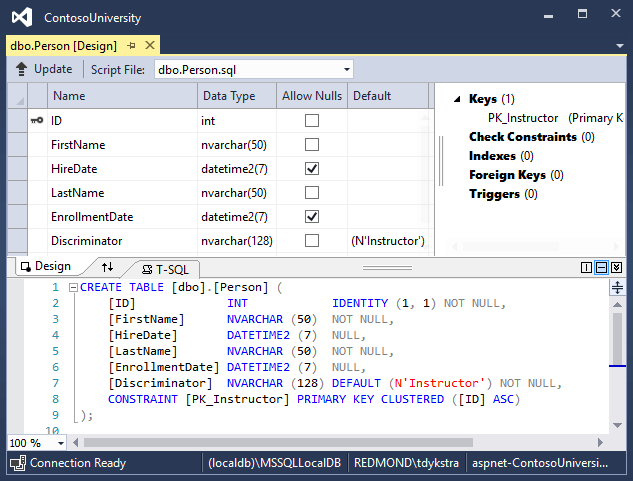
這就是 Entity Framework 為了設定單表繼承而必須執行的所有工作。 如您所見,當資料庫更新時,會有一個 Person 資料表來替代 Student 和 Instructor 資料表。
建立及更新移轉
儲存您的變更,並建置專案。 然後,在專案資料夾中開啟命令視窗,並輸入下列命令:
dotnet ef migrations add Inheritance
還不要執行 database update 命令。 該命令將導致資料遺失,因為它會卸除 Instructor 資料表,然後將 Student 資料表重新命名為 Person。 您必須提供自訂程式碼來保留現有的資料。
開啟 Migrations/<timestamp>_Inheritance.cs,並以下列程式碼取代 Up 方法:
protected override void Up(MigrationBuilder migrationBuilder)
{
    migrationBuilder.DropForeignKey(
        name: "FK_Enrollment_Student_StudentID",
        table: "Enrollment");

    migrationBuilder.DropIndex(name: "IX_Enrollment_StudentID", table: "Enrollment");

    migrationBuilder.RenameTable(name: "Instructor", newName: "Person");
    migrationBuilder.AddColumn<DateTime>(name: "EnrollmentDate", table: "Person", nullable: true);
    migrationBuilder.AddColumn<string>(name: "Discriminator", table: "Person", nullable: false, maxLength: 128, defaultValue: "Instructor");
    migrationBuilder.AlterColumn<DateTime>(name: "HireDate", table: "Person", nullable: true);
    migrationBuilder.AddColumn<int>(name: "OldId", table: "Person", nullable: true);

    // Copy existing Student data into new Person table.
    migrationBuilder.Sql("INSERT INTO dbo.Person (LastName, FirstName, HireDate, EnrollmentDate, Discriminator, OldId) SELECT LastName, FirstName, null AS HireDate, EnrollmentDate, 'Student' AS Discriminator, ID AS OldId FROM dbo.Student");
    // Fix up existing relationships to match new PK's.
    migrationBuilder.Sql("UPDATE dbo.Enrollment SET StudentId = (SELECT ID FROM dbo.Person WHERE OldId = Enrollment.StudentId AND Discriminator = 'Student')");

    // Remove temporary key
    migrationBuilder.DropColumn(name: "OldID", table: "Person");

    migrationBuilder.DropTable(
        name: "Student");

    migrationBuilder.CreateIndex(
         name: "IX_Enrollment_StudentID",
         table: "Enrollment",
         column: "StudentID");

    migrationBuilder.AddForeignKey(
        name: "FK_Enrollment_Person_StudentID",
        table: "Enrollment",
        column: "StudentID",
        principalTable: "Person",
        principalColumn: "ID",
        onDelete: ReferentialAction.Cascade);
}
此程式碼負責下列資料庫更新工作:
移除指向 Student 資料表的外部索引鍵條件約束和索引。
將 Instructor 資料表重新命名為 Person,並對其進行所需的變更來儲存 Student 資料:
針對學生新增可為 null 的 EnrollmentDate。
新增 Discriminator 資料行,以指出資料列適用於學生或講師。
使 HireDate 成為可為 Null,因為學生資料列不會有雇用日期。
新增暫存欄位,它將用來更新指向學生的外部索引鍵。 當您將學生複製到 Person 資料表時,它們會取得新的主索引鍵值。
將 Student 資料表中的資料複製到 Person 資料表。 這會導致學生獲指派新的主索引鍵值。
修正指向學生的外部索引鍵值。
重新建立外部索引鍵條件約束和索引,現在將它們指向 Person 資料表。
(如果您使用 GUID 而不是整數作為主索引鍵類型,學生的主索引鍵值將無需變更,而且可能已省略其中幾個步驟。)
執行 database update 命令:
dotnet ef database update
(在生產環境系統中,您會對 Down 方法進行對應的變更,以防您必須使用該方法來回到先前的資料庫版本。在此教學課程中,您將不會使用 Down 方法。)
注意
在具有現有資料的資料庫中進行結構描述變更時,可能會收到其他錯誤。 如果收到無法解決的移轉錯誤,您可以變更連接字串中的資料庫名稱,或刪除該資料庫。 使用新資料庫時,沒有可移轉的資料,因此 update-database 命令更可能會在沒有錯誤的情況下完成。 若要刪除資料庫,請使用 SSOX 或執行 database drop CLI 命令。
測試實作
執行應用程式,然後嘗試各種頁面。 一切項目的運作與之前一樣。
在 [SQL Server 物件總管] 中,展開 [資料連線/SchoolContext],然後展開 [資料表],您會看到 Person 資料表已取代 Student 和 Instructor 資料表。 開啟 Person 資料表設計工具,您會看到它包含了過去位在 Student 和 Instructor 資料表中的所有資料行。
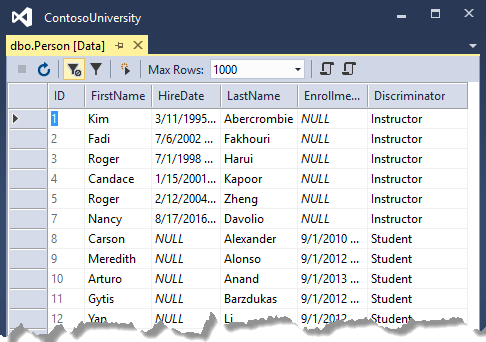
以滑鼠右鍵按一下 Person 資料表,然後按一下 [顯示資料表資料] 以查看鑑別子資料行。
取得程式碼
其他資源
如需 Entity Framework Core 中有關繼承的詳細資訊,請參閱繼承。
下一步
在本教學課程中,您已:
- 將繼承對應至資料庫
- 建立 Person 類別
- 更新 Instructor 和 Student
- 將 Person 新增至模型
- 建立及更新移轉
- 測試實作
若要了解如何處理各種較進階的 Entity Framework 案例,請前往下一個教學課程。
意見反應
即將登場:在 2024 年,我們將逐步淘汰 GitHub 問題作為內容的意見反應機制,並將它取代為新的意見反應系統。 如需詳細資訊,請參閱:https://aka.ms/ContentUserFeedback。
提交並檢視相關的意見反應