ASP.NET Core 中的帳戶確認和密碼復原
由 Rick Anderson、Ponant 和 Joe Audette 撰寫
本教學課程示範如何使用電子郵件確認和密碼重設來建置 ASP.NET Core 應用程式。 本教學課程不是初級主題。 您應熟悉:
如需 Blazor 指引,請參閱 ASP.NET Core Blazor中的帳戶確認和密碼復原。
必要條件
建立具有驗證功能的 Web 應用程式
執行下列命令以建立具有驗證的 Web 應用程式。
dotnet new webapp -au Individual -o WebPWrecover
cd WebPWrecover
dotnet run
使用模擬的電子郵件確認註冊使用者
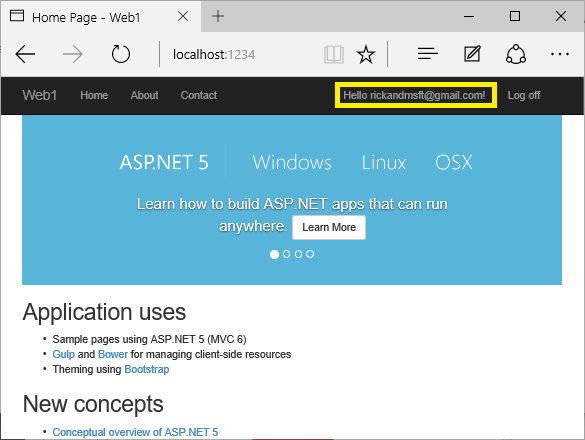
執行應用程式、選取[註冊]連結 ,然後註冊使用者。 註冊之後,系統會將您重新導向至 /Identity/Account/RegisterConfirmation 頁面,其中包含模擬電子郵件確認的連結:
- 選取
Click here to confirm your account連結。 - 選取[登入]連結,並使用相同的認證登入。
- 選取
Hello YourEmail@provider.com!連結,該連結會將您重新導向至/Identity/Account/Manage/PersonalData頁面。 - 選取左側的[個人資料]索引標籤,然後選取[刪除]。
Click here to confirm your account 連結會顯示,因為尚未實作 IEmailSender 並向相依性插入容器註冊。 請參閱RegisterConfirmation來源。
注意
.NET 參考來源的文件連結通常會載入存放庫的預設分支,這表示下一版 .NET 的目前開發。 若要選取特定版本的標籤,請使用 [切換分支或標籤] 下拉式清單。 如需詳細資訊,請參閱如何選取 ASP.NET Core 原始程式碼 (dotnet/AspNetCore.Docs #26205) 的版本標籤。
設定電子郵件提供者
本教學課程中,會使用 SendGrid 來傳送電子郵件。 傳送電子郵件需要 SendGrid 帳戶和金鑰。 我們建議使用 SendGrid 或其他電子郵件服務來傳送電子郵件,而不是 SMTP。 SMTP 難以正確保護及設定。
SendGrid 帳戶可能需要新增傳送者。
建立類別以擷取安全的電子郵件金鑰。 在此範例中,建立 Services/AuthMessageSenderOptions.cs :
namespace WebPWrecover.Services;

public class AuthMessageSenderOptions
{
    public string? SendGridKey { get; set; }
}
設定 SendGrid 使用者秘密
使用秘密管理員工具設定 SendGridKey。 例如:
dotnet user-secrets set SendGridKey <key>

Successfully saved SendGridKey to the secret store.
在 Windows 上,祕密管理員會將索引鍵/值組儲存在 %APPDATA%/Microsoft/UserSecrets/<WebAppName-userSecretsId> 目錄中的 secrets.json 檔案中。
secrets.json 檔案的內容不會加密。 下列標記顯示 secrets.json 檔案。 已移除 SendGridKey 值。
{
  "SendGridKey": "<key removed>"
}
安裝 SendGrid
本教學課程示範如何透過 SendGrid 新增電子郵件通知,但其他電子郵件提供者也可以使用。
安裝 SendGrid NuGet 套件:
請在套件管理員主控台 (PMC) 中輸入下列命令:
Install-Package SendGrid
請參閱免費開始使用 SendGrid,以註冊免費的 SendGrid 帳戶。
實作 IEmailSender
若要實作 IEmailSender,請使用類似下列的程式碼來建立 Services/EmailSender.cs:
using Microsoft.AspNetCore.Identity.UI.Services;
using Microsoft.Extensions.Options;
using SendGrid;
using SendGrid.Helpers.Mail;

namespace WebPWrecover.Services;

public class EmailSender : IEmailSender
{
    private readonly ILogger _logger;

    public EmailSender(IOptions<AuthMessageSenderOptions> optionsAccessor,
                       ILogger<EmailSender> logger)
    {
        Options = optionsAccessor.Value;
        _logger = logger;
    }

    public AuthMessageSenderOptions Options { get; } //Set with Secret Manager.

    public async Task SendEmailAsync(string toEmail, string subject, string message)
    {
        if (string.IsNullOrEmpty(Options.SendGridKey))
        {
            throw new Exception("Null SendGridKey");
        }
        await Execute(Options.SendGridKey, subject, message, toEmail);
    }

    public async Task Execute(string apiKey, string subject, string message, string toEmail)
    {
        var client = new SendGridClient(apiKey);
        var msg = new SendGridMessage()
        {
            From = new EmailAddress("Joe@contoso.com", "Password Recovery"),
            Subject = subject,
            PlainTextContent = message,
            HtmlContent = message
        };
        msg.AddTo(new EmailAddress(toEmail));

        // Disable click tracking.
        // See https://sendgrid.com/docs/User_Guide/Settings/tracking.html
        msg.SetClickTracking(false, false);
        var response = await client.SendEmailAsync(msg);
        _logger.LogInformation(response.IsSuccessStatusCode
                               ? $"Email to {toEmail} queued successfully!"
                               : $"Failure Email to {toEmail}");
    }
}
設定應用程式以支援電子郵件
將下列程式碼新增至 Program.cs 檔案:
- 新增
EmailSender為暫時性服務。 - 註冊
AuthMessageSenderOptions設定執行個體。
using Microsoft.AspNetCore.Identity;
using Microsoft.AspNetCore.Identity.UI.Services;
using Microsoft.EntityFrameworkCore;
using WebPWrecover.Data;
using WebPWrecover.Services;

var builder = WebApplication.CreateBuilder(args);

var connectionString = builder.Configuration.GetConnectionString("DefaultConnection");
builder.Services.AddDbContext<ApplicationDbContext>(options =>
    options.UseSqlite(connectionString));
builder.Services.AddDatabaseDeveloperPageExceptionFilter();

builder.Services.AddDefaultIdentity<IdentityUser>(options => options.SignIn.RequireConfirmedAccount = true)
    .AddEntityFrameworkStores<ApplicationDbContext>();
builder.Services.AddRazorPages();

builder.Services.AddTransient<IEmailSender, EmailSender>();
builder.Services.Configure<AuthMessageSenderOptions>(builder.Configuration);

var app = builder.Build();

if (app.Environment.IsDevelopment())
{
    app.UseMigrationsEndPoint();
}
else
{
    app.UseExceptionHandler("/Error");
    app.UseHsts();
}

app.UseHttpsRedirection();
app.UseStaticFiles();

app.UseRouting();

app.UseAuthentication();
app.UseAuthorization();

app.MapRazorPages();

app.Run();
當 Account.RegisterConfirmation 已建立 Scaffold 時,停用預設帳戶驗證
本節僅適用於已架設 Account.RegisterConfirmation 時。 如果您尚未架設 Account.RegisterConfirmation,請略過本節。
系統會將使用者重新導向至 Account.RegisterConfirmation,讓他們選取連結以確認帳戶。 預設值 Account.RegisterConfirmation僅用於測試,應在生產應用程式中停用自動帳戶驗證。
若要要求已確認的帳戶並防止在註冊時立即登入,請在架設的 /Areas/Identity/Pages/Account/RegisterConfirmation.cshtml.cs 檔案中設定 DisplayConfirmAccountLink = false:
// Licensed to the .NET Foundation under one or more agreements.
// The .NET Foundation licenses this file to you under the MIT license.
#nullable disable

using System;
using System.Text;
using System.Threading.Tasks;
using Microsoft.AspNetCore.Authorization;
using Microsoft.AspNetCore.Identity;
using Microsoft.AspNetCore.Identity.UI.Services;
using Microsoft.AspNetCore.Mvc;
using Microsoft.AspNetCore.Mvc.RazorPages;
using Microsoft.AspNetCore.WebUtilities;

namespace WebPWrecover.Areas.Identity.Pages.Account
{
    [AllowAnonymous]
    public class RegisterConfirmationModel : PageModel
    {
        private readonly UserManager<IdentityUser> _userManager;
        private readonly IEmailSender _sender;

        public RegisterConfirmationModel(UserManager<IdentityUser> userManager, IEmailSender sender)
        {
            _userManager = userManager;
            _sender = sender;
        }

        /// <summary>
        ///     This API supports the ASP.NET Core Identity default UI infrastructure and is not intended to be used
        ///     directly from your code. This API may change or be removed in future releases.
        /// </summary>
        public string Email { get; set; }

        /// <summary>
        ///     This API supports the ASP.NET Core Identity default UI infrastructure and is not intended to be used
        ///     directly from your code. This API may change or be removed in future releases.
        /// </summary>
        public bool DisplayConfirmAccountLink { get; set; }

        /// <summary>
        ///     This API supports the ASP.NET Core Identity default UI infrastructure and is not intended to be used
        ///     directly from your code. This API may change or be removed in future releases.
        /// </summary>
        public string EmailConfirmationUrl { get; set; }

        public async Task<IActionResult> OnGetAsync(string email, string returnUrl = null)
        {
            if (email == null)
            {
                return RedirectToPage("/Index");
            }
            returnUrl = returnUrl ?? Url.Content("~/");

            var user = await _userManager.FindByEmailAsync(email);
            if (user == null)
            {
                return NotFound($"Unable to load user with email '{email}'.");
            }

            Email = email;
            // Once you add a real email sender, you should remove this code that lets you confirm the account
            DisplayConfirmAccountLink = false;
            if (DisplayConfirmAccountLink)
            {
                var userId = await _userManager.GetUserIdAsync(user);
                var code = await _userManager.GenerateEmailConfirmationTokenAsync(user);
                code = WebEncoders.Base64UrlEncode(Encoding.UTF8.GetBytes(code));
                EmailConfirmationUrl = Url.Page(
                    "/Account/ConfirmEmail",
                    pageHandler: null,
                    values: new { area = "Identity", userId = userId, code = code, returnUrl = returnUrl },
                    protocol: Request.Scheme);
            }

            return Page();
        }
    }
}
只有在已架設 Account.RegisterConfirmation 時才需要此步驟。 非架設 RegisterConfirmation 會自動偵測何時已實作 IEmailSender,並向相依性插入容器註冊。
註冊、確認電子郵件和重設密碼
執行 Web 應用程式,並測試帳戶確認和密碼復原流程。
- 執行應用程式並註冊使用者
- 請檢查您的電子郵件,以取得帳戶確認連結。 如果您沒有收到電子郵件,請參閱 電子郵件偵錯。
- 按一下連結以確認您的電子郵件。
- 使用您的電子郵件和密碼登入。
- 登出。
測試密碼重設
- 如果您已登入,請選取[登出]。
- 選取[登入]連結,然後選取[忘記密碼嗎?]連結。
- 輸入您用來註冊帳戶的電子郵件。
- 傳送含有重設密碼連結的電子郵件。 請檢查您的電子郵件,然後按一下連結以重設密碼。 成功重設密碼之後,您可以使用電子郵件和新密碼登入。
重新傳送電子郵件確認
選取[登入]頁面上的[重新傳送電子郵件確認]連結。
變更電子郵件和活動逾時
預設無活動逾時為 14 天。 下列程式碼會將無活動逾時設定為 5 天:
using Microsoft.AspNetCore.Identity;
using Microsoft.AspNetCore.Identity.UI.Services;
using Microsoft.EntityFrameworkCore;
using WebPWrecover.Data;
using WebPWrecover.Services;

var builder = WebApplication.CreateBuilder(args);

var connectionString = builder.Configuration.GetConnectionString("DefaultConnection");
builder.Services.AddDbContext<ApplicationDbContext>(options =>
    options.UseSqlite(connectionString));
builder.Services.AddDatabaseDeveloperPageExceptionFilter();

builder.Services.AddDefaultIdentity<IdentityUser>(options => options.SignIn.RequireConfirmedAccount = true)
    .AddEntityFrameworkStores<ApplicationDbContext>();
builder.Services.AddRazorPages();

builder.Services.AddTransient<IEmailSender, EmailSender>();
builder.Services.Configure<AuthMessageSenderOptions>(builder.Configuration);

builder.Services.ConfigureApplicationCookie(o => {
    o.ExpireTimeSpan = TimeSpan.FromDays(5);
    o.SlidingExpiration = true;
});

var app = builder.Build();

// Code removed for brevity
變更所有資料保護權杖生命週期
下列程式碼會將所有資料保護權杖逾時期間變更為 3 小時:
using Microsoft.AspNetCore.Identity;
using Microsoft.AspNetCore.Identity.UI.Services;
using Microsoft.EntityFrameworkCore;
using WebPWrecover.Data;
using WebPWrecover.Services;

var builder = WebApplication.CreateBuilder(args);

var connectionString = builder.Configuration.GetConnectionString("DefaultConnection");
builder.Services.AddDbContext<ApplicationDbContext>(options =>
    options.UseSqlite(connectionString));
builder.Services.AddDatabaseDeveloperPageExceptionFilter();

builder.Services.AddDefaultIdentity<IdentityUser>(options => options.SignIn.RequireConfirmedAccount = true)
    .AddEntityFrameworkStores<ApplicationDbContext>();
builder.Services.AddRazorPages();

builder.Services.AddTransient<IEmailSender, EmailSender>();
builder.Services.Configure<AuthMessageSenderOptions>(builder.Configuration);

builder.Services.Configure<DataProtectionTokenProviderOptions>(o =>
       o.TokenLifespan = TimeSpan.FromHours(3));

var app = builder.Build();

// Code removed for brevity.
內建Identity使用者權杖 (請參閱 AspNetCore/src/Identity/Extensions.Core/src/TokenOptions.cs) 具有一天逾時。
變更電子郵件權杖生命週期
Identity使用者權杖的預設權杖存留期為一天。 本節說明如何變更電子郵件權杖生命週期。
新增自訂 DataProtectorTokenProvider<TUser> 和 DataProtectionTokenProviderOptions:
public class CustomEmailConfirmationTokenProvider<TUser>
                              :  DataProtectorTokenProvider<TUser> where TUser : class
{
    public CustomEmailConfirmationTokenProvider(
        IDataProtectionProvider dataProtectionProvider,
        IOptions<EmailConfirmationTokenProviderOptions> options,
        ILogger<DataProtectorTokenProvider<TUser>> logger)
                                       : base(dataProtectionProvider, options, logger)
    {

    }
}
public class EmailConfirmationTokenProviderOptions : DataProtectionTokenProviderOptions
{
    public EmailConfirmationTokenProviderOptions()
    {
        Name = "EmailDataProtectorTokenProvider";
        TokenLifespan = TimeSpan.FromHours(4);
    }
}
將自訂提供者新增至服務容器:
using Microsoft.AspNetCore.Identity;
using Microsoft.AspNetCore.Identity.UI.Services;
using Microsoft.EntityFrameworkCore;
using WebPWrecover.Data;
using WebPWrecover.Services;
using WebPWrecover.TokenProviders;

var builder = WebApplication.CreateBuilder(args);

var connectionString = builder.Configuration.GetConnectionString("DefaultConnection");
builder.Services.AddDbContext<ApplicationDbContext>(options =>
    options.UseSqlite(connectionString));
builder.Services.AddDatabaseDeveloperPageExceptionFilter();

builder.Services.AddDefaultIdentity<IdentityUser>(config =>
{
    config.SignIn.RequireConfirmedEmail = true;
    config.Tokens.ProviderMap.Add("CustomEmailConfirmation",
        new TokenProviderDescriptor(
            typeof(CustomEmailConfirmationTokenProvider<IdentityUser>)));
    config.Tokens.EmailConfirmationTokenProvider = "CustomEmailConfirmation";
}).AddEntityFrameworkStores<ApplicationDbContext>();

builder.Services.AddTransient<CustomEmailConfirmationTokenProvider<IdentityUser>>();

builder.Services.AddRazorPages();

builder.Services.AddTransient<IEmailSender, EmailSender>();
builder.Services.Configure<AuthMessageSenderOptions>(builder.Configuration);

var app = builder.Build();

// Code removed for brevity.
電子郵件偵錯
如果您無法讓電子郵件運作:
- 在
EmailSender.Execute中設定中斷點以確認SendGridClient.SendEmailAsync已呼叫。 - 建立主控台應用程式,以使用與
EmailSender.Execute類似的程式碼來傳送電子郵件。 - 檢閱[電子郵件活動]頁面。
- 檢查您的垃圾郵件資料夾。
- 在不同的電子郵件提供者上嘗試另一個電子郵件別名 (Microsoft、Yahoo、Gmail 等)
- 請嘗試傳送至不同的電子郵件帳戶。
安全性最佳做法就是不要在測試和開發環境中使用生產環境秘密。 如果您將應用程式發佈至 Azure,請在 Azure Web 應用程式入口網站中將 SendGrid 秘密設定為應用程式設定。 設定系統已設為從環境變數讀取金鑰。
結合社交和本機登入帳戶
若要完成本節,您必須先啟用外部驗證提供者。 參閱ASP.NET Core 中的 Facebook、Google 及外部提供者驗證。
您可以按一下電子郵件連結來合併本機和社交帳戶。 在下列順序中,會先建立「RickAndMSFT@gmail.com」作為本機登入;不過,您也可以先建立帳戶作為社交登入,然後新增本機登入。
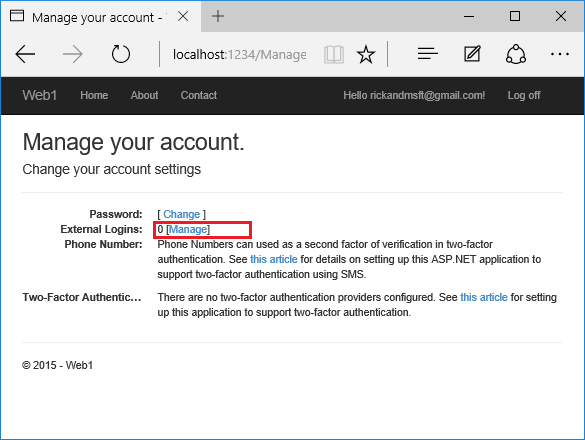
按一下[管理]連結。 請注意與此帳戶相關聯的 0 個外部 (社交登入)。
按一下另一個登入服務的連結,並接受應用程式要求。 在下圖中,Facebook 是外部驗證提供者:

這兩個帳戶已經合併。 您可以使用任一帳戶登入。 您可能會想要讓使用者新增本機帳戶,以防其社交登入驗證服務關閉,或更有可能失去其社交帳戶的存取權。
在網站有使用者之後啟用帳戶確認
在有使用者的網站上啟用帳戶確認,會鎖定所有現有的使用者。 現有的使用者因為未確認其帳戶而遭到鎖定。 若要解決現有的使用者鎖定問題,請使用下列其中一種方法:
- 更新資料庫,將所有現有的使用者標示為已確認。
- 確認現有的使用者。 例如,批次傳送具有確認連結的電子郵件。
必要條件
.NET Core 3.0 SDK 或更新版本
建立具有驗證功能的 Web 應用程式
執行下列命令以建立具有驗證的 Web 應用程式。
dotnet new webapp -au Individual -uld -o WebPWrecover
cd WebPWrecover
dotnet run
執行應用程式、選取[註冊]連結 ,然後註冊使用者。 註冊之後,系統會將您重新導向至 /Identity/Account/RegisterConfirmation 頁面,其中包含模擬電子郵件確認的連結:
- 選取
Click here to confirm your account連結。 - 選取[登入]連結,並使用相同的認證登入。
- 選取將您重新導向至
/Identity/Account/Manage/PersonalData頁面的Hello YourEmail@provider.com!連結。 - 選取左側的[個人資料]索引標籤,然後選取[刪除]。
設定電子郵件提供者
本教學課程中,會使用 SendGrid 來傳送電子郵件。 您可以使用其他電子郵件提供者。 建議您使用 SendGrid 或其他電子郵件服務來傳送電子郵件。 SMTP 難以設定,因此郵件不會標示為垃圾郵件。
SendGrid 帳戶可能需要新增傳送者。
建立類別以擷取安全的電子郵件金鑰。 在此範例中,建立 Services/AuthMessageSenderOptions.cs :
namespace WebPWrecover.Services;

public class AuthMessageSenderOptions
{
    public string? SendGridKey { get; set; }
}
設定 SendGrid 使用者秘密
使用秘密管理員工具設定 SendGridKey。 例如:
dotnet user-secrets set SendGridKey <SG.key>

Successfully saved SendGridKey = SG.keyVal to the secret store.
在 Windows 上,祕密管理員會將索引鍵/值組儲存在 %APPDATA%/Microsoft/UserSecrets/<WebAppName-userSecretsId> 目錄中的 secrets.json 檔案中。
secrets.json 檔案的內容不會加密。 下列標記顯示 secrets.json 檔案。 已移除 SendGridKey 值。
{
  "SendGridKey": "<key removed>"
}
安裝 SendGrid
本教學課程示範如何透過 SendGrid 新增電子郵件通知,但您也可以使用 SMTP 和其他機制來傳送電子郵件。
安裝 SendGrid NuGet 套件:
請在套件管理員主控台 (PMC) 中輸入下列命令:
Install-Package SendGrid
請參閱免費開始使用 SendGrid,以註冊免費的 SendGrid 帳戶。
實作 IEmailSender
若要實作 IEmailSender,請使用類似下列的程式碼來建立 Services/EmailSender.cs:
using Microsoft.AspNetCore.Identity.UI.Services;
using Microsoft.Extensions.Options;
using SendGrid;
using SendGrid.Helpers.Mail;

namespace WebPWrecover.Services;

public class EmailSender : IEmailSender
{
    private readonly ILogger _logger;

    public EmailSender(IOptions<AuthMessageSenderOptions> optionsAccessor,
                       ILogger<EmailSender> logger)
    {
        Options = optionsAccessor.Value;
        _logger = logger;
    }

    public AuthMessageSenderOptions Options { get; } //Set with Secret Manager.

    public async Task SendEmailAsync(string toEmail, string subject, string message)
    {
        if (string.IsNullOrEmpty(Options.SendGridKey))
        {
            throw new Exception("Null SendGridKey");
        }
        await Execute(Options.SendGridKey, subject, message, toEmail);
    }

    public async Task Execute(string apiKey, string subject, string message, string toEmail)
    {
        var client = new SendGridClient(apiKey);
        var msg = new SendGridMessage()
        {
            From = new EmailAddress("Joe@contoso.com", "Password Recovery"),
            Subject = subject,
            PlainTextContent = message,
            HtmlContent = message
        };
        msg.AddTo(new EmailAddress(toEmail));

        // Disable click tracking.
        // See https://sendgrid.com/docs/User_Guide/Settings/tracking.html
        msg.SetClickTracking(false, false);
        var response = await client.SendEmailAsync(msg);
        _logger.LogInformation(response.IsSuccessStatusCode
                               ? $"Email to {toEmail} queued successfully!"
                               : $"Failure Email to {toEmail}");
    }
}
設定啟動以支援電子郵件
將下列程式碼新增至 Startup.cs 檔案中的 ConfigureServices 方法:
- 新增
EmailSender為暫時性服務。 - 註冊
AuthMessageSenderOptions設定執行個體。
using Microsoft.AspNetCore.Identity;
using Microsoft.AspNetCore.Identity.UI.Services;
using Microsoft.EntityFrameworkCore;
using WebPWrecover.Data;
using WebPWrecover.Services;

var builder = WebApplication.CreateBuilder(args);

var connectionString = builder.Configuration.GetConnectionString("DefaultConnection");
builder.Services.AddDbContext<ApplicationDbContext>(options =>
    options.UseSqlite(connectionString));
builder.Services.AddDatabaseDeveloperPageExceptionFilter();

builder.Services.AddDefaultIdentity<IdentityUser>(options => options.SignIn.RequireConfirmedAccount = true)
    .AddEntityFrameworkStores<ApplicationDbContext>();
builder.Services.AddRazorPages();

builder.Services.AddTransient<IEmailSender, EmailSender>();
builder.Services.Configure<AuthMessageSenderOptions>(builder.Configuration);

var app = builder.Build();

if (app.Environment.IsDevelopment())
{
    app.UseMigrationsEndPoint();
}
else
{
    app.UseExceptionHandler("/Error");
    app.UseHsts();
}

app.UseHttpsRedirection();
app.UseStaticFiles();

app.UseRouting();

app.UseAuthentication();
app.UseAuthorization();

app.MapRazorPages();

app.Run();
Scaffold RegisterConfirmation
請遵循 ScaffoldIdentity 和 scaffold Account\RegisterConfirmation 的指示。
當 Account.RegisterConfirmation 已建立 Scaffold 時,停用預設帳戶驗證
本節僅適用於已架設 Account.RegisterConfirmation 時。 如果您尚未架設 Account.RegisterConfirmation,請略過本節。
系統會將使用者重新導向至 Account.RegisterConfirmation,讓他們選取連結以確認帳戶。 預設值 Account.RegisterConfirmation僅用於測試,應在生產應用程式中停用自動帳戶驗證。
若要要求已確認的帳戶並防止在註冊時立即登入,請在架設的 /Areas/Identity/Pages/Account/RegisterConfirmation.cshtml.cs 檔案中設定 DisplayConfirmAccountLink = false:
// Licensed to the .NET Foundation under one or more agreements.
// The .NET Foundation licenses this file to you under the MIT license.
#nullable disable

using System;
using System.Text;
using System.Threading.Tasks;
using Microsoft.AspNetCore.Authorization;
using Microsoft.AspNetCore.Identity;
using Microsoft.AspNetCore.Identity.UI.Services;
using Microsoft.AspNetCore.Mvc;
using Microsoft.AspNetCore.Mvc.RazorPages;
using Microsoft.AspNetCore.WebUtilities;

namespace WebPWrecover.Areas.Identity.Pages.Account
{
    [AllowAnonymous]
    public class RegisterConfirmationModel : PageModel
    {
        private readonly UserManager<IdentityUser> _userManager;
        private readonly IEmailSender _sender;

        public RegisterConfirmationModel(UserManager<IdentityUser> userManager, IEmailSender sender)
        {
            _userManager = userManager;
            _sender = sender;
        }

        /// <summary>
        ///     This API supports the ASP.NET Core Identity default UI infrastructure and is not intended to be used
        ///     directly from your code. This API may change or be removed in future releases.
        /// </summary>
        public string Email { get; set; }

        /// <summary>
        ///     This API supports the ASP.NET Core Identity default UI infrastructure and is not intended to be used
        ///     directly from your code. This API may change or be removed in future releases.
        /// </summary>
        public bool DisplayConfirmAccountLink { get; set; }

        /// <summary>
        ///     This API supports the ASP.NET Core Identity default UI infrastructure and is not intended to be used
        ///     directly from your code. This API may change or be removed in future releases.
        /// </summary>
        public string EmailConfirmationUrl { get; set; }

        public async Task<IActionResult> OnGetAsync(string email, string returnUrl = null)
        {
            if (email == null)
            {
                return RedirectToPage("/Index");
            }
            returnUrl = returnUrl ?? Url.Content("~/");

            var user = await _userManager.FindByEmailAsync(email);
            if (user == null)
            {
                return NotFound($"Unable to load user with email '{email}'.");
            }

            Email = email;
            // Once you add a real email sender, you should remove this code that lets you confirm the account
            DisplayConfirmAccountLink = false;
            if (DisplayConfirmAccountLink)
            {
                var userId = await _userManager.GetUserIdAsync(user);
                var code = await _userManager.GenerateEmailConfirmationTokenAsync(user);
                code = WebEncoders.Base64UrlEncode(Encoding.UTF8.GetBytes(code));
                EmailConfirmationUrl = Url.Page(
                    "/Account/ConfirmEmail",
                    pageHandler: null,
                    values: new { area = "Identity", userId = userId, code = code, returnUrl = returnUrl },
                    protocol: Request.Scheme);
            }

            return Page();
        }
    }
}
只有在已架設 Account.RegisterConfirmation 時才需要此步驟。 非架設 RegisterConfirmation 會自動偵測何時已實作 IEmailSender,並向相依性插入容器註冊。
註冊、確認電子郵件和重設密碼
執行 Web 應用程式,並測試帳戶確認和密碼復原流程。
- 執行應用程式並註冊使用者
- 請檢查您的電子郵件,以取得帳戶確認連結。 如果您沒有收到電子郵件,請參閱 電子郵件偵錯。
- 按一下連結以確認您的電子郵件。
- 使用您的電子郵件和密碼登入。
- 登出。
測試密碼重設
- 如果您已登入,請選取[登出]。
- 選取[登入]連結,然後選取[忘記密碼嗎?]連結。
- 輸入您用來註冊帳戶的電子郵件。
- 傳送含有重設密碼連結的電子郵件。 請檢查您的電子郵件,然後按一下連結以重設密碼。 成功重設密碼之後,您可以使用電子郵件和新密碼登入。
重新傳送電子郵件確認
在 ASP.NET Core 5.0 和更新版本中,選取[登入]頁面上的[重新傳送電子郵件確認]連結。
變更電子郵件和活動逾時
預設無活動逾時為 14 天。 下列程式碼會將無活動逾時設定為 5 天:
services.ConfigureApplicationCookie(o => {
    o.ExpireTimeSpan = TimeSpan.FromDays(5);
    o.SlidingExpiration = true;
});
變更所有資料保護權杖生命週期
下列程式碼會將所有資料保護權杖逾時期間變更為 3 小時:
public void ConfigureServices(IServiceCollection services)
{

    services.AddDbContext<ApplicationDbContext>(options =>
        options.UseSqlServer(
            Configuration.GetConnectionString("DefaultConnection")));
    services.AddDefaultIdentity<IdentityUser>(
                  options => options.SignIn.RequireConfirmedAccount = true)
        .AddEntityFrameworkStores<ApplicationDbContext>();

    services.Configure<DataProtectionTokenProviderOptions>(o =>
       o.TokenLifespan = TimeSpan.FromHours(3));

    services.AddTransient<IEmailSender, EmailSender>();
    services.Configure<AuthMessageSenderOptions>(Configuration);

    services.AddRazorPages();
}
內建Identity使用者權杖 (請參閱 AspNetCore/src/Identity/Extensions.Core/src/TokenOptions.cs) 具有一天逾時。
變更電子郵件權杖生命週期
Identity使用者權杖的預設權杖存留期為一天。 本節說明如何變更電子郵件權杖生命週期。
新增自訂 DataProtectorTokenProvider<TUser> 和 DataProtectionTokenProviderOptions:
public class CustomEmailConfirmationTokenProvider<TUser>
                                       : DataProtectorTokenProvider<TUser> where TUser : class
{
    public CustomEmailConfirmationTokenProvider(IDataProtectionProvider dataProtectionProvider,
        IOptions<EmailConfirmationTokenProviderOptions> options,
        ILogger<DataProtectorTokenProvider<TUser>> logger)
                                          : base(dataProtectionProvider, options, logger)
    {

    }
}
public class EmailConfirmationTokenProviderOptions : DataProtectionTokenProviderOptions
{
    public EmailConfirmationTokenProviderOptions()
    {
        Name = "EmailDataProtectorTokenProvider";
        TokenLifespan = TimeSpan.FromHours(4);
    }
}
將自訂提供者新增至服務容器:
public void ConfigureServices(IServiceCollection services)
{

    services.AddDbContext<ApplicationDbContext>(options =>
        options.UseSqlServer(
            Configuration.GetConnectionString("DefaultConnection")));
    services.AddDefaultIdentity<IdentityUser>(config =>
    {
        config.SignIn.RequireConfirmedEmail = true;
        config.Tokens.ProviderMap.Add("CustomEmailConfirmation",
            new TokenProviderDescriptor(
                typeof(CustomEmailConfirmationTokenProvider<IdentityUser>)));
        config.Tokens.EmailConfirmationTokenProvider = "CustomEmailConfirmation";
      }).AddEntityFrameworkStores<ApplicationDbContext>();

    services.AddTransient<CustomEmailConfirmationTokenProvider<IdentityUser>>();

    services.AddTransient<IEmailSender, EmailSender>();
    services.Configure<AuthMessageSenderOptions>(Configuration);

    services.AddRazorPages();
}
電子郵件偵錯
如果您無法讓電子郵件運作:
- 在
EmailSender.Execute中設定中斷點以確認SendGridClient.SendEmailAsync已呼叫。 - 建立主控台應用程式,以使用與
EmailSender.Execute類似的程式碼來傳送電子郵件。 - 檢閱[電子郵件活動]頁面。
- 檢查您的垃圾郵件資料夾。
- 在不同的電子郵件提供者上嘗試另一個電子郵件別名 (Microsoft、Yahoo、Gmail 等)
- 請嘗試傳送至不同的電子郵件帳戶。
安全性最佳做法就是不要在測試和開發環境中使用生產環境秘密。 如果您將應用程式發佈至 Azure,請在 Azure Web 應用程式入口網站中將 SendGrid 秘密設定為應用程式設定。 設定系統已設為從環境變數讀取金鑰。
結合社交和本機登入帳戶
若要完成本節,您必須先啟用外部驗證提供者。 參閱ASP.NET Core 中的 Facebook、Google 及外部提供者驗證。
您可以按一下電子郵件連結來合併本機和社交帳戶。 在下列順序中,會先建立「RickAndMSFT@gmail.com」作為本機登入;不過,您也可以先建立帳戶作為社交登入,然後新增本機登入。
按一下[管理]連結。 請注意與此帳戶相關聯的 0 個外部 (社交登入)。
按一下另一個登入服務的連結,並接受應用程式要求。 在下圖中,Facebook 是外部驗證提供者:
這兩個帳戶已經合併。 您可以使用任一帳戶登入。 您可能會想要讓使用者新增本機帳戶,以防其社交登入驗證服務關閉,或更有可能失去其社交帳戶的存取權。
在網站有使用者之後啟用帳戶確認
在有使用者的網站上啟用帳戶確認,會鎖定所有現有的使用者。 現有的使用者因為未確認其帳戶而遭到鎖定。 若要解決現有的使用者鎖定問題,請使用下列其中一種方法:
- 更新資料庫,將所有現有的使用者標示為已確認。
- 確認現有的使用者。 例如,批次傳送具有確認連結的電子郵件。
意見反應
即將登場:在 2024 年,我們將逐步淘汰 GitHub 問題作為內容的意見反應機制,並將它取代為新的意見反應系統。 如需詳細資訊,請參閱:https://aka.ms/ContentUserFeedback。
提交並檢視相關的意見反應