將 ASP.NET Identity 新增至空的或現有的 Web Form 專案
本教學課程說明如何將 ASP.NET 身分識別 (ASP.NET) 新的成員資格系統新增至 ASP.NET 應用程式。
當您使用個別帳戶在 Visual Studio 2017 RTM 中建立新的Web Form或 MVC 專案時,Visual Studio 會安裝所有必要的套件,並為您新增所有必要的類別。 本教學課程將說明將 ASP.NET 身分識別支援新增至您現有Web Form專案或新的空白專案的步驟。 我將概述您需要安裝的所有 NuGet 套件,以及您需要新增的類別。 我將會流覽範例Web Form,以註冊新使用者和登入,同時醒目提示使用者管理和驗證的所有主要進入點 API。 此範例會針對以 Entity Framework 為基礎的 SQL 資料儲存體,使用 ASP.NET 身分識別預設實作。 本教學課程將針對 SQL 資料庫使用 LocalDB。
開始使用 ASP.NET 身分識別
從安裝和執行 Visual Studio 2017開始。
從 [開始] 頁面選取 [新增專案 ],或者您可以使用功能表並選取 [ 檔案],然後選取 [ 新增專案]。
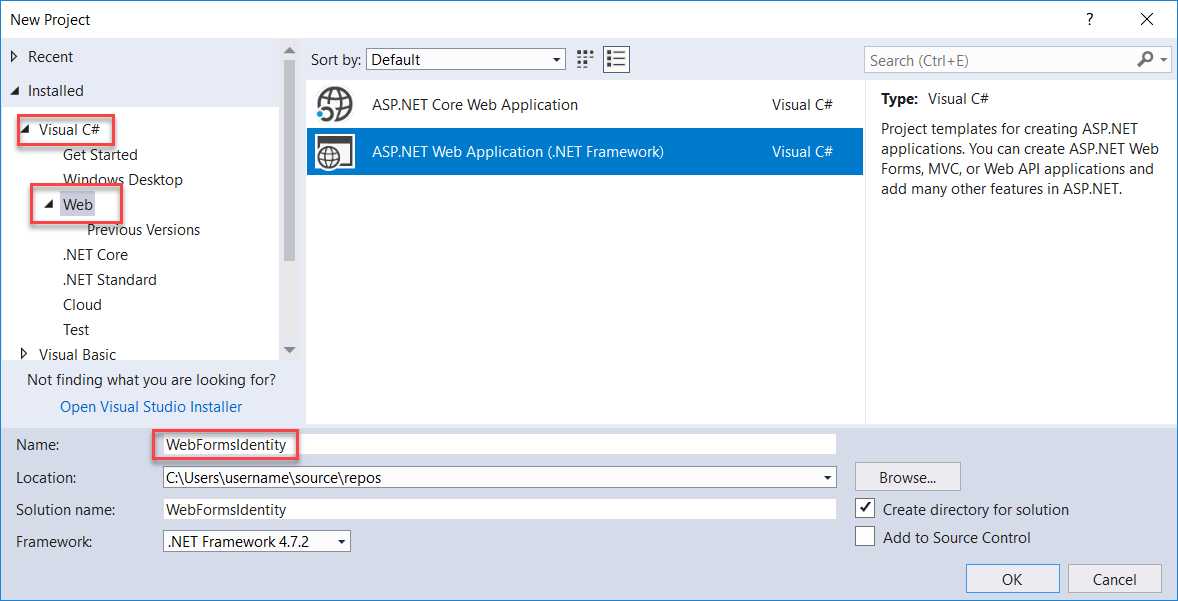
在左窗格中,展開 [Visual C#],然後選取 [Web],然後 ASP.NET 選取 [Web 應用程式] (.Net Framework) 。 將專案命名為 「WebFormsIdentity」,然後選取 [ 確定]。
在 [ 新增 ASP.NET 專案 ] 對話方塊中,選取 [空白 ] 範本。
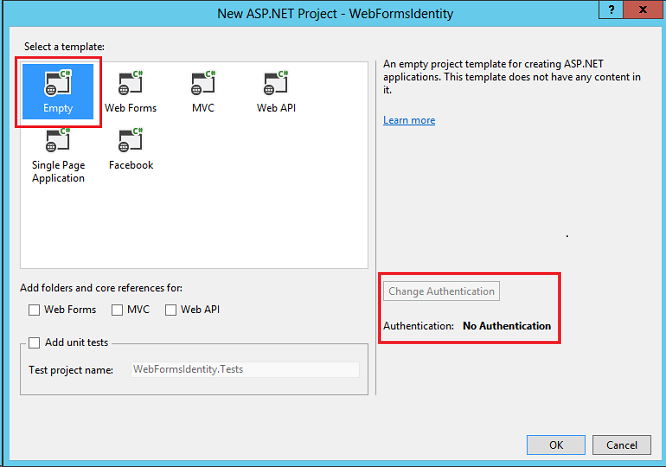
請注意,[ 變更驗證 ] 按鈕已停用,而且此範本中未提供任何驗證支援。 Web Form、MVC 和 Web API 範本可讓您選取驗證方法。
將身分識別套件新增至您的應用程式
在方案總管中,以滑鼠右鍵按一下您的專案,然後選取[管理 NuGet 套件]。 搜尋並安裝 Microsoft.AspNet.Identity.EntityFramework 套件。
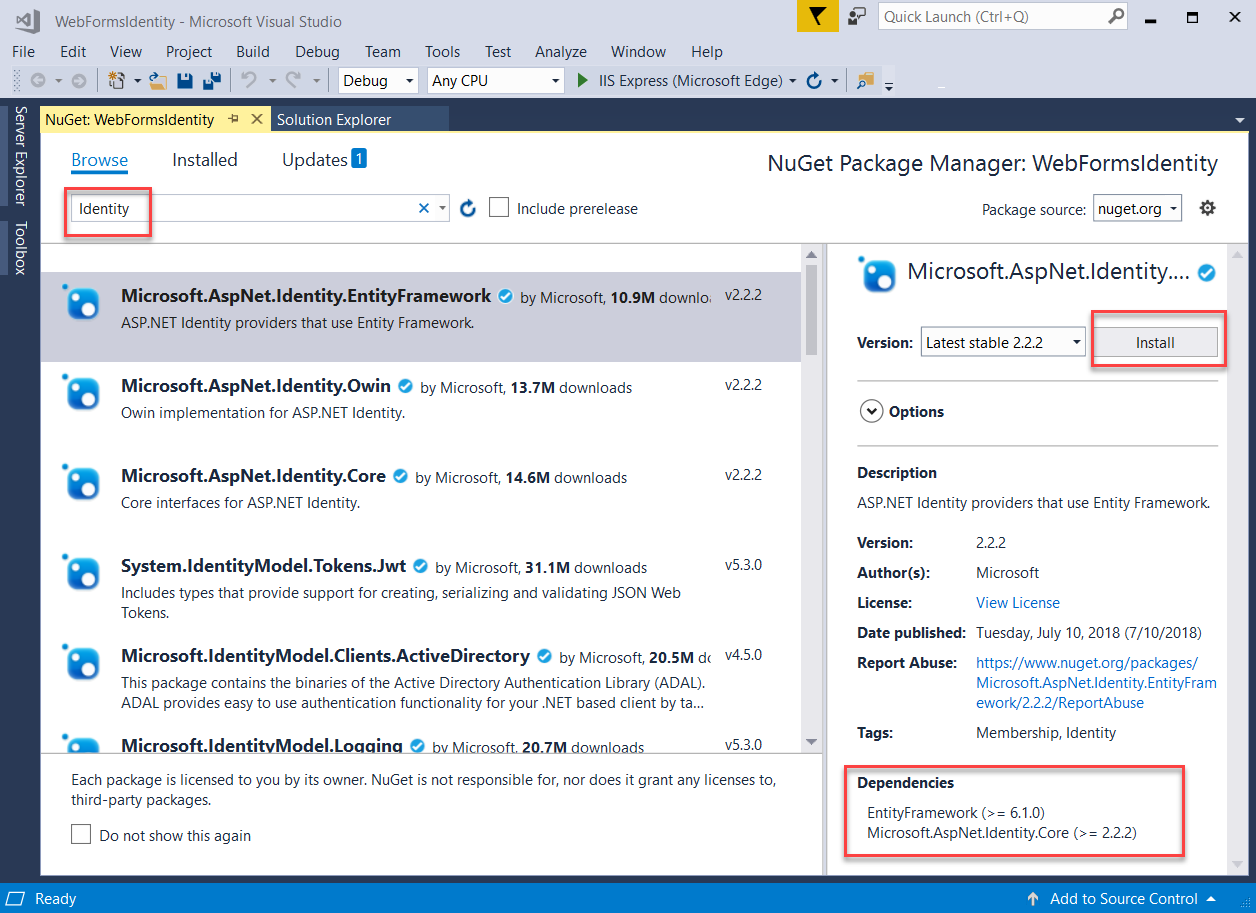
請注意,此套件會安裝相依性套件: EntityFramework 和 Microsoft ASP.NET Identity Core。
新增 Web 表單以註冊使用者
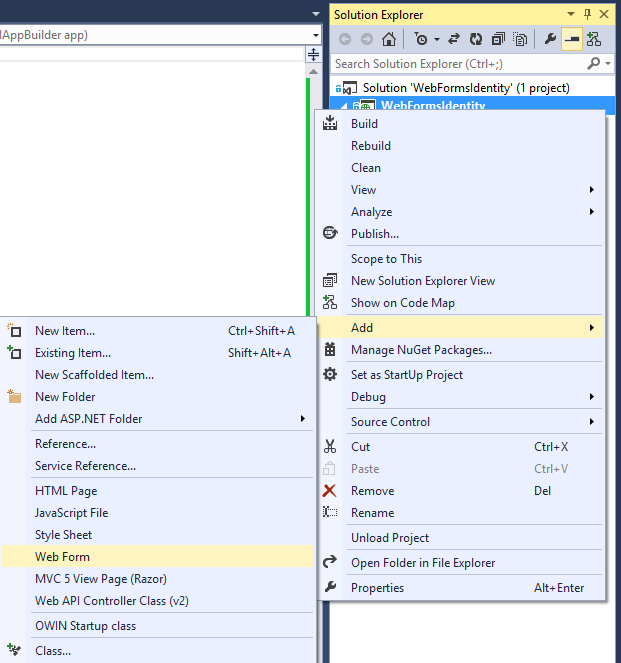
在方案總管中,以滑鼠右鍵按一下您的專案,然後選取 [新增],然後選取 [Web Form]。

在 [ 指定專案名稱 ] 對話方塊中,將新的 Web 表單命名為 Register,然後選取 [ 確定]
以下列程式碼取代產生的 Register.aspx 檔案中的標記。 程式碼變更已醒目提示。
<%@ Page Language="C#" AutoEventWireup="true" CodeBehind="Register.aspx.cs" Inherits="WebFormsIdentity.Register" %>

<!DOCTYPE html>

<html xmlns="http://www.w3.org/1999/xhtml">
<head runat="server">
    <title></title>
</head>
<body style="font-family: Arial, Helvetica, sans-serif; font-size: small">
    <form id="form1" runat="server">
    <div>
        <h4 style="font-size: medium">Register a new user</h4>
        <hr />
        <p>
            <asp:Literal runat="server" ID="StatusMessage" />
        </p>
        <div style="margin-bottom:10px">
            <asp:Label runat="server" AssociatedControlID="UserName">User name</asp:Label>
            <div>
                <asp:TextBox runat="server" ID="UserName" />
            </div>
        </div>
        <div style="margin-bottom:10px">
            <asp:Label runat="server" AssociatedControlID="Password">Password</asp:Label>
            <div>
                <asp:TextBox runat="server" ID="Password" TextMode="Password" />
            </div>
        </div>
        <div style="margin-bottom:10px">
            <asp:Label runat="server" AssociatedControlID="ConfirmPassword">Confirm password</asp:Label>
            <div>
                <asp:TextBox runat="server" ID="ConfirmPassword" TextMode="Password" />
            </div>
        </div>
        <div>
            <div>
                <asp:Button runat="server" OnClick="CreateUser_Click" Text="Register" />
            </div>
        </div>
    </div>
    </form>
</body>
</html>
注意
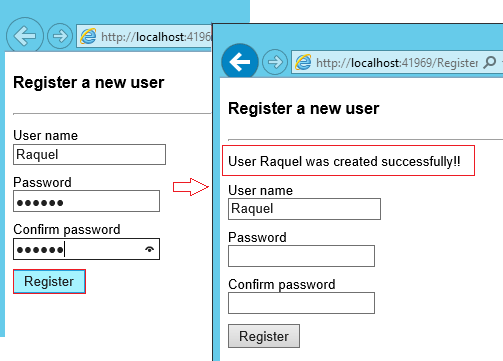
這只是您在建立新 ASP.NET Web Forms專案時所建立的 Register.aspx檔案簡化版本。 上述標記會新增表單欄位和按鈕來註冊新使用者。
開啟 Register.aspx.cs 檔案,並以下列程式碼取代檔案的內容:
using Microsoft.AspNet.Identity;
using Microsoft.AspNet.Identity.EntityFramework;
using System;
using System.Linq;

namespace WebFormsIdentity
{
   public partial class Register : System.Web.UI.Page
   {
      protected void CreateUser_Click(object sender, EventArgs e)
      {
         // Default UserStore constructor uses the default connection string named: DefaultConnection
         var userStore = new UserStore<IdentityUser>();
         var manager = new UserManager<IdentityUser>(userStore);

         var user = new IdentityUser() { UserName = UserName.Text };
         IdentityResult result = manager.Create(user, Password.Text);

         if (result.Succeeded)
         {
            StatusMessage.Text = string.Format("User {0} was created successfully!", user.UserName);
         }
         else
         {
            StatusMessage.Text = result.Errors.FirstOrDefault();
         }
      }
   }
}
注意
- 上述程式碼是您在建立新 ASP.NET Web Forms專案時所建立的 Register.aspx.cs檔案簡化版本。
- IdentityUser類別是IUser介面的預設 EntityFramework 實作。 IUser 介面是 ASP.NET Identity Core 上使用者的最低介面。
- UserStore類別是使用者存放區的預設 EntityFramework 實作。 這個類別會實作 ASP.NET Identity Core 的最小介面:IUserStore、IUserLoginStore、IUserClaimStore 和 IUserRoleStore。
- UserManager類別會公開使用者相關的 API,這會自動將變更儲存至UserStore。
- IdentityResult類別代表識別作業的結果。
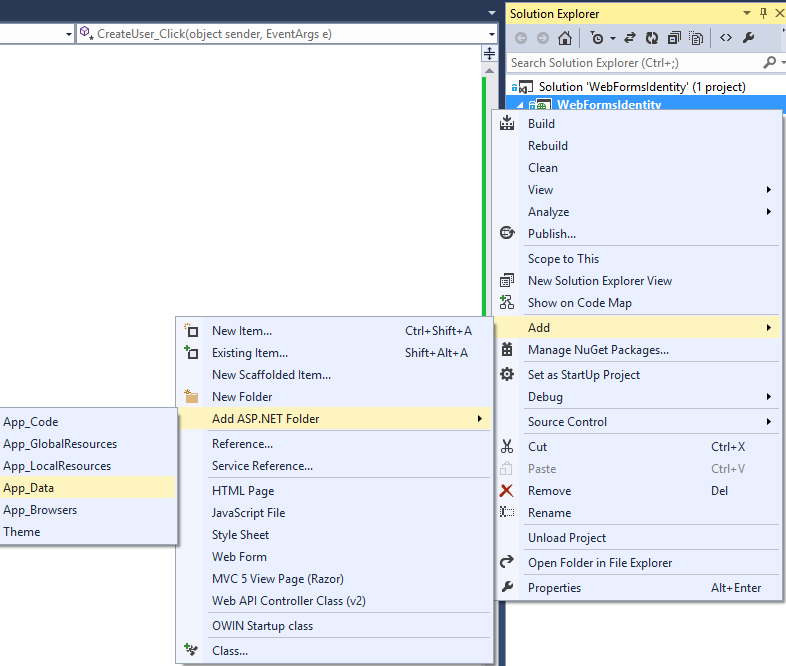
在方案總管中,以滑鼠右鍵按一下您的專案,然後選取 [新增]、[新增 ASP.NET 資料夾],然後App_Data。
開啟 Web.config 檔案,並為我們將用來儲存使用者資訊的資料庫新增連接字串專案。 身分識別實體的 EntityFramework 會在執行時間建立資料庫。 當您建立新的Web Form專案時,連接字串類似于為您建立的連接字串。 醒目提示的程式碼會顯示您應該新增的標記:
<?xml version="1.0" encoding="utf-8"?>
<!--
  For more information on how to configure your ASP.NET application, please visit
  https://go.microsoft.com/fwlink/?LinkId=169433
  -->
<configuration>
  <configSections>
    <!-- For more information on Entity Framework configuration, visit https://go.microsoft.com/fwlink/?LinkID=237468 -->
    <section name="entityFramework" type="System.Data.Entity.Internal.ConfigFile.EntityFrameworkSection, EntityFramework, Version=6.0.0.0, Culture=neutral, PublicKeyToken=b77a5c561934e089" requirePermission="false" />
  </configSections>
   <connectionStrings>
      <add name="DefaultConnection" connectionString="Data Source=(LocalDb)\v11.0;AttachDbFilename=|DataDirectory|\WebFormsIdentity.mdf;Initial Catalog=WebFormsIdentity;Integrated Security=True"
            providerName="System.Data.SqlClient" />
   </connectionStrings>
  <system.web>
    <compilation debug="true" targetFramework="4.5" />
    <httpRuntime targetFramework="4.5" />
  </system.web>
  <entityFramework>
    <defaultConnectionFactory type="System.Data.Entity.Infrastructure.LocalDbConnectionFactory, EntityFramework">
      <parameters>
        <parameter value="v11.0" />
      </parameters>
    </defaultConnectionFactory>
    <providers>
      <provider invariantName="System.Data.SqlClient" type="System.Data.Entity.SqlServer.SqlProviderServices, EntityFramework.SqlServer" />
    </providers>
  </entityFramework>
</configuration>
注意
若為 Visual Studio 2015 或更高版本,請將 取代
(localdb)\v11.0(localdb)\MSSQLLocalDB為連接字串中的 。以滑鼠右鍵按一下專案中的 Register.aspx 檔案,然後選取 [ 設定為起始頁]。 按下 [Ctrl+F5] 以組建並執行 Web 應用程式。 輸入新的使用者名稱和密碼,然後選取 [ 註冊]。
注意
ASP.NET 身分識別支援驗證,在此範例中,您可以驗證來自 Identity Core 套件的使用者和密碼驗證程式的預設行為。 使用者 (
UserValidator的預設驗證程式) 具有預設值設定為true的屬性AllowOnlyAlphanumericUserNames。 密碼MinimumLengthValidator(的預設驗證程式) 可確保密碼至少有 6 個字元。 這些驗證程式是屬性,UserManager如果您想要進行自訂驗證,則可以覆寫這些驗證程式的屬性。
確認 Entity Framework 所產生的 LocalDb Identity 資料庫和資料表
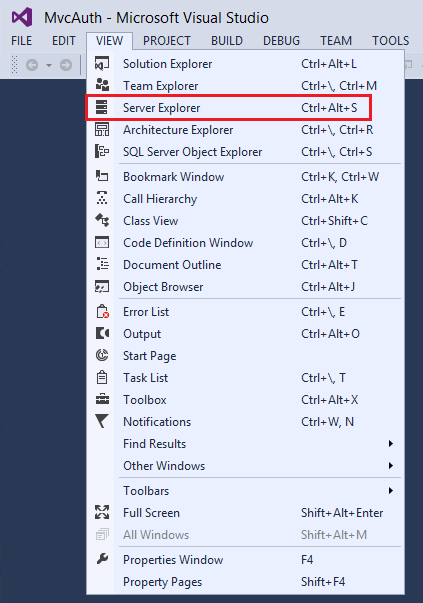
在 [ 檢視] 功能表中,選取 [伺服器總管]。
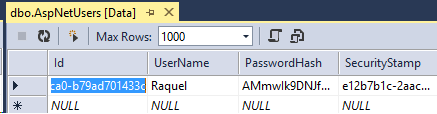
展開 [DefaultConnection] ([WebFormsIdentity]) ,展開 [ 資料表],以滑鼠右鍵按一下 [AspNetUsers ],然後選取 [ 顯示資料表資料]。

設定 OWIN 驗證的應用程式
此時,我們只新增了建立使用者的支援。 現在,我們將示範如何新增驗證來登入使用者。 ASP.NET 身分識別會使用 Microsoft OWIN 驗證中介軟體來進行表單驗證。 OWIN Cookie 驗證是一種 Cookie 和宣告型驗證機制,可供 裝載于 OWIN 或 IIS 上的任何架構使用。 使用此模型時,相同的驗證套件可以跨多個架構使用,包括 ASP.NET MVC 和Web Form。 如需 Project Katana 的詳細資訊,以及如何在主機中執行中介軟體的詳細資訊,請參閱使用 Katana 專案消費者入門。
將驗證套件安裝至您的應用程式
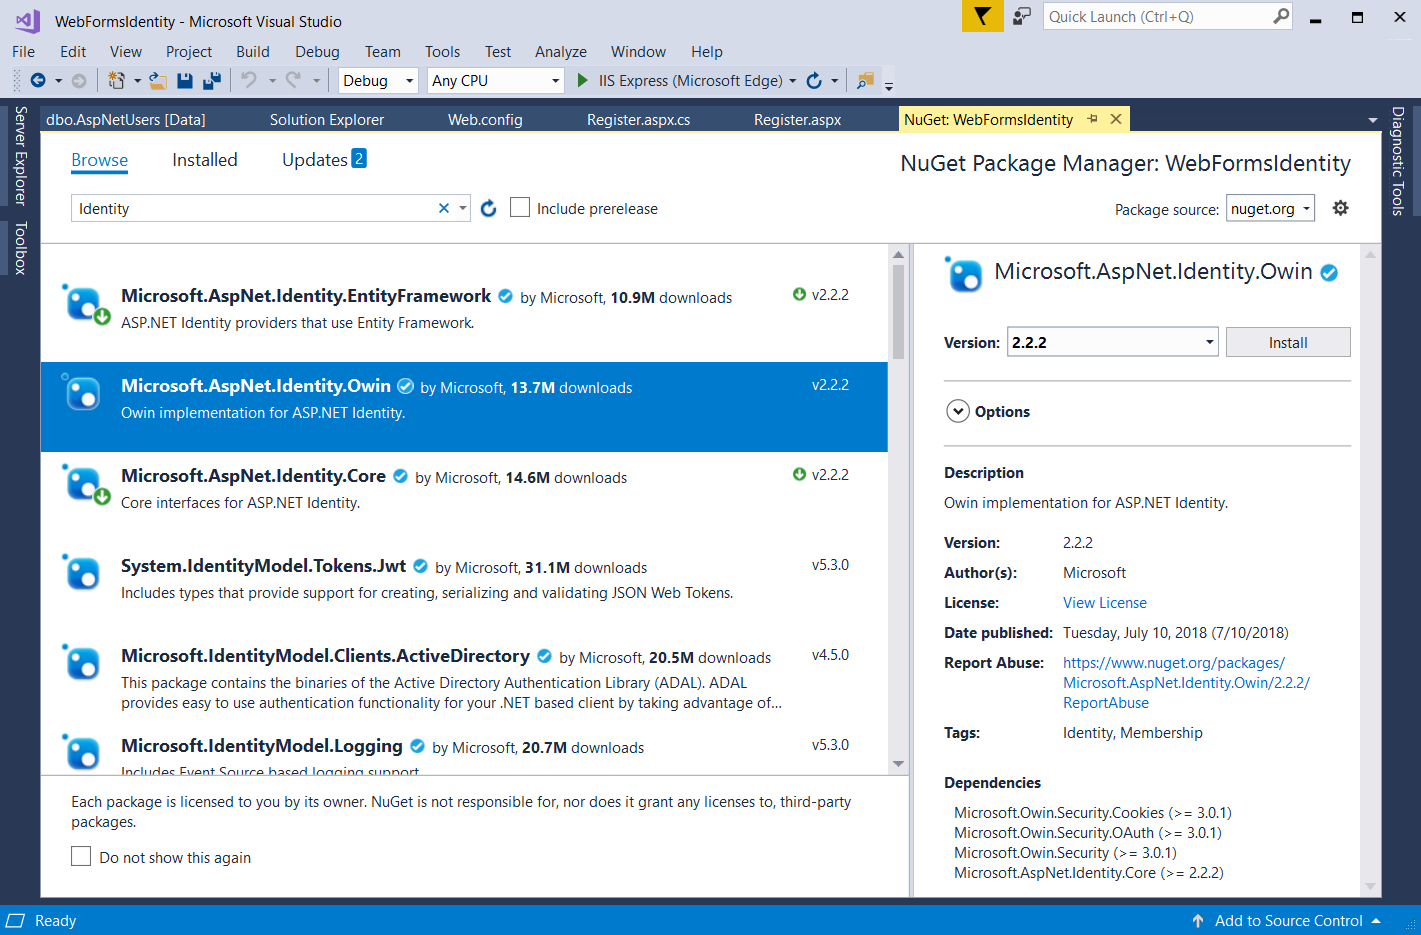
在方案總管中,以滑鼠右鍵按一下您的專案,然後選取[管理 NuGet 套件]。 搜尋並安裝 Microsoft.AspNet.Identity.Owin 套件。
搜尋並安裝 Microsoft.Owin.Host.SystemWeb 套件。
注意
Microsoft.Aspnet.Identity.Owin套件包含一組 OWIN 擴充類別,可管理和設定 ASP.NET Identity Core 套件所取用的 OWIN 驗證中介軟體。 Microsoft.Owin.Host.SystemWeb 套件包含 OWIN伺服器,可讓以 OWIN 為基礎的應用程式使用 ASP.NET 要求管線在 IIS 上執行。 如需詳細資訊,請參閱 IIS 整合管線中的 OWIN 中介軟體。
新增 OWIN 啟動和驗證組態類別
在方案總管中,以滑鼠右鍵按一下您的專案,選取 [新增],然後選取 [新增專案]。 在搜尋文字方塊中,輸入 「owin」。 將類別命名為 「Startup」,然後選取 [ 新增]。

在 Startup.cs 檔案中,新增以下醒目提示的程式碼,以設定 OWIN Cookie 驗證。
using Microsoft.AspNet.Identity;
using Microsoft.Owin;
using Microsoft.Owin.Security.Cookies;
using Owin;

[assembly: OwinStartup(typeof(WebFormsIdentity.Startup))]

namespace WebFormsIdentity
{
   public class Startup
   {
      public void Configuration(IAppBuilder app)
      {
         // For more information on how to configure your application, visit https://go.microsoft.com/fwlink/?LinkID=316888
         app.UseCookieAuthentication(new CookieAuthenticationOptions
         {
            AuthenticationType = DefaultAuthenticationTypes.ApplicationCookie,
            LoginPath = new PathString("/Login")
         });
      }
   }
}
注意
這個類別包含
OwinStartup用來指定 OWIN 啟動類別的屬性。 每個 OWIN 應用程式都有一個啟動類別,您可以在其中指定應用程式管線的元件。 如需此模型的詳細資訊,請參閱 OWIN 啟動類別偵測 。
新增 Web 表單以註冊和登入使用者
開啟 Register.aspx.cs 檔案,並在註冊成功時新增下列程式碼來登入使用者。
using Microsoft.AspNet.Identity;
using Microsoft.AspNet.Identity.EntityFramework;
using Microsoft.Owin.Security;
using System;
using System.Linq;
using System.Web;

namespace WebFormsIdentity
{
   public partial class Register : System.Web.UI.Page
   {
      protected void CreateUser_Click(object sender, EventArgs e)
      {
         // Default UserStore constructor uses the default connection string named: DefaultConnection
         var userStore = new UserStore<IdentityUser>();
         var manager = new UserManager<IdentityUser>(userStore);
         var user = new IdentityUser() { UserName = UserName.Text };

         IdentityResult result = manager.Create(user, Password.Text);

         if (result.Succeeded)
         {
            var authenticationManager = HttpContext.Current.GetOwinContext().Authentication;
            var userIdentity = manager.CreateIdentity(user, DefaultAuthenticationTypes.ApplicationCookie);
            authenticationManager.SignIn(new AuthenticationProperties() { }, userIdentity);
            Response.Redirect("~/Login.aspx");
         }
         else
         {
            StatusMessage.Text = result.Errors.FirstOrDefault();
         }
      }
   }
}
注意
- 由於 ASP.NET 身分識別和 OWIN Cookie 驗證是以宣告為基礎的系統,因此架構需要應用程式開發人員為使用者產生 ClaimsIdentity 。 ClaimsIdentity 具有使用者所有宣告的相關資訊,例如使用者所屬的角色。 您也可以在此階段為使用者新增更多宣告。
- 您可以使用 OWIN 的 AuthenticationManager 登入使用者,並呼叫
SignInClaimsIdentity 並傳入 ClaimsIdentity,如下所示。 此程式碼也會登入使用者並產生 Cookie。 此呼叫類似于FormsAuthentication 模組所使用的 FormAuthentication.SetAuthCookie。
在[方案總管] 中,以滑鼠右鍵按一下您的專案,選取 [新增],然後選取 [Web 表單]。 將 Web 表單命名為 Login。
以下列程式碼取代 Login.aspx 檔案的內容:
<%@ Page Language="C#" AutoEventWireup="true" CodeBehind="Login.aspx.cs" Inherits="WebFormsIdentity.Login" %>

<!DOCTYPE html>

<html xmlns="http://www.w3.org/1999/xhtml">
<head runat="server">
   <title></title>
</head>
<body style="font-family: Arial, Helvetica, sans-serif; font-size: small">
   <form id="form1" runat="server">
      <div>
         <h4 style="font-size: medium">Log In</h4>
         <hr />
         <asp:PlaceHolder runat="server" ID="LoginStatus" Visible="false">
            <p>
               <asp:Literal runat="server" ID="StatusText" />
            </p>
         </asp:PlaceHolder>
         <asp:PlaceHolder runat="server" ID="LoginForm" Visible="false">
            <div style="margin-bottom: 10px">
               <asp:Label runat="server" AssociatedControlID="UserName">User name</asp:Label>
               <div>
                  <asp:TextBox runat="server" ID="UserName" />
               </div>
            </div>
            <div style="margin-bottom: 10px">
               <asp:Label runat="server" AssociatedControlID="Password">Password</asp:Label>
               <div>
                  <asp:TextBox runat="server" ID="Password" TextMode="Password" />
               </div>
            </div>
            <div style="margin-bottom: 10px">
               <div>
                  <asp:Button runat="server" OnClick="SignIn" Text="Log in" />
               </div>
            </div>
         </asp:PlaceHolder>
         <asp:PlaceHolder runat="server" ID="LogoutButton" Visible="false">
            <div>
               <div>
                  <asp:Button runat="server" OnClick="SignOut" Text="Log out" />
               </div>
            </div>
         </asp:PlaceHolder>
      </div>
   </form>
</body>
</html>
以下列內容取代 Login.aspx.cs 檔案的內容:
using Microsoft.AspNet.Identity;
using Microsoft.AspNet.Identity.EntityFramework;
using Microsoft.Owin.Security;
using System;
using System.Web;
using System.Web.UI.WebControls;

namespace WebFormsIdentity
{
   public partial class Login : System.Web.UI.Page
   {
      protected void Page_Load(object sender, EventArgs e)
      {
         if (!IsPostBack)
         {
            if (User.Identity.IsAuthenticated)
            {
               StatusText.Text = string.Format("Hello {0}!!", User.Identity.GetUserName());
               LoginStatus.Visible = true;
               LogoutButton.Visible = true;
            }
            else
            {
               LoginForm.Visible = true;
            }
         }
      }

      protected void SignIn(object sender, EventArgs e)
      {
         var userStore = new UserStore<IdentityUser>();
         var userManager = new UserManager<IdentityUser>(userStore);
         var user = userManager.Find(UserName.Text, Password.Text);

         if (user != null)
         {
            var authenticationManager = HttpContext.Current.GetOwinContext().Authentication;
            var userIdentity = userManager.CreateIdentity(user, DefaultAuthenticationTypes.ApplicationCookie);

            authenticationManager.SignIn(new AuthenticationProperties() { IsPersistent = false }, userIdentity);
            Response.Redirect("~/Login.aspx");
         }
         else
         {
            StatusText.Text = "Invalid username or password.";
            LoginStatus.Visible = true;
         }
      }

      protected void SignOut(object sender, EventArgs e)
      {
         var authenticationManager = HttpContext.Current.GetOwinContext().Authentication;
         authenticationManager.SignOut();
         Response.Redirect("~/Login.aspx");
      }
   }
}
注意
- 現在會
Page_Load檢查目前使用者的狀態,並根據狀態Context.User.Identity.IsAuthenticated採取動作。 顯示已登入的使用者名稱 :Microsoft ASP.NET Identity Framework 已在 System.Security.Principal.IIdentity 上新增擴充方法,可讓您取得UserName登入使用者的 和UserId。 這些擴充方法定義在元件中Microsoft.AspNet.Identity.Core。 這些擴充方法會取代 HttpCoNtext.User.Identity.Name 。 - SignIn 方法:
This方法會取代此範例中的上一CreateUser_Click個方法,現在會在成功建立使用者之後登入使用者。
Microsoft OWIN Framework 已在 上新增擴充方法System.Web.HttpContext,可讓您取得 的IOwinContext參考。 這些擴充方法定義于元件中Microsoft.Owin.Host.SystemWeb。 類別OwinContext會IAuthenticationManager公開 屬性,此屬性工作表示目前要求上可用的驗證中介軟體功能。 您可以使用來自 OWIN 的 來登入使用者AuthenticationManager,並呼叫SignIn並傳入 ,ClaimsIdentity如上所示。 因為 ASP.NET 身分識別和 OWIN Cookie 驗證是以宣告為基礎的系統,所以架構需要應用程式為使用者產生ClaimsIdentity。ClaimsIdentity具有使用者所有宣告的相關資訊,例如使用者所屬的角色。 您也可以在此階段為使用者新增更多宣告。此程式碼也會登入使用者並產生 Cookie。 此呼叫類似于FormsAuthentication 模組所使用的 FormAuthentication.SetAuthCookie。 SignOut方法:從 OWIN 取得 的AuthenticationManager參考,並呼叫SignOut。 這類似于FormsAuthentication 模組所使用的 FormsAuthentication.SignOut方法。
- 現在會
按 Ctrl + F5 以建置並執行 Web 應用程式。 輸入新的使用者名稱和密碼,然後選取 [ 註冊]。
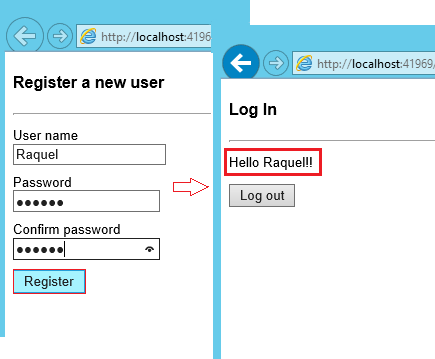
注意:此時會建立並登入新的使用者。選取 [ 登出 ] 按鈕。 系統會將您重新導向至登入表單。
輸入不正確使用者名稱或密碼,然後選取 [ 登入] 按鈕。 方法
UserManager.Find會傳回 null,並顯示錯誤訊息:「 不正確使用者名稱或密碼 」。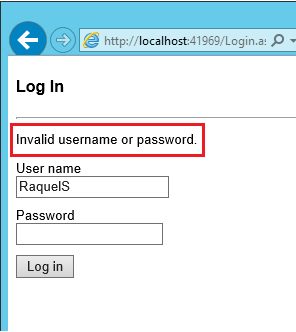
意見反應
即將登場:在 2024 年,我們將逐步淘汰 GitHub 問題作為內容的意見反應機制,並將它取代為新的意見反應系統。 如需詳細資訊,請參閱:https://aka.ms/ContentUserFeedback。
提交並檢視相關的意見反應