Azure 背景工作角色中的主機 ASP.NET Web API 2
作者:Mike Wasson
本教學課程說明如何使用 OWIN 在 Azure 背景工作角色中裝載 ASP.NET Web API,以自我裝載 Web API 架構。
開啟 .NET (OWIN 的 Web 介面) 定義 .NET Web 服務器與 Web 應用程式之間的抽象概念。 OWIN 會將 Web 應用程式與伺服器分離,這讓 OWIN 非常適合在您自己的進程中自行裝載 Web 應用程式,例如在 Azure 背景工作角色內。
在本教學課程中,您將使用 Microsoft.Owin.Host.HttpListener 套件,其提供用來自我裝載 OWIN 應用程式的 HTTP 伺服器。
教學課程中使用的軟體版本
- Visual Studio 2013
- Web API 2
- Azure SDK for .NET 2.3
建立 Microsoft Azure 專案
使用系統管理員許可權啟動 Visual Studio。 您必須具備系統管理員許可權,才能使用 Azure 計算模擬器在本機偵錯應用程式。
在 [ 檔案] 功能表上,按一下 [ 新增],然後按一下 [ 專案]。 在 [已安裝的範本] 的 [Visual C#] 下,按一下 [ 雲端 ],然後按一下 [ Windows Azure 雲端服務]。 將專案命名為 「AzureApp」,然後按一下 [ 確定]。
![[新增專案] 對話方塊的螢幕擷取畫面,其中醒目提示功能表選項中的步驟,以建立Azure App專案。](host-aspnet-web-api-in-an-azure-worker-role/_static/image1.png)
在 [ 新增 Windows Azure 雲端服務 ] 對話方塊中,按兩下 [ 背景工作角色]。 保留預設名稱 (「WorkerRole1」) 。 此步驟會將背景工作角色新增至解決方案。 按一下 [確定]。
![[新增 Windows Azure 雲端服務] 對話方塊的螢幕擷取畫面,其中顯示建立背景工作角色的功能表選項。](host-aspnet-web-api-in-an-azure-worker-role/_static/image3.png)
建立的 Visual Studio 解決方案包含兩個專案:
- 「AzureApp」 會定義 Azure 應用程式的角色和設定。
- 「WorkerRole1」 包含背景工作角色的程式碼。
一般而言,雖然本教學課程使用單一角色,但 Azure 應用程式可以包含多個角色。
新增 Web API 和 OWIN 套件
從 [ 工具] 功能表中,按一下 [NuGet 套件管理員],然後按一下 [ 套件管理員主控台]。
在 [Package Manager Console] 視窗中,輸入下列命令:
Install-Package Microsoft.AspNet.WebApi.OwinSelfHost
新增 HTTP 端點
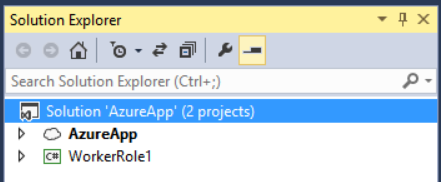
在 方案總管 中,展開 AzureApp 專案。 展開 [角色] 節點,以滑鼠右鍵按一下 [WorkerRole1],然後選取 [ 屬性]。
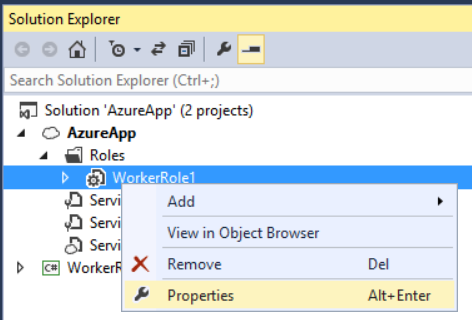
按一下 [端點],然後按一下 [新增端點]。
在 [ 通訊協定 ] 下拉式清單中,選取 [HTTP]。 在 [公用埠 ] 和 [ 私人埠] 中,輸入 80。 這些連接埠號碼可以不同。 公用埠是用戶端傳送要求給角色時所使用的埠。

設定 Self-Host 的 Web API
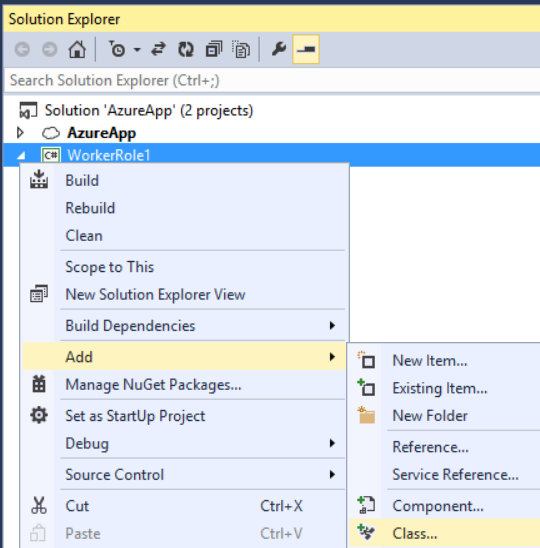
在 方案總管中,以滑鼠右鍵按一下 WorkerRole1 專案,然後選取 [新增 / 類別] 以新增類別。 將類別命名為 Startup。
將此檔案中的所有重複使用程式碼取代為下列專案:
using Owin;
using System.Web.Http;

namespace WorkerRole1
{
    class Startup
    {
        public void Configuration(IAppBuilder app)
        {
            HttpConfiguration config = new HttpConfiguration();
            config.Routes.MapHttpRoute(
                "Default",
                "{controller}/{id}",
                new { id = RouteParameter.Optional });

            app.UseWebApi(config);
        }
    }
}
新增 Web API 控制器
接下來,新增 Web API 控制器類別。 以滑鼠右鍵按一下 WorkerRole1 專案,然後選取 [新增 / 類別]。 將類別命名為 TestController。 將此檔案中的所有重複使用程式碼取代為下列專案:
using System;
using System.Net.Http;
using System.Web.Http;

namespace WorkerRole1
{
    public class TestController : ApiController
    {
        public HttpResponseMessage Get()
        {
            return new HttpResponseMessage()
            {
                Content = new StringContent("Hello from OWIN!")
            };
        }

        public HttpResponseMessage Get(int id)
        {
            string msg = String.Format("Hello from OWIN (id = {0})", id);
            return new HttpResponseMessage()
            {
                Content = new StringContent(msg)
            };
        }
    }
}
為了簡單起見,此控制器只會定義兩個傳回純文字的 GET 方法。
啟動 OWIN 主機
開啟 WorkerRole.cs 檔案。 這個類別會定義啟動和停止背景工作角色時所執行的程式碼。
加入下列 using 陳述式:
using Microsoft.Owin.Hosting;
將 IDisposable 成員新增至 WorkerRole 類別:
public class WorkerRole : RoleEntryPoint
{
    private IDisposable _app = null;

    // ....
}
在 方法中 OnStart ,新增下列程式碼以啟動主機:
public override bool OnStart()
{
    ServicePointManager.DefaultConnectionLimit = 12;

    // New code:
    var endpoint = RoleEnvironment.CurrentRoleInstance.InstanceEndpoints["Endpoint1"];
    string baseUri = String.Format("{0}://{1}",
        endpoint.Protocol, endpoint.IPEndpoint);

    Trace.TraceInformation(String.Format("Starting OWIN at {0}", baseUri),
        "Information");

    _app = WebApp.Start<Startup>(new StartOptions(url: baseUri));
    return base.OnStart();
}
WebApp.Start方法會啟動 OWIN 主機。 類別的名稱是 方法的類型 Startup 參數。 根據慣例,主機會呼叫 Configure 這個類別的 方法。
OnStop覆寫 以處置_app實例:
public override void OnStop()
{
    if (_app != null)
    {
        _app.Dispose();
    }
    base.OnStop();
}
以下是 WorkerRole.cs 的完整程式碼:
using Microsoft.Owin.Hosting;
using Microsoft.WindowsAzure.ServiceRuntime;
using System;
using System.Diagnostics;
using System.Net;
using System.Threading;

namespace WorkerRole1
{
    public class WorkerRole : RoleEntryPoint
    {
        private IDisposable _app = null;

        public override void Run()
        {
            Trace.TraceInformation("WebApiRole entry point called", "Information");

            while (true)
            {
                Thread.Sleep(10000);
                Trace.TraceInformation("Working", "Information");
            }
        }

        public override bool OnStart()
        {
            ServicePointManager.DefaultConnectionLimit = 12;

            var endpoint = RoleEnvironment.CurrentRoleInstance.InstanceEndpoints["Endpoint1"];
            string baseUri = String.Format("{0}://{1}",
                endpoint.Protocol, endpoint.IPEndpoint);

            Trace.TraceInformation(String.Format("Starting OWIN at {0}", baseUri),
                "Information");

            _app = WebApp.Start<Startup>(new StartOptions(url: baseUri));
           return base.OnStart();
        }

        public override void OnStop()
        {
            if (_app != null)
            {
                _app.Dispose();
            }
            base.OnStop();
        }
    }
}
建置解決方案,然後按 F5 在 Azure 計算模擬器本機執行應用程式。 視防火牆設定而定,您可能需要允許模擬器通過防火牆。
注意
如果您收到如下的例外狀況,請參閱 此部落格文章 以取得因應措施。 「無法載入檔案或元件 'Microsoft.Owin, Version=2.0.2.0, Culture=neutral, PublicKeyToken=31bf3856ad364e35' 或其其中一個相依性。 找到的元件資訊清單定義不符合元件參考。 (HRESULT 的例外狀況:0x80131040) 」
計算模擬器會將本機 IP 位址指派給端點。 您可以檢視計算模擬器 UI 來尋找 IP 位址。 以滑鼠右鍵按一下工作列通知區域中的模擬器圖示,然後選取 [ 顯示計算模擬器 UI]。
![在選取 [服務詳細資料] 選項時,顯示功能表和 I P 端點位址資訊的 Azure 計算模擬器 U I 螢幕擷取畫面。](host-aspnet-web-api-in-an-azure-worker-role/_static/image10.png)
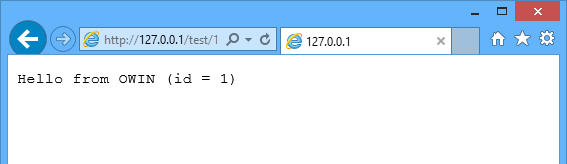
在 [服務部署]、部署 [識別碼]、[服務詳細資料] 下尋找 IP 位址。 開啟網頁瀏覽器並流覽至 HTTP:// address/test/1,其中 address 是計算模擬器指派的 IP 位址;例如, http://127.0.0.1:80/test/1 。 您應該會看到來自 Web API 控制器的回應:
部署至 Azure
在此步驟中,您必須擁有 Azure 帳戶。 如果您還沒有免費試用帳戶,只需幾分鐘的時間就可以建立免費試用帳戶。 如需詳細資訊,請參閱 Microsoft Azure 免費試用。
在 方案總管中,以滑鼠右鍵按一下 AzureApp 專案。 選取 [發佈]。

如果您未登入您的 Azure 帳戶,請按一下 [登入]。
![[發佈 Azure 應用程式] 對話方塊的螢幕擷取畫面,該對話方塊會在其他選項可用之前要求登入選項。](host-aspnet-web-api-in-an-azure-worker-role/_static/image14.png)
登入之後,請選擇訂用帳戶,然後按 [ 下一步]。

輸入雲端服務的名稱,然後選擇區域。 按一下 [建立]。
![[建立雲端服務和儲存體帳戶] 對話方塊的螢幕擷取畫面,要求使用者輸入其應用程式服務的名稱和區域。](host-aspnet-web-api-in-an-azure-worker-role/_static/image18.png)
按一下 [發佈]。
![[發佈 Azure 應用程式] 視窗的螢幕擷取畫面,確認所做的所有設定選取專案,並提供返回或發佈按鈕選項。](host-aspnet-web-api-in-an-azure-worker-role/_static/image19.png)
其他資源
意見反應
即將登場:在 2024 年,我們將逐步淘汰 GitHub 問題作為內容的意見反應機制,並將它取代為新的意見反應系統。 如需詳細資訊,請參閱:https://aka.ms/ContentUserFeedback。
提交並檢視相關的意見反應