為 Azure Stack Hub 或 Azure Stack 開發套件上的 Azure CLI 設定憑證
遵循本文中的步驟從 Linux、Mac 和 Windows 用戶端平台設定 Azure 命令列介面 (CLI),來管理 Azure Stack 開發套件 (ASDK) 資源。 如果您在已中斷連線的環境中使用整合式系統 Azure Stack Hub,或者如果憑證不是由受信任根目錄程式中的 CA 所發行,您也可以遵循這些步驟。
本文說明如何取得您的憑證,並在遠端系統管理電腦上信任這些憑證。 若要安裝 Azure CLI 並連線到您的環境,請參閱在 Azure Stack Hub 上安裝 Azure CLI。
針對 Azure CLI 進行準備
您需要有 CA 根憑證,Azure Stack Hub 才能在開發電腦上使用 Azure CLI。 您可以使用該憑證來透過 CLI 管理資源。
如果您要從位於 Azure Stack Hub 環境外的工作站使用 CLI,就必須要有 Azure Stack Hub CA 根憑證。
虛擬機器別名端點提供一個別名 (例如 "UbuntuLTS" 或 "Win2012Datacenter")。在部署 VM 時,該別名可作為單一參數來參考映像發行者、供應項目、SKU 及版本。
下列各節會說明如何取得這些值。
匯出 Azure Stack Hub CA 根憑證
匯出 CA 根憑證。 若要以 PEM 格式匯出 ASDK 根憑證:
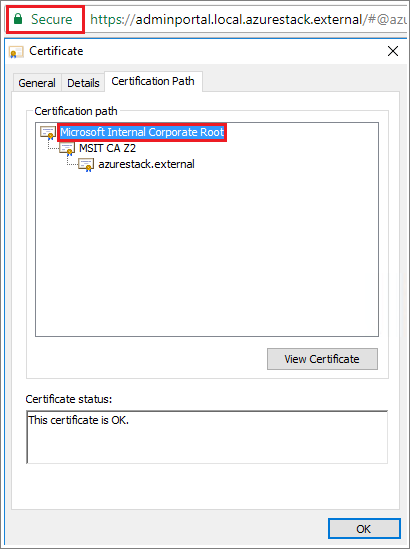
取得您 Azure Stack Hub 根憑證的名稱:
- 登入 Azure Stack Hub 使用者或 Azure Stack Hub 管理員入口網站。
- 選取瀏覽器網址列中的鎖定。
- 在快顯視窗中,選取 [Connection is secure] \(連線是安全的\)。
- 在 [憑證] 視窗中,選取 [憑證路徑] 索引標籤。
- 記下您 Azure Stack Hub 根憑證的名稱,例如
*.<locale>.<FQDN>
登入 VM,開啟提升權限的 PowerShell 提示字元,然後執行下列指令碼:
  $label = "*.<locale>.<FQDN> from step 1"
  Write-Host "Getting certificate from the current user trusted store with subject CN=$label"
  $root = Get-ChildItem Cert:\CurrentUser\Root | Where-Object Subject -eq "CN=$label" | select -First 1
  if (-not $root)
  {
      Write-Error "Certificate with subject CN=$label not found"
      return
  }

Write-Host "Exporting certificate"
Export-Certificate -Type CERT -FilePath root.cer -Cert $root
針對 Linux,也需要下列命令:
export REQUESTS_CA_BUNDLE=~/.local/lib/python3.9/site-packages/certifi/cacert.pem
# RECOMMENDED: set the env var automatically for your subsequent sessions
echo 'export REQUESTS_CA_BUNDLE=~/.local/lib/python3.9/site-packages/certifi/cacert.pem' >> ~/.bash_profile
將憑證複製到本機電腦。
設定虛擬機器別名端點
您可以設定裝載 VM 別名檔案的可公開存取端點。 VM 別名檔案是為映像提供通用名稱的 JSON 檔案。 您會在部署 VM 作為 Azure CLI 參數時使用此名稱。
如果您發行自訂映像,請記下您在發行時所指定的發行者、供應項目、SKU 及版本資訊。 如果映像來自 Marketplace,則可以使用
Get-AzureVMImageCmdlet 來檢視資訊。從 GitHub 下載範例檔案。
在 Azure Stack Hub 中建立儲存體帳戶。 完成時,建立 Blob 容器。 將存取原則設定為「公用」。
將 JSON 檔案上傳到新的容器。 完成時,您可以檢視 Blob 的 URL。 選取 Blob 名稱,然後選取 Blob 屬性中的 URL。
信任憑證
若要搭配 ASDK 使用 Azure CLI,您必須信任遠端電腦上的 CA 根憑證。
尋找您機器上的憑證位置。 此位置可能會根據您安裝 Python 的位置不同而有所差異。
若要尋找該位置,請開啟 CMD 命令提示字元或已提升權限的 PowerShell 命令提示字元,並鍵入:
az --version。 版本和 Python 位置會出現在命令提示字元中。azure-cli 2.30.0 core 2.30.0 telemetry 1.0.6 Python location 'C:\Program Files (x86)\Microsoft SDKs\Azure\CLI2\python.exe' Extensions directory 'C:\Users\username\.azure\cliextensions' Python (Windows) 3.8.9 (tags/v3.8.9:a743f81, Apr 6 2021, 13:22:56) [MSC v.1928 32 bit (Intel)] Legal docs and information: aka.ms/AzureCliLegal Your CLI is up-to-date. Please let us know how we are doing: https://aka.ms/azureclihats and let us know if you're interested in trying out our newest features: https://aka.ms/CLIUXstudy變更至 Azure CLI 已安裝 Python 的目錄。 例如,使用步驟 2 中的位置:
cd "C:\Program Files (x86)\Microsoft SDKs\Azure\CLI2\。輸入以下命令:
.\python -c "import certifi; print(certifi.where())"這會傳回您電腦上的憑證位置路徑。 您的特定路徑取決於安裝的 OS 和 Python 版本。 例如:
C:\Program Files (x86)\Microsoft SDKs\Azure\CLI2\lib\site-packages\certifi\cacert.pem記下憑證位置。 您將會在下一個步驟中使用此路徑。
將 Azure Stack Hub CA 根憑證附加到現有的 Python 憑證,以信任該根憑證。
$cerFile = "<Fully qualified path to the cer certificate exported from `
your Azure Stack Hub and saved. For example: C:\Users\user1\Downloads\root.cer"
$pythonCertStore = <result from step 4>

$cerDir = Split-Path -Parent $cerFile
$pemFile = "$cerDir\root.pem"
Write-Host "Converting certificate to PEM format at $pemFile"
certutil -encode $cerFile $pemFile
$root = New-Object System.Security.Cryptography.X509Certificates.X509Certificate2
$root.Import($pemFile)

# X509Certificate2.Thumbprint calculates SHA1 hash of the public key. You can get sha1 of the pem file by using openssl,
# e.g. openssl x509 -noout -fingerprint -sha1 -inform pem -in ./root.pem
# Alternatively, 'Get-FileHash' gives the same value (without ':') for the corresponding cer file
# Since the thumbprint is a unique value for the certificate, it is commonly used to find a particular certificate in a certificate store
Write-Host "Extracting required information from the cert file"
$md5Hash    = (Get-FileHash -Path $cerFile -Algorithm MD5).Hash.ToLower()
$sha1Hash   = (Get-FileHash -Path $cerFile -Algorithm SHA1).Hash.ToLower()
$sha256Hash = (Get-FileHash -Path $cerFile -Algorithm SHA256).Hash.ToLower()

$issuerEntry  = [string]::Format("# Issuer: {0}", $root.Issuer)
$subjectEntry = [string]::Format("# Subject: {0}", $root.Subject)
$labelEntry   = [string]::Format("# Label: {0}", $root.Subject.Split('=')[-1])
$serialEntry  = [string]::Format("# Serial: {0}", $root.GetSerialNumberString().ToLower())
$md5Entry     = [string]::Format("# MD5 Fingerprint: {0}", $md5Hash)
$sha1Entry    = [string]::Format("# SHA1 Fingerprint: {0}", $sha1Hash)
$sha256Entry  = [string]::Format("# SHA256 Fingerprint: {0}", $sha256Hash)
$certText = (Get-Content -Path $pemFile -Raw).ToString().Replace("`r`n","`n")

$rootCertEntry = "`n" + $issuerEntry + "`n" + $subjectEntry + "`n" + $labelEntry + "`n" + `
$serialEntry + "`n" + $md5Entry + "`n" + $sha1Entry + "`n" + $sha256Entry + "`n" + $certText

Write-Host "Adding the certificate content to Python Cert store"
Add-Content $pythonCertStore $rootCertEntry

Write-Host "Python Cert store was updated to allow the Azure Stack Hub CA root certificate"
如需安裝和連線 Azure CLI 的指示,請參閱在 Azure Stack Hub 上安裝 Azure CLI。
後續步驟
意見反應
即將登場:在 2024 年,我們將逐步淘汰 GitHub 問題作為內容的意見反應機制,並將它取代為新的意見反應系統。 如需詳細資訊,請參閱:https://aka.ms/ContentUserFeedback。
提交並檢視相關的意見反應