向 Azure 註冊 ASDK
您可以向 Azure 註冊 Azure Stack 開發套件 (ASDK) 安裝,以便從 Azure 下載市集項目,以及設定向 Microsoft 回報商務資料的功能。 必須註冊才能支援完整的 Azure Stack Hub 功能,包括 Marketplace 摘要整合。 需要註冊才能讓您測試重要的 Azure Stack Hub 功能,例如市集摘要整合和使用情況報告。 註冊 Azure Stack Hub 之後,使用情況會回報給 Azure Commerce。 您可以在註冊時所使用的訂用帳戶下看到這項資訊。 然而,ASDK 使用者將不需針對回報的任何使用方式支付費用。
如果您尚未註冊 ASDK,您可能會看到 [需要啟用] 警告警示,提示您註冊 ASDK。 這是預期的行為。
Prerequisites
在使用這些指示向 Azure 註冊 ASDK 前,請確定您已安裝 Azure Stack Hub PowerShell,並已下載部署後組態一文所述的 Azure Stack Hub 工具。
在用來向 Azure 註冊 ASDK 的電腦上,PowerShell 語言模式也必須設定為 FullLanguage。 若要確認目前的語言模式設定為完整,請開啟已提升權限的 PowerShell 視窗,並執行下列 PowerShell 命令:
$ExecutionContext.SessionState.LanguageMode
確定輸出有傳回 FullLanguage。 如果傳回任何其他語言模式,則必須在另一部電腦上執行註冊,或是將語言模式設定為 FullLanguage,才能繼續。
用於註冊的Microsoft Entra帳戶必須具有 Azure 訂用帳戶的存取權,而且有權在該訂用帳戶相關聯的目錄中建立身分識別應用程式和服務主體。 建議您建立註冊用的服務帳戶,以向 Azure 註冊 Azure Stack Hub,而不要使用全域管理員認證。
註冊 ASDK
請遵循這些步驟來向 Azure 註冊 ASDK。
注意
這些步驟全都必須從可存取具有特殊權限之端點的電腦執行。 對於 ASDK 而言,這就是 ASDK 主機電腦。
開啟提升權限的 PowerShell 命令提示字元。
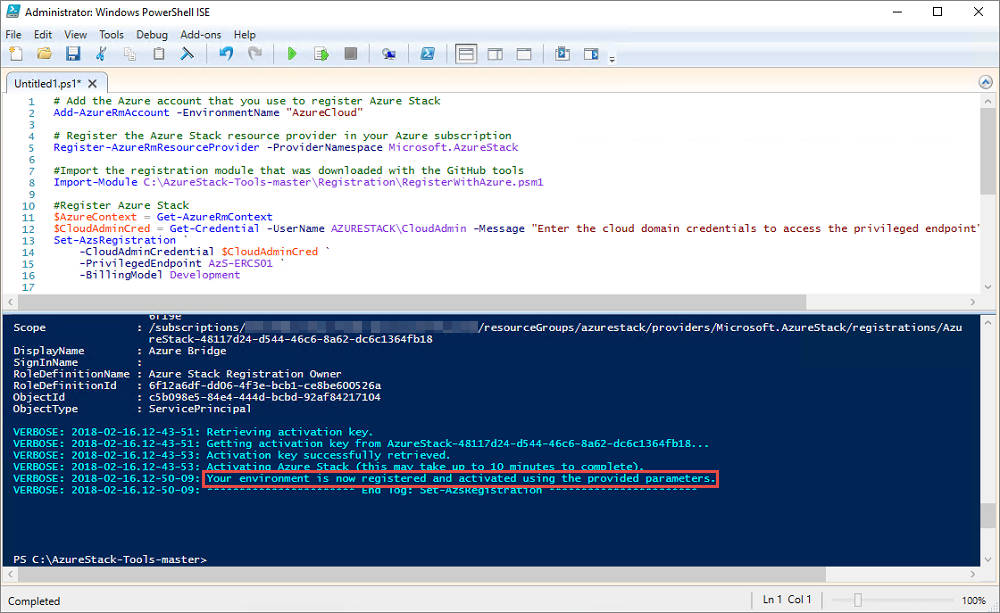
執行下列 PowerShell Cmdlet,以向 Azure 註冊 ASDK 安裝。 登入 Azure 計費訂用帳戶識別碼與本機 ASDK 安裝。 如果您還沒有 Azure 計費訂用帳戶識別碼,您可以在此建立免費的 Azure 帳戶。 註冊 Azure Stack Hub 不會對您的 Azure 訂用帳戶收取任何費用。
執行 Set-AzsRegistration Cmdlet 時,請設定註冊的唯一名稱。 RegistrationName 參數的預設值是 AzureStackRegistration。 不過,如果您在多個 Azure Stack Hub 執行個體上使用相同的名稱,指令碼將會失敗。# Add the Azure cloud subscription environment name. # Supported environment names are AzureCloud, AzureChinaCloud, or AzureUSGovernment depending which Azure subscription you're using. Connect-AzAccount -EnvironmentName "<environment name>" # Register the Azure Stack Hub resource provider in your Azure subscription Register-AzResourceProvider -ProviderNamespace Microsoft.AzureStack # Import the registration module that was downloaded with the GitHub tools Import-Module C:\AzureStack-Tools-az\Registration\RegisterWithAzure.psm1 # If you have multiple subscriptions, run the following command to select the one you want to use: # Get-AzSubscription -SubscriptionID "<subscription ID>" | Select-AzSubscription # Register Azure Stack Hub $AzureContext = Get-AzContext $CloudAdminCred = Get-Credential -UserName AZURESTACK\CloudAdmin -Message "Enter the credentials to access the privileged endpoint." $RegistrationName = "<unique-registration-name>" Set-AzsRegistration ` -PrivilegedEndpointCredential $CloudAdminCred ` -PrivilegedEndpoint AzS-ERCS01 ` -BillingModel Development ` -RegistrationName $RegistrationName ` -UsageReportingEnabled:$true當命令完成時,您會看到此訊息:您的環境現在已使用提供的參數註冊並啟動。
在中斷連線的環境中註冊
如果您要在已中斷連線的環境 (沒有網際網路連線能力) 中註冊 Azure Stack Hub,就需要從 Azure Stack Hub 環境中取得註冊權杖,然後在可連線到 Azure 的電腦上使用該權杖,並針對 ASDK 環境建立啟用資源。
重要
在使用這些指示來註冊 Azure Stack Hub 之前,請確定您已在 ASDK 主機電腦和有網際網路可連線到 Azure 並且註冊的電腦上,安裝適用於 Azure Stack Hub 的 PowerShell,並下載部署後組態一文所述的 Azure Stack Hub 工具。
從 Azure Stack Hub 環境中取得註冊權杖
在 ASDK 主機電腦上,以系統管理員身分啟動 PowerShell,並瀏覽至您下載 Azure Stack Hub 工具時所建 AzureStack-Tools-az 目錄中的 Registration 資料夾。 使用下列 PowerShell 命令來匯入 RegisterWithAzure.psm1 模組,然後使用 Get-AzsRegistrationToken Cmdlet 來取得註冊權杖:
# Import the registration module that was downloaded with the GitHub tools
Import-Module C:\AzureStack-Tools-az\Registration\RegisterWithAzure.psm1

# Create registration token
$CloudAdminCred = Get-Credential -UserName AZURESTACK\CloudAdmin -Message "Enter the credentials to access the privileged endpoint."
# File path to save the token. This example saves the file as C:\RegistrationToken.txt.
$FilePathForRegistrationToken = "$env:SystemDrive\RegistrationToken.txt"
$RegistrationToken = Get-AzsRegistrationToken -PrivilegedEndpointCredential $CloudAdminCred `
-UsageReportingEnabled:$false `
-PrivilegedEndpoint AzS-ERCS01 `
-BillingModel Development `
-MarketplaceSyndicationEnabled:$false `
-TokenOutputFilePath $FilePathForRegistrationToken
儲存此註冊權杖,以在有網際網路連線的電腦上使用。 您可以從由 $FilePathForRegistrationToken 參數建立的檔案複製檔案或文字。
連線至 Azure 並註冊
在與網際網路連線的電腦上,使用下列 PowerShell 命令來匯入RegisterWithAzure.psm1 模組,然後用您剛才建立的註冊權杖和唯一的註冊名稱,使用 Register-AzsEnvironment Cmdlet 向 Azure 註冊:
# Add the Azure cloud subscription environment name.
# Supported environment names are AzureCloud, AzureChinaCloud or AzureUSGovernment depending which Azure subscription you are using.
Connect-AzAccount -EnvironmentName "<environment name>"

# If you have multiple subscriptions, run the following command to select the one you want to use:
# Get-AzSubscription -SubscriptionID "<subscription ID>" | Select-AzSubscription

# Register the Azure Stack Hub resource provider in your Azure subscription
Register-AzResourceProvider -ProviderNamespace Microsoft.AzureStack

# Import the registration module that was downloaded with the GitHub tools
Import-Module C:\AzureStack-Tools-az\Registration\RegisterWithAzure.psm1

# Register with Azure
# This example uses the C:\RegistrationToken.txt file.
$registrationToken = Get-Content -Path "$env:SystemDrive\RegistrationToken.txt"
$RegistrationName = "<unique-registration-name>"
Register-AzsEnvironment -RegistrationToken $registrationToken `
-RegistrationName $RegistrationName
或者,您可以使用 Get-Content Cmdlet 來指向包含您註冊權杖的檔案:
# Add the Azure cloud subscription environment name.
# Supported environment names are AzureCloud, AzureChinaCloud or AzureUSGovernment depending which Azure subscription you are using.
Connect-AzAccount -EnvironmentName "<environment name>"

# If you have multiple subscriptions, run the following command to select the one you want to use:
# Get-AzSubscription -SubscriptionID "<subscription ID>" | Select-AzSubscription

# Register the Azure Stack Hub resource provider in your Azure subscription
Register-AzResourceProvider -ProviderNamespace Microsoft.AzureStack

# Import the registration module that was downloaded with the GitHub tools
Import-Module C:\AzureStack-Tools-az\Registration\RegisterWithAzure.psm1

# Register with Azure
# This example uses the C:\RegistrationToken.txt file.
$registrationToken = Get-Content -Path "$env:SystemDrive\RegistrationToken.txt"
Register-AzsEnvironment -RegistrationToken $registrationToken `
-RegistrationName $RegistrationName
註冊完成時,您應該會看到類似的訊息:您的 Azure Stack Hub 環境現在已向 Azure 完成註冊。
重要
請勿關閉 PowerShell 視窗。
儲存註冊權杖和註冊資源名稱,供日後參考。
從 Azure 註冊資源擷取啟用金鑰
仍使用網際網路連線的電腦,以及相同的 PowerShell 主控台視窗,從您向 Azure 註冊時所建立的註冊資源中擷取啟用金鑰。
若要取得啟用金鑰,請執行下列 PowerShell 命令。 使用您在上一個步驟中向 Azure 註冊時所提供的同一個唯一註冊名稱值:
$RegistrationResourceName = "<unique-registration-name>"
# File path to save the activation key. This example saves the file as C:\ActivationKey.txt.
$KeyOutputFilePath = "$env:SystemDrive\ActivationKey.txt"
$ActivationKey = Get-AzsActivationKey -RegistrationName $RegistrationResourceName `
-KeyOutputFilePath $KeyOutputFilePath
在 Azure Stack Hub 中建立啟用資源
從 Get-AzsActivationKey 建立的啟用金鑰中取得檔案或文字後,返回 Azure Stack Hub 環境。 執行下列 PowerShell 命令,以使用該啟動金鑰在 Azure Stack Hub 中建立啟用資源:
# Import the registration module that was downloaded with the GitHub tools
Import-Module C:\AzureStack-Tools-az\Registration\RegisterWithAzure.psm1

$CloudAdminCred = Get-Credential -UserName AZURESTACK\CloudAdmin -Message "Enter the credentials to access the privileged endpoint."
$ActivationKey = "<activation key>"
New-AzsActivationResource -PrivilegedEndpointCredential $CloudAdminCred `
-PrivilegedEndpoint AzS-ERCS01 `
-ActivationKey $ActivationKey
或者,您可以使用 Get-Content Cmdlet 來指向包含您註冊權杖的檔案:
# Import the registration module that was downloaded with the GitHub tools
Import-Module C:\AzureStack-Tools-az\Registration\RegisterWithAzure.psm1

$CloudAdminCred = Get-Credential -UserName AZURESTACK\CloudAdmin -Message "Enter the credentials to access the privileged endpoint."
# This example uses the C:\ActivationKey.txt file.
$ActivationKey = Get-Content -Path "$env:SystemDrive\Activationkey.txt"
New-AzsActivationResource -PrivilegedEndpointCredential $CloudAdminCred `
-PrivilegedEndpoint AzS-ERCS01 `
-ActivationKey $ActivationKey
啟用完成時,您應會看到類似以下的訊息:您的環境已完成註冊和啟用程序。
確認註冊已成功
您可以使用 [區域管理] 圖格來確認 Azure Stack Hub 註冊是否已成功。 此圖格位於系統管理員入口網站中的預設儀表板上。
登入 Azure Stack Hub 系統管理員入口網站
https://adminportal.local.azurestack.external。從儀表板中,選取 [Region management] \(區域管理\)。

選取 [屬性] 。 此刀鋒視窗會顯示您環境的狀態和詳細資料。 狀態可以是 [已註冊] 或 [未註冊] 。 如果是已註冊,則會一併顯示您用來註冊 Azure Stack Hub 的 Azure 訂用帳戶 ID,以及註冊資源群組和名稱。

移動註冊資源
支援在相同的訂用帳戶下的資源群組之間移動註冊資源。 如需將資源移到新資源群組的詳細資訊,請參閱將資源移到新的資源群組或訂用帳戶。
後續步驟
意見反應
即將登場:在 2024 年,我們將逐步淘汰 GitHub 問題作為內容的意見反應機制,並將它取代為新的意見反應系統。 如需詳細資訊,請參閱:https://aka.ms/ContentUserFeedback。
提交並檢視相關的意見反應