在 Azure Stack Hub 中部署 Service Fabric 叢集
使用 Azure Marketplace 中的 [Service Fabric 叢集] 項目,在 Azure Stack Hub 中部署安全的 Service Fabric 叢集。
如需有關使用 Service Fabric 的詳細資訊,請參閱 Azure 文件中的 Azure Service Fabric 概觀和 Service Fabric 叢集安全性案例。
Azure Stack Hub 中的 Service Fabric 叢集不會使用資源提供者 Microsoft.ServiceFabric。 而在 Azure Stack Hub 中,Service Fabric 叢集是一個虛擬機器擴展集,內含以 Desired State Configuration (DSC) 設定的預先安裝軟體。
Prerequisites
部署 Service Fabric 叢集時需要下列各項:
叢集憑證
這是在部署 Service Fabric 時,您新增至 Key Vault 的 X.509 伺服器憑證。此憑證上的 CN 必須符合您所建立之 Service Fabric 叢集的完整網域名稱 (FQDN)。
憑證格式必須是 PFX,因為需要公用與私密金鑰。 請參閱建立此伺服器端憑證的需求。
注意
您可以使用自我簽署的憑證代替 X.509 伺服器憑證進行測試。 自我簽署的憑證不需要符合叢集的 FQDN。
系統管理用戶端憑證
這是用戶端用來驗證 Service Fabric 叢集的憑證,其可自我簽署。 請參閱建立此用戶端憑證的需求。在 Azure Stack Hub Marketplace 中必須可取得下列項目:
- Windows Server 2016 – 範本使用 Windows Server 2016 映像來建立叢集。
- 自訂指令碼擴充功能 - 來自 Microsoft 的虛擬機器擴充功能。
- PowerShell 所需階段組態-來自 Microsoft 的虛擬機器擴充功能。
將祕密新增至 Key Vault
若要部署 Service Fabric 叢集時,您必須為 Service Fabric 叢集指定正確的 Key Vault「祕密識別碼」 或 URL。 Azure Resource Manager 範本會使用 Key Vault 作為輸入。 接著,範本會在安裝 Service Fabric 叢集時擷取叢集憑證。
重要
您必須使用 PowerShell 將祕密新增至 Key Vault,以便搭配 Service Fabric 使用。 請勿使用入口網站。
使用下列指令碼來建立 Key Vault,並且在其中新增「叢集憑證」 。 (請參閱必要條件。)執行指令碼之前,請檢閱範例指令碼及更新指定的參數,以符合您的環境。 此指令碼也會將您需要提供的值輸出至 Azure Resource Manager 範本。
提示
必須先具備公用供應項目 (包括用於計算、網路、儲存體和 Key Vault 的服務),指令碼才可能成功。
   function Get-ThumbprintFromPfx($PfxFilePath, $Password)
      {
         return New-Object System.Security.Cryptography.X509Certificates.X509Certificate2($PfxFilePath, $Password)
      }

   function Publish-SecretToKeyVault ($PfxFilePath, $Password, $KeyVaultName)
      {
         $keyVaultSecretName = "ClusterCertificate"
         $certContentInBytes = [io.file]::ReadAllBytes($PfxFilePath)
         $pfxAsBase64EncodedString = [System.Convert]::ToBase64String($certContentInBytes)

         $jsonObject = ConvertTo-Json -Depth 10 ([pscustomobject]@{
               data     = $pfxAsBase64EncodedString
               dataType = 'pfx'
               password = $Password
         })

         $jsonObjectBytes = [System.Text.Encoding]::UTF8.GetBytes($jsonObject)
         $jsonEncoded = [System.Convert]::ToBase64String($jsonObjectBytes)
         $secret = ConvertTo-SecureString -String $jsonEncoded -AsPlainText -Force
         $keyVaultSecret = Set-AzureKeyVaultSecret -VaultName $KeyVaultName -Name $keyVaultSecretName -SecretValue $secret

         $pfxCertObject = Get-ThumbprintFromPfx -PfxFilePath $PfxFilePath -Password $Password

         Write-Host "KeyVault id: " -ForegroundColor Green
         (Get-AzKeyVault -VaultName $KeyVaultName).ResourceId

         Write-Host "Secret Id: " -ForegroundColor Green
         (Get-AzureKeyVaultSecret -VaultName $KeyVaultName -Name $keyVaultSecretName).id

         Write-Host "Cluster Certificate Thumbprint: " -ForegroundColor Green
         $pfxCertObject.Thumbprint
      }

   #========================== CHANGE THESE VALUES ===============================
   $armEndpoint = "https://management.local.azurestack.external"
   $tenantId = "your_tenant_ID"
   $location = "local"
   $clusterCertPfxPath = "Your_path_to_ClusterCert.pfx"
   $clusterCertPfxPassword = "Your_password_for_ClusterCert.pfx"
   #==============================================================================

   Add-AzEnvironment -Name AzureStack -ARMEndpoint $armEndpoint
   Connect-AzAccount -Environment AzureStack -TenantId $tenantId

   $rgName = "sfvaultrg"
   Write-Host "Creating Resource Group..." -ForegroundColor Yellow
   New-AzResourceGroup -Name $rgName -Location $location

   Write-Host "Creating Key Vault..." -ForegroundColor Yellow
   $Vault = New-AzKeyVault -VaultName sfvault -ResourceGroupName $rgName -Location $location -EnabledForTemplateDeployment -EnabledForDeployment -EnabledForDiskEncryption

   Write-Host "Publishing certificate to Vault..." -ForegroundColor Yellow
   Publish-SecretToKeyVault -PfxFilePath $clusterCertPfxPath -Password $clusterCertPfxPassword -KeyVaultName $vault.VaultName
如需詳細資訊,請參閱使用 PowerShell 在 Azure Stack Hub 上管理 Key Vault。
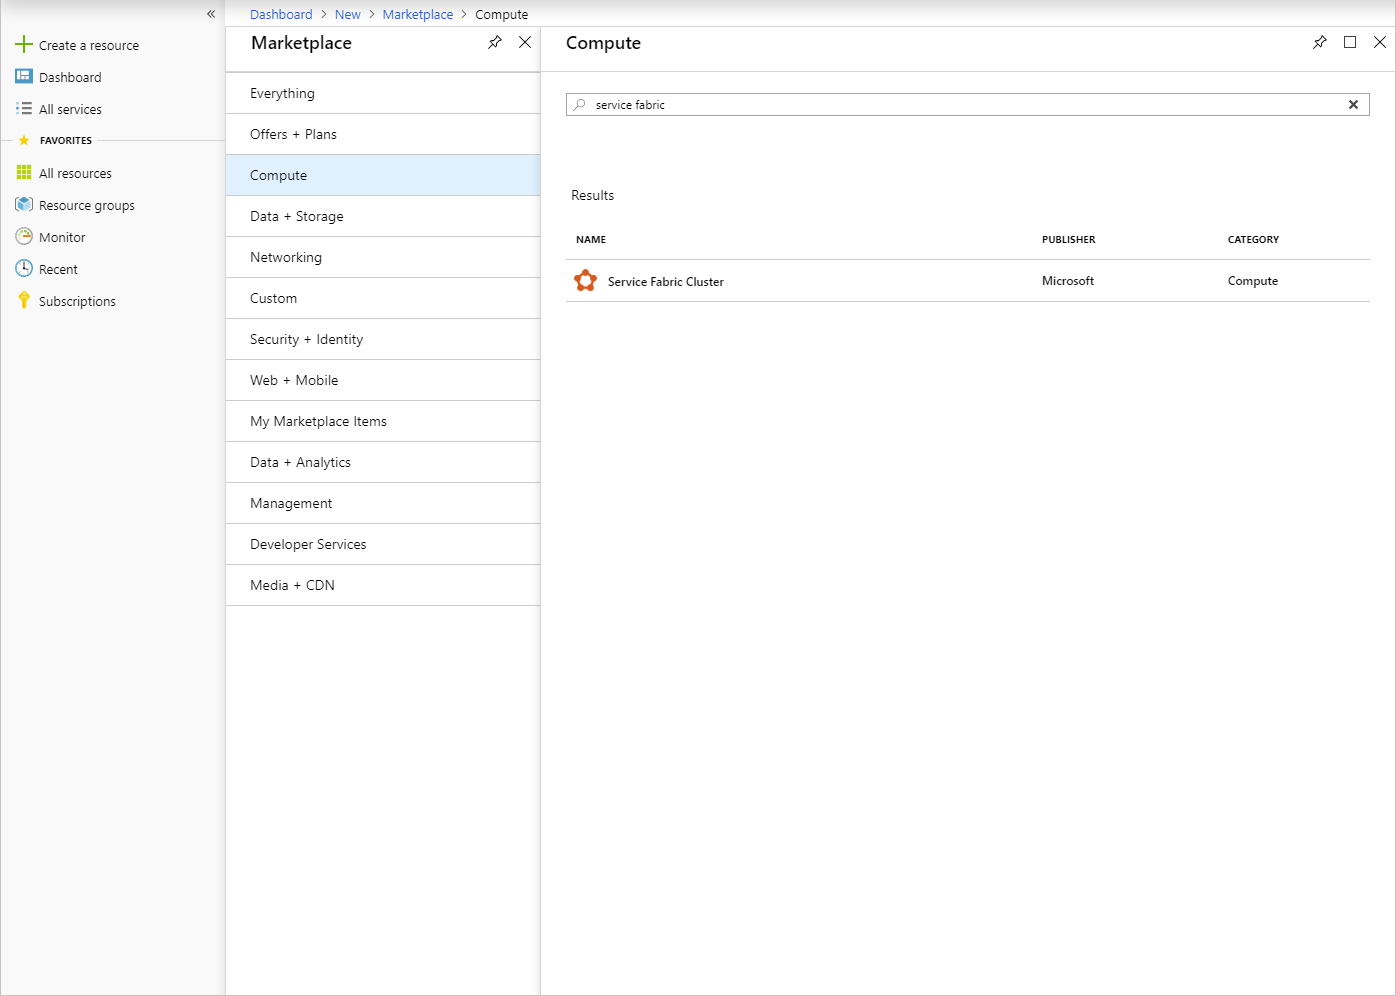
部署 Marketplace 項目
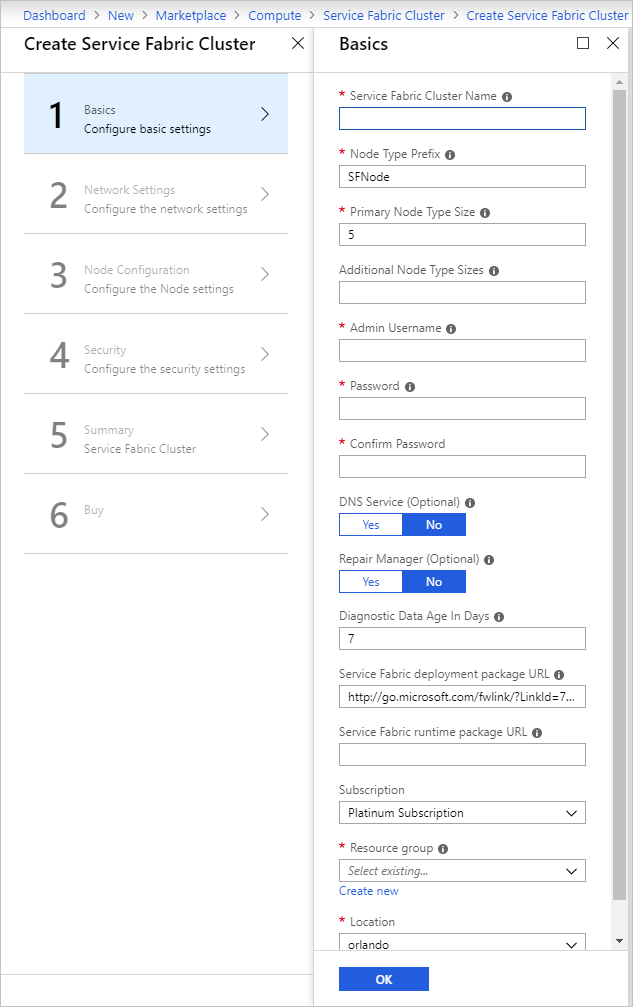
在使用者入口網站中,移至 [+ 建立資源] > [計算] > [Service Fabric 叢集] 。
針對每個頁面 (如「基本概念」 ),填妥部署表單。 如果您不確定值為何,請使用預設值。
若要針對中斷連線的 Azure Stack Hub 進行部署,或部署另一版本的 Service Fabric,請下載 Service Fabric 部署套件和其對應的執行階段套件,並裝載於 Azure Stack Hub Blob 中。 在 Service Fabric 部署套件 URL 和 Service Fabric 執行階段套件 URL 欄位中提供這些值。
注意
最新版本的 Service Fabric 和其對應的 SDK 出現相容性問題。 在問題解決前,請在部署套件 URL 和執行階段套件 URL 中提供下列參數。 否則您的部署將會失敗。
- Service Fabric 部署套件 URL:https://download.microsoft.com/download/8/3/6/836E3E99-A300-4714-8278-96BC3E8B5528/6.5.641.9590/Microsoft.Azure.ServiceFabric.WindowsServer.6.5.641.9590.zip
- Service Fabric 執行階段套件 URL:https://download.microsoft.com/download/B/0/B/B0BCCAC5-65AA-4BE3-AB13-D5FF5890F4B5/6.5.641.9590/MicrosoftAzureServiceFabric.6.5.641.9590.cab
若是已中斷連線的部署,請從指定位置下載這些套件,並在 Azure Stack Hub Blob 中以本機安裝方式裝載。
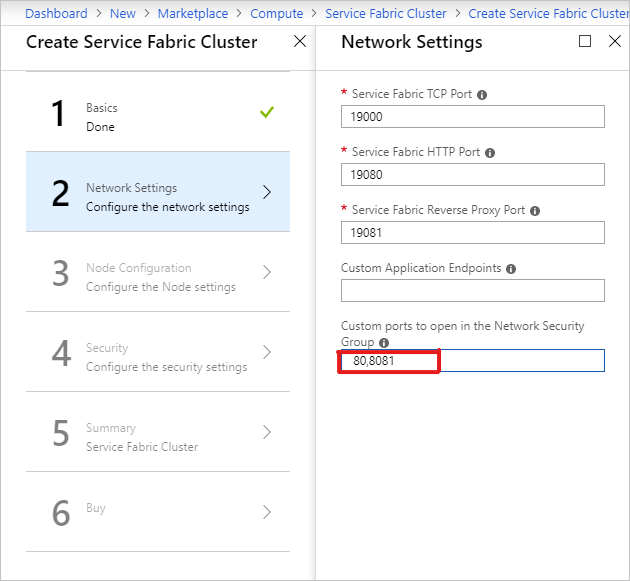
在 [網路設定] 頁面上,您可以指定要對您的應用程式開啟的特定連接埠:
在 [安全性] 頁面上,新增您經由建立 Azure Key Vault 和上傳祕密所得到的值。
針對 [管理用戶端憑證指紋] ,輸入 [管理用戶端憑證] 的指紋。 (請參閱必要條件。)
- 來源 Key Vault:指定指令碼結果中的完整
keyVault id字串。 - 叢集憑證 URL:指定指令碼結果中
Secret Id的完整 URL。 - 叢集憑證指紋:指定指令碼結果中的「叢集憑證指紋」 。
- 伺服器憑證 URL:如果想要使用叢集憑證中的個別憑證,請將憑證上傳到金鑰存放庫,並提供完整的 URL 以供選擇。
- 伺服器憑證指紋:指定伺服器憑證的指紋
- 管理員用戶端憑證指紋:指定在必要條件中建立的「管理員用戶端憑證指紋」 。

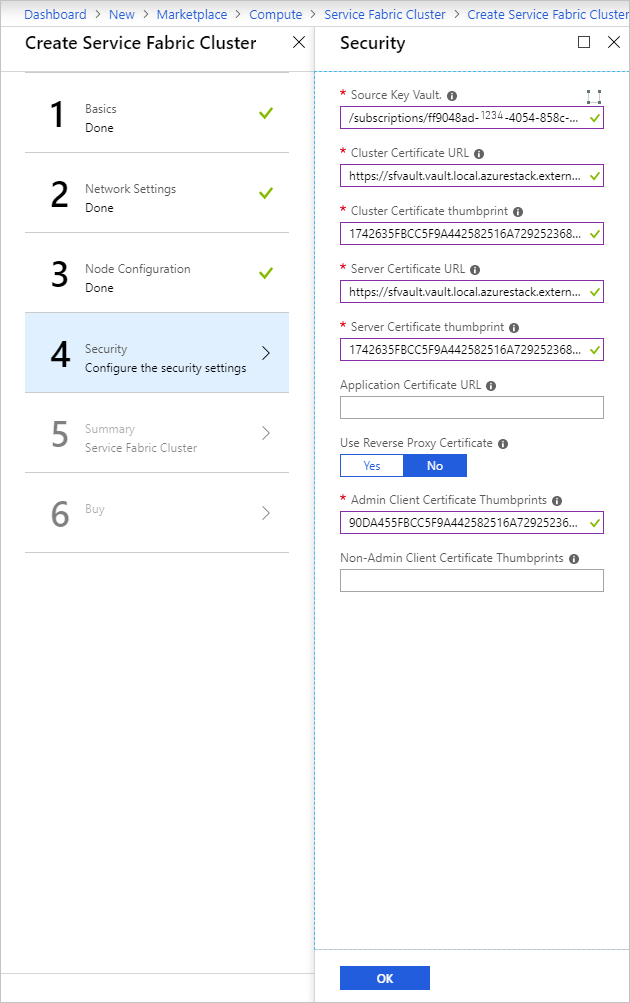
- 來源 Key Vault:指定指令碼結果中的完整
完成精靈,然後選取 [建立] 來部署 Service Fabric 叢集。
存取 Service Fabric 叢集
您可以使用 Service Fabric Explorer 或 Service Fabric PowerShell 來存取 Service Fabric 叢集。
使用 Service Fabric Explorer
確保瀏覽器可以存取您的管理用戶端憑證,而且可以向 Service Fabric 叢集進行驗證。
a. 開啟 Internet Explorer 並移至 [網際網路選項] >[內容] >[憑證] 。
b. 在 [憑證] 上,選取 [匯入] 啟動 [憑證匯入精靈] ,然後按 [下一步] 。 在 [要匯入的檔案] 頁面上,按一下 [瀏覽] ,然後選取您提供給 Azure Resource Manager 範本的 [管理用戶端憑證] 。
注意
此憑證不是先前新增至 Key Vault 的叢集憑證。
c. 確定您已在 [檔案總管] 視窗的擴充下拉式清單中選取 [個人資訊交換]。
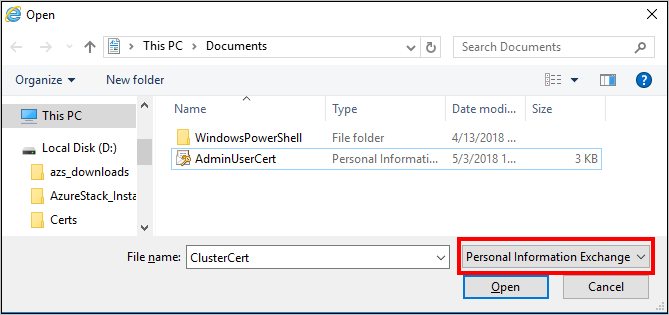
d. 在 [憑證存放區] 頁面上,選取 [個人] ,然後完成精靈。

若要尋找 Service Fabric 叢集的 FQDN:
a. 請移至與 Service Fabric 叢集相關聯的資源群組,並找出 [公用 IP 位址] 資源。 選取與公用 IP 位址相關聯的物件,以開啟 [公用 IP 位址] 刀鋒視窗。
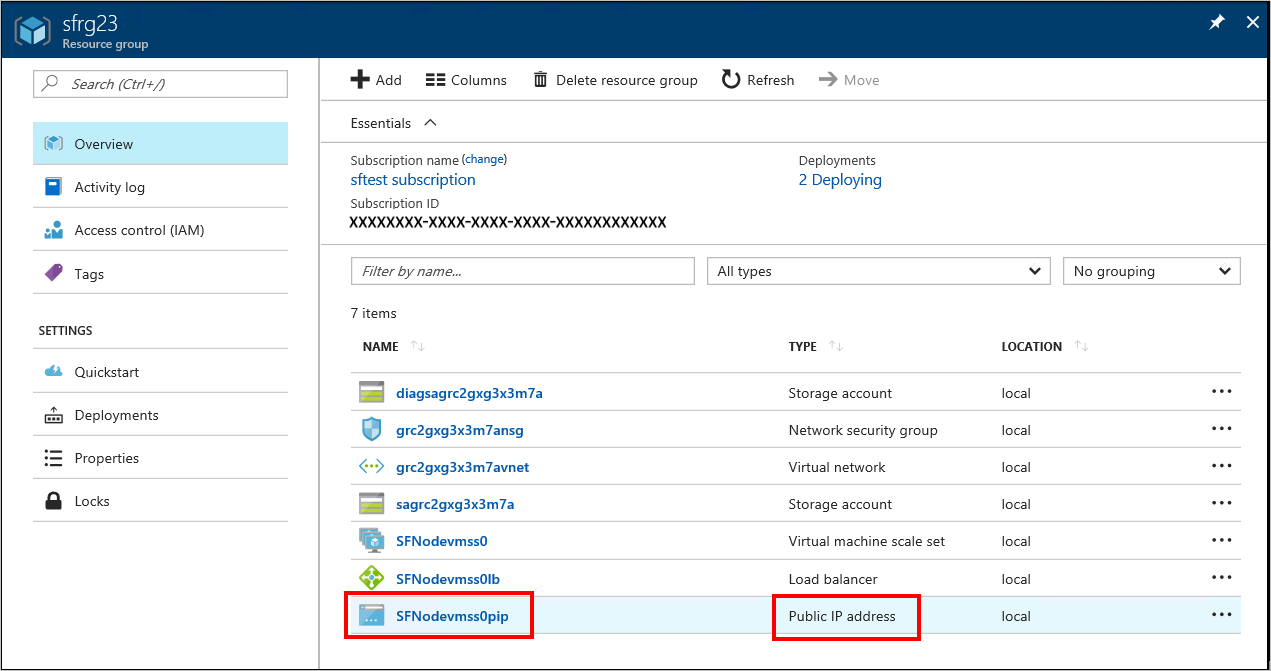
b. 在 [公用 IP 位址] 刀鋒視窗上,FQDN 會顯示為 [DNS 名稱] 。

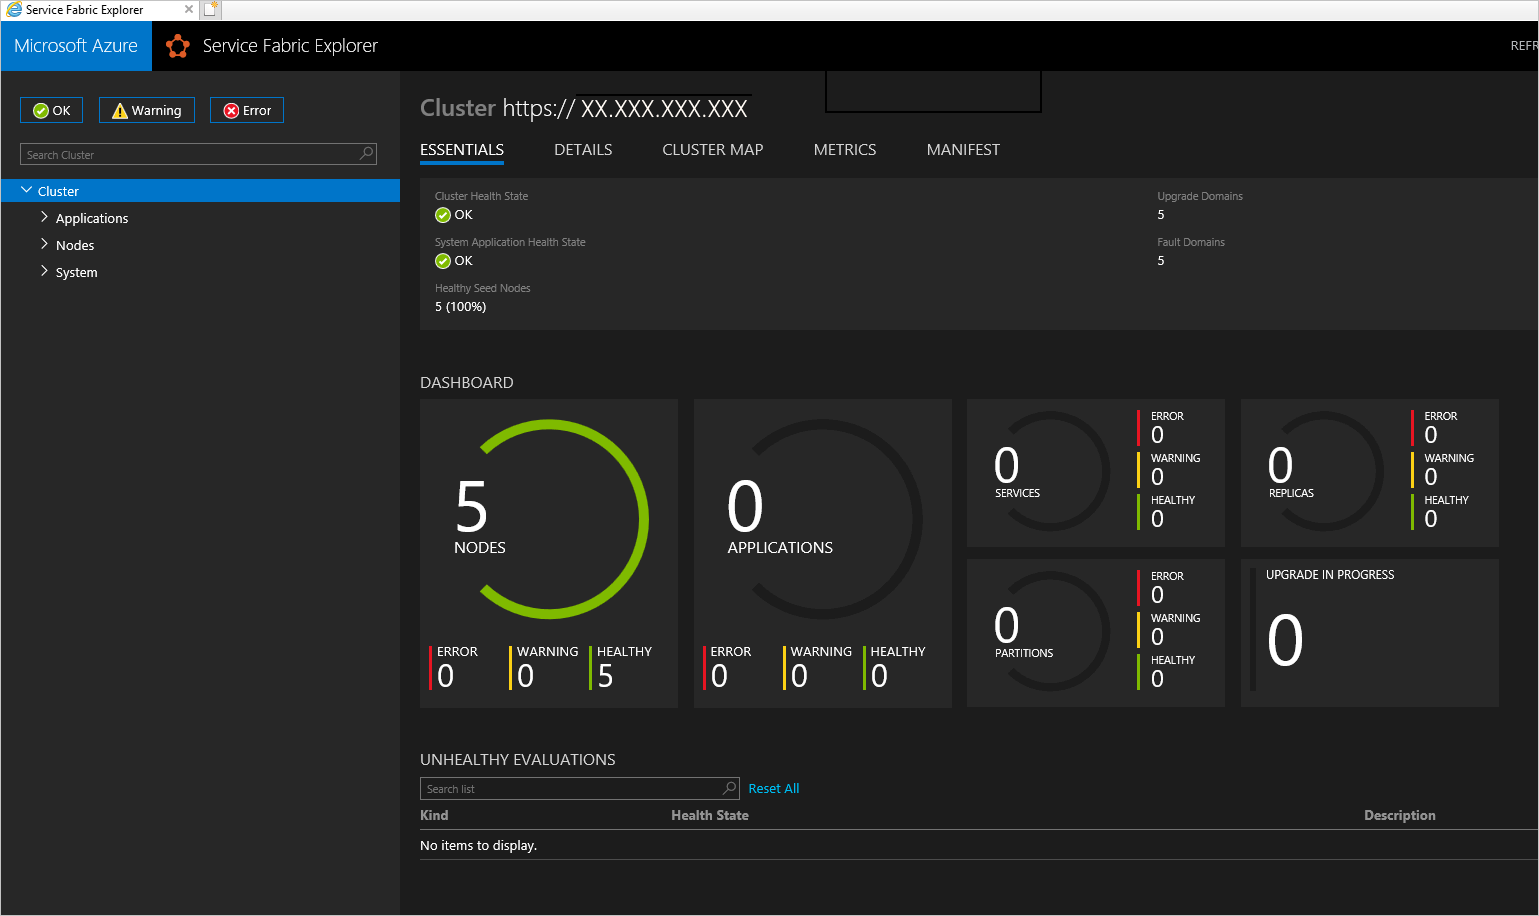
若要尋找 Service Fabric Explorer 和用戶端連線端點的 URL,請檢閱範本部署的結果。
在瀏覽器中,前往
https://*FQDN*:19080。 使用步驟 2 中 Service Fabric 叢集的 FQDN 來取代 FQDN。
如果您已使用自我簽署的憑證,您會收到連線不安全的警告。 若要繼續使用網站,請選取 [更多資訊] ,然後 [前往網頁] 。若要向網站進行驗證,您必須選取要使用的憑證。 選取 [更多選擇] ,挑選適當的憑證,然後按一下 [確定] 以連線到 Service Fabric Explorer。
使用 Service Fabric PowerShell
從 Azure Service Fabric 文件中的在 Windows 上準備開發環境,安裝 Microsoft Azure Service Fabric SDK 。
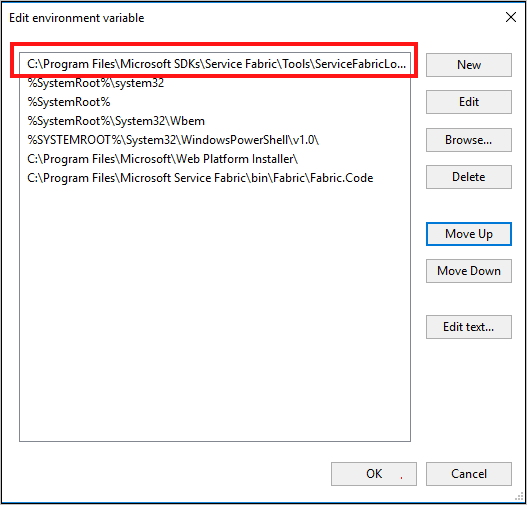
完成安裝之後,設定系統環境變數,以確保可從 PowerShell 存取 Service Fabric Cmdlet。
a. 移至 [控制台] >[系統及安全性] >[系統] ,然後選取 [進階系統設定] 。

b. 在 [系統屬性] 的 [進階] 索引標籤上,選取 [環境變數] 。
c. 針對 [系統變數],請編輯 [路徑] 並確定 C:\Program Files\Microsoft Service Fabric\bin\Fabric\Fabric.Code 位於環境變數清單頂端。
變更環境變數的順序之後,重新啟動 PowerShell,然後執行下列 PowerShell 指令碼來存取 Service Fabric 叢集:
 Connect-ServiceFabricCluster -ConnectionEndpoint "\[Service Fabric
 CLUSTER FQDN\]:19000" \`

 -X509Credential -ServerCertThumbprint
 761A0D17B030723A37AA2E08225CD7EA8BE9F86A \`

 -FindType FindByThumbprint -FindValue
 0272251171BA32CEC7938A65B8A6A553AA2D3283 \`

 -StoreLocation CurrentUser -StoreName My -Verbose
注意
指令碼中的叢集名稱前面沒有 https:// 。 需要連接埠 19000。
後續步驟
意見反應
即將登場:在 2024 年,我們將逐步淘汰 GitHub 問題作為內容的意見反應機制,並將它取代為新的意見反應系統。 如需詳細資訊,請參閱:https://aka.ms/ContentUserFeedback。
提交並檢視相關的意見反應