教學課程:基本 Active Directory 環境
本教學課程會逐步引導您建立基本的 Active Directory 環境。

您可以使用您在教學課程中建立的環境來測試混合式身分識別案例的各種層面,而且是一些教學課程的必要條件。 如果您已經有現有的 Active Directory 環境,您可以使用該環境做為替代專案。 此資訊會提供給可能從無項目開始的個人。
本教學課程包含
必要條件
以下是完成本教學課程的必要條件
- 已安裝 Hyper-V 的電腦。 建議在 Windows 10 或 Windows Server 2016 電腦上執行這項操作。
- 外部 網路適配器 ,可讓虛擬機與因特網通訊。
- Azure 訂閱
- Windows Server 2016 的複本
- Microsoft .NET Framework 4.7.1
注意
本教學課程使用PowerShell腳本,讓您可以以最快的時間建立教學課程環境。 每個指令碼都使用在指令碼開頭處宣告的變數。 您可以和應該變更變數以反映您的環境。
這些腳本會在安裝 Microsoft Entra 連線 雲端布建代理程式之前,先建立一般 Active Directory 環境。 它們與所有教學課程相關。
本教學課程中使用的PowerShell腳本複本可在 GitHub 上取得。
建立虛擬機器
您需要做的第一件事,若要讓混合式身分識別環境啟動並執行,首先要建立將作為 內部部署的 Active Directory 伺服器的虛擬機。 執行下列操作:
以系統管理員身分開啟 PowerShell ISE。
執行下列指令碼。
#Declare variables
$VMName = 'DC1'
$Switch = 'External'
$InstallMedia = 'D:\ISO\en_windows_server_2016_updated_feb_2018_x64_dvd_11636692.iso'
$Path = 'D:\VM'
$VHDPath = 'D:\VM\DC1\DC1.vhdx'
$VHDSize = '64424509440'

#Create New Virtual Machine
New-VM -Name $VMName -MemoryStartupBytes 16GB -BootDevice VHD -Path $Path -NewVHDPath $VHDPath -NewVHDSizeBytes $VHDSize  -Generation 2 -Switch $Switch

#Set the memory to be non-dynamic
Set-VMMemory $VMName -DynamicMemoryEnabled $false

#Add DVD Drive to Virtual Machine
Add-VMDvdDrive -VMName $VMName -ControllerNumber 0 -ControllerLocation 1 -Path $InstallMedia

#Mount Installation Media
$DVDDrive = Get-VMDvdDrive -VMName $VMName

#Configure Virtual Machine to Boot from DVD
Set-VMFirmware -VMName $VMName -FirstBootDevice $DVDDrive
完成作業系統部署
若要完成虛擬機器的建置,您必須完成作業系統安裝。
- 在 [Hyper-V 管理員] 中,按兩下虛擬機器。
- 按一下 [開始] 按鈕。
- 系統會提示您「按任意鍵從 CD 或 DVD 開機」。 繼續執行。
- 在 [Windows Server 啟動] 畫面上,選取您的語言,然後按 [下一步]。
- 按一下 [立即安裝]。
- 輸入您的授權金鑰,然後按 [ 下一步]。
- 選取 [我接受授權條款],然後按一下 [下一步]。
- 選取 [自訂:只安裝 Windows (進階)]
- 按 [下一步]
- 安裝完成後,請重新啟動虛擬機、登入並執行 Windows 更新,以確保 VM 是最新的。 安裝最新的更新。
安裝 Active Directory 必要條件
現在您已啟動虛擬機,您必須在安裝 Active Directory 之前先執行一些動作。 也就是說,您必須重新命名虛擬機器、設定靜態 IP 位址和 DNS 資訊,以及安裝遠端伺服器管理工具。 執行下列操作:
以系統管理員身分開啟 PowerShell ISE。
執行下列指令碼。
#Declare variables
$ipaddress = "10.0.1.117"
$ipprefix = "24"
$ipgw = "10.0.1.1"
$ipdns = "10.0.1.117"
$ipdns2 = "8.8.8.8"
$ipif = (Get-NetAdapter).ifIndex
$featureLogPath = "c:\poshlog\featurelog.txt"
$newname = "DC1"
$addsTools = "RSAT-AD-Tools"

#Set static IP address
New-NetIPAddress -IPAddress $ipaddress -PrefixLength $ipprefix -InterfaceIndex $ipif -DefaultGateway $ipgw

# Set the DNS servers
Set-DnsClientServerAddress -InterfaceIndex $ipif -ServerAddresses ($ipdns, $ipdns2)

#Rename the computer
Rename-Computer -NewName $newname -force

#Install features
New-Item $featureLogPath -ItemType file -Force
Add-WindowsFeature $addsTools
Get-WindowsFeature | Where installed >>$featureLogPath

#Restart the computer
Restart-Computer
建立 Windows Server AD 環境
既然您已建立 VM 且已重新命名並具有靜態 IP 位址,您可以繼續安裝和設定 Active Directory 網域服務。 執行下列操作:
以系統管理員身分開啟 PowerShell ISE。
執行下列指令碼。
#Declare variables
$DatabasePath = "c:\windows\NTDS"
$DomainMode = "WinThreshold"
$DomainName = "contoso.com"
$DomaninNetBIOSName = "CONTOSO"
$ForestMode = "WinThreshold"
$LogPath = "c:\windows\NTDS"
$SysVolPath = "c:\windows\SYSVOL"
$featureLogPath = "c:\poshlog\featurelog.txt"
$Password = "Pass1w0rd"
$SecureString = ConvertTo-SecureString $Password -AsPlainText -Force

#Install AD DS, DNS and GPMC
start-job -Name addFeature -ScriptBlock {
Add-WindowsFeature -Name "ad-domain-services" -IncludeAllSubFeature -IncludeManagementTools
Add-WindowsFeature -Name "dns" -IncludeAllSubFeature -IncludeManagementTools
Add-WindowsFeature -Name "gpmc" -IncludeAllSubFeature -IncludeManagementTools }
Wait-Job -Name addFeature
Get-WindowsFeature | Where installed >>$featureLogPath

#Create New AD Forest
Install-ADDSForest -CreateDnsDelegation:$false -DatabasePath $DatabasePath -DomainMode $DomainMode -DomainName $DomainName -SafeModeAdministratorPassword $SecureString -DomainNetbiosName $DomainNetBIOSName -ForestMode $ForestMode -InstallDns:$true -LogPath $LogPath -NoRebootOnCompletion:$false -SysvolPath $SysVolPath -Force:$true
建立 Windows Server AD 使用者
既然您已擁有我們的 Active Directory 環境,您需要測試帳戶。 此帳戶將會在我們的內部部署 AD 環境中建立,然後同步處理至 Microsoft Entra ID。 執行下列操作:
以系統管理員身分開啟 PowerShell ISE。
執行下列指令碼。
# Filename:    4_CreateUser.ps1
# Description: Creates a user in Active Directory.  This is part of
#              the Azure AD Connect password hash sync tutorial.
#
# DISCLAIMER:
# Copyright (c) Microsoft Corporation. All rights reserved. This
# script is made available to you without any express, implied or
# statutory warranty, not even the implied warranty of
# merchantability or fitness for a particular purpose, or the
# warranty of title or non-infringement. The entire risk of the
# use or the results from the use of this script remains with you.
#
#
#
#
#Declare variables
$Givenname = "Allie"
$Surname = "McCray"
$Displayname = "Allie McCray"
$Name = "amccray"
$Password = "Pass1w0rd"
$Identity = "CN=ammccray,CN=Users,DC=contoso,DC=com"
$SecureString = ConvertTo-SecureString $Password -AsPlainText -Force


#Create the user
New-ADUser -Name $Name -GivenName $Givenname -Surname $Surname -DisplayName $Displayname -AccountPassword $SecureString

#Set the password to never expire
Set-ADUser -Identity $Identity -PasswordNeverExpires $true -ChangePasswordAtLogon $false -Enabled $true
建立 Microsoft Entra 租用戶
提示
本文中的步驟可能會根據您從開始的入口網站稍有不同。
現在您需要建立 Microsoft Entra 租用戶,以便將使用者同步至雲端。 若要建立新的 Microsoft Entra 租用戶,請按照下列步驟操作。
- 登入 Microsoft Entra 系統管理中心 ,並使用具有 Microsoft Entra 訂用帳戶的帳戶登入。
- 按一下 [概觀]。
- 按兩下 [ 管理租使用者]。
- 選取 [ 建立]
。 - 提供組織的名稱以及初始功能變數名稱。 然後選取建立。 這會建立您的目錄。
- 完成之後,請按兩下 這裡 連結來管理目錄。
在 Microsoft Entra ID 中建立全域管理員
現在您已擁有 Microsoft Entra 租使用者,您將建立全域管理員帳戶。 若要建立全域管理員帳戶,請執行下列動作。
- 在 [管理] 底下,選取 [使用者]。
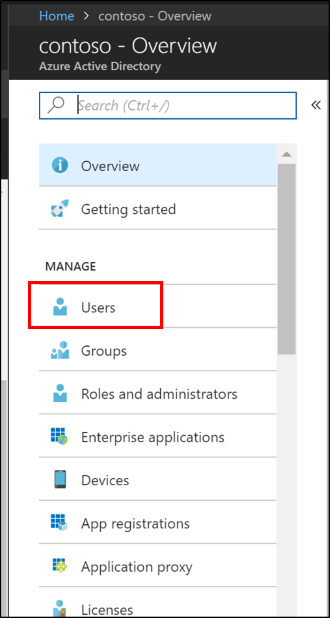
- 選取 [ 所有使用者 ],然後選取 [+ 新增使用者]。
- 提供此使用者的名稱和使用者名稱。 這會是租使用者的全域 管理員 管理員。 您也會想要將 目錄角色 變更為 全域管理員。 您也可以顯示暫時密碼。 完成時,請選取 [建立]。

- 完成之後,請開啟新的網頁瀏覽器,並使用新的全域管理員帳戶和暫時密碼登入 myapps.microsoft.com。
- 將全域管理員密碼變更為您可以記住的密碼。
選擇性:其他伺服器和樹系
以下是選擇性區段,提供建立其他伺服器和或樹系的步驟。 這可用於某些更進階的教學課程,例如 Microsoft Entra 的試驗 連線 至雲端同步處理。
如果您只需要額外的伺服器,您可以在 - 建立虛擬機 步驟之後停止,並將伺服器加入上述建立的現有網域。
建立虛擬機器
以系統管理員身分開啟 PowerShell ISE。
執行下列指令碼。
# Filename:    1_CreateVM_CP.ps1
# Description: Creates a VM to be used in the tutorial.
#
# DISCLAIMER:
# Copyright (c) Microsoft Corporation. All rights reserved. #This script is made available to you without any express, implied or statutory warranty, not even the implied warranty of merchantability or fitness for a particular purpose, or the warranty of title or non-infringement. The entire risk of the use or the results from the use of this script remains with you.
#
#
#
#
#Declare variables
$VMName = 'CP1'
$Switch = 'External'
$InstallMedia = 'D:\ISO\en_windows_server_2016_updated_feb_2018_x64_dvd_11636692.iso'
$Path = 'D:\VM'
$VHDPath = 'D:\VM\CP1\CP1.vhdx'
$VHDSize = '64424509440'

#Create New Virtual Machine
New-VM -Name $VMName -MemoryStartupBytes 16GB -BootDevice VHD -Path $Path -NewVHDPath $VHDPath -NewVHDSizeBytes $VHDSize  -Generation 2 -Switch $Switch

#Set the memory to be non-dynamic
Set-VMMemory $VMName -DynamicMemoryEnabled $false

#Add DVD Drive to Virtual Machine
Add-VMDvdDrive -VMName $VMName -ControllerNumber 0 -ControllerLocation 1 -Path $InstallMedia

#Mount Installation Media
$DVDDrive = Get-VMDvdDrive -VMName $VMName

#Configure Virtual Machine to Boot from DVD
Set-VMFirmware -VMName $VMName -FirstBootDevice $DVDDrive
完成作業系統部署
若要完成虛擬機器的建置,您必須完成作業系統安裝。
- 在 [Hyper-V 管理員] 中,按兩下虛擬機器。
- 按一下 [開始] 按鈕。
- 系統會提示您「按任意鍵從 CD 或 DVD 開機」。 繼續執行。
- 在 [Windows Server 啟動] 畫面上,選取您的語言,然後按 [下一步]。
- 按一下 [立即安裝]。
- 輸入您的授權金鑰,然後按 [ 下一步]。
- 選取 [我接受授權條款],然後按一下 [下一步]。
- 選取 [自訂:只安裝 Windows (進階)]
- 按 [下一步]
- 安裝完成後,請重新啟動虛擬機、登入並執行 Windows 更新,以確保 VM 是最新的。 安裝最新的更新。
安裝 Active Directory 必要條件
現在您已啟動虛擬機,您必須在安裝 Active Directory 之前先執行一些動作。 也就是說,您必須重新命名虛擬機器、設定靜態 IP 位址和 DNS 資訊,以及安裝遠端伺服器管理工具。 執行下列操作:
以系統管理員身分開啟 PowerShell ISE。
執行下列指令碼。
# Filename:    2_ADPrep_CP.ps1
# Description: Prepares your environment for Active Directory.  This is part of
#              the Azure AD Connect password hash sync tutorial.
#
# DISCLAIMER:
# Copyright (c) Microsoft Corporation. All rights reserved. This
# script is made available to you without any express, implied or
# statutory warranty, not even the implied warranty of
# merchantability or fitness for a particular purpose, or the
# warranty of title or non-infringement. The entire risk of the
# use or the results from the use of this script remains with you.
#
#
#
#
#Declare variables
$ipaddress = "10.0.1.118"
$ipprefix = "24"
$ipgw = "10.0.1.1"
$ipdns = "10.0.1.118"
$ipdns2 = "8.8.8.8"
$ipif = (Get-NetAdapter).ifIndex
$featureLogPath = "c:\poshlog\featurelog.txt"
$newname = "CP1"
$addsTools = "RSAT-AD-Tools"

#Set static IP address
New-NetIPAddress -IPAddress $ipaddress -PrefixLength $ipprefix -InterfaceIndex $ipif -DefaultGateway $ipgw

#Set the DNS servers
Set-DnsClientServerAddress -InterfaceIndex $ipif -ServerAddresses ($ipdns, $ipdns2)

#Rename the computer
Rename-Computer -NewName $newname -force

#Install features
New-Item $featureLogPath -ItemType file -Force
Add-WindowsFeature $addsTools
Get-WindowsFeature | Where installed >>$featureLogPath

#Restart the computer
Restart-Computer
建立 Windows Server AD 環境
既然您已建立 VM 且已重新命名並具有靜態 IP 位址,您可以繼續安裝和設定 Active Directory 網域服務。 執行下列操作:
以系統管理員身分開啟 PowerShell ISE。
執行下列指令碼。
# Filename:    3_InstallAD_CP.ps1
# Description: Creates an on-premises AD environment.  This is part of
#              the Azure AD Connect password hash sync tutorial.
#
# DISCLAIMER:
# Copyright (c) Microsoft Corporation. All rights reserved. This
# script is made available to you without any express, implied or
# statutory warranty, not even the implied warranty of
# merchantability or fitness for a particular purpose, or the
# warranty of title or non-infringement. The entire risk of the
# use or the results from the use of this script remains with you.
#
#
#
#
#Declare variables
$DatabasePath = "c:\windows\NTDS"
$DomainMode = "WinThreshold"
$DomainName = "fabrikam.com"
$DomaninNetBIOSName = "FABRIKAM"
$ForestMode = "WinThreshold"
$LogPath = "c:\windows\NTDS"
$SysVolPath = "c:\windows\SYSVOL"
$featureLogPath = "c:\poshlog\featurelog.txt"
$Password = "Pass1w0rd"
$SecureString = ConvertTo-SecureString $Password -AsPlainText -Force

#Install AD DS, DNS and GPMC
start-job -Name addFeature -ScriptBlock {
Add-WindowsFeature -Name "ad-domain-services" -IncludeAllSubFeature -IncludeManagementTools
Add-WindowsFeature -Name "dns" -IncludeAllSubFeature -IncludeManagementTools
Add-WindowsFeature -Name "gpmc" -IncludeAllSubFeature -IncludeManagementTools }
Wait-Job -Name addFeature
Get-WindowsFeature | Where installed >>$featureLogPath

#Create New AD Forest
Install-ADDSForest -CreateDnsDelegation:$false -DatabasePath $DatabasePath -DomainMode $DomainMode -DomainName $DomainName -SafeModeAdministratorPassword $SecureString -DomainNetbiosName $DomainNetBIOSName -ForestMode $ForestMode -InstallDns:$true -LogPath $LogPath -NoRebootOnCompletion:$false -SysvolPath $SysVolPath -Force:$true
建立 Windows Server AD 使用者
既然您已擁有我們的 Active Directory 環境,您需要測試帳戶。 此帳戶將會在我們的內部部署 AD 環境中建立,然後同步處理至 Microsoft Entra ID。 執行下列操作:
以系統管理員身分開啟 PowerShell ISE。
執行下列指令碼。
# Filename:    4_CreateUser_CP.ps1
# Description: Creates a user in Active Directory.  This is part of
#              the Azure AD Connect password hash sync tutorial.
#
# DISCLAIMER:
# Copyright (c) Microsoft Corporation. All rights reserved. This
# script is made available to you without any express, implied or
# statutory warranty, not even the implied warranty of
# merchantability or fitness for a particular purpose, or the
# warranty of title or non-infringement. The entire risk of the
# use or the results from the use of this script remains with you.
#
#
#
#
#Declare variables
$Givenname = "Anna"
$Surname = "Ringdal"
$Displayname = "Anna Ringdal"
$Name = "aringdal"
$Password = "Pass1w0rd"
$Identity = "CN=aringdal,CN=Users,DC=fabrikam,DC=com"
$SecureString = ConvertTo-SecureString $Password -AsPlainText -Force


#Create the user
New-ADUser -Name $Name -GivenName $Givenname -Surname $Surname -DisplayName $Displayname -AccountPassword $SecureString

#Set the password to never expire
Set-ADUser -Identity $Identity -PasswordNeverExpires $true -ChangePasswordAtLogon $false -Enabled $true
推論
現在您有可用於現有教學課程的環境,並測試雲端同步提供的其他功能。