將資料移至 vFXT 叢集 - 平行資料擷取
在您建立新的 vFXT 叢集之後,您的第一項工作可能是將資料移至 Azure 上的新儲存體磁碟區。 不過,如果您一般移動資料的方法是從一個用戶端發出簡單的複製命令,您可能會發現複製效能很差。 對於將資料複製到 Avere vFXT 叢集的後端儲存體來說,單一執行緒複製並不是一個理想的選項。
由於 Avere vFXT for Azure 叢集是一個可調整規模的多用戶端快取,因此將資料複製到此叢集的最快且最有效率方式就是使用多個用戶端。 此技術會平行處理資料與物件的擷取。
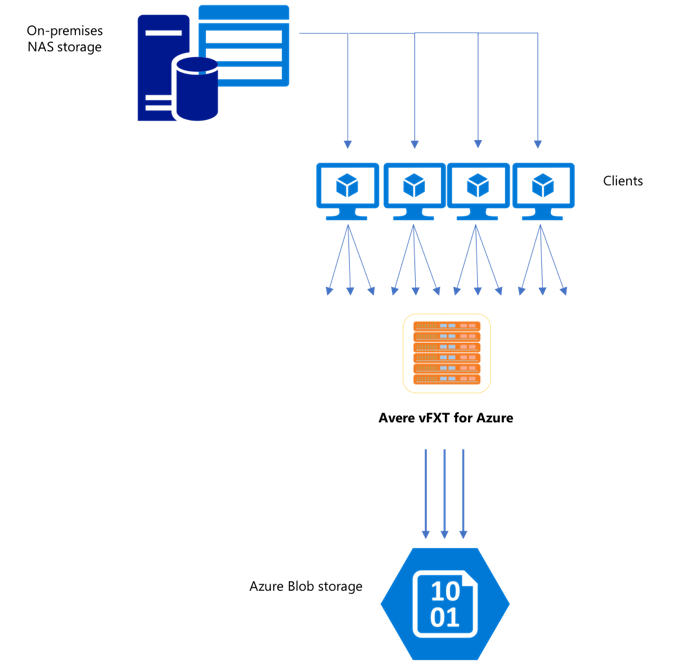
通常用來將資料從一個儲存體系統傳輸至另一個儲存體系統的 cp 或 copy 命令是只會一次複製一個檔案的單一執行緒處理序。 這意謂著檔案伺服器一次只會擷取一個檔案 - 這相當浪費叢集資源。
本文說明建立多用戶端、多執行緒檔案複製系統以將資料移至 Avere vFXT 叢集的策略。 它說明檔案傳輸概念和決策點,這些可用來以多個用戶端和簡單的複製命令進行有效率的資料複製。
此外,也說明一些能夠提供幫助的公用程式。 msrsync 公用程式可用來部分自動化將資料集分割成貯體及使用 rsync 命令的流程。 parallelcp 指令碼是另一個公用程式,可自動讀取來源目錄並發出複製命令。 此外,rsync 工具可以在兩個階段中使用,以提供更快速的複製,同時仍提供資料一致性。
按一下連結來跳至某個小節:
- 手動複製範例 - 一個使用複製命令的完整說明
- 雙階段 rsync 範例
- 部分自動化 (msrsync) 範例
- 平行複製範例
資料擷取器 VM 範本
GitHub 上有提供 Resource Manager 範本,此範本可藉由本文中所提到的平行資料擷取工具自動建立 VM。
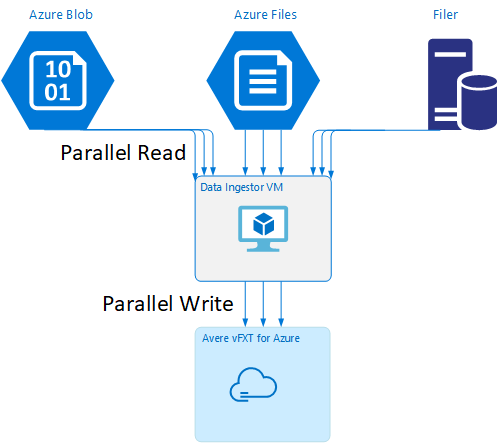
資料擷取器 VM 是一個教學課程的一部分,在該教學課程中,新建立的 VM 會掛接 Avere vFXT 叢集,並從該叢集下載其啟動程序指令碼。 如需詳細資料,請參閱啟動載入資料擷取器 VM \(英文\)。
策略性規劃
設計同時複製資料的策略時,您應該了解檔案大小、檔案計數及目錄深度方面的權衡取捨。
- 當檔案較小時,攸關的計量是每秒檔案數。
- 當檔案較大 (10 MiBi 或更大) 時,攸關的計量是每秒位元組數。
每個複製處理序都有輸送量速率和檔案傳輸速率,藉由對複製命令的長度進行計時及分解檔案大小和檔案計數,即可測量這些速率。 本文件未涵蓋測量這些速率的方式,但了解您將處理的是大型檔案還是小型檔案相當重要。
手動複製範例
您可以藉由在背景中針對幾組預先定義的檔案或路徑,一次執行多個複製命令,在用戶端上手動建立多執行緒複製。
Linux/UNIX cp 命令包含可保留擁有權和 mtime 中繼資料的 -p 引數。 您可以視需要將此引數新增至下方的命令。 (如果新增此引數,將會增加從用戶端傳送到目的地檔案系統以進行中繼資料修改的檔案系統呼叫次數)。
此簡單範例會平行複製兩個檔案:
cp /mnt/source/file1 /mnt/destination1/ & cp /mnt/source/file2 /mnt/destination1/ &
在發出此命令之後,jobs 命令會顯示有兩個執行緒正在執行。
可預測的檔案名稱結構
如果您的檔案名稱是可預測的,您可以使用運算式來建立平行複製執行緒。
例如,如果您的目錄包含從 0001 到 1000 依序編號的 1000 個檔案,您便可以使用下列運算式來建立 10 個平行執行緒,每個執行緒各複製 100 個檔案:
cp /mnt/source/file0* /mnt/destination1/ & \
cp /mnt/source/file1* /mnt/destination1/ & \
cp /mnt/source/file2* /mnt/destination1/ & \
cp /mnt/source/file3* /mnt/destination1/ & \
cp /mnt/source/file4* /mnt/destination1/ & \
cp /mnt/source/file5* /mnt/destination1/ & \
cp /mnt/source/file6* /mnt/destination1/ & \
cp /mnt/source/file7* /mnt/destination1/ & \
cp /mnt/source/file8* /mnt/destination1/ & \
cp /mnt/source/file9* /mnt/destination1/
未知的檔案名稱結構
如果您的檔案命名結構不可預測,您可以依目錄名稱將檔案分組。
此範例會收集整個目錄來傳送給以背景工作身分執行的 cp 命令:
/root
|-/dir1
| |-/dir1a
| |-/dir1b
| |-/dir1c
   |-/dir1c1
|-/dir1d
收集檔案之後,您可以執行平行複製命令,以遞迴方式複製子目錄及其所有內容:
cp /mnt/source/* /mnt/destination/
mkdir -p /mnt/destination/dir1 && cp /mnt/source/dir1/* mnt/destination/dir1/ &
cp -R /mnt/source/dir1/dir1a /mnt/destination/dir1/ &
cp -R /mnt/source/dir1/dir1b /mnt/destination/dir1/ &
cp -R /mnt/source/dir1/dir1c /mnt/destination/dir1/ & # this command copies dir1c1 via recursion
cp -R /mnt/source/dir1/dir1d /mnt/destination/dir1/ &
新增掛接點的時機
在您有足夠的平行執行緒針對單一目的地檔案系統掛接點執行之後,會遇到一個新增更多執行緒也不會提升輸送量的瓶頸點。 (輸送量會以每秒檔案數或每秒位元組數來測量,視您的資料類型而定)。或是更糟,過多執行緒有時會造成輸送量降低。
當發生這種情況時,您可以使用相同的遠端檔案系統掛接路徑,將用戶端掛接點新增至其他 vFXT 叢集 IP 位址:
10.1.0.100:/nfs on /mnt/sourcetype nfs (rw,vers=3,proto=tcp,addr=10.1.0.100)
10.1.1.101:/nfs on /mnt/destination1type nfs (rw,vers=3,proto=tcp,addr=10.1.1.101)
10.1.1.102:/nfs on /mnt/destination2type nfs (rw,vers=3,proto=tcp,addr=10.1.1.102)
10.1.1.103:/nfs on /mnt/destination3type nfs (rw,vers=3,proto=tcp,addr=10.1.1.103)
新增用戶端掛接點可讓您將額外的複製命令分岔至額外的 /mnt/destination[1-3] 掛接點,達成進一步的平行處理原則。
例如,如果您的檔案非常大,您可以將複製命令定義成使用不同的目的地路徑,以平行方式從執行複製的用戶端送出更多命令。
cp /mnt/source/file0* /mnt/destination1/ & \
cp /mnt/source/file1* /mnt/destination2/ & \
cp /mnt/source/file2* /mnt/destination3/ & \
cp /mnt/source/file3* /mnt/destination1/ & \
cp /mnt/source/file4* /mnt/destination2/ & \
cp /mnt/source/file5* /mnt/destination3/ & \
cp /mnt/source/file6* /mnt/destination1/ & \
cp /mnt/source/file7* /mnt/destination2/ & \
cp /mnt/source/file8* /mnt/destination3/ & \
在上述範例中,所有三個目的地掛接點都被用戶端檔案複製處理序當作目標。
新增用戶端的時機
最後,當您已達到用戶端處理能力上限時,新增更多複製執行緒或額外的掛接點將無法產生任何額外的每秒檔案數或每秒位元組數增加。 在此情況下,您可以使用同一組掛接點來部署另一個用戶端,此用戶端將執行自己的一組檔案複製處理序。
範例:
Client1: cp -R /mnt/source/dir1/dir1a /mnt/destination/dir1/ &
Client1: cp -R /mnt/source/dir2/dir2a /mnt/destination/dir2/ &
Client1: cp -R /mnt/source/dir3/dir3a /mnt/destination/dir3/ &

Client2: cp -R /mnt/source/dir1/dir1b /mnt/destination/dir1/ &
Client2: cp -R /mnt/source/dir2/dir2b /mnt/destination/dir2/ &
Client2: cp -R /mnt/source/dir3/dir3b /mnt/destination/dir3/ &

Client3: cp -R /mnt/source/dir1/dir1c /mnt/destination/dir1/ &
Client3: cp -R /mnt/source/dir2/dir2c /mnt/destination/dir2/ &
Client3: cp -R /mnt/source/dir3/dir3c /mnt/destination/dir3/ &

Client4: cp -R /mnt/source/dir1/dir1d /mnt/destination/dir1/ &
Client4: cp -R /mnt/source/dir2/dir2d /mnt/destination/dir2/ &
Client4: cp -R /mnt/source/dir3/dir3d /mnt/destination/dir3/ &
建立檔案資訊清單
了解上述方法 (每個目的地多個複製執行緒、每個用戶端多個目的地、每個可透過網路存取之來源檔案系統多個用戶端) 之後,請考慮這項建議:建置檔案資訊清單,然後跨多個用戶端將它們與複製命令搭配使用。
此案例會使用 UNIX find 命令來建立檔案或目錄的資訊清單:
user@build:/mnt/source > find . -mindepth 4 -maxdepth 4 -type d
./atj5b55c53be6-01/support/gsi/2018-07-22T21:12:06EDT
./atj5b55c53be6-01/support/pcap/2018-07-23T01:34:57UTC
./atj5b55c53be6-01/support/trace/rolling
./atj5b55c53be6-03/support/gsi/2018-07-22T21:12:06EDT
./atj5b55c53be6-03/support/pcap/2018-07-23T01:34:57UTC
./atj5b55c53be6-03/support/trace/rolling
./atj5b55c53be6-02/support/gsi/2018-07-22T21:12:06EDT
./atj5b55c53be6-02/support/pcap/2018-07-23T01:34:57UTC
./atj5b55c53be6-02/support/trace/rolling
請將此結果重新導向到檔案:find . -mindepth 4 -maxdepth 4 -type d > /tmp/foo
接著,您可以藉由使用 BASH 命令來計算檔案及判斷子目錄的大小,逐一查看資訊清單:
ben@xlcycl1:/sps/internal/atj5b5ab44b7f > for i in $(cat /tmp/foo); do echo " `find ${i} |wc -l` `du -sh ${i}`"; done
244    3.5M    ./atj5b5ab44b7f-02/support/gsi/2018-07-18T00:07:03EDT
9      172K    ./atj5b5ab44b7f-02/support/gsi/stats_2018-07-18T05:01:00UTC
124    5.8M    ./atj5b5ab44b7f-02/support/gsi/stats_2018-07-19T01:01:01UTC
152    15M     ./atj5b5ab44b7f-02/support/gsi/stats_2018-07-20T01:01:00UTC
131    13M     ./atj5b5ab44b7f-02/support/gsi/stats_2018-07-20T21:59:41UTC_partial
789    6.2M    ./atj5b5ab44b7f-02/support/gsi/2018-07-20T21:59:41UTC
134    12M     ./atj5b5ab44b7f-02/support/gsi/stats_2018-07-20T22:22:55UTC_vfxt_catchup
7      16K     ./atj5b5ab44b7f-02/support/pcap/2018-07-18T17:12:19UTC
8      83K     ./atj5b5ab44b7f-02/support/pcap/2018-07-18T17:17:17UTC
575    7.7M    ./atj5b5ab44b7f-02/support/cores/armada_main.2000.1531980253.gsi
33     4.4G    ./atj5b5ab44b7f-02/support/trace/rolling
281    6.6M    ./atj5b5ab44b7f-01/support/gsi/2018-07-18T00:07:03EDT
15     182K    ./atj5b5ab44b7f-01/support/gsi/stats_2018-07-18T05:01:00UTC
244    17M     ./atj5b5ab44b7f-01/support/gsi/stats_2018-07-19T01:01:01UTC
299    31M     ./atj5b5ab44b7f-01/support/gsi/stats_2018-07-20T01:01:00UTC
256    29M     ./atj5b5ab44b7f-01/support/gsi/stats_2018-07-20T21:59:41UTC_partial
889    7.7M    ./atj5b5ab44b7f-01/support/gsi/2018-07-20T21:59:41UTC
262    29M     ./atj5b5ab44b7f-01/support/gsi/stats_2018-07-20T22:22:55UTC_vfxt_catchup
11     248K    ./atj5b5ab44b7f-01/support/pcap/2018-07-18T17:12:19UTC
11     88K     ./atj5b5ab44b7f-01/support/pcap/2018-07-18T17:17:17UTC
645    11M     ./atj5b5ab44b7f-01/support/cores/armada_main.2019.1531980253.gsi
33     4.0G    ./atj5b5ab44b7f-01/support/trace/rolling
244    2.1M    ./atj5b5ab44b7f-03/support/gsi/2018-07-18T00:07:03EDT
9      158K    ./atj5b5ab44b7f-03/support/gsi/stats_2018-07-18T05:01:00UTC
124    5.3M    ./atj5b5ab44b7f-03/support/gsi/stats_2018-07-19T01:01:01UTC
152    15M     ./atj5b5ab44b7f-03/support/gsi/stats_2018-07-20T01:01:00UTC
131    12M     ./atj5b5ab44b7f-03/support/gsi/stats_2018-07-20T21:59:41UTC_partial
789    8.4M    ./atj5b5ab44b7f-03/support/gsi/2018-07-20T21:59:41UTC
134    14M     ./atj5b5ab44b7f-03/support/gsi/stats_2018-07-20T22:25:58UTC_vfxt_catchup
7      159K    ./atj5b5ab44b7f-03/support/pcap/2018-07-18T17:12:19UTC
7      157K    ./atj5b5ab44b7f-03/support/pcap/2018-07-18T17:17:17UTC
576    12M     ./atj5b5ab44b7f-03/support/cores/armada_main.2013.1531980253.gsi
33     2.8G    ./atj5b5ab44b7f-03/support/trace/rolling
最後您必須針對用戶端打造實際的檔案複製命令。
如果您有四個用戶端,請使用此命令:
for i in 1 2 3 4 ; do sed -n ${i}~4p /tmp/foo > /tmp/client${i}; done
如果您有五個用戶端,請使用類似以下的命令:
for i in 1 2 3 4 5; do sed -n ${i}~5p /tmp/foo > /tmp/client${i}; done
針對六個用戶端...請視需要依此類推。
for i in 1 2 3 4 5 6; do sed -n ${i}~6p /tmp/foo > /tmp/client${i}; done
您將會得到 N 個產生的檔案,您 N 個用戶端中的每一個都有一個檔案,此檔案會有從 find 命令輸出中取得之第四層目錄的路徑名稱。
請使用每個檔案來建置複製命令:
for i in 1 2 3 4 5 6; do for j in $(cat /tmp/client${i}); do echo "cp -p -R /mnt/source/${j} /mnt/destination/${j}" >> /tmp/client${i}_copy_commands ; done; done
上述範例會提供 N 個檔案,每個檔案的每一行都有一個複製命令,可在用戶端上當作 BASH 指令碼來執行。
目標是要在多個用戶端上以平行方式同時為每個用戶端執行這些指令碼的多個執行緒。
使用雙階段 rsync 流程
標準 rsync 公用程式在透過 Avere vFXT for Azure 系統填入雲端儲存體時效果不佳,因為它會產生大量的檔案建立和重新命名作業,以確保資料完整性。 不過,如果您之後二次執行來檢查檔案完整性,便可以放心地搭配 rsync 使用 --inplace 選項來略過較詳細的複製程序。
標準 rsync 複製作業會建立暫存檔,並填入資料。 如果資料傳輸順利完成,暫存檔會重新命名為原始檔案名稱。 即使檔案是在複製期間存取,這個方法可保證一致性。 但這個方法會產生較多的寫入作業,讓檔案在透過快取移動時速度變慢。
選項 --inplace 會直接在其最終位置寫入新檔案。 檔案不保證在傳輸期間保持一致,但如果您是要預備儲存體系統以供稍後使用,則這一點並不重要。
第二個 rsync 作業可作為第一次作業的一致性檢查。 因為檔案已經複製,所以第二個階段是快速掃描,以確保目的地上的檔案符合來源上的檔案。 如果有任何檔案不相符,則會重新複製這些檔案。
您可以在一個命令中同時發佈這兩個階段:
rsync -azh --inplace <source> <destination> && rsync -azh <source> <destination>
若是資料集未超過內部目錄管理員所能處理的檔案數目,此方法既簡單又符合時間效益。 (這通常是 3 節點叢集的 2 億個檔案、6 個節點叢集的 5 億個檔案等等。)
使用 msrsync 公用程式
msrsync 工具也可用來將資料移至 Avere 叢集的後端核心檔案管理工具。 此工具的設計目的是要藉由執行多個平行的 rsync 處理序,將頻寬使用情況最佳化。 您可以從 GitHub 取得它,網址為 https://github.com/jbd/msrsync。
msrsync 會將來源目錄分解成個別的「貯體」,然後在每個貯體上執行個別的 rsync 處理序。
使用四核心 VM 的初步測試在使用 64 個處理序時所顯示的效率最佳。 請使用 msrsync 選項 -p 將處理序數目設定為 64。
您也可以搭配 msrsync 命令使用 --inplace 引數。 如果您使用此選項,請考慮執行第二個命令 (如上所述使用 rsync),以確保資料完整性。
msrsync 只能在本地磁碟區寫入和寫出。 來源和目的地必須在叢集的虛擬網路中可作為本機掛接來存取。
若要使用 msrsync 以 Avere 叢集的填入 Azure 雲端磁碟區,請依照下列指示進行操作:
安裝
msrsync及其必要條件 (rsync 和 Python 2.6 或更新版本)決定要複製的檔案和目錄總數。
例如,使用 Avere 公用程式
prime.py搭配prime.py --directory /path/to/some/directory引數 (可藉由下載 URL https://github.com/Azure/Avere/blob/master/src/clientapps/dataingestor/prime.py 來取得)。如果不使用
prime.py,您可以依照以下方式,使用 GNUfind工具來計算項目數:find <path> -type f |wc -l # (counts files) find <path> -type d |wc -l # (counts directories) find <path> |wc -l # (counts both)將項目數除以 64 以決定每一處理序的項目數。 當您執行命令時,請將此數目與
-f選項搭配使用來設定貯體的大小。發佈
msrsync命令來複製檔案:msrsync -P --stats -p 64 -f <ITEMS_DIV_64> --rsync "-ahv" <SOURCE_PATH> <DESTINATION_PATH>如果使用
--inplace,請新增第二個不含選項的執行,來檢查是否已正確複製資料:msrsync -P --stats -p 64 -f <ITEMS_DIV_64> --rsync "-ahv --inplace" <SOURCE_PATH> <DESTINATION_PATH> && msrsync -P --stats -p 64 -f <ITEMS_DIV_64> --rsync "-ahv" <SOURCE_PATH> <DESTINATION_PATH>例如,此命令的設計目的是要以 64 個處理序將 11,000 個檔案從 /test/source-repository 移至 /mnt/vfxt/repository:
msrsync -P --stats -p 64 -f 170 --rsync "-ahv --inplace" /test/source-repository/ /mnt/vfxt/repository && msrsync -P --stats -p 64 -f 170 --rsync "-ahv --inplace" /test/source-repository/ /mnt/vfxt/repository
使用平行複製指令碼
parallelcp 指令碼對於將資料移至 vFXT 叢集的後端儲存體也相當有用。
下方指令碼會新增 parallelcp 可執行檔。 (此指令碼是專為 Ubuntu 而設計的;如果使用另一個散發套件,則必須個別安裝 parallel)。
sudo touch /usr/bin/parallelcp && sudo chmod 755 /usr/bin/parallelcp && sudo sh -c "/bin/cat >/usr/bin/parallelcp" <<EOM
#!/bin/bash

display_usage() {
    echo -e "\nUsage: \$0 SOURCE_DIR DEST_DIR\n"
}

if [  \$# -le 1 ] ; then
    display_usage
    exit 1
fi

if [[ ( \$# == "--help") ||  \$# == "-h" ]] ; then
    display_usage
    exit 0
fi

SOURCE_DIR="\$1"
DEST_DIR="\$2"

if [ ! -d "\$SOURCE_DIR" ] ; then
    echo "Source directory \$SOURCE_DIR does not exist, or is not a directory"
    display_usage
    exit 2
fi

if [ ! -d "\$DEST_DIR" ] && ! mkdir -p \$DEST_DIR ; then
    echo "Destination directory \$DEST_DIR does not exist, or is not a directory"
    display_usage
    exit 2
fi

if [ ! -w "\$DEST_DIR" ] ; then
    echo "Destination directory \$DEST_DIR is not writeable, or is not a directory"
    display_usage
    exit 3
fi

if ! which parallel > /dev/null ; then
    sudo apt-get update && sudo apt install -y parallel
fi

DIRJOBS=225
JOBS=225
find \$SOURCE_DIR -mindepth 1 -type d -print0 | sed -z "s/\$SOURCE_DIR\///" | parallel --will-cite -j\$DIRJOBS -0 "mkdir -p \$DEST_DIR/{}"
find \$SOURCE_DIR -mindepth 1 ! -type d -print0 | sed -z "s/\$SOURCE_DIR\///" | parallel --will-cite -j\$JOBS -0 "cp -P \$SOURCE_DIR/{} \$DEST_DIR/{}"
EOM
平行複製範例
此範例會使用來自 Avere 叢集的來源檔案,利用平行複製指令碼來編譯 glibc。
這些來源檔案儲存在 Avere 叢集掛接點上,而物件檔案則儲存在本機硬碟上。
此指令碼會使用上述平行複製指令碼。 -j 選項會與 parallelcp 和 make 搭配使用來進行平行處理。
sudo apt-get update
sudo apt install -y gcc bison gcc binutils make parallel
cd
wget https://mirrors.kernel.org/gnu/libc/glibc-2.27.tar.bz2
tar jxf glibc-2.27.tar.bz2
ln -s /nfs/node1 avere
time parallelcp glibc-2.27 avere/glibc-2.27
cd
mkdir obj
mkdir usr
cd obj
/home/azureuser/avere/glibc-2.27/configure --prefix=/home/azureuser/usr
time make -j