教學課程:使用自訂動作和資源建立受控應用程式
在本教學課程中,您會使用自訂動作和資源建立您自己的受控應用程式。 受控應用程式會包含在 Overview 頁面上的自訂動作、在 Table of Content 中顯示為個別功能表項目的自訂資源類型,以及自訂資源頁面上的自訂內容動作。
本教學課程包含下列步驟:
- 撰寫用來建立受控應用程式執行個體的使用者介面定義檔案
- 撰寫 Azure 自訂提供者、Azure 儲存體帳戶和 Azure 函式的部署範本
- 撰寫具有自訂動作和資源的檢視定義成品
- 部署受控應用程式定義
- 部署受控應用程式的執行個體
- 執行自訂動作並建立自訂資源
必要條件
若要完成本教學課程,您必須了解:
- 如何建立及發佈受控應用程式定義。
- 如何透過 Azure 入口網站部署服務類別目錄應用程式。
- 如何為您的受控應用程式建立 Azure 入口網站使用者介面。
- 檢視定義成品功能。
- Azure 自訂提供者功能。
使用者介面定義
在本教學課程中,您會建立受控應用程式,且其受控資源群組將包含自訂提供者執行個體、儲存體帳戶和函式。 此範例中使用的 Azure 函式會實作 API,以處理動作和資源的自訂提供者作業。 Azure 儲存體帳戶可作為您自訂提供者資源的基本儲存體。
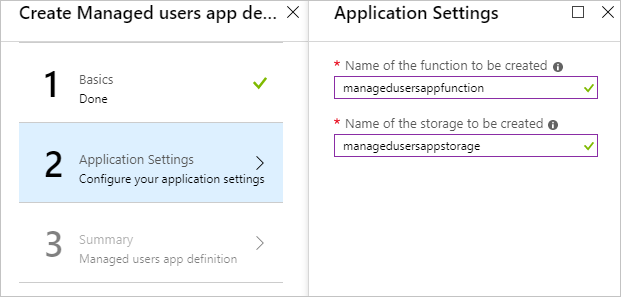
用來建立受控應用程式執行個體的使用者介面包含 funcname 和 storagename 輸入元素。 儲存體帳戶名稱函式名稱必須是全域唯一的。 根據預設,函式檔案會從範例函式套件部署,但您可以在「createUiDefinition.json」 中新增套件連結的輸入元素來變更此行為:
{
  "name": "funcname",
  "type": "Microsoft.Common.TextBox",
  "label": "Name of the function to be created",
  "toolTip": "Name of the function to be created",
  "visible": true,
  "constraints": {
    "required": true
  }
},
{
  "name": "storagename",
  "type": "Microsoft.Common.TextBox",
  "label": "Name of the storage to be created",
  "toolTip": "Name of the storage to be created",
  "visible": true,
  "constraints": {
    "required": true
  }
},
{
  "name": "zipFileBlobUri",
  "type": "Microsoft.Common.TextBox",
  "defaultValue": "https://github.com/Azure/azure-quickstart-templates/tree/master/quickstarts/microsoft.customproviders/custom-rp-with-function/artifacts/functionzip/functionpackage.zip",
  "label": "The Uri to the uploaded function zip file",
  "toolTip": "The Uri to the uploaded function zip file",
  "visible": true
}
此外也可在「createUiDefinition.json」 中新增輸出:
  "funcname": "[steps('applicationSettings').funcname]",
  "storageName": "[steps('applicationSettings').storagename]",
  "zipFileBlobUri": "[steps('applicationSettings').zipFileBlobUri]"
您可以在參考:使用者介面元素成品中找到完整的 createUiDefinition.json 範例。
自訂提供者的範本
若要使用自訂提供者建立受控應用程式執行個體,您必須在 mainTemplate.json 中定義名為 public 的自訂提供者資源和類型 Microsoft.CustomProviders/resourceProviders。 在該資源中,您會為您的服務定義資源類型和動作。 若要部署 Azure 函式和 Azure 儲存體帳戶執行個體,請分別定義 Microsoft.Web/sites 和 Microsoft.Storage/storageAccounts 類型的資源。
在本教學課程中,您將建立一個 users 資源類型、ping 自訂動作,以及將在 users 自訂資源的內容中執行的 users/contextAction 自訂動作。 請為每個資源類型和動作提供一個端點,且該端點應指向函式名稱已提供於 createUiDefinition.json 中的函式。 針對資源類型請將 routingType 指定為 Proxy,Cache,並指定 Proxy 作為動作:
{
  "apiVersion": "[variables('customrpApiversion')]",
  "type": "Microsoft.CustomProviders/resourceProviders",
  "name": "[variables('customProviderName')]",
  "location": "[parameters('location')]",
  "properties": {
    "actions": [
      {
        "name": "ping",
        "routingType": "Proxy",
        "endpoint": "[listSecrets(resourceId('Microsoft.Web/sites/functions', parameters('funcname'), 'HttpTrigger1'), '2018-02-01').trigger_url]"
      },
      {
        "name": "users/contextAction",
        "routingType": "Proxy",
        "endpoint": "[listSecrets(resourceId('Microsoft.Web/sites/functions', parameters('funcname'), 'HttpTrigger1'), '2018-02-01').trigger_url]"
      }
    ],
    "resourceTypes": [
      {
        "name": "users",
        "routingType": "Proxy,Cache",
        "endpoint": "[listSecrets(resourceId('Microsoft.Web/sites/functions', parameters('funcname'), 'HttpTrigger1'), '2018-02-01').trigger_url]"
      }
    ]
  },
  "dependsOn": [
    "[concat('Microsoft.Web/sites/',parameters('funcname'))]"
  ]
}
您可以在參考:部署範本成品中找到完整的 mainTemplate.json 範例。
檢視定義成品
若要定義使用者介面,並使其包含受控應用程式中的自訂動作和自訂資源,您必須撰寫 viewDefinition.json 成品。 如需檢視定義成品的詳細資訊,請參閱 Azure 受控應用程式中的檢視定義成品。
在本教學課程中,您會定義:
- 一個 [概觀] 頁面,其中包含工具列按鈕,代表具有基本文字輸入的自訂動作
TestAction。 - 一個 [使用者] 頁面,代表自訂資源類型
users。 - [使用者] 頁面中會在類型
users的自訂資源內容中執行的自訂資源動作users/contextAction。
下列範例顯示 [概觀] 頁面的檢視組態:
{
    "kind": "Overview",
    "properties": {
      "header": "Welcome to your Demo Azure Managed Application",
      "description": "This Managed application with Custom Provider is for demo purposes only.",
      "commands": [{
          "displayName": "Ping Action",
          "path": "/customping",
          "icon": "LaunchCurrent"
      }]
    }
  }
下列範例包含具有自訂資源動作的 [使用者] 資源頁面組態:
{
    "kind": "CustomResources",
    "properties": {
      "displayName": "Users",
      "version": "1.0.0.0",
      "resourceType": "users",
      "createUIDefinition": {
      },
      "commands": [{
        "displayName": "Custom Context Action",
        "path": "users/contextAction",
        "icon": "Start"
      }],
      "columns": [
        { "key": "properties.FullName", "displayName": "Full Name" },
        { "key": "properties.Location", "displayName": "Location", "optional": true }
      ]
    }
  }
您可以在參考:檢視定義成品中找到完整的 viewDefinition.json 範例。
受控應用程式定義
將下列受控應用程式成品封裝到 zip 封存檔,並將其上傳至儲存體:
- createUiDefinition.json
- mainTemplate.json
- viewDefinition.json
所有檔案都必須位於根層級。 含有成品的套件可儲存在任何儲存體中,例如 GitHub Blob 或 Azure 儲存體帳戶 Blob。 以下是可將應用程式套件上傳至儲存體帳戶的指令碼:
$resourceGroup="appResourcesGroup"
$storageName="mystorageaccount$RANDOM"

# Sign in to your Azure subscription
Connect-AzAccount
# Create resource group for managed application definition and application package
New-AzResourceGroup -Name $resourceGroup -Location eastus

# Create storage account for a package with application artifacts
$storageAccount=New-AzStorageAccount `
  -ResourceGroupName $resourceGroup `
  -Name $storageName `
  -SkuName Standard_LRS `
  -Location eastus `
$ctx=$storageAccount.Context

# Create storage container and upload zip to blob
New-AzStorageContainer -Name appcontainer -Context $ctx -Permission blob
Set-AzStorageBlobContent `
  -File "path_to_your_zip_package" `
  -Container appcontainer `
  -Blob app.zip `
  -Context $ctx

# Get blob absolute uri
$blobUri=(Get-AzureStorageBlob -Container appcontainer -Blob app.zip -Context $ctx).ICloudBlob.uri.AbsoluteUri
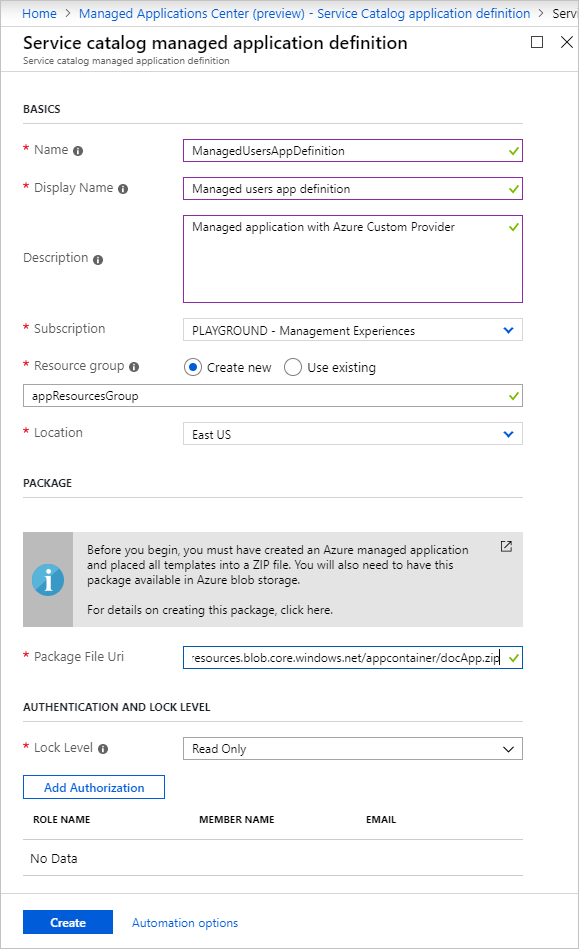
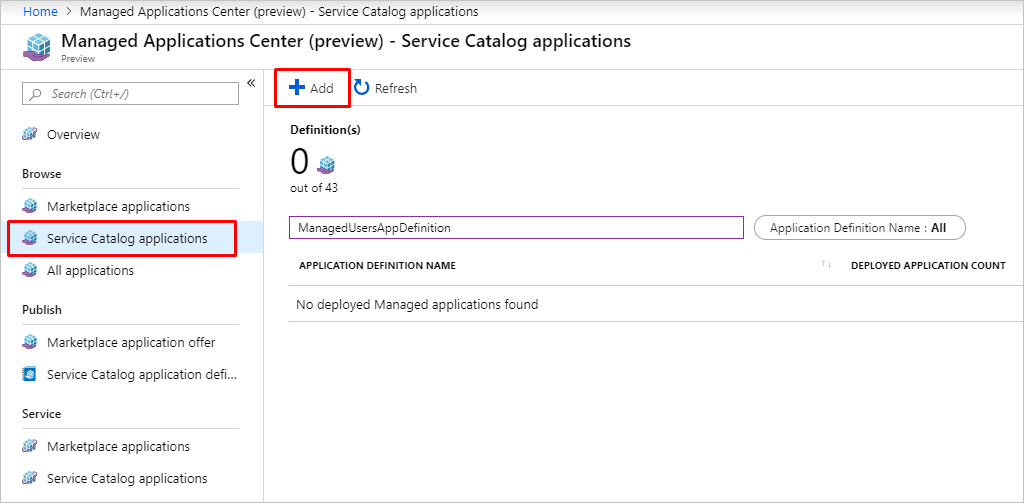
執行下列 Azure CLI 指令碼,或依照 Azure 入口網站中的步驟,部署服務類別目錄受控應用程式定義:
若要執行此範例,請安裝最新版的 Azure CLI。 若要啟動,請執行 az login 來建立與 Azure 的連線。
Azure CLI 的範例專為 bash 殼層撰寫。 若要在 Windows PowerShell 或命令提示字元中執行此範例,您可能需要變更指令碼的元素。
resourceGroup="appResourcesGroup"
# Select subscription and create resource group (if you have not created yet)
az account set --subscription <subscriptionID>
az group create --name $resourceGroup --location eastus
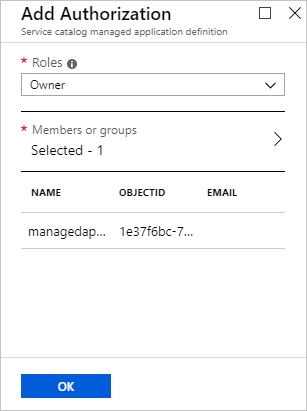
# Get object ID of your identity
userid=$(az ad user list --upn example@contoso.org --query [0].id --output tsv)
# Get role definition ID for the Owner role
roleid=$(az role definition list --name Owner --query [].name --output tsv)
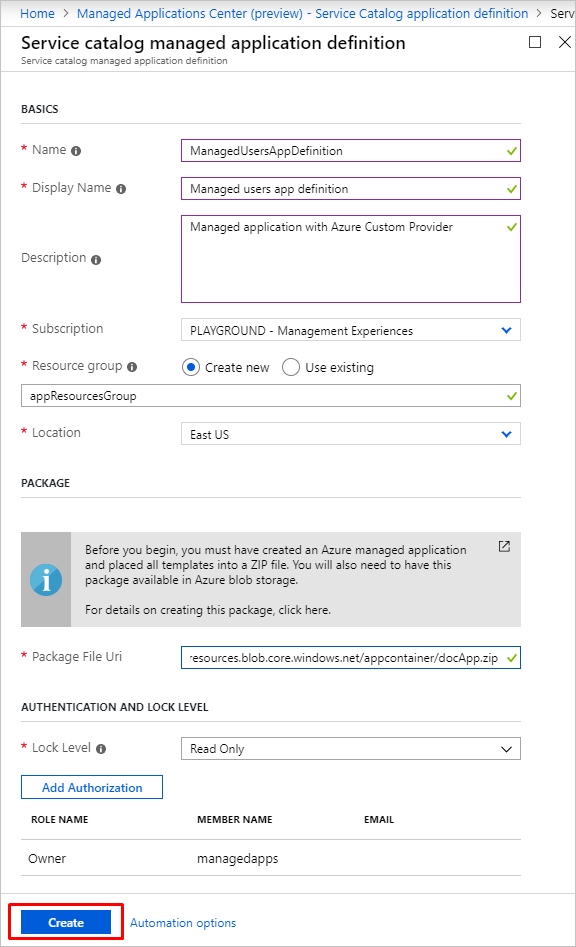
# Create managed application definition resource
az managedapp definition create \
--name "ManagedUsersAppDefinition" \
--location "eastus" \
--resource-group $resourceGroup \
--lock-level ReadOnly \
--display-name "Managed users app definition" \
--description "Managed application with Azure Custom Provider" \
--authorizations "$userid:$roleid" \
--package-file-uri "path to your app.zip package"

受控應用程式執行個體
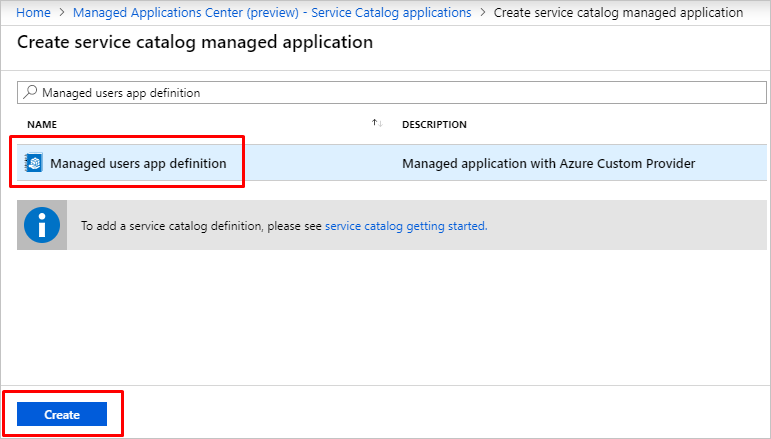
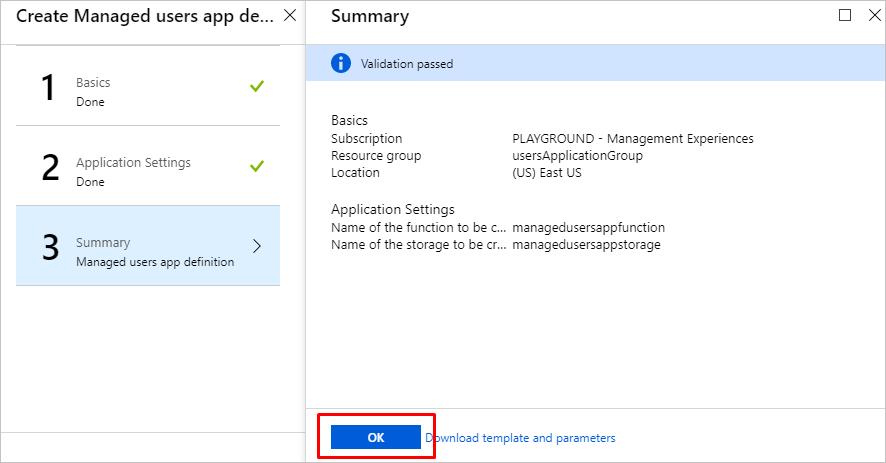
部署受控應用程式定義時,請執行下列指令碼,或依照 Azure 入口網站中的步驟,使用自訂提供者部署您的受控應用程式執行個體:
appResourcesGroup="appResourcesGroup"
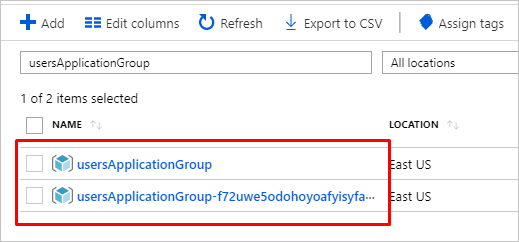
applicationGroup="usersApplicationGroup"
# Create resource group for managed application instance
az group create --name $applicationGroup --location eastus
# Get ID of managed application definition
appid=$(az managedapp definition show --name ManagedUsersAppDefinition --resource-group $appResourcesGroup --query id --output tsv)
# Create the managed application
az managedapp create \
--name ManagedUsersApp \
--location "eastus" \
--kind "Servicecatalog" \
--resource-group $applicationGroup \
--managedapp-definition-id $appid \
--managed-rg-id "managedResourcesGroup" \
--parameters "{\"funcname\": {\"value\": \"managedusersappfunction\"}, \"storageName\": {\"value\": \"managedusersappstorage\"}}"
自訂動作和資源
在部署服務目錄應用程式執行個體之後,您會有兩個新的資源群組。 第一個資源群組 applicationGroup 包含受控應用程式的執行個體,第二個資源群組 managedResourceGroup 會保存受控應用程式的資源,包括自訂提供者。
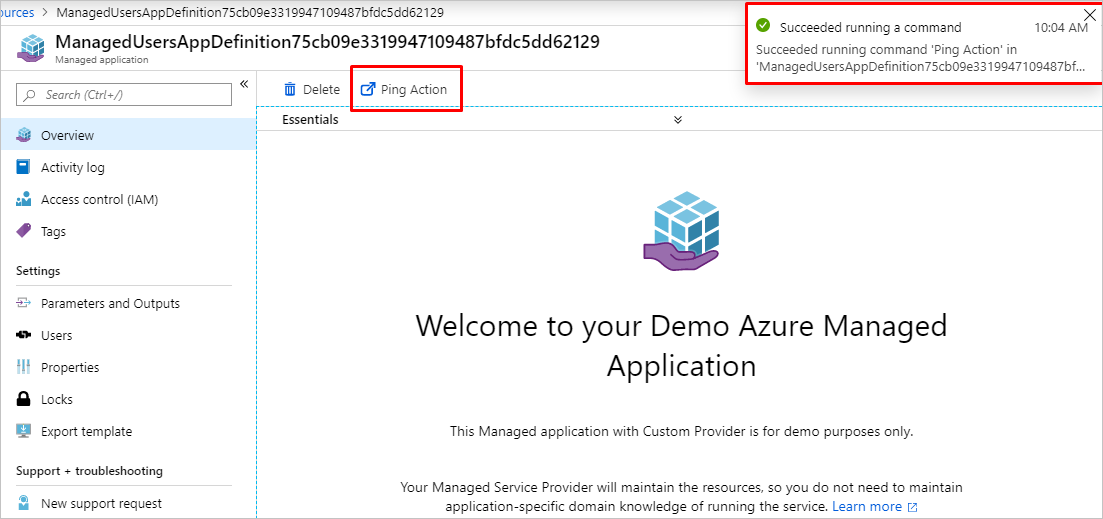
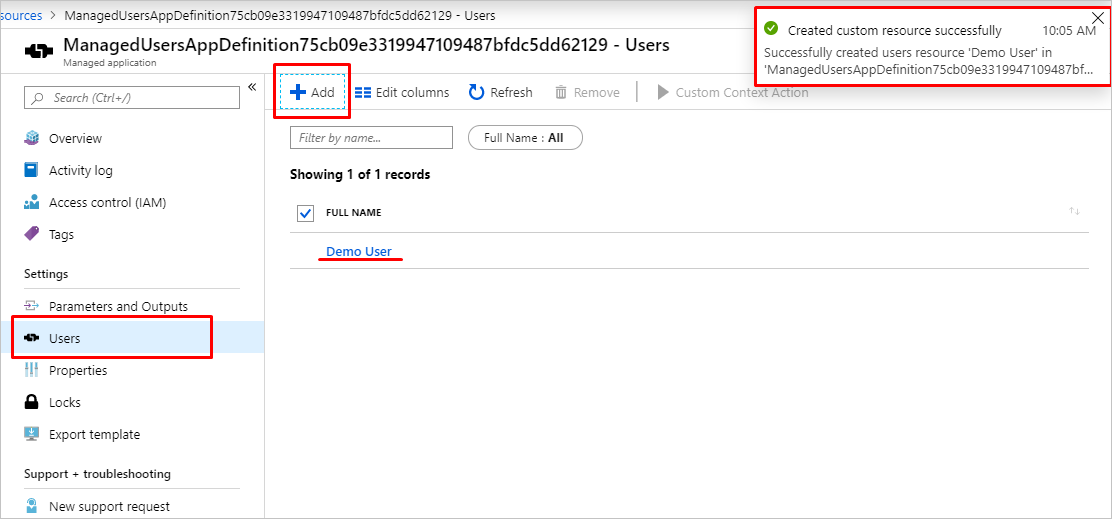
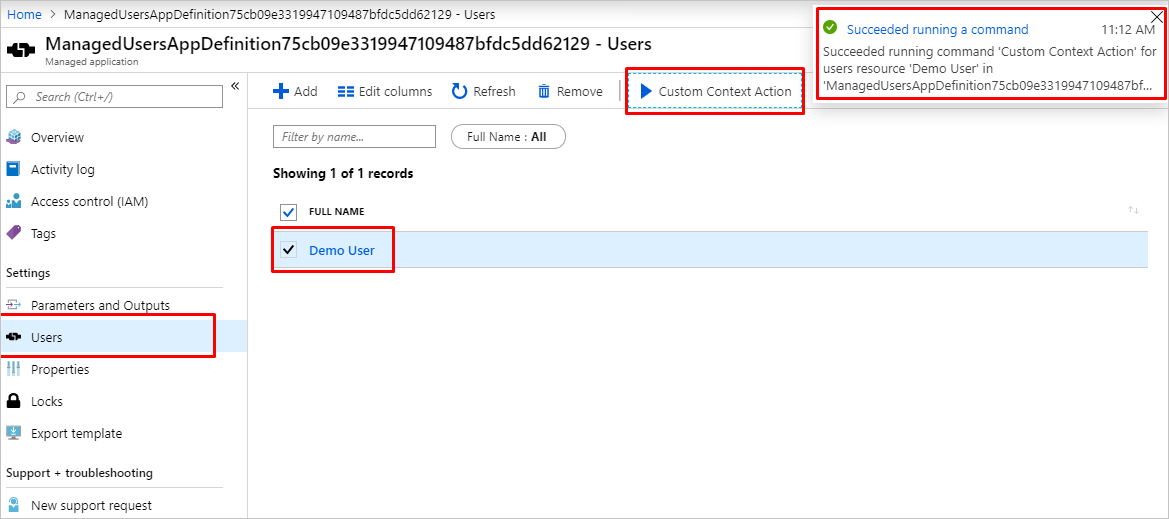
您可以移至受控應用程式執行個體,並執行 [概觀] 頁面中的自訂動作、在 [使用者] 頁面中建立使用者自訂資源,以及在自訂資源上執行自訂內容動作。
- 移至 [概觀] 頁面,然後按一下 [Ping 動作] 按鈕:
- 移至 [使用者] 頁面,然後按一下 [新增] 按鈕。 提供用來建立資源及提交表單的輸入:
- 移至 [使用者] 頁面,選取 [使用者] 資源,然後按一下 [自訂內容動作]:
清除資源
在上述步驟中,您已建立資源群組中的 Azure 資源。 如果您預期未來不需要這些資源,則可以藉由刪除資源群組予以刪除。
從 Azure 入口網站功能表或 [首頁] 頁面,選取 [資源群組]。 然後,在 [資源群組] 頁面上,選取 [myResourceGroup]。
在 [myResourceGroup] 頁面上,確定所列出的資源是您想要刪除的項目。
選取 [刪除資源群組],在文字方塊中輸入 myResourceGroup,然後選取 [刪除]。
尋求協助
如果您有關於 Azure 受控應用程式的問題,可以嘗試使用 azure-managed-app 標籤在 Stack Overflow 上提問,或者使用 azure-managed-application 標籤在 Microsoft Q&A 上提問。 類似的問題可能已有人詢問和回答,因此請先查看再張貼問題。 請使用對應的標籤以加快回應速度。
下一步
若要將您的受控應用程式發佈至 Azure Marketplace,請參閱 Marketplace 中 Azure 受控應用程式。
深入了解 Azure 自訂提供者。