快速入門:使用 SignalR 服務建立聊天室
Azure SignalR Service 是一項 Azure 服務,可協助開發人員使用即時功能輕鬆地建置 Web 應用程式。
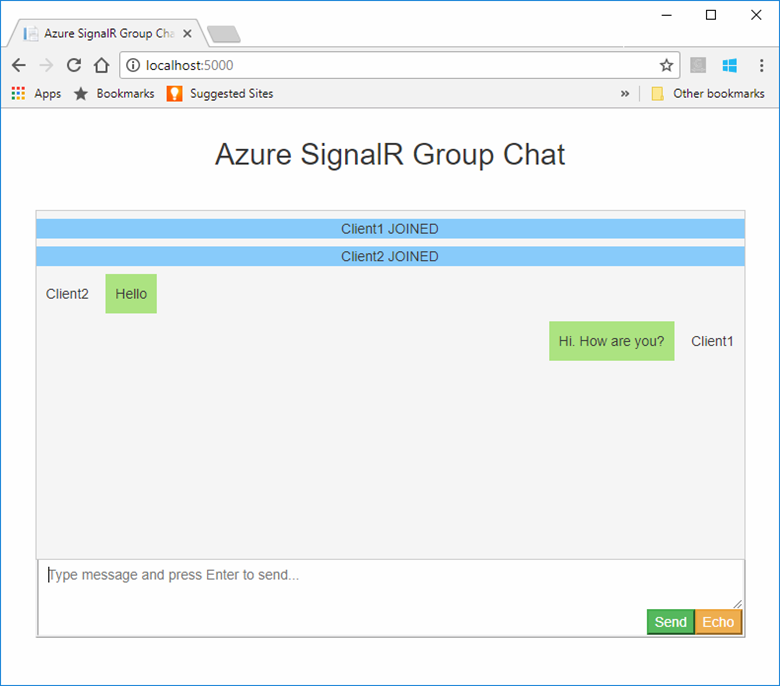
本文說明如何開始使用 Azure SignalR 服務。 在本快速入門中,您將使用 ASP.NET Core Web 應用程式來建立聊天應用程式。 此應用程式會與 Azure SignalR Service 資源建立連線,以啟用即時內容更新。 您將在本機裝載 Web 應用程式,並與多個瀏覽器用戶端連線。 每個用戶端都可以將內容更新推送至所有其他用戶端。
您可以使用任何程式碼編輯器來完成本快速入門中的步驟。 其中一個選項是 Visual Studio Code ,可在 Windows、macOS 和 Linux 平臺上使用。
本教學課程的程式碼可在 AzureSignalR-samples GitHub 存放庫中 下載 。 您可以遵循 建立 SignalR Service 腳本 ,來建立本快速入門中使用的 Azure 資源。
如果您沒有 Azure 訂 用帳戶,請在開始之前建立 免費帳戶 。
準備開始了嗎?
必要條件
- 安裝最新的 .NET Core SDK。
- 下載或複製 AzureSignalR-sample GitHub 存放庫。
建立 Azure SignalR 資源
在本節中,您會建立要用於應用程式的基本 Azure SignalR 實例。 下列步驟會使用Azure 入口網站來建立新的實例,但您也可以使用 Azure CLI。 如需詳細資訊,請參閱 Azure SignalR Service CLI 參考 中的 az signalr create 命令。
- 登入 Azure 入口網站。
- 在頁面左上角,選取 [+ 建立資源 ]。
- 在 [ 建立資源 ] 頁面上的 [搜尋服務 和市 集] 文字方塊中, 輸入 signalr ,然後從清單中選取 SignalR 服務 。
- 在 [ SignalR 服務] 頁面上,選取 [ 建立 ]。
- 在 [ 基本] 索引 標籤上,輸入新 SignalR Service 實例的基本資訊。 輸入下列值:
| 欄位 | 建議的值 | 描述 |
|---|---|---|
| 訂用帳戶 | 選擇您的訂用帳戶 | 選取您想要用來建立新 SignalR Service 實例的訂用帳戶。 |
| 資源群組 | 建立名為 SignalRTestResources 的資源群組 | 選取或建立 SignalR 資源的資源群組。 為本教學課程建立新的資源群組,而不是使用現有的資源群組會很有用。 若要在完成本教學課程之後釋放資源,請刪除資源群組。 刪除資源群組也會刪除屬於群組的所有資源。 此動作無法復原。 刪除資源群組之前,請確定它不包含您想要保留的資源。 如需詳細資訊,請參閱 使用資源群組來管理您的 Azure 資源 。 |
| 資源名稱 | testsignalr | 輸入要用於 SignalR 資源的唯一資源名稱。 如果您的 區域中已經採用 testignalr ,請新增數位或字元,直到名稱是唯一的。 名稱必須是 1 到 63 個字元的字串,且只包含數位、字母和連字號 ( - ) 字元。 名稱不能以連字號字元開頭或結尾,且連續連字號字元無效。 |
| 區域 | 選擇您的區域 | 為新的 SignalR 服務實例選取適當的區域。 Azure SignalR Service 目前無法在所有區域中使用。 如需詳細資訊,請參閱 Azure SignalR 服務區域可用性 |
| 定價層 | 選取 [變更 ],然後選擇 [ 免費](僅限開發/測試)。 選擇 [ 選取 ] 以確認您選擇的定價層。 | Azure SignalR Service 有三個定價層:免費、標準和進階版。 除非必要條件另有說明,否則教學課程會使用 免費 層。 如需階層與定價之間功能差異的詳細資訊,請參閱 Azure SignalR 服務定價 |
| 服務模式 | 選擇適當的服務模式 | 當您在 Web 應用程式中裝載 SignalR 中樞邏輯,並使用 SignalR 服務作為 Proxy 時,請使用預設值 。 當您使用無伺服器技術,例如 Azure Functions 來裝載 SignalR 中樞邏輯時,請使用 無 伺服器。 傳統 模式僅供回溯相容性使用,不建議使用。 如需詳細資訊,請參閱 Azure SignalR Service 中的服務模式。 |
您不需要變更 SignalR 教學課程之 [網路 和 標籤 ] 索引標籤上的設定。
- 選取 [基本] 索引 標籤底部的 [ 檢閱 + 建立] 按鈕。
- 在 [ 檢閱 + 建立] 索引標籤上,檢閱值,然後選取 [ 建立 ]。 部署需要一些時間才能完成。
- 部署完成時,選取 [移至資源 ] 按鈕。
- 在 [SignalR 資源] 頁面上,從左側的功能表中, 選取 [設定 ]。
- 複製主鍵的連線字串 。 在本教學課程稍後,您需要此連接字串來設定您的應用程式。
建立 ASP.NET Core Web 應用程式
在本節中 ,您會使用 .NET Core 命令列介面 (CLI) 來建立 ASP.NET Core MVC Web 應用程式專案。 透過 Visual Studio 使用 .NET Core CLI 的優點是可在 Windows、macOS 和 Linux 平臺上使用。
為您的專案建立資料夾。 本快速入門使用 chattest 資料夾。
在新的資料夾中,執行下列命令來建立專案:
dotnet new web
將秘密管理員新增至專案
在本節中,您會將 秘密管理員工具 新增至專案。 秘密管理員工具會將敏感性資料儲存在專案樹狀結構外部的開發工作。 這種方法有助於防止在原始程式碼中意外共用應用程式秘密。
在 資料夾中,執行下列命令以 init
UserSecretsId:dotnet user-secrets init將名為 Azure:SignalR:連線ionString 的秘密新增至秘密管理員。
此秘密將包含存取 SignalR Service 資源的連接字串。 Azure:SignalR:連線ionString 是 SignalR 尋找建立連線的預設組態金鑰。 將下列命令中的值取代為您的 SignalR Service 資源連接字串。
您必須在與
csproj檔案相同的目錄中執行此命令。dotnet user-secrets set Azure:SignalR:ConnectionString "<Your connection string>"秘密管理員只會用於在本機裝載 Web 應用程式時進行測試。 在稍後的教學課程中,您將將聊天 Web 應用程式部署至 Azure。 將 Web 應用程式部署至 Azure 之後,您將使用應用程式設定,而不是使用秘密管理員儲存連接字串。
此秘密是透過組態 API 來存取。 冒號 (:)適用于所有支援平臺上的組態 API,以組態名稱運作。 請參閱 依環境 設定。
將 Azure SignalR 新增至 Web 應用程式
執行下列命令,以新增 NuGet 套件的
Microsoft.Azure.SignalR參考:dotnet add package Microsoft.Azure.SignalR開啟 Program.cs 並將程式碼更新為下列程式碼,它會呼叫
AddSignalR()和AddAzureSignalR()方法來使用 Azure SignalR 服務:var builder = WebApplication.CreateBuilder(args); builder.Services.AddSignalR().AddAzureSignalR(); var app = builder.Build(); app.UseDefaultFiles(); app.UseRouting(); app.UseStaticFiles(); app.MapHub<ChatSampleHub>("/chat"); app.Run();未傳遞參數,
AddAzureSignalR()表示它會使用 SignalR Service 資源的預設組態索引鍵連接字串。 預設組態金鑰為 Azure:SignalR:連線ionString 。 它也會使用ChatSampleHub我們將在下一節中建立的 。
新增中樞類別
在 SignalR 中,中 樞 是一個核心元件,會公開用戶端可以呼叫的一組方法。 在本節中,您會使用兩種方法來定義中樞類別:
BroadcastMessage:此方法會將訊息廣播至所有用戶端。Echo:這個方法會將訊息傳回給呼叫端。
這兩種方法都會使用 Clients ASP.NET Core SignalR SDK 提供的介面。 此介面可讓您存取所有連線的用戶端,因此您可以將內容推送至用戶端。
在您的專案目錄中,新增名為 Hub 的新資料夾。 將名為 ChatSampleHub.cs 的新中樞程式碼檔案新增至新資料夾。
將下列程式碼新增至 ChatSampleHub.cs ,以定義您的中樞類別並儲存檔案。
using Microsoft.AspNetCore.SignalR;

public class ChatSampleHub : Hub
{
    public Task BroadcastMessage(string name, string message) =>
        Clients.All.SendAsync("broadcastMessage", name, message);

    public Task Echo(string name, string message) =>
        Clients.Client(Context.ConnectionId)
                .SendAsync("echo", name, $"{message} (echo from server)");
}
新增 Web 應用程式的用戶端介面
此聊天室應用程式的用戶端使用者介面將包含 wwwroot 目錄中名為 index.html 的檔案中的 HTML 和 JavaScript。
從範例存放庫的 wwwroot 資料夾複製 css/site.css 檔案。 將專案的 css/site.css 取代為您複製的 css/site.css 。
在 wwwroot 目錄中建立名為 index.html 的新檔案,複製下列 HTML 並貼到新建立的檔案中。
<!DOCTYPE html>
<html>
<head>
<meta http-equiv="Cache-Control" content="no-cache, no-store, must-revalidate" />
<meta name="viewport" content="width=device-width">
<meta http-equiv="Pragma" content="no-cache" />
<meta http-equiv="Expires" content="0" />
<link href="https://cdn.jsdelivr.net/npm/bootstrap@3.3.7/dist/css/bootstrap.min.css" rel="stylesheet" />
<link href="css/site.css" rel="stylesheet" />
<title>Azure SignalR Group Chat</title>
</head>
<body>
<h2 class="text-center" style="margin-top: 0; padding-top: 30px; padding-bottom: 30px;">Azure SignalR Group Chat</h2>
<div class="container" style="height: calc(100% - 110px);">
<div id="messages" style="background-color: whitesmoke; "></div>
<div style="width: 100%; border-left-style: ridge; border-right-style: ridge;">
<textarea id="message" style="width: 100%; padding: 5px 10px; border-style: hidden;"
placeholder="Type message and press Enter to send..."></textarea>
</div>
<div style="overflow: auto; border-style: ridge; border-top-style: hidden;">
<button class="btn-warning pull-right" id="echo">Echo</button>
<button class="btn-success pull-right" id="sendmessage">Send</button>
</div>
</div>
<div class="modal alert alert-danger fade" id="myModal" tabindex="-1" role="dialog" aria-labelledby="myModalLabel">
<div class="modal-dialog" role="document">
<div class="modal-content">
<div class="modal-header">
<div>Connection Error...</div>
<div><strong style="font-size: 1.5em;">Hit Refresh/F5</strong> to rejoin. ;)</div>
</div>
</div>
</div>
</div>
<!--Reference the SignalR library. -->
<script src="https://cdnjs.cloudflare.com/ajax/libs/microsoft-signalr/6.0.1/signalr.js"></script>
<!--Add script to update the page and send messages.-->
<script type="text/javascript">
document.addEventListener("DOMContentLoaded", function () {
function getUserName() {
function generateRandomName() {
return Math.random().toString(36).substring(2, 10);
}
// Get the user name and store it to prepend to messages.
var username = generateRandomName();
var promptMessage = "Enter your name:";
do {
username = prompt(promptMessage, username);
if (!username || username.startsWith("_") || username.indexOf("<") > -1 || username.indexOf(">") > -1) {
username = "";
promptMessage = "Invalid input. Enter your name:";
}
} while (!username)
return username;
}
username = getUserName();
// Set initial focus to message input box.
var messageInput = document.getElementById("message");
messageInput.focus();
function createMessageEntry(encodedName, encodedMsg) {
var entry = document.createElement("div");
entry.classList.add("message-entry");
if (encodedName === "_SYSTEM_") {
entry.innerHTML = encodedMsg;
entry.classList.add("text-center");
entry.classList.add("system-message");
} else if (encodedName === "_BROADCAST_") {
entry.classList.add("text-center");
entry.innerHTML = `<div class="text-center broadcast-message">${encodedMsg}</div>`;
} else if (encodedName === username) {
entry.innerHTML = `<div class="message-avatar pull-right">${encodedName}</div>` +
`<div class="message-content pull-right">${encodedMsg}<div>`;
} else {
entry.innerHTML = `<div class="message-avatar pull-left">${encodedName}</div>` +
`<div class="message-content pull-left">${encodedMsg}<div>`;
}
return entry;
}
function appendMessage(encodedName, encodedMsg) {
var messageEntry = createMessageEntry(encodedName, encodedMsg);
var messageBox = document.getElementById("messages");
messageBox.appendChild(messageEntry);
messageBox.scrollTop = messageBox.scrollHeight;
}
function bindConnectionMessage(connection) {
var messageCallback = function (name, message) {
if (!message) return;
// Html encode display name and message.
var encodedName = name;
var encodedMsg = message.replace(/&/g, "&").replace(/</g, "<").replace(/>/g, ">");
appendMessage(encodedName, encodedMsg);
};
// Create a function that the hub can call to broadcast messages.
connection.on("broadcastMessage", messageCallback);
connection.on("echo", messageCallback);
connection.onclose(onConnectionError);
}
function onConnected(connection) {
console.log("connection started");
connection.send("broadcastMessage", "_SYSTEM_", username + " JOINED");
document.getElementById("sendmessage").addEventListener("click", function (event) {
// Call the broadcastMessage method on the hub.
if (messageInput.value) {
connection.send("broadcastMessage", username, messageInput.value)
.catch((e) => appendMessage("_BROADCAST_", e.message));
}
// Clear text box and reset focus for next comment.
messageInput.value = "";
messageInput.focus();
event.preventDefault();
});
document.getElementById("message").addEventListener("keypress", function (event) {
if (event.keyCode === 13) {
event.preventDefault();
document.getElementById("sendmessage").click();
return false;
}
});
document.getElementById("echo").addEventListener("click", function (event) {
// Call the echo method on the hub.
connection.send("echo", username, messageInput.value);
// Clear text box and reset focus for next comment.
messageInput.value = "";
messageInput.focus();
event.preventDefault();
});
}
function onConnectionError(error) {
if (error && error.message) {
console.error(error.message);
}
var modal = document.getElementById("myModal");
modal.classList.add("in");
modal.style = "display: block;";
}
var connection = new signalR.HubConnectionBuilder()
.withUrl("/chat")
.build();
bindConnectionMessage(connection);
connection.start()
.then(function () {
onConnected(connection);
})
.catch(function (error) {
console.error(error.message);
});
});
</script>
</body>
</html>
index.html 中的程式代碼會呼叫 HubConnectionBuilder.build() ,以對 Azure SignalR 資源進行 HTTP 連線。
如果連線成功,該連接會傳遞至 bindConnectionMessage,這會將傳入內容推送的事件處理程式新增至用戶端。
HubConnection.start() 會開始與中樞通訊。 然後, onConnected() 新增按鈕事件處理程式。 這些處理程式會使用連線來允許此用戶端將內容更新推送至所有連線的用戶端。
在本機建置並執行應用程式
執行下列命令,在本機執行 Web 應用程式:
dotnet run應用程式會裝載在本機,其中包含localhostURL的輸出,例如,如下所示:
Building...
info: Microsoft.Hosting.Lifetime[14]
      Now listening on: http://localhost:5000
info: Microsoft.Hosting.Lifetime[0]
      Application started. Press Ctrl+C to shut down.
info: Microsoft.Hosting.Lifetime[0]
      Hosting environment: Development
開啟兩個瀏覽器視窗。 在每個瀏覽器中,移至輸出視窗中顯示的localhostURL,例如, http://localhost:5000/ 如上述輸出視窗所示。 系統會提示您輸入名稱。 使用 [傳送] 按鈕,輸入用戶端的用戶端名稱,並測試兩個用戶端之間的推播訊息內容。
清除資源
如果您將繼續下一個教學課程,您可以保留在本快速入門中建立的資源,並重複使用它們。
如果您已完成快速入門範例應用程式,您可以刪除本快速入門中建立的 Azure 資源,以避免產生費用。
重要
刪除資源群組是無法復原的,並包含該群組中的所有資源。 請確定您不會不小心刪除錯誤的資源群組或資源。 如果您在包含要保留之資源的現有資源群組中建立此範例中的資源,您可以從其刀鋒視窗中個別刪除每個資源,而不是刪除資源群組。
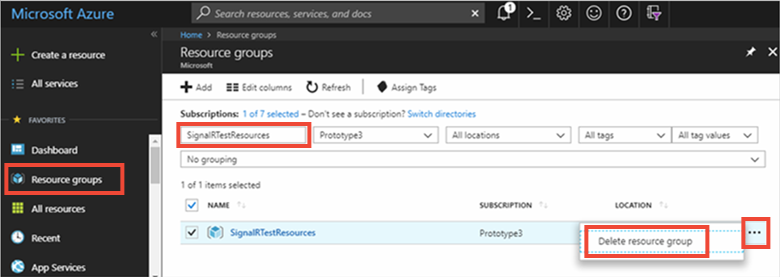
登入 Azure 入口網站,然後選取 [資源群組]。
在 [ 依名稱 篩選] 文本框中,輸入資源群組的名稱。 本快速入門的指示使用了名為 SignalRTestResources 的資源群組。 在結果清單中的資源群組上,選取省略號 (...) >刪除資源群組。
系統會要求您確認刪除資源群組。 輸入要確認的資源群組名稱,然後選取 [ 刪除]。
幾分鐘后,資源群組及其所有資源都會遭到刪除。
下一步
在本快速入門中,您已建立新的 Azure SignalR 服務資源。 然後,您將它與 ASP.NET Core Web 應用程式搭配使用,將內容更新即時推送至多個連線的用戶端。 若要深入瞭解如何使用 Azure SignalR Service,請繼續進行示範驗證的教學課程。