使用 Node.js 和 mssql npm 套件連線至和查詢 Azure SQL 資料庫
適用於:![]() Azure SQL 資料庫
Azure SQL 資料庫
本快速入門說明如何在 Azure SQL 資料庫中將應用程式連線至資料庫,並使用 Node.js 和 mssql 執行查詢。 本快速入門遵循建議的無密碼方法與資料庫連線。
適用於開發人員的無密碼連線
無密碼連線提供更安全的機制來存取 Azure 資源。 本文使用以下進階步驟,透過無密碼連線來連線至 Azure SQL 資料庫:
- 準備您的環境以進行無密碼驗證。
- 對於本機環境:系統會使用您的個人身分識別。 可以從 IDE、CLI 或其他本機開發工具提取此身分識別。
- 對於雲端環境:系統會使用受控識別。
- 在環境中使用身分識別程式庫中的
DefaultAzureCredential進行驗證,以取得經驗證的認證。 - 使用經驗證的認證來建立 Azure SDK 用戶端物件,以存取資源。
您可以在無密碼中樞上深入了解無密碼連線。
必要條件
- Azure 訂閱
- Azure SQL 資料庫中的資料庫設定為使用 Microsoft Entra ID (先前稱為 Azure AD) 進行驗證。 您可以使用建立資料庫快速入門建立資料庫。
- 啟用 Bash 的殼層
- Node.js LTS
- Visual Studio Code
- Visual Studio Code App Service 延伸項目
- 最新版本的 Azure CLI
設定資料庫伺服器
Azure SQL 資料庫的安全無密碼連線需要特定資料庫設定。 確認 Azure 中邏輯伺服器上的下列設定,以在本機和託管環境中正確連線到 Azure SQL 資料庫:
針對本機開發連線,請確定您的邏輯伺服器已設定為允許本機電腦 IP 位址及其他 Azure 服務連線:
瀏覽至伺服器的 [網路] 頁面。
切換 [選取的網路] 選項按鈕以顯示其他組態選項。
選取 [新增用戶端 IPv4 位址 (xx.xx.xx.xx)],以新增防火牆規則,啟用來自本機電腦 IPv4 位址的連線。 或者您也可以選取 [+ 新增防火牆規則] 來輸入您選擇的特定 IP 位址。
確定選取 [允許 Azure 服務和資源存取此伺服器] 核取方塊。
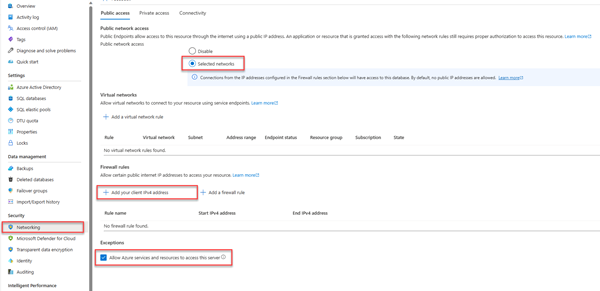
警告
對於實際執行場景,出於安全考量,不建議啟用 [允許 Azure 服務和資源存取此伺服器] 設定。 實際應用程式應該實作更安全的方法,例如更強大的防火牆限制或虛擬網路設定。
可以存取下列資源,深入了解資料庫安全設定:
伺服器也必須啟用 Microsoft Entra 驗證,並已指派 Microsoft Entra 管理帳戶。 針對本機開發連線,Microsoft Entra 管理帳戶應該也可以用於本機登入 Visual Studio 或 Azure CLI 的帳戶。 您可以在邏輯伺服器的 [Microsoft Entra ID] 頁面確認伺服器是否已啟用 Microsoft Entra 驗證。
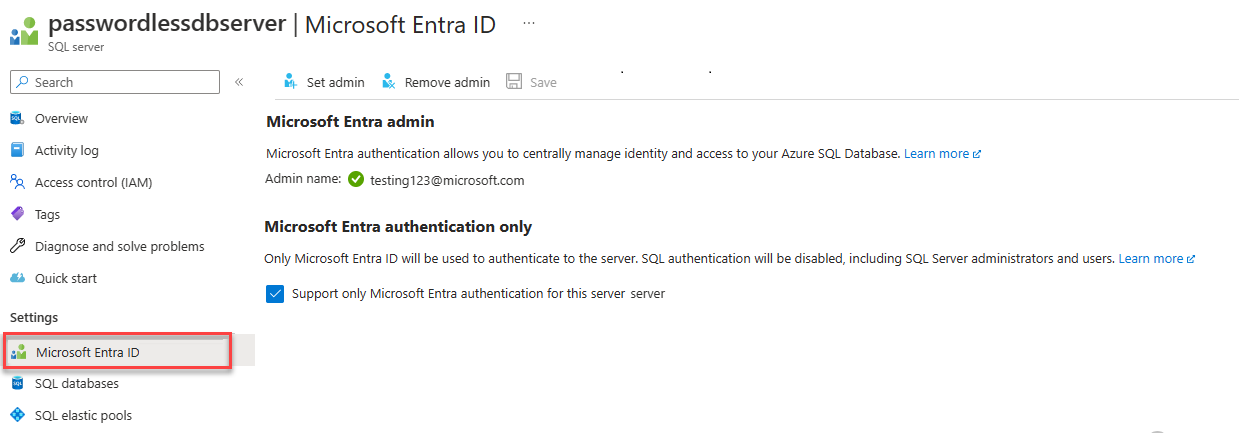
如果您使用個人 Azure 帳戶,請確定您已針對 Azure SQL 資料庫設定 Microsoft Entra,將您的帳戶指派為伺服器管理員。如果您使用公司帳戶,很可能已為您設定好 Microsoft Entra ID。


建立專案
本節中的步驟用於建立 Node.js REST API。
建立專案的新目錄並瀏覽至該目錄。
透過在終端機中執行以下命令來初始化專案:
npm init -y安裝本文範例程式碼中使用的必要套件:
npm install mssql swagger-ui-express yamljs安裝本文範例程式碼中使用的開發套件:
npm install --save-dev dotenv在 Visual Studio Code 中開啟專案。
code .開啟 package.json 檔案並在 name 屬性後新增下列屬性和值,為 ESM 模組設定專案。
"type": "module",
建立 Express.js 應用程式程式碼
若要建立 Express.js OpenAPI 應用程式,您將建立數個檔案:
| 檔案 | 說明 |
|---|---|
| .env.development | 僅限本機開發的環境檔案。 |
| index.js | 主應用程式檔案,在連接埠 3000 上啟動 Express.js 應用程式。 |
| person.js | Express.js /person 路由 API 檔案來處理 CRUD 作業。 |
| openapi.js | OpenAPI 總管 UI 的 Express.js /api-docs 路由。 根路徑重新導向至此路由。 |
| openApiSchema.yml | 定義 Person API 的 OpenAPI 3.0 結構描述檔案。 |
| config.js | 用於讀取環境變數並建構適當 mssql 連線物件的設定檔。 |
| database.js | 使用 mssql npm 套件來處理 Azure SQL CRUD 作業的資料庫類。 |
| ./vscode/settings.json | 在部署期間依 Glob 模式略過檔案。 |
建立 index.js 檔案,並新增下列程式碼:
import express from 'express';
import { config } from './config.js';
import Database from './database.js';

// Import App routes
import person from './person.js';
import openapi from './openapi.js';

const port = process.env.PORT || 3000;

const app = express();

// Development only - don't do in production
// Run this to create the table in the database
if (process.env.NODE_ENV === 'development') {
  const database = new Database(config);
  database
    .executeQuery(
      `CREATE TABLE Person (id int NOT NULL IDENTITY, firstName varchar(255), lastName varchar(255));`
    )
    .then(() => {
      console.log('Table created');
    })
    .catch((err) => {
      // Table may already exist
      console.error(`Error creating table: ${err}`);
    });
}

// Connect App routes
app.use('/api-docs', openapi);
app.use('/persons', person);
app.use('*', (_, res) => {
  res.redirect('/api-docs');
});

// Start the server
app.listen(port, () => {
  console.log(`Server started on port ${port}`);
});
建立 person.js 路由檔案,並新增下列程式碼:
import express from 'express';
import { config } from './config.js';
import Database from './database.js';

const router = express.Router();
router.use(express.json());

// Development only - don't do in production
console.log(config);

// Create database object
const database = new Database(config);

router.get('/', async (_, res) => {
  try {
    // Return a list of persons
    const persons = await database.readAll();
    console.log(`persons: ${JSON.stringify(persons)}`);
    res.status(200).json(persons);
  } catch (err) {
    res.status(500).json({ error: err?.message });
  }
});

router.post('/', async (req, res) => {
  try {
    // Create a person
    const person = req.body;
    console.log(`person: ${JSON.stringify(person)}`);
    const rowsAffected = await database.create(person);
    res.status(201).json({ rowsAffected });
  } catch (err) {
    res.status(500).json({ error: err?.message });
  }
});

router.get('/:id', async (req, res) => {
  try {
    // Get the person with the specified ID
    const personId = req.params.id;
    console.log(`personId: ${personId}`);
    if (personId) {
      const result = await database.read(personId);
      console.log(`persons: ${JSON.stringify(result)}`);
      res.status(200).json(result);
    } else {
      res.status(404);
    }
  } catch (err) {
    res.status(500).json({ error: err?.message });
  }
});

router.put('/:id', async (req, res) => {
  try {
    // Update the person with the specified ID
    const personId = req.params.id;
    console.log(`personId: ${personId}`);
    const person = req.body;

    if (personId && person) {
      delete person.id;
      console.log(`person: ${JSON.stringify(person)}`);
      const rowsAffected = await database.update(personId, person);
      res.status(200).json({ rowsAffected });
    } else {
      res.status(404);
    }
  } catch (err) {
    res.status(500).json({ error: err?.message });
  }
});

router.delete('/:id', async (req, res) => {
  try {
    // Delete the person with the specified ID
    const personId = req.params.id;
    console.log(`personId: ${personId}`);

    if (!personId) {
      res.status(404);
    } else {
      const rowsAffected = await database.delete(personId);
      res.status(204).json({ rowsAffected });
    }
  } catch (err) {
    res.status(500).json({ error: err?.message });
  }
});

export default router;
建立 openapi.js 路由檔案,並為 OpenAPI UI 總管新增下列程式碼:
import express from 'express';
import { join, dirname } from 'path';
import swaggerUi from 'swagger-ui-express';
import yaml from 'yamljs';
import { fileURLToPath } from 'url';

const __dirname = dirname(fileURLToPath(import.meta.url));

const router = express.Router();
router.use(express.json());

const pathToSpec = join(__dirname, './openApiSchema.yml');
const openApiSpec = yaml.load(pathToSpec);

router.use('/', swaggerUi.serve, swaggerUi.setup(openApiSpec));

export default router;
建立 openApiSchema.yml 結構描述檔案,並新增下列 YAML:
openapi: 3.0.0
info:
  version: 1.0.0
  title: Persons API
paths:
  /persons:
    get:
      summary: Get all persons
      responses:
        '200':
          description: OK
          content:
            application/json:
              schema:
                type: array
                items:
                  $ref: '#/components/schemas/Person'
    post:
      summary: Create a new person
      requestBody:
        required: true
        content:
          application/json:
            schema:
              $ref: '#/components/schemas/Person'
      responses:
        '201':
          description: Created
          content:
            application/json:
              schema:
                $ref: '#/components/schemas/Person'
  /persons/{id}:
    parameters:
      - name: id
        in: path
        required: true
        schema:
          type: integer
    get:
      summary: Get a person by ID
      responses:
        '200':
          description: OK
          content:
            application/json:
              schema:
                $ref: '#/components/schemas/Person'
        '404':
          description: Person not found
    put:
      summary: Update a person by ID
      requestBody:
        required: true
        content:
          application/json:
            schema:
              $ref: '#/components/schemas/Person'
      responses:
        '200':
          description: OK
          content:
            application/json:
              schema:
                $ref: '#/components/schemas/Person'
        '404':
          description: Person not found
    delete:
      summary: Delete a person by ID
      responses:
        '204':
          description: No Content
        '404':
          description: Person not found
components:
  schemas:
    Person:
      type: object
      properties:
        id:
          type: integer
          readOnly: true
        firstName:
          type: string
        lastName:
          type: string
設定 mssql 連線物件
mssql 套件藉由提供驗證類型的組態設定,實作與 Azure SQL 資料庫的連線。
在 Visual Studio Code 中,建立 config.js 檔案,並新增下列 mssql 設定程式碼,以向 Azure SQL 資料庫驗證。
import * as dotenv from 'dotenv';
dotenv.config({ path: `.env.${process.env.NODE_ENV}`, debug: true });

const server = process.env.AZURE_SQL_SERVER;
const database = process.env.AZURE_SQL_DATABASE;
const port = parseInt(process.env.AZURE_SQL_PORT);
const type = process.env.AZURE_SQL_AUTHENTICATIONTYPE;

export const config = {
    server,
    port,
    database,
    authentication: {
        type
    },
    options: {
        encrypt: true
    }
};
為您的本機環境變數建立 .env.development 檔案,新增下列文字並更新您的
<YOURSERVERNAME>和<YOURDATABASENAME>值。AZURE_SQL_SERVER=<YOURSERVERNAME>.database.windows.net AZURE_SQL_DATABASE=<YOURDATABASENAME> AZURE_SQL_PORT=1433 AZURE_SQL_AUTHENTICATIONTYPE=azure-active-directory-default
注意
無密碼設定物件可以安全地提交至原始檔控制,因為它們不包含任何機密,例如使用者名稱、密碼或存取金鑰。
建立
.vscode資料夾,並在資料夾中建立 settings.json 檔案。新增下列內容以略過 zip 部署期間的環境變數和相依性。
{
    "appService.zipIgnorePattern": ["./.env*","node_modules{,/**}"]
}
新增程式碼以連線至 Azure SQL 資料庫
建立 database.js 檔案,並新增下列程式碼:
import sql from 'mssql';

export default class Database {
  config = {};
  poolconnection = null;
  connected = false;

  constructor(config) {
    this.config = config;
    console.log(`Database: config: ${JSON.stringify(config)}`);
  }

  async connect() {
    try {
      console.log(`Database connecting...${this.connected}`);
      if (this.connected === false) {
        this.poolconnection = await sql.connect(this.config);
        this.connected = true;
        console.log('Database connection successful');
      } else {
        console.log('Database already connected');
      }
    } catch (error) {
      console.error(`Error connecting to database: ${JSON.stringify(error)}`);
    }
  }

  async disconnect() {
    try {
      this.poolconnection.close();
      console.log('Database connection closed');
    } catch (error) {
      console.error(`Error closing database connection: ${error}`);
    }
  }

  async executeQuery(query) {
    await this.connect();
    const request = this.poolconnection.request();
    const result = await request.query(query);

    return result.rowsAffected[0];
  }

  async create(data) {
    await this.connect();
    const request = this.poolconnection.request();

    request.input('firstName', sql.NVarChar(255), data.firstName);
    request.input('lastName', sql.NVarChar(255), data.lastName);

    const result = await request.query(
      `INSERT INTO Person (firstName, lastName) VALUES (@firstName, @lastName)`
    );

    return result.rowsAffected[0];
  }

  async readAll() {
    await this.connect();
    const request = this.poolconnection.request();
    const result = await request.query(`SELECT * FROM Person`);

    return result.recordsets[0];
  }

  async read(id) {
    await this.connect();

    const request = this.poolconnection.request();
    const result = await request
      .input('id', sql.Int, +id)
      .query(`SELECT * FROM Person WHERE id = @id`);

    return result.recordset[0];
  }

  async update(id, data) {
    await this.connect();

    const request = this.poolconnection.request();

    request.input('id', sql.Int, +id);
    request.input('firstName', sql.NVarChar(255), data.firstName);
    request.input('lastName', sql.NVarChar(255), data.lastName);

    const result = await request.query(
      `UPDATE Person SET firstName=@firstName, lastName=@lastName WHERE id = @id`
    );

    return result.rowsAffected[0];
  }

  async delete(id) {
    await this.connect();

    const idAsNumber = Number(id);

    const request = this.poolconnection.request();
    const result = await request
      .input('id', sql.Int, idAsNumber)
      .query(`DELETE FROM Person WHERE id = @id`);

    return result.rowsAffected[0];
  }
}
在本機測試應用程式
應用程式已準備好在本機進行測試。 確定使用設定為資料庫管理員的帳戶,在 Visual Studio Code 中登入 Azure 雲端。
使用下列命令執行應用程式。 應用程式會在連接埠 3000 上啟動。
NODE_ENV=development node index.js當您執行此應用程式時,系統會在資料庫中建立 Person 資料表。
在瀏覽器中,瀏覽至位於 http://localhost:3000 的 OpenAPI 總管。
在 Swagger UI 頁面上,展開 POST 方法,然後選取 [試用]。
修改範例 JSON 以包含屬性的值。 ID 屬性會被略過。

選取 [執行] 以將新記錄新增至資料庫。 API 會傳回成功的回應。
在 Swagger UI 頁面上,展開 GET 方法,然後選取 [試用]。 選取 [執行],隨即傳回您剛才建立的人員。

部署到 Azure App Service
如此應用程式即已就緒,可開始部署至 Azure。 Visual Studio Code 可以建立 Azure App Service,並在單一工作流程中部署應用程式。
請確定應用程式已停止。
如果尚未登入 Azure,請在命令選擇區中選取 Azure: Sign In to Azure Cloud 命令 (Ctrl + Shift + P)
在 Visual Studio Code 的 [Azure 總管] 視窗中,以滑鼠右鍵按一下 App Service 節點,然後選取 [建立新的 Web 應用程式] (進階)。
使用下表建立 App Service:
提示 值 輸入新 Web 應用程式的全域唯一名稱。 輸入提示,例如 azure-sql-passwordless。 後置唯一字串,例如123。選取新資源的資源群組。 選取 [+ 新建資源群組],然後選取預設名稱。 選取執行階段堆疊。 選取 Node.js 堆疊的 LTS 版本。 選取作業系統。 選取 [Linux]。 選取新資源的位置。 選取您附近的位置。 選取 Linux App Service 方案。 選取 [建立新的 App Service 方案]。然後選取預設名稱。 選取價格區間。 選取 [免費] (F1)。 為應用程式選取 Application Insights 資源。 選取 [暫時略過]。 等待直至收到應用程式建立的通知後,再繼續。
在 Azure 總管中,展開 App Service 節點,然後以滑鼠右鍵按一下新的應用程式。
選取 [部署至 Web 應用程式]。
![Azure 總管中 Visual Studio Code 的螢幕擷取畫面,其中醒目提示 [部署至 Web 應用程式]。](media/passwordless-connections/visual-studio-code-web-app-deploy.png?view=azuresql)
選取 JavaScript 專案的根資料夾。
當 Visual Studio Code 彈出視窗顯示時,選取 [部署]。
部署完成時,應用程式將無法在 Azure 上正常運作。 您仍然需要設定 App Service 與 SQL Database 之間的安全連線,才可擷取您的資料。
將 App Service 連線到 Azure SQL 資料庫
若要將 App Service 執行個體連線至 Azure SQL 資料庫,必須執行下列步驟:
- 建立 App Service 的受控識別。
- 建立 SQL Database 使用者,並將其與 App Service 受控識別關聯。
- 將 SQL 角色指派給允許讀取、寫入和其他權限的資料庫使用者。
有多項工具可用來實作下列步驟:
服務連接器是一種工具,可簡化 Azure 中不同服務之間的已驗證連線。 服務連接器目前支援使用 az webapp connection create sql 命令,透過 Azure CLI 將 App Service 連線至 Azure SQL 資料庫。 這個單一命令會為您完成上述的三個步驟。
使用服務連接器建立受控識別
在 Azure 入口網站的 Cloud Shell 中執行下列命令。 Cloud Shell 具有最新版本的 Azure CLI。 將 <> 中的變數替換為您自己的值。
az webapp connection create sql \
    -g <app-service-resource-group> \
    -n <app-service-name> \
    --tg <database-server-resource-group> \
    --server <database-server-name> \
    --database <database-name> \
    --system-identity
驗證 App Service 應用程式設定
您可以在 App Service 設定上確認服務連接器所做的變更。
在 Visual Studio Code 的 Azure 總管中,以滑鼠右鍵按一下您的 App Service,然後選取 [在入口網站中開啟]。
瀏覽至 App Service 的 [身分識別] 頁面。 在 [系統指派] 索引標籤下,[狀態] 應設定為 [開啟]。 此值表示您的應用程式已啟用系統指派的受控識別。
瀏覽至 App Service 的 [組態] 頁面。 在 [應用程式設定] 索引標籤下,您應該會看到數個環境變數,這些環境變數已經在 mssql 設定物件中。
AZURE_SQL_SERVERAZURE_SQL_DATABASEAZURE_SQL_PORTAZURE_SQL_AUTHENTICATIONTYPE
請勿刪除或者變更屬性名稱或值。

測試已部署的應用程式
瀏覽至應用程式的 URL,以測試與 Azure SQL 資料庫間的連線是否正常運作。 您可以在 App Service 概觀頁面上找到您應用程式的 URL。
您在本機建立的人員應該會顯示在瀏覽器中。 恭喜! 您的應用程式現在已與本機和託管環境中的 Azure SQL 資料庫建立連線。
提示
如果您在測試時收到 500 內部伺服器錯誤,可能是您的資料庫網路設定所致。 驗證您的邏輯伺服器是否已使用設定資料庫章節中概述的設定進行設定。
清除資源
用完 Azure SQL 資料庫後,請刪除資源以避免非預期的成本。
在 Azure 入口網站搜尋列中,搜尋 Azure SQL 並選取相符的結果。
在資料庫清單中找到並選取您的資料庫。
在 Azure SQL 資料庫的 [概觀] 頁面,選取 [刪除]。
在開啟的 Azure 您是否確定要刪除... 頁面,輸入資料庫的名稱以進行確認,然後選取 [刪除]。
範例指令碼
此應用程式的範例程式碼可在 GitHub 上取得。
下一步
意見反應
即將登場:在 2024 年,我們將逐步淘汰 GitHub 問題作為內容的意見反應機制,並將它取代為新的意見反應系統。 如需詳細資訊,請參閱:https://aka.ms/ContentUserFeedback。
提交並檢視相關的意見反應