教學課程:使用 .NET API 透過 Azure Batch 執行平行工作負載
使用 Azure Batch 在 Azure 中有效率地執行大規模的平行和高效能運算 (HPC) 批次作業。 本教學課程會逐步說明使用 Batch 執行平行工作負載的 C# 範例。 您會了解 Batch 應用程式的通用工作流程,以及如何以程式設計方式與 Batch 和儲存體資源進行互動。
- 將應用程式套件新增至您的 Batch 帳戶。
- 驗證 Batch 和儲存體帳戶。
- 將輸入檔案上傳至儲存體。
- 建立計算節點的集區來執行應用程式。
- 建立作業和工作來處理輸入檔案。
- 監視工作執行。
- 擷取輸出檔案。
在本教學課程中,您會使用 ffmpeg 開放原始碼工具將 MP4 媒體檔案平行轉換為 MP3 格式。
如果您沒有 Azure 訂閱,請在開始之前,先建立 Azure 免費帳戶。
必要條件
適用於 Linux、macOS 或 Windows 的 Visual Studio 2017 或更新版本或 .NET Core SDK。
Batch 帳戶和連結的 Azure 儲存體帳戶。 若要建立這些帳戶,請參閱使用 Azure 入口網站或 Azure CLI 的 Batch 快速入門指南。
將適合您使用案例的 ffmpeg 適當版本下載到您的本機電腦。 本教學課程和相關範例應用程式使用 ffmpeg 4.3.1 的 Windows 64 位元完整建置版本。 在本教學課程中,您只需要 ZIP 檔案。 您不需要將此檔案解壓縮或在本機進行安裝。
登入 Azure
登入 Azure 入口網站。
新增應用程式套件
使用 Azure 入口網站,將 ffmpeg 新增至 Batch 帳戶作為應用程式套件。 應用程式套件可協助您管理工作應用程式並將其部署到集區中的計算節點。
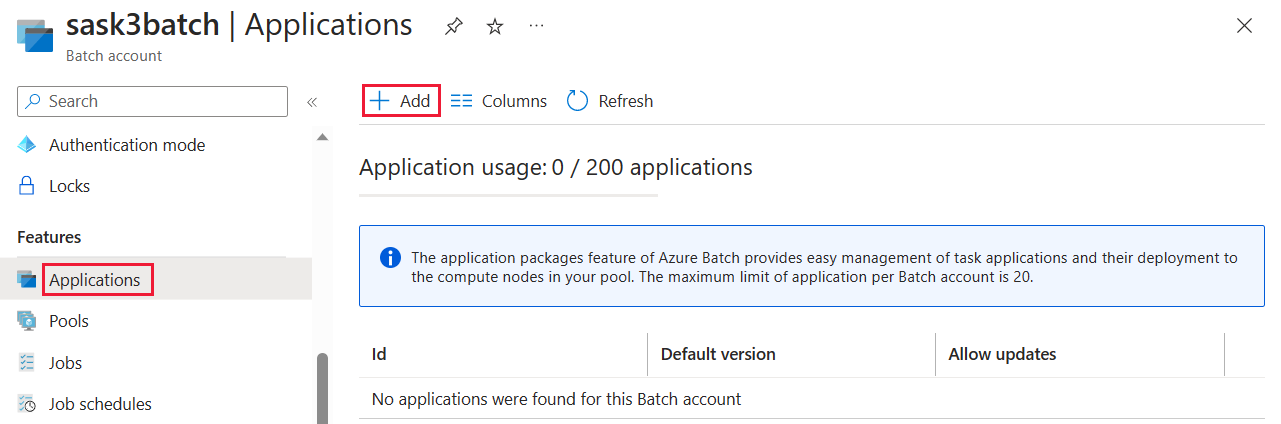
在 Azure 入口網站中,按一下 [更多服務]>[Batch 帳戶],然後選取您的 Batch 帳戶名稱。
按一下 [應用程式]>[新增]。
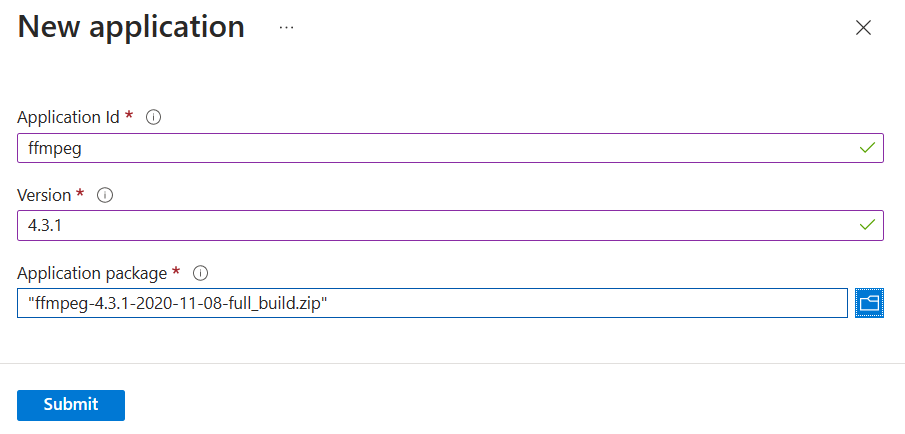
在 [應用程式識別碼] 欄位中輸入 ffmpeg,並在 [版本] 欄位中輸入套件版本 4.3.1。 選取您下載的 ffmpeg ZIP 檔案,然後選取 [提交]。 ffmpeg 應用程式套件會新增至您的 Batch 帳戶。
取得帳戶認證
在此範例中,您必須提供 Batch 和儲存體帳戶的認證。 在 Azure 入口網站中可以直接取得所需的認證。 (您也可以使用 Azure API 或命令列工具取得這些認證。)
選取 [所有服務]>[Batch 帳戶],然後選取您的 Batch 帳戶名稱。
若要查看 Batch 認證,請選取 [金鑰]。 將 [Batch 帳戶]、[URL] 和 [主要存取金鑰] 的值複製到文字編輯器。
若要查看儲存體帳戶名稱和金鑰,請選取 [儲存體帳戶]。 將 [儲存體帳戶名稱] 和 [金鑰1] 的值複製到文字編輯器。
下載及執行範例應用程式
下載範例應用程式
從 GitHub 下載或複製範例應用程式。 若要使用 Git 用戶端複製範例應用程式存放庫,請使用下列命令:
git clone https://github.com/Azure-Samples/batch-dotnet-ffmpeg-tutorial.git
瀏覽至包含 Visual Studio 解決方案檔案 BatchDotNetFfmpegTutorial.sln 的目錄。
在 Visual Studio 中開啟方案檔,然後使用您為帳戶取得的值來更新 Program.cs 中的認證字串。 例如:
// Batch account credentials
private const string BatchAccountName = "yourbatchaccount";
private const string BatchAccountKey  = "xxxxxxxxxxxxxxxxE+yXrRvJAqT9BlXwwo1CwF+SwAYOxxxxxxxxxxxxxxxx43pXi/gdiATkvbpLRl3x14pcEQ==";
private const string BatchAccountUrl  = "https://yourbatchaccount.yourbatchregion.batch.azure.com";

// Storage account credentials
private const string StorageAccountName = "yourstorageaccount";
private const string StorageAccountKey  = "xxxxxxxxxxxxxxxxy4/xxxxxxxxxxxxxxxxfwpbIC5aAWA8wDu+AFXZB827Mt9lybZB1nUcQbQiUrkPtilK5BQ==";
注意
為了簡化範例,Batch 和儲存體帳戶認證均以純文字顯示。 在實務上,建議您限制認證的存取,並使用環境變數或組態檔在您的程式碼中加以參考。 如需範例,請參閱 Azure Batch程式碼範例存放庫。
此外,請確定解決方案中的 ffmpeg 應用程式套件參考符合您上傳至 Batch 帳戶的 ffmpeg 套件識別碼和版本。 例如,ffmpeg 與 4.3.1。
const string appPackageId = "ffmpeg";
const string appPackageVersion = "4.3.1";
建置及執行範例專案
在 Visual Studio 中建置及執行應用程式,或是在命令列使用 dotnet build 和 dotnet run 命令。 執行此應用程式之後,檢閱程式碼以了解應用程式的每部分用途。 例如,在 Visual Studio 中:
以滑鼠右鍵按一下方案總管中的解決方案,然後選取 [建置方案]。
出現提示時,請確認任何 NuGet 封裝的還原。 如果您需要下載遺漏的套件,請確保已安裝 NuGet 套件管理員。
執行方案。 當您執行範例應用程式時,主控台輸出大致如下。 在執行期間,集區的計算節點啟動後,您會在
Monitoring all tasks for 'Completed' state, timeout in 00:30:00...遇到暫停。
Sample start: 11/19/2018 3:20:21 PM

Container [input] created.
Container [output] created.
Uploading file LowPriVMs-1.mp4 to container [input]...
Uploading file LowPriVMs-2.mp4 to container [input]...
Uploading file LowPriVMs-3.mp4 to container [input]...
Uploading file LowPriVMs-4.mp4 to container [input]...
Uploading file LowPriVMs-5.mp4 to container [input]...
Creating pool [WinFFmpegPool]...
Creating job [WinFFmpegJob]...
Adding 5 tasks to job [WinFFmpegJob]...
Monitoring all tasks for 'Completed' state, timeout in 00:30:00...
Success! All tasks completed successfully within the specified timeout period.
Deleting container [input]...

Sample end: 11/19/2018 3:29:36 PM
Elapsed time: 00:09:14.3418742
移至 Azure 入口網站中您的 Batch 帳戶,以監視集區、計算節點、作業和工作。 例如,若要查看集區中計算節點的熱度圖,請按一下 [集區]>[WinFFmpegPool]。
當工作正在執行時,熱度圖會如下所示:
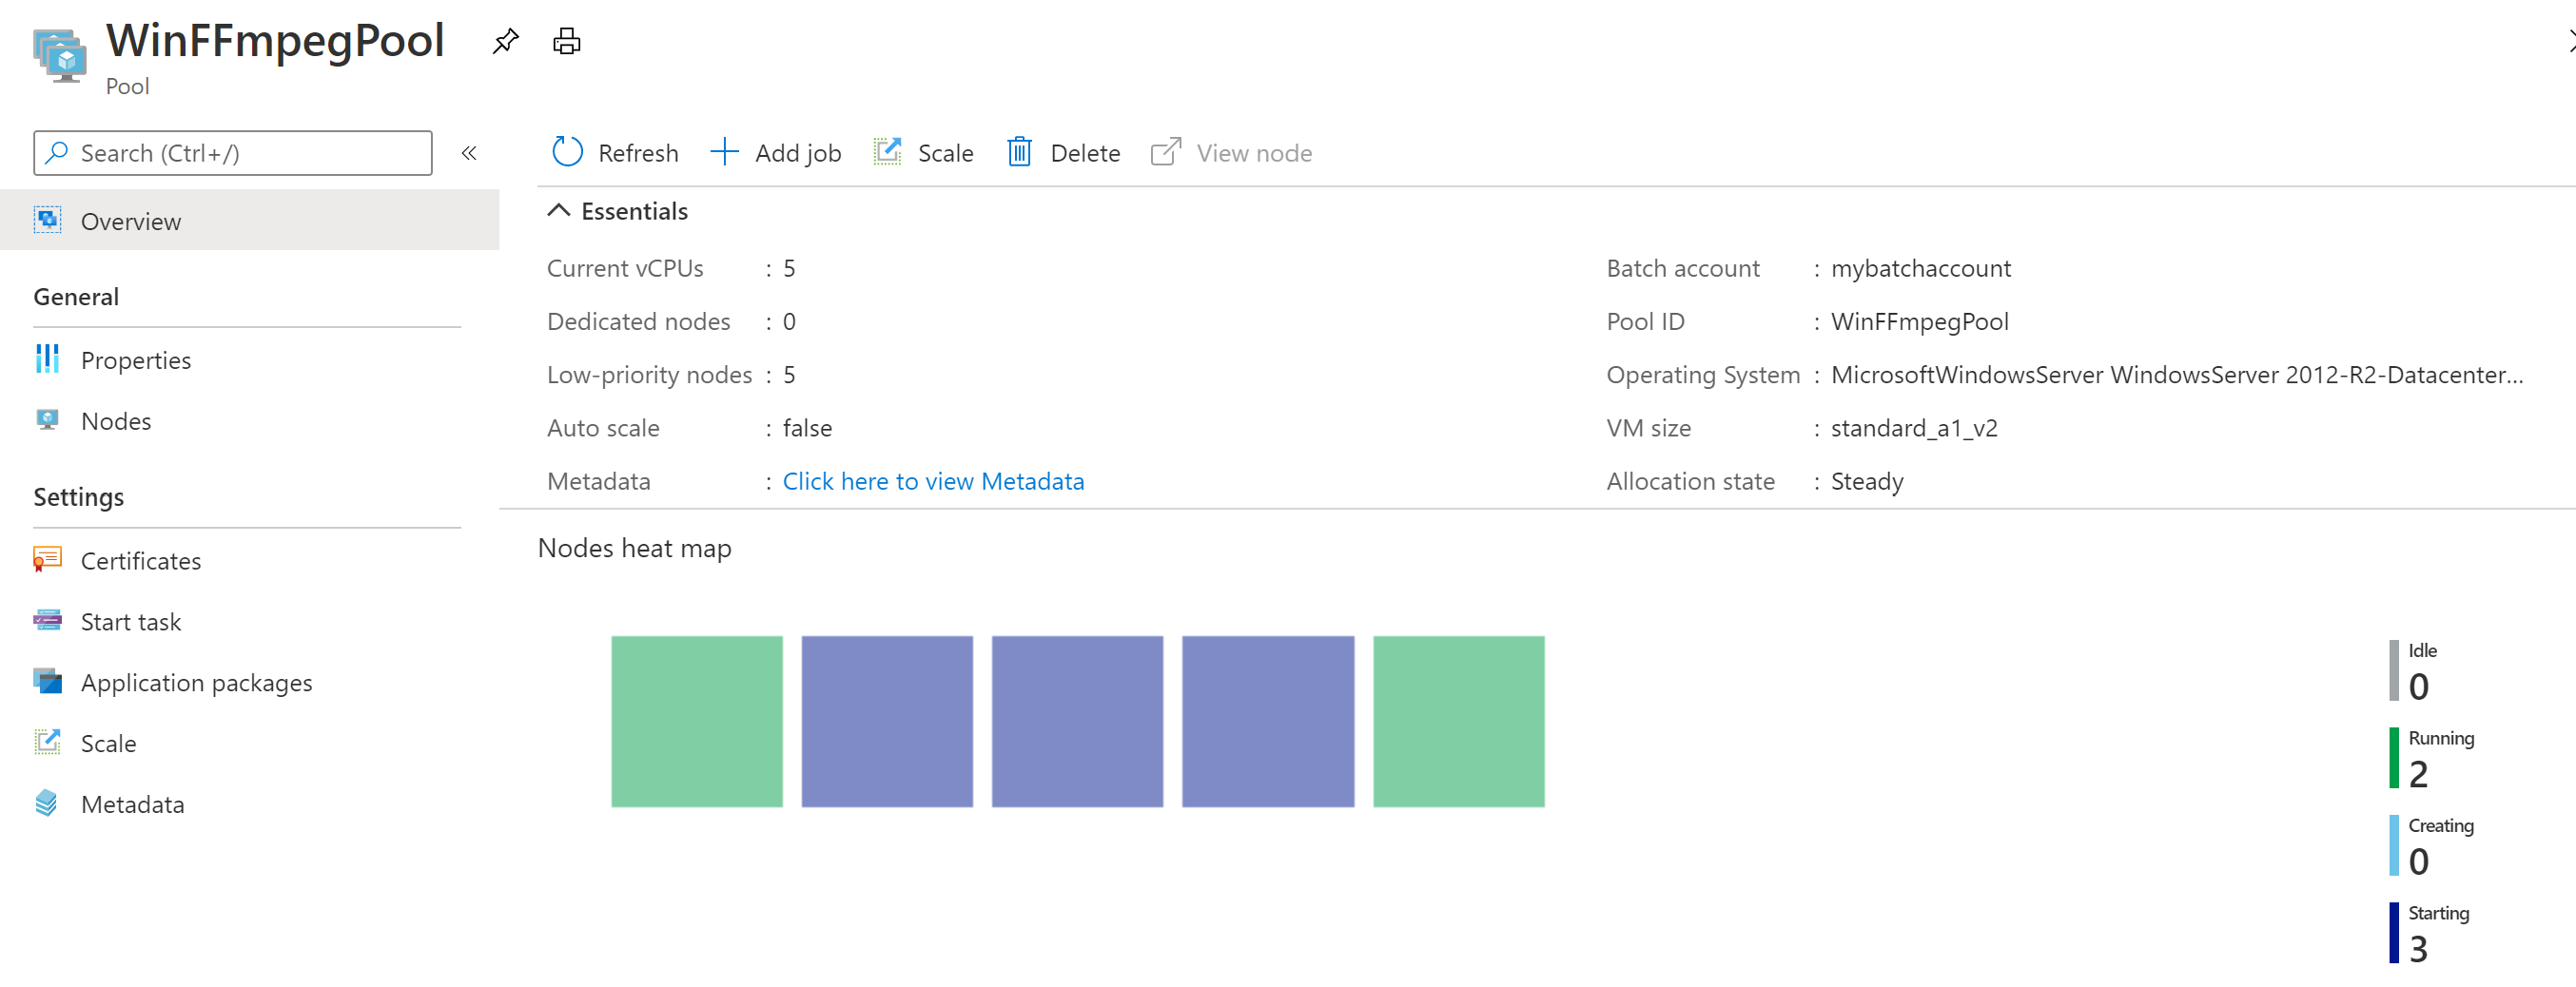
以預設設定執行應用程式時,一般的執行時間大約 10 分鐘。 建立集區佔用大部分的時間。
擷取輸出檔案
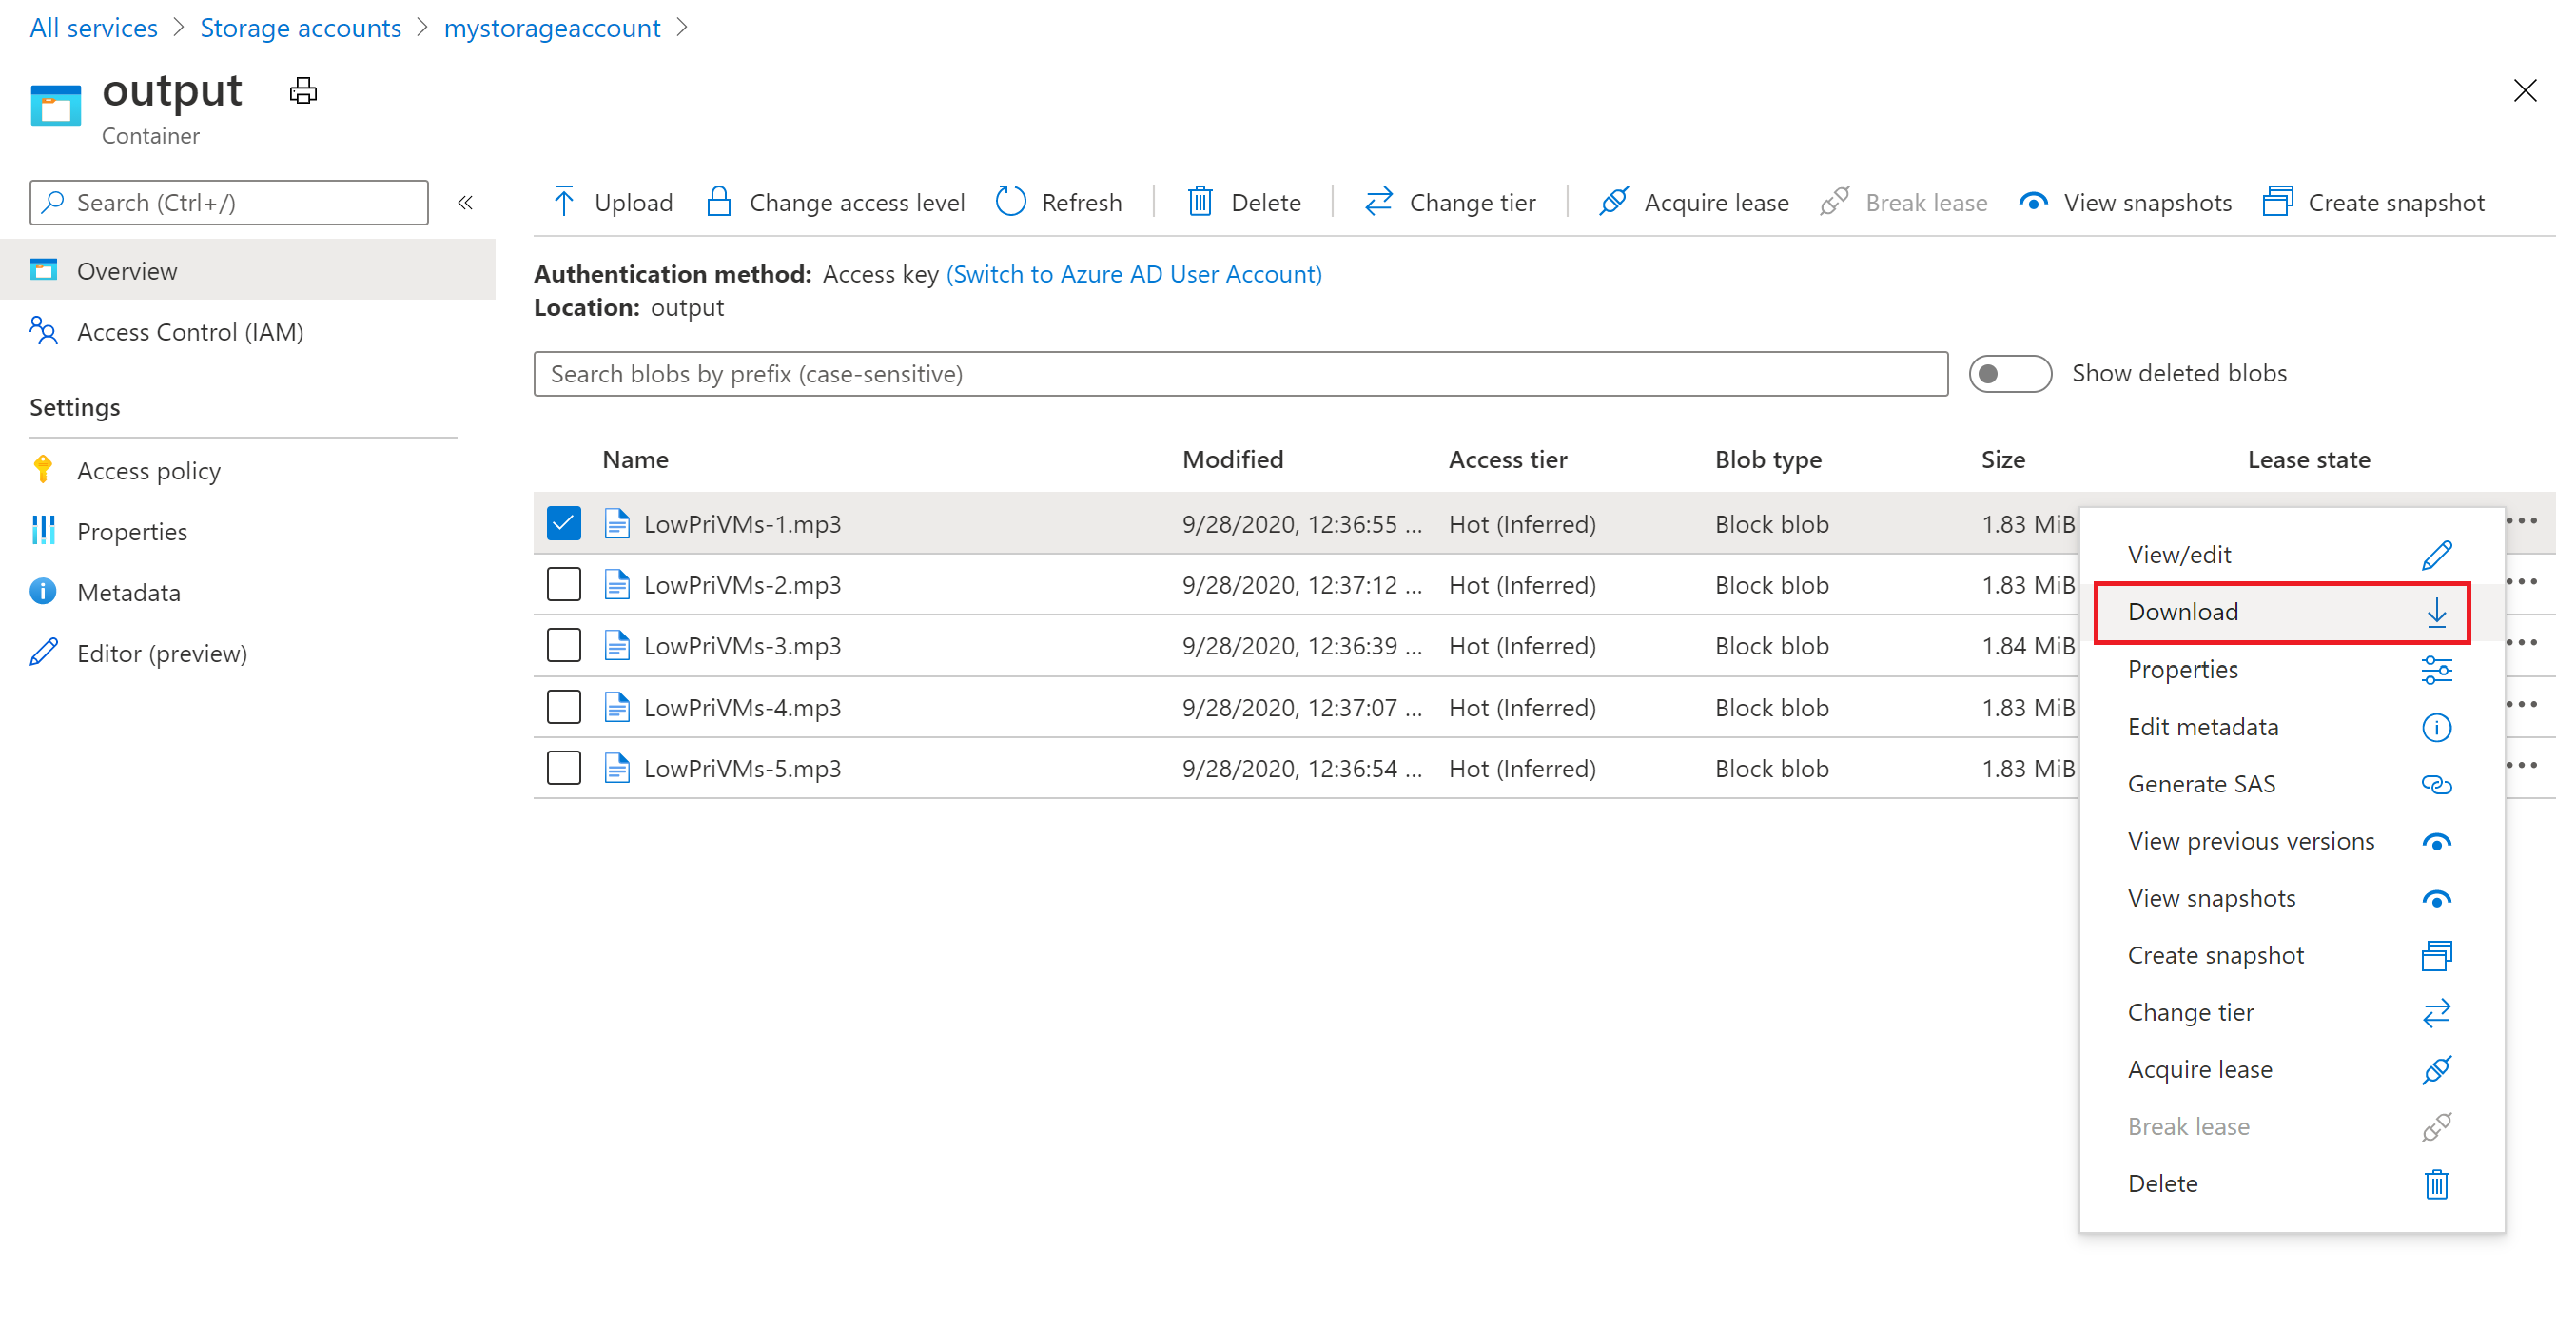
您可以使用 Azure 入口網站來下載 ffmpeg 工作所產生的 MP3 輸出檔案。
- 按一下 [所有服務]>[儲存體帳戶],然後按一下您的儲存體帳戶名稱。
- 按一下 [Blob]>[輸出]。
- 以滑鼠右鍵按一下其中一個 MP3 輸出檔案,然後按 [下載]。 請依照瀏覽器的提示開啟或儲存檔案。
此範例雖未示範,但您也可以用程式設計方式從計算節點或儲存體容器下載檔案。
檢閱程式碼
後面各節將範例應用程式細分為用來處理 Batch 服務中工作負載的數個步驟。 在閱讀本文的其餘部分時,請參考解決方案中的 Program.cs,因為本文並不會討論範例中的每一行程式碼。
驗證 Blob 和 Batch 用戶端
為了與連結的儲存體帳戶進行互動,應用程式會使用適用於 .NET 的 Azure 儲存體用戶端程式庫。 其使用 CloudStorageAccount 建立帳戶的參考,並使用共用金鑰驗證進行驗證。 然後會建立 CloudBlobClient。
// Construct the Storage account connection string
string storageConnectionString = String.Format("DefaultEndpointsProtocol=https;AccountName={0};AccountKey={1}",
                                StorageAccountName, StorageAccountKey);

// Retrieve the storage account
CloudStorageAccount storageAccount = CloudStorageAccount.Parse(storageConnectionString);

CloudBlobClient blobClient = storageAccount.CreateCloudBlobClient();
應用程式會建立 BatchClient 物件,以在 Batch 服務中建立和管理集區、作業和工作。 範例中的 Batch 用戶端會使用共用金鑰驗證。 Batch 也支援透過 Microsoft Entra ID 進行驗證,以便驗證個別使用者或自動執行的應用程式。
BatchSharedKeyCredentials sharedKeyCredentials = new BatchSharedKeyCredentials(BatchAccountUrl, BatchAccountName, BatchAccountKey);

using (BatchClient batchClient = BatchClient.Open(sharedKeyCredentials))
...
上傳輸入檔案
應用程式會將 blobClient 物件傳遞至 CreateContainerIfNotExistAsync 方法,以建立輸入檔案 (MP4 格式) 的儲存體容器和工作輸出的容器。
CreateContainerIfNotExistAsync(blobClient, inputContainerName);
CreateContainerIfNotExistAsync(blobClient, outputContainerName);
接著,檔案會從本機 InputFiles 資料夾上傳至輸入容器。 儲存體中的檔案會定義為 Batch ResourceFile 物件,Batch 之後可將這類物件下載到計算節點。
上傳檔案時需要 Program.cs 中的兩個方法:
UploadFilesToContainerAsync:傳回ResourceFile物件的集合,並在內部呼叫UploadResourceFileToContainerAsync以上傳在inputFilePaths參數中傳入的每個檔案。UploadResourceFileToContainerAsync:將每個檔案當作 blob 上傳至輸入容器。 上傳檔案之後,它會取得此 blob 的共用存取簽章 (SAS) 並傳回代表它的ResourceFile物件。
string inputPath = Path.Combine(Environment.CurrentDirectory, "InputFiles");

List<string> inputFilePaths = new List<string>(Directory.GetFileSystemEntries(inputPath, "*.mp4",
    SearchOption.TopDirectoryOnly));

List<ResourceFile> inputFiles = await UploadFilesToContainerAsync(
  blobClient,
  inputContainerName,
  inputFilePaths);
如需使用 .NET 將檔案當作 Blob 上傳至儲存體帳戶的詳細資訊,請參閱使用 .NET 上傳、下載及列出 Blob。
建立計算節點的集區
接著,範例會呼叫 CreatePoolIfNotExistAsync 以在 Batch 帳戶中建立計算節點集區。 這個已定義的方法會使用 BatchClient.PoolOperations.CreatePool 方法來設定節點數目、VM 大小和集區設定。 在此,VirtualMachineConfiguration 物件會將 ImageReference 指定至 Azure Marketplace 中發佈的 Windows Server 映像。 Batch 支援 Azure Marketplace 中各式各樣的 VM 映像,以及自訂 VM 映像。
使用已定義的常數可設定節點數目和 VM 大小。 Batch 支援專用節點和現成品節點,而您可以在集區中使用其中一種或同時使用兩種。 專用節點會保留給您的集區使用。 現成品節點則會以較低的價格從 Azure 中的剩餘容量提供。 如果 Azure 沒有足夠的容量,便無法使用現成品節點。 此範例預設建立的集區只包含 5 個大小為 Standard_A1_v2 的現成品節點。
注意
請務必檢查您的節點配額。 如需如何建立配額要求的指示,請參閱 Batch 服務配額和限制。
將 ApplicationPackageReference 新增到集區設定,ffmpeg 應用程式便會部署至計算節點。
CommitAsync 方法會將集區提交至 Batch 服務。
ImageReference imageReference = new ImageReference(
    publisher: "MicrosoftWindowsServer",
    offer: "WindowsServer",
    sku: "2016-Datacenter-smalldisk",
    version: "latest");

VirtualMachineConfiguration virtualMachineConfiguration =
    new VirtualMachineConfiguration(
    imageReference: imageReference,
    nodeAgentSkuId: "batch.node.windows amd64");

pool = batchClient.PoolOperations.CreatePool(
    poolId: poolId,
    targetDedicatedComputeNodes: DedicatedNodeCount,
    targetLowPriorityComputeNodes: LowPriorityNodeCount,
    virtualMachineSize: PoolVMSize,
    virtualMachineConfiguration: virtualMachineConfiguration);

pool.ApplicationPackageReferences = new List<ApplicationPackageReference>
    {
    new ApplicationPackageReference {
    ApplicationId = appPackageId,
    Version = appPackageVersion}};

await pool.CommitAsync();
建立作業
Batch 工作會指定要在其中執行工作的集區及選擇性設定,例如工作的優先順序和排程。 此範例會藉由呼叫 CreateJobAsync 來建立作業。 這個已定義的方法會使用 BatchClient.JobOperations.CreateJob 方法在您的集區上建立作業。
CommitAsync 方法會將作業提交至 Batch 服務。 一開始作業沒有任何工作。
CloudJob job = batchClient.JobOperations.CreateJob();
job.Id = JobId;
job.PoolInformation = new PoolInformation { PoolId = PoolId };

await job.CommitAsync();
建立工作
此範例會藉由呼叫 AddTasksAsync 方法在作業中建立工作,而這個方法會建立一份 CloudTask 物件清單。 每項 CloudTask 都會使用 CommandLine 屬數來執行 ffmpeg,以處理輸入 ResourceFile 物件。 ffmpeg 已在先前建立集區時安裝於每個節點上。 在此,命令列會執行 ffmpeg,將每個輸入 MP4 (影片) 檔案轉換為 MP3 (音訊) 檔案。
此範例會在執行命令列之後,為 MP3 檔案建立 OutputFile 物件。 每項工作的輸出檔案 (在此例中只有一個輸出檔案) 都會使用工作的 OutputFiles 屬性,上傳至所連結儲存體帳戶中的容器。 在先前的程式碼範例中可取得共用存取簽章 URL (outputContainerSasUrl),以提供輸出容器的寫入存取權。 請注意 outputFile 物件上設定的條件。 工作順利完成後,工作的輸出檔只會上傳至容器 (OutputFileUploadCondition.TaskSuccess)。 如需進一步的實作詳細資料,請參閱 GitHub 上的完整程式碼範例。
然後,範例會使用 AddTaskAsync 方法將工作新增至作業,該方法會將工作排入佇列以在計算節點上執行。
將可執行檔的檔案路徑取代為您下載的版本名稱。 此範例程式碼會使用範例 ffmpeg-4.3.1-2020-11-08-full_build。
 // Create a collection to hold the tasks added to the job.
List<CloudTask> tasks = new List<CloudTask>();

for (int i = 0; i < inputFiles.Count; i++)
{
    string taskId = String.Format("Task{0}", i);

    // Define task command line to convert each input file.
    string appPath = String.Format("%AZ_BATCH_APP_PACKAGE_{0}#{1}%", appPackageId, appPackageVersion);
    string inputMediaFile = inputFiles[i].FilePath;
    string outputMediaFile = String.Format("{0}{1}",
        System.IO.Path.GetFileNameWithoutExtension(inputMediaFile),
        ".mp3");
    string taskCommandLine = String.Format("cmd /c {0}\\ffmpeg-4.3.1-2020-09-21-full_build\\bin\\ffmpeg.exe -i {1} {2}", appPath, inputMediaFile, outputMediaFile);

    // Create a cloud task (with the task ID and command line)
    CloudTask task = new CloudTask(taskId, taskCommandLine);
    task.ResourceFiles = new List<ResourceFile> { inputFiles[i] };

    // Task output file
    List<OutputFile> outputFileList = new List<OutputFile>();
    OutputFileBlobContainerDestination outputContainer = new OutputFileBlobContainerDestination(outputContainerSasUrl);
    OutputFile outputFile = new OutputFile(outputMediaFile,
       new OutputFileDestination(outputContainer),
       new OutputFileUploadOptions(OutputFileUploadCondition.TaskSuccess));
    outputFileList.Add(outputFile);
    task.OutputFiles = outputFileList;
    tasks.Add(task);
}

// Add tasks as a collection
await batchClient.JobOperations.AddTaskAsync(jobId, tasks);
return tasks
監視工作
當 Batch 將工作新增至作業時,此服務會自動將工作排入佇列並進行排程,以便在相關聯集區中的計算節點上執行。 根據您指定的設定,Batch 會處理所有工作佇列、排程、重試和其他工作管理責任。
監視工作執行的方法有許多種。 此範例會定義 MonitorTasks 方法,而這個方法只會報告完成和工作失敗或成功的狀態。 MonitorTasks 程式碼會指定 ODATADetailLevel,進而有效率地只選取最少工作相關資訊。 然後,它會建立 TaskStateMonitor,以提供用來監視工作狀態的協助程式公用程式。 在 MonitorTasks 中,此範例會等候所有工作在某個時限內達到 TaskState.Completed。 然後它會終止作業,並回報任何已完成但可能發生失敗 (例如結束代碼不為零) 的工作。
TaskStateMonitor taskStateMonitor = batchClient.Utilities.CreateTaskStateMonitor();
try
{
    await taskStateMonitor.WhenAll(addedTasks, TaskState.Completed, timeout);
}
catch (TimeoutException)
{
    batchClient.JobOperations.TerminateJob(jobId);
    Console.WriteLine(incompleteMessage);
    return false;
}
batchClient.JobOperations.TerminateJob(jobId);
 Console.WriteLine(completeMessage);
...
清除資源
應用程式在執行工作之後,會自動刪除它所建立的輸入儲存體容器,並且為您提供用於刪除 Batch 集區和工作的選項。 BatchClient 的 JobOperations 和 PoolOperations 類別都有對應的刪除方法 (在您確認刪除時呼叫)。 雖然您不需支付作業和工作本身的費用,但您需支付計算節點的費用。 因此,我們建議您只在必要時配置集區。 當您刪除集區時,節點上的所有工作輸出也會跟著刪除。 不過,輸出檔案會保留在儲存體帳戶中。
若不再需要,可刪除資源群組、Batch 帳戶和儲存體帳戶。 若要在 Azure 入口網站中這麼做,請選取 Batch 帳戶的資源群組,然後按一下 [刪除資源群組]。
下一步
在本教學課程中,您已了解如何:
- 將應用程式套件新增至您的 Batch 帳戶。
- 驗證 Batch 和儲存體帳戶。
- 將輸入檔案上傳至儲存體。
- 建立計算節點的集區來執行應用程式。
- 建立作業和工作來處理輸入檔案。
- 監視工作執行。
- 擷取輸出檔案。
如需更多使用 .NET API 來排程和處理 Batch 工作負載的範例,請參閱 GitHub 上的 Batch C# 範例。