網路聊天自訂
適用于: SDK v4
本文詳述如何自訂網路聊天範例以符合您的聊天機器人。
將網路聊天整合到您的網站
網路聊天概觀說明如何將網路聊天控制項整合到您的網站。
自訂樣式
網路聊天控制項提供豐富的自訂選項:您可以變更色彩、大小、元素的位置、新增自訂元素,以及與主控網頁互動。 以下是如何自訂網路聊天 UI 的幾個範例。
您可以找到可在 檔案中網路聊天 StyleOptions.ts 修改之所有設定的完整清單。 您可以在defaultStyleOptions.ts檔案中找到網路聊天的預設值
這些設定會產生樣式集,這是使用 glamor 所增強的一組 CSS 規則。 您可以在 檔案的樣式集 createStyleSet.ts 中找到產生的 CSS 樣式完整清單。
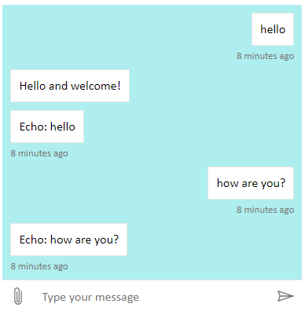
設定網路聊天容器的大小
若要調整網路聊天容器的大小,請使用樣式集的rootHeight 和 rootWidth 屬性。 下列範例也會設定容器的背景色彩,以顯示控制器的大小。
<!DOCTYPE html>
<head>
    <script src="https://cdn.botframework.com/botframework-webchat/latest/webchat.js"></script>
</head>
<body>
  <div style="height: 60%; width: 40%; margin-top:5%; margin-left:10%" id="webchat" role="main"></div>
  <script>
     // Set  the CSS rules.
     const styleSet = window.WebChat.createStyleSet({
         rootHeight: '100%',
         rootWidth: '50%',
         backgroundColor: 'paleturquoise'
      });

    window.WebChat.renderWebChat({
      directLine: window.WebChat.createDirectLine({
          token: '<Your Direct Line token>'}),
      styleSet
    }, document.getElementById('webchat'));

  </script>
</body>
警告
在主控網頁中,請勿在一目了然地使用您的Direct Line金鑰。 使用權杖,如如何將Bot 連線至網路聊天的生產內嵌選項一節中所述。
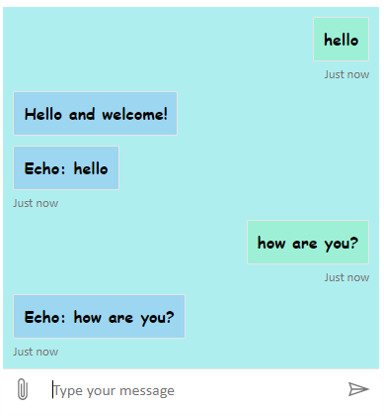
變更聊天泡泡字型和色彩
您可以自訂聊天泡泡中使用的背景色彩和字型,以符合裝載網路聊天控制項的網頁樣式。 下列程式碼片段示範如何執行此動作。
<!DOCTYPE html>
<head>
    <script src="https://cdn.botframework.com/botframework-webchat/latest/webchat.js"></script>
</head>
<body>
  <div style="height: 60%; width: 40%; margin-top:5%; margin-left:10%" id="webchat" role="main"></div>
  <script>

     // Set  the CSS rules.
     const styleSet = window.WebChat.createStyleSet({
         bubbleBackground: 'rgba(0, 0, 255, .1)',
         bubbleFromUserBackground: 'rgba(0, 255, 0, .1)',
         rootHeight: '100%',
         rootWidth: '50%',
         backgroundColor: 'paleturquoise'
      });

      // After generated, you can modify the CSS rules.
      // Change font family and weight.
      styleSet.textContent = {
         ...styleSet.textContent,
         fontFamily: "'Comic Sans MS', 'Arial', sans-serif",
         fontWeight: 'bold'
      };
    window.WebChat.renderWebChat({
      directLine: window.WebChat.createDirectLine({
          token: '<Your Direct Line token>'}),
      styleSet
    }, document.getElementById('webchat'));

  </script>
</body>
變更 Bot 和使用者虛擬人偶
網路聊天支援虛擬人偶,您可以在 屬性中 styleOptions 設定 botAvatarInitials 和 userAvatarInitials 來自訂。
![]()
<!DOCTYPE html>
<head>
    <script src="https://cdn.botframework.com/botframework-webchat/latest/webchat.js"></script>
</head>
<body>
  <div style="height: 60%; width: 40%; margin-top:5%; margin-left:10%" id="webchat" role="main"></div>
  <script>

     // Set  the CSS rules.
     const styleSet = window.WebChat.createStyleSet({
         bubbleBackground: 'rgba(0, 0, 255, .1)',
         bubbleFromUserBackground: 'rgba(0, 255, 0, .1)',
         rootHeight: '100%',
         rootWidth: '50%',
         backgroundColor: 'paleturquoise'
      });

      // After generated, you can modify the CSS rules.
      // Change font family and weight.
      styleSet.textContent = {
         ...styleSet.textContent,
         fontFamily: "'Comic Sans MS', 'Arial', sans-serif",
         fontWeight: 'bold'
      };

    // Set the avatar options.
     const avatarOptions = {
         botAvatarInitials: 'BF',
         userAvatarInitials: 'WC'
         };

    window.WebChat.renderWebChat({
      directLine: window.WebChat.createDirectLine({
          token: '<Your Direct Line token>'}),
      styleSet,
      styleOptions: avatarOptions
    }, document.getElementById('webchat'));

  </script>
</body>
botAvatarInitials使用 屬性來設定 Bot 的虛擬人偶縮寫,其會出現在控制項的左側。
userAvatarInitials使用 屬性來設定使用者虛擬人偶縮寫,其會出現在右側。
botAvatarImage使用 和 userAvatarImage 屬性來提供 Bot 和使用者虛擬人偶的影像 URL。 控制項會顯示這些值來取代縮寫,如下所示。
const avatarOptions = {
   botAvatarImage: '<URL to your bot avatar image>',
   botAvatarInitials: 'BF',
   userAvatarImage: '<URL to your user avatar image>',
   userAvatarInitials: 'WC'
};
![]()
自訂呈現活動或附件
使用最新版本的 網路聊天,您也可以轉譯網路聊天不支援現用的活動或附件。 活動和附件會透過仿照 Redux 中介軟體的可自訂管線來傳送。 管線有足夠的彈性,因此您可以輕鬆執行下列工作:
- 裝飾現有活動/附件
- 新增活動/附件
- 取代現有活動/附件 (或加以移除)
- 將中介軟體連接形成菊輪鍊
將 GitHub 存放庫顯示為附件
例如,如果您想要顯示一組 GitHub 存放庫卡片,您可以為 GitHub 存放庫建立新的React元件,並將其新增為中介軟體。 下圖和程式碼片段來自 customization-card-components 範例範例。
當您輸入預設訊息時,輸出如下: sample:github-repository。

如果您輸入 的協助 ,可以取得所有卡片的選取專案。 這是許多範例之一:

import ReactWebChat from 'botframework-webchat';
import ReactDOM from 'react-dom';

// Create a new React component that accept render a GitHub repository attachment
const GitHubRepositoryAttachment = props => (
   <div
      style={{
         fontFamily: "'Calibri', 'Helvetica Neue', Arial, sans-serif",
         margin: 20,
         textAlign: 'center'
      }}
   >
      <svg
         height="64"
         viewBox="0 0 16 16"
         version="1.1"
         width="64"
         aria-hidden="true"
      >
         <path
            fillRule="evenodd"
            d="M8 0C3.58 0 0 3.58 0 8c0 3.54 2.29 6.53 5.47 7.59.4.07.55-.17.55-.38 0-.19-.01-.82-.01-1.49-2.01.37-2.53-.49-2.69-.94-.09-.23-.48-.94-.82-1.13-.28-.15-.68-.52-.01-.53.63-.01 1.08.58 1.23.82.72 1.21 1.87.87 2.33.66.07-.52.28-.87.51-1.07-1.78-.2-3.64-.89-3.64-3.95 0-.87.31-1.59.82-2.15-.08-.2-.36-1.02.08-2.12 0 0 .67-.21 2.2.82.64-.18 1.32-.27 2-.27.68 0 1.36.09 2 .27 1.53-1.04 2.2-.82 2.2-.82.44 1.1.16 1.92.08 2.12.51.56.82 1.27.82 2.15 0 3.07-1.87 3.75-3.65 3.95.29.25.54.73.54 1.48 0 1.07-.01 1.93-.01 2.2 0 .21.15.46.55.38A8.013 8.013 0 0 0 16 8c0-4.42-3.58-8-8-8z"
         />
      </svg>
      <p>
         <a
            href={`https://github.com/${encodeURI(props.owner)}/${encodeURI(
               props.repo
            )}`}
            target="_blank"
         >
            {props.owner}/<br />
            {props.repo}
         </a>
      </p>
   </div>
);

// Creating a new middleware pipeline that will render <GitHubRepositoryAttachment> for specific type of attachment
const attachmentMiddleware = () => next => card => {
   switch (card.attachment.contentType) {
      case 'application/vnd.microsoft.botframework.samples.github-repository':
         return (
            <GitHubRepositoryAttachment
               owner={card.attachment.content.owner}
               repo={card.attachment.content.repo}
            />
         );

      default:
         return next(card);
   }
};

ReactDOM.render(
   <ReactWebChat
      // Prepending the new middleware pipeline
      attachmentMiddleware={attachmentMiddleware}
      directLine={window.WebChat.createDirectLine({ token })}
   />,
   document.getElementById('webchat')
);
在此範例中,我們會新增稱為 GitHubRepositoryAttachment 的新 React 元件:
const GitHubRepositoryAttachment = props => (
   <div
      style={{
         fontFamily: "'Calibri', 'Helvetica Neue', Arial, sans-serif",
         margin: 20,
         textAlign: 'center'
      }}
   >
      <svg
         height="64"
         viewBox="0 0 16 16"
         version="1.1"
         width="64"
         aria-hidden="true"
      >
         <path
            fillRule="evenodd"
            d="M8 0C3.58 0 0 3.58 0 8c0 3.54 2.29 6.53 5.47 7.59.4.07.55-.17.55-.38 0-.19-.01-.82-.01-1.49-2.01.37-2.53-.49-2.69-.94-.09-.23-.48-.94-.82-1.13-.28-.15-.68-.52-.01-.53.63-.01 1.08.58 1.23.82.72 1.21 1.87.87 2.33.66.07-.52.28-.87.51-1.07-1.78-.2-3.64-.89-3.64-3.95 0-.87.31-1.59.82-2.15-.08-.2-.36-1.02.08-2.12 0 0 .67-.21 2.2.82.64-.18 1.32-.27 2-.27.68 0 1.36.09 2 .27 1.53-1.04 2.2-.82 2.2-.82.44 1.1.16 1.92.08 2.12.51.56.82 1.27.82 2.15 0 3.07-1.87 3.75-3.65 3.95.29.25.54.73.54 1.48 0 1.07-.01 1.93-.01 2.2 0 .21.15.46.55.38A8.013 8.013 0 0 0 16 8c0-4.42-3.58-8-8-8z"
         />
      </svg>
      <p>
         <a
            href={`https://github.com/${encodeURI(props.owner)}/${encodeURI(
               props.repo
            )}`}
            target="_blank"
         >
            {props.owner}/<br />
            {props.repo}
         </a>
      </p>
   </div>
);
接著,我們會建立中介軟體,以在聊天機器人傳送內容類型為 application/vnd.microsoft.botframework.samples.github-repository 的附件時,呈現新的 React 元件。 否則,其會藉由呼叫 next(card) 在中介軟體上繼續進行。
const attachmentMiddleware = () => next => card => {
   switch (card.attachment.contentType) {
      case 'application/vnd.microsoft.botframework.samples.github-repository':
         return (
            <GitHubRepositoryAttachment
               owner={card.attachment.content.owner}
               repo={card.attachment.content.repo}
            />
         );

      default:
         return next(card);
   }
};
聊天機器人所傳來的活動看起來如下所示:
{
   "type": "message",
   "from": {
      "role": "bot"
   },
   "attachmentLayout": "carousel",
   "attachments": [
      {
         "contentType": "application/vnd.microsoft.botframework.samples.github-repository",
         "content": {
            "owner": "Microsoft",
            "repo": "BotFramework-WebChat"
         }
      },
      {
         "contentType": "application/vnd.microsoft.botframework.samples.github-repository",
         "content": {
            "owner": "Microsoft",
            "repo": "BotFramework-Emulator"
         }
      },
      {
         "contentType": "application/vnd.microsoft.botframework.samples.github-repository",
         "content": {
            "owner": "Microsoft",
            "repo": "BotFramework-DirectLineJS"
         }
      }
   ]
}