在 Azure 雲端服務 (傳統) 中啟用 Azure 診斷
重要
針對新客戶目前已取代 Azure 雲端服務 (傳統),而針對所有客戶,該服務將從 2024 年 8 月 31 日起完全淘汰。 新部署應該使用 Azure Resource Manager 型的新部署模型 Azure 雲端服務 (延伸支援)。
如需有關 Azure 診斷的背景資訊,請參閱 Azure 診斷概觀 。
如何在背景工作角色中啟用診斷
本逐步解說說明如何實作 Azure 背景工作角色,該角色使用 .NET EventSource 類別發出遙測資料。 Azure 診斷可用來收集遙測資料,並將資料儲存在 Azure 儲存體帳戶。 建立背景工作角色時,Visual Studio 會自動啟用診斷 1.0 來作為 Azure SDK for .NET 2.4 及更早版本中解決方案的一部分。 下列指示說明建立背景工作角色、從解決方案停用診斷 1.0,以及將診斷 1.2 或 1.3 部署至背景工作角色的程序。
必要條件
本文假設您擁有 Azure 訂用帳戶,並且搭配 Azure SDK 使用 Visual Studio。 如果您沒有 Azure 訂用帳戶,可以註冊 免費試用版。 請務必 安裝及設定 Azure PowerShell 0.8.7 版或更新版本。
步驟 1:建立背景工作角色
- 啟動 Visual Studio。
- 從以 .NET Framework 4.5 為目標的雲端範本,建立 Azure 雲端服務專案。 將專案命名為 "WadExample" 並按一下 [確定]。
- 選取 [ 背景工作角色 ] 並按一下 [確定]。 將會建立專案。
- 在方案總管中,按兩下 [WorkerRole1] 屬性檔。
- 在 [設定] 索引標籤中取消核取 [啟用診斷] 以停用診斷 1.0 (Azure SDK 2.4 和更早版本)。
- 建置您的解決方案以確認無誤。
步驟 2:實作您的程式碼
以下列程式碼取代 WorkerRole.cs 的內容。 繼承自 EventSource 類別的 SampleEventSourceWriter 類別實作四種記錄方法:SendEnums、MessageMethod、SetOther 和 HighFreq。 傳遞至 WriteEvent 方法的第一個參數定義個別事件的識別碼。 Run 方法實作一個無限迴圈,每 10 秒呼叫一次在 SampleEventSourceWriter 類別中實作的每種記錄方法。
using Microsoft.WindowsAzure.ServiceRuntime;
using System;
using System.Diagnostics;
using System.Diagnostics.Tracing;
using System.Net;
using System.Threading;

namespace WorkerRole1
{
    sealed class SampleEventSourceWriter : EventSource
    {
        public static SampleEventSourceWriter Log = new SampleEventSourceWriter();
        public void SendEnums(MyColor color, MyFlags flags) { if (IsEnabled())  WriteEvent(1, (int)color, (int)flags); }// Cast enums to int for efficient logging.
        public void MessageMethod(string Message) { if (IsEnabled())  WriteEvent(2, Message); }
        public void SetOther(bool flag, int myInt) { if (IsEnabled())  WriteEvent(3, flag, myInt); }
        public void HighFreq(int value) { if (IsEnabled()) WriteEvent(4, value); }

    }

    enum MyColor
    {
        Red,
        Blue,
        Green
    }

    [Flags]
    enum MyFlags
    {
        Flag1 = 1,
        Flag2 = 2,
        Flag3 = 4
    }

    public class WorkerRole : RoleEntryPoint
    {
        public override void Run()
        {
            // This is a sample worker implementation. Replace with your logic.
            Trace.TraceInformation("WorkerRole1 entry point called");

            int value = 0;

            while (true)
            {
                Thread.Sleep(10000);
                Trace.TraceInformation("Working");

                // Emit several events every time we go through the loop
                for (int i = 0; i < 6; i++)
                {
                    SampleEventSourceWriter.Log.SendEnums(MyColor.Blue, MyFlags.Flag2 | MyFlags.Flag3);
                }

                for (int i = 0; i < 3; i++)
                {
                    SampleEventSourceWriter.Log.MessageMethod("This is a message.");
                    SampleEventSourceWriter.Log.SetOther(true, 123456789);
                }

                if (value == int.MaxValue) value = 0;
                SampleEventSourceWriter.Log.HighFreq(value++);
            }
        }

        public override bool OnStart()
        {
            // Set the maximum number of concurrent connections
            ServicePointManager.DefaultConnectionLimit = 12;

            // For information on handling configuration changes
            // see the MSDN topic at https://go.microsoft.com/fwlink/?LinkId=166357.

            return base.OnStart();
        }
    }
}
步驟 3:部署您的背景工作角色
警告
當您在現有角色上啟用診斷功能時,您已設定的任何擴充功能都會在部署套件時停用。 包括:
- Microsoft Monitoring Agent 診斷
- Microsoft Azure 安全性監控
- Microsoft Antimalware \(部分機器翻譯\)
- Microsoft Monitoring Agent
- Microsoft 服務分析工具代理程式
- Windows Azure 網域擴充功能
- Windows Azure 診斷擴充功能
- Windows Azure 遠端桌面擴充功能
- Windows Azure 記錄檔收集器
在部署更新的角色之後,您可以透過 Azure 入口網站或 PowerShell 重設您的擴充功能。
- 在 [方案總管] 中選取 WadExample 專案,然後從 [建置] 功能表選取 [發佈],以從 Visual Studio 將背景工作角色部署至 Azure。
- 選擇您的訂用帳戶。
- 在 [Microsoft Azure 發行設定] 對話方塊中,選取 [新建...]。
- 在 [建立雲端服務和儲存體帳戶] 對話方塊中,輸入名稱 (例如 "WadExample") 並選取區域或同質群組。
- 將 [環境] 設為 [預備]。
- 適當地修改其他任何 [設定],然後按一下 [發佈]。
- 部署完成之後,請在 Azure 入口網站中確認您的雲端服務是否處於執行中狀態。
步驟 4:建立您的診斷組態檔並安裝擴充功能
執行下列 PowerShell 命令,以下載公用組態檔結構描述定義:
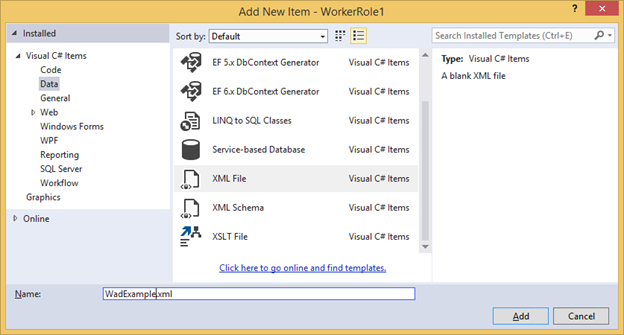
(Get-AzureServiceAvailableExtension -ExtensionName 'PaaSDiagnostics' -ProviderNamespace 'Microsoft.Azure.Diagnostics').PublicConfigurationSchema | Out-File -Encoding utf8 -FilePath 'WadConfig.xsd'以滑鼠右鍵按一下 [WorkerRole1] 專案,然後選取 [新增] ->[新增項目...] ->[Visual C# 項目] ->[資料] ->[XML 檔案],將 XML 檔案新增至您的WorkerRole1 專案。 將檔案命名為 "WadExample.xml"。
將 WadConfig.xsd 與組態檔產生關聯。 確定 WadExample.xml 編輯器視窗是使用中視窗。 按 F4 鍵開啟 [屬性] 視窗。 在 [屬性] 視窗中,按一下 [結構描述] 屬性。 按一下 [結構描述] 屬性中的 [...]。 按一下 [新增...] 按鈕,並導覽至您儲存 XSD 檔案的位置,然後選取檔案 WadConfig.xsd。 按一下 [確定]。
以下列 XML 取代 WadExample.xml 組態檔的內容,然後儲存檔案。 此組態檔可定義兩個要收集的效能計數器:一個用於 CPU 使用率,一個用於記憶體使用率。 組態會接著定義四個事件,分別對應至 SampleEventSourceWriter 類別中的方法。
<?xml version="1.0" encoding="utf-8"?>
<PublicConfig xmlns="http://schemas.microsoft.com/ServiceHosting/2010/10/DiagnosticsConfiguration">
  <WadCfg>
    <DiagnosticMonitorConfiguration overallQuotaInMB="25000">
      <PerformanceCounters scheduledTransferPeriod="PT1M">
        <PerformanceCounterConfiguration counterSpecifier="\Processor(_Total)\% Processor Time" sampleRate="PT1M" unit="percent" />
        <PerformanceCounterConfiguration counterSpecifier="\Memory\Committed Bytes" sampleRate="PT1M" unit="bytes"/>
      </PerformanceCounters>
      <EtwProviders>
        <EtwEventSourceProviderConfiguration provider="SampleEventSourceWriter" scheduledTransferPeriod="PT5M">
          <Event id="1" eventDestination="EnumsTable"/>
          <Event id="2" eventDestination="MessageTable"/>
          <Event id="3" eventDestination="SetOtherTable"/>
          <Event id="4" eventDestination="HighFreqTable"/>
          <DefaultEvents eventDestination="DefaultTable" />
        </EtwEventSourceProviderConfiguration>
      </EtwProviders>
    </DiagnosticMonitorConfiguration>
  </WadCfg>
</PublicConfig>
步驟 5:在您的背景工作角色上安裝診斷
用於管理 Web 角色或背景工作角色上之診斷的 PowerShell Cmdlet 為:Set-AzureServiceDiagnosticsExtension、Get-AzureServiceDiagnosticsExtension 和 Remove-AzureServiceDiagnosticsExtension。
- 開啟 Azure PowerShell。
- 執行指令碼,在您的背景工作角色上安裝診斷 (以 wadexample 儲存體帳戶的儲存體帳戶金鑰取代 StorageAccountKey,並以 WadExample.xml 檔案的路徑取代 config_path):
$storage_name = "wadexample"
$key = "<StorageAccountKey>"
$config_path="c:\users\<user>\documents\visual studio 2013\Projects\WadExample\WorkerRole1\WadExample.xml"
$service_name="wadexample"
$storageContext = New-AzureStorageContext -StorageAccountName $storage_name -StorageAccountKey $key
Set-AzureServiceDiagnosticsExtension -StorageContext $storageContext -DiagnosticsConfigurationPath $config_path -ServiceName $service_name -Slot Staging -Role WorkerRole1
步驟 6:查看您的遙測資料
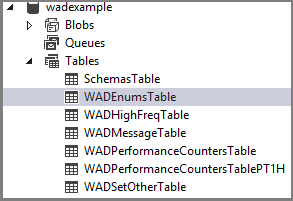
在 Visual Studio 的 [伺服器總管] 中,巡覽至 wadexample 儲存體帳戶。 在雲端服務執行約 5 分鐘之後,您應該會看到資料表 WADEnumsTable、WADHighFreqTable、WADMessageTable、WADPerformanceCountersTable 和 WADSetOtherTable。 按兩下其中一份資料表以檢視收集的遙測資料。
組態檔結構描述
診斷組態檔定義當診斷代理程式啟動時,用來初始化診斷組態設定的值。 如需相關的有效值和範例,請參閱 最新的結構描述參考 。
疑難排解
如果您遇到困難,請參閱 Azure 診斷的疑難排解 ,以解決常見的問題。
後續步驟
請參閱相關的 Azure 虛擬機器診斷文章清單,以變更您收集的資料、為問題進行疑難排解,或深入了解一般的診斷。