如何使用適用於 C 的語音 SDK 從語音辨識意圖#
Azure AI 服務語音 SDK 會與 Language Understanding Intelligent Service (LUIS) 整合以提供意圖辨識。 意圖是使用者想要執行的動作:預訂航班、檢查天氣或撥打電話。 用戶可以使用任何字詞感覺自然。 LUIS 會將使用者要求對應至您定義的意圖。
注意
LUIS 應用程式會定義您想要辨識的意圖和實體。 它與使用語音服務的 C# 應用程式不同。 在本文中,「應用程式」表示 LUIS 應用程式,而「應用程式」則表示 C# 程式代碼。
在本指南中,您會使用語音 SDK 來開發 C# 控制台應用程式,以透過裝置的麥克風從使用者語句衍生意圖。 您將學習如何:
- 建立參考語音 SDK NuGet 套件的 Visual Studio 專案
- 建立語音設定並取得意圖辨識器
- 取得 LUIS 應用程式的模型,並新增您需要的意圖
- 指定語音辨識的語言
- 從檔案辨識語音
- 使用異步、事件驅動的連續辨識
必要條件
開始本指南之前,請確定您有下列專案:
- LUIS 帳戶。 您可以透過 LUIS 入口網站免費取得一個。
- Visual Studio 2019 (任何版本)。
LUIS 和語音
LUIS 會與語音服務整合,以辨識來自語音的意圖。 您不需要語音服務訂用帳戶,只需 LUIS。
LUIS 使用兩種金鑰:
| 金鑰類型 | 目的 |
|---|---|
| 編寫 | 可讓您以程式設計方式建立和修改 LUIS 應用程式 |
| 預測 | 用來存取運行時間中的 LUIS 應用程式 |
針對本指南,您需要預測索引鍵類型。 本指南使用範例 Home Automation LUIS 應用程式,您可以遵循 使用預先建置的家庭自動化應用程式 快速入門來建立。 如果您已建立自己的 LUIS 應用程式,您可以改用它。
當您建立 LUIS 應用程式時,LUIS 會自動產生撰寫金鑰,讓您可以使用文字查詢來測試應用程式。 此金鑰不會啟用語音服務整合,且不適用於本指南。 在 Azure 儀錶板中建立 LUIS 資源,並將它指派給 LUIS 應用程式。 您可以針對本指南使用免費訂用帳戶層。
在 Azure 儀錶板中建立 LUIS 資源之後,請登入 LUIS 入口網站,在 [我的應用程式] 頁面上選擇您的應用程式,然後切換至應用程式的 [管理] 頁面。 最後,選取 提要字段中的 [Azure 資源 ]。

在 [ Azure 資源] 頁面上:
選取金鑰旁的圖示,將它複製到剪貼簿。 (您可以使用任一金鑰。
建立專案並新增工作負載
若要建立適用於 Windows 開發的 Visual Studio 專案,您需要建立專案、設定 Visual Studio for .NET 桌面開發、安裝語音 SDK,然後選擇目標架構。
若要開始,請在Visual Studio中建立專案,並確定Visual Studio已針對 .NET 桌面開發進行設定:
開啟 Visual Studio 2019。
在 [開始] 視窗上,選取 [建立新專案]。
在 [ 建立新專案 ] 視窗中,選擇 [控制台應用程式][.NET Framework],然後選取 [ 下一步]。
在 [設定新專案] 視窗中,在 [項目名稱] 中輸入 helloworld,選擇或建立 [位置] 中的目錄路徑,然後選取 [建立]。
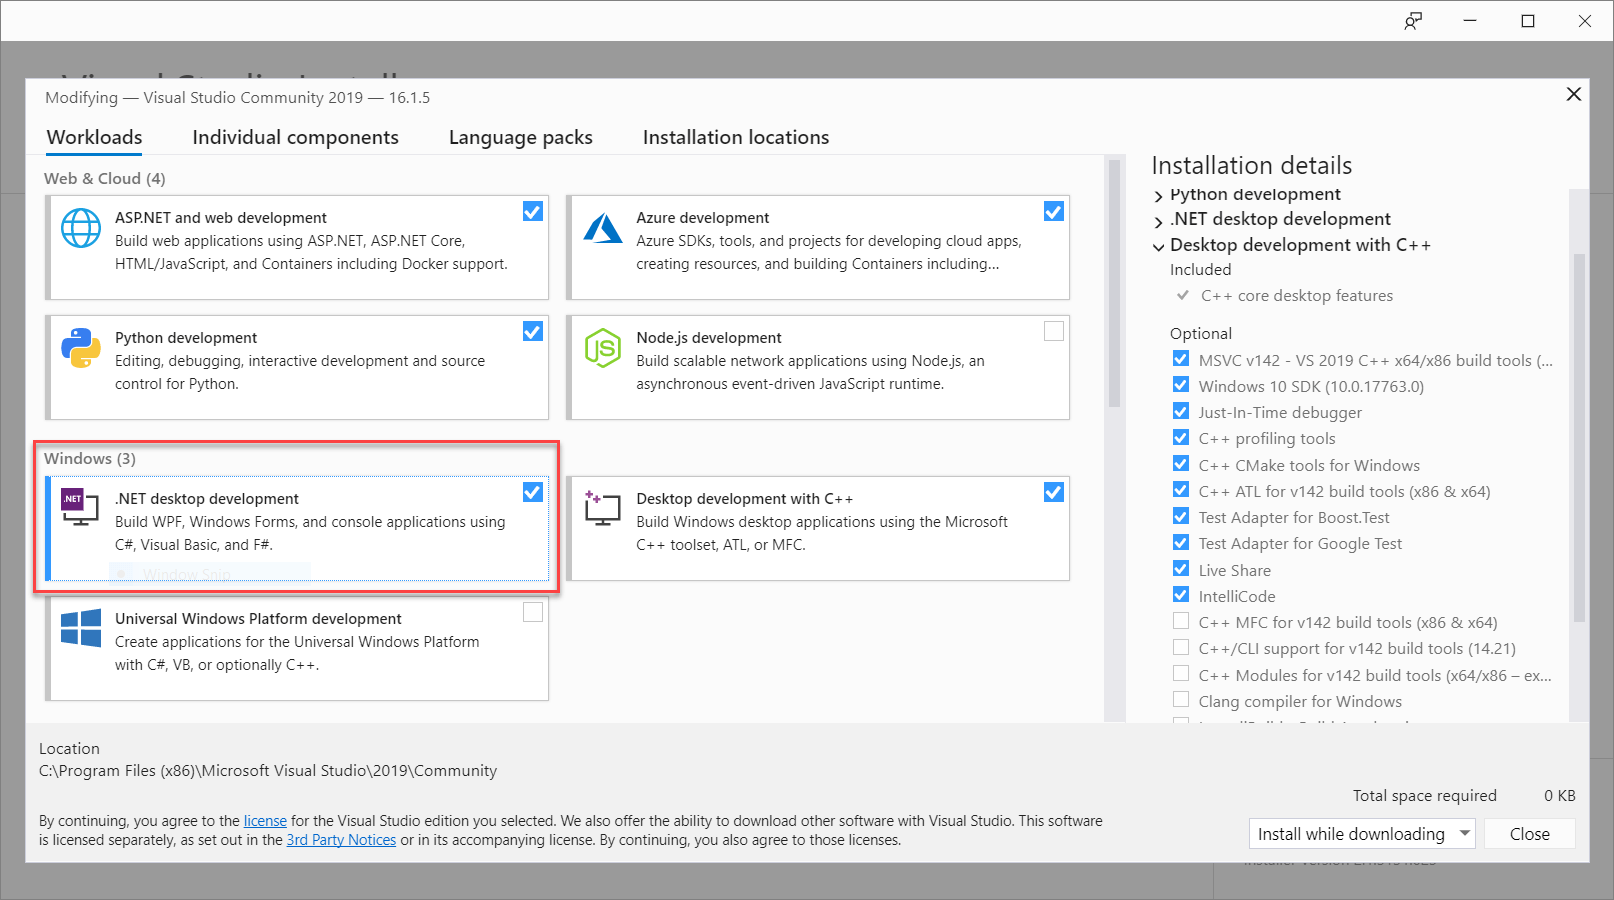
從 Visual Studio 選單欄,選取 [工具>取得工具和功能],這會開啟 Visual Studio 安裝程式 並顯示 [修改] 對話框。
檢查 .NET 桌面開發工作負載是否可用。 如果未安裝工作負載,請選取其旁邊的複選框,然後選取 [修改 ] 以開始安裝。 下載並安裝可能需要幾分鐘的時間。
如果已選取 .NET 桌面開發旁的複選框,請選取 [關閉] 結束對話框。
關閉 Visual Studio 安裝程式。
安裝語音 SDK
下一個步驟是安裝 語音 SDK NuGet 套件,以便您可以在程式代碼中參考它。
在 方案總管 中,以滑鼠右鍵按兩下 helloworld 專案,然後選取 [管理 NuGet 套件] 以顯示 NuGet 封裝管理員。
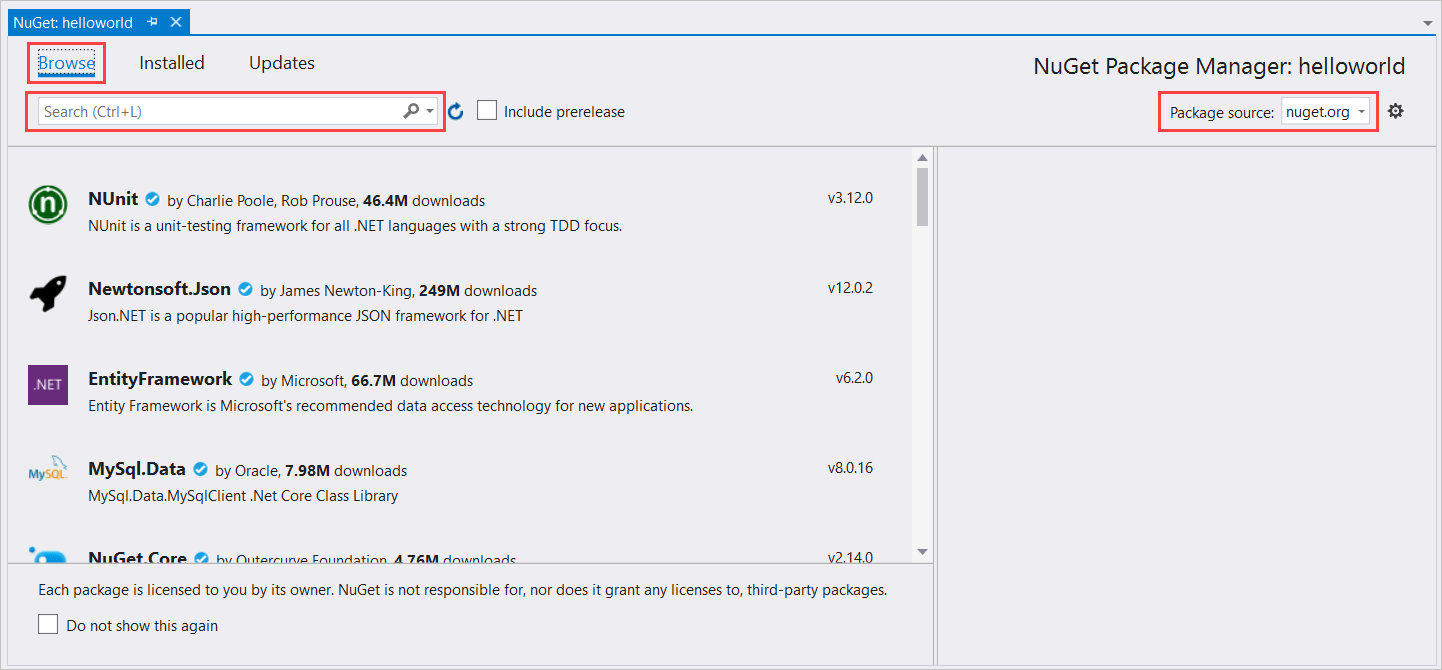
在右上角尋找 [套件來源 ] 下拉式方塊,並確定 已選取 nuget.org 。
在左上角,選取 [ 瀏覽]。
在搜尋方塊中,輸入 Microsoft.CognitiveServices.Speech ,然後選取 Enter。
從搜尋結果中,選取 Microsoft.CognitiveServices.Speech 套件,然後選取 [ 安裝 ] 以安裝最新的穩定版本。
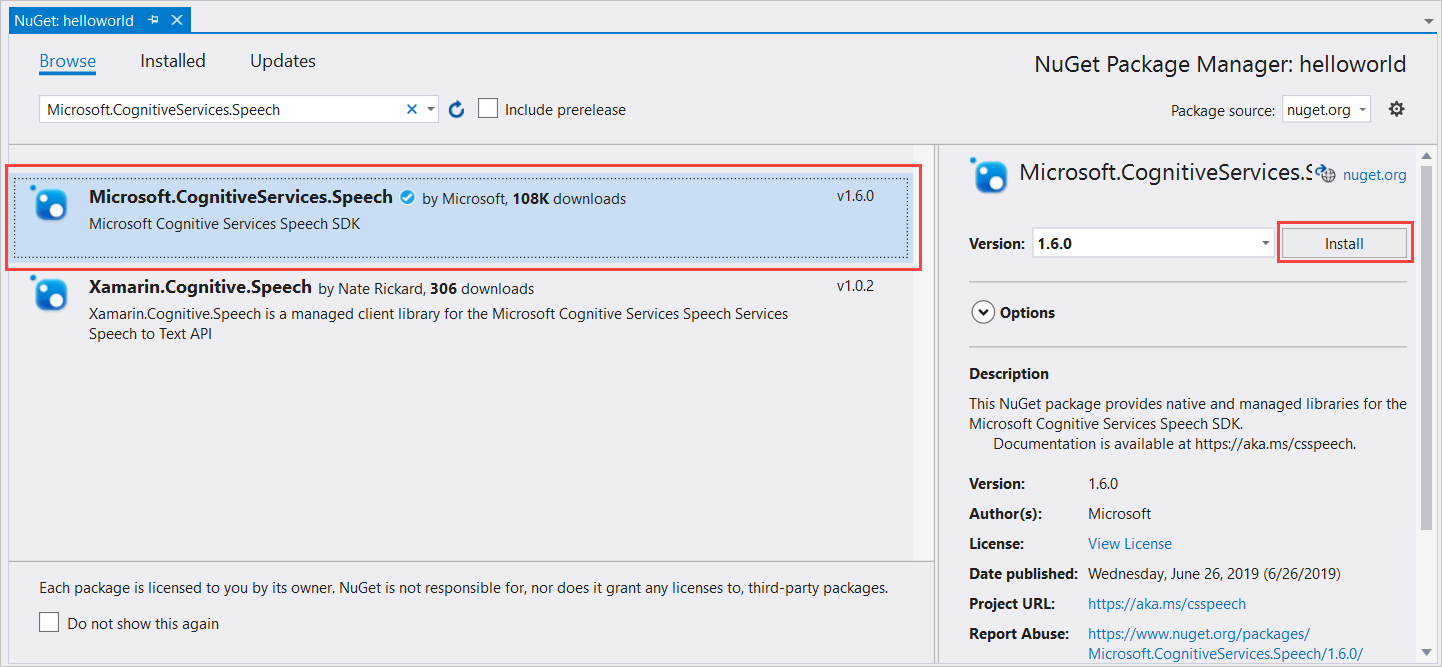
接受所有合約和授權以開始安裝。
安裝套件之後,確認會出現在 [控制台] 視窗中 封裝管理員。
選擇目標架構
現在,若要建置並執行主控台應用程式,請建立符合您電腦架構的平台組態。
從功能表欄,選取 [建>置組態管理員]。 [組態管理員] 對話方塊隨即出現。
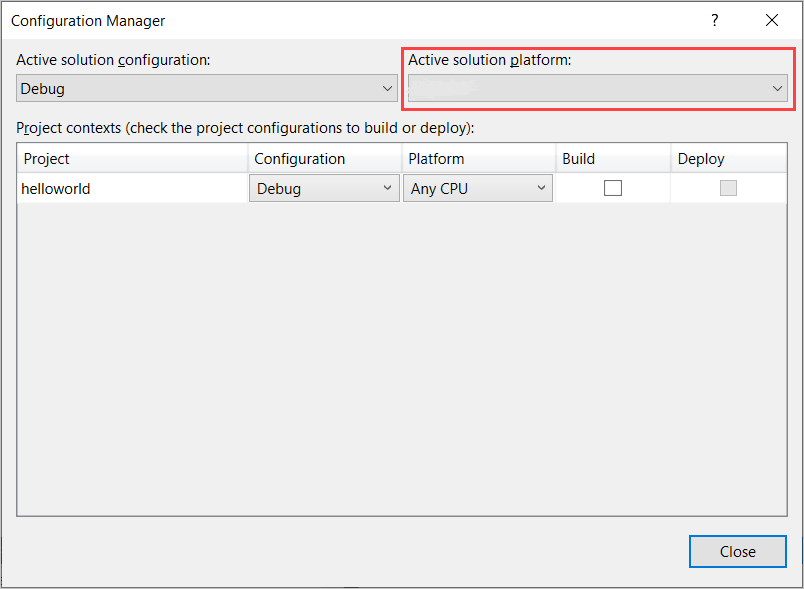
在 [作用中 解決方案平臺 ] 下拉式方塊中,選取 [ 新增]。 [新增方案平台] 對話方塊隨即出現。
在 [ 輸入或選取新的平臺 ] 下拉式方塊中:
- 如果您正在執行 64 位 Windows,請選取 x64。
- 如果您正在執行 32 位 Windows,請選取 [x86]。
選取 [確定],然後選取 [關閉]。
新增程式碼
接下來,您會將程式代碼新增至專案。
從 方案總管,開啟檔案Program.cs。
將檔案開頭的 語句區塊
using取代為下列宣告:using System; using System.Threading.Tasks; using Microsoft.CognitiveServices.Speech; using Microsoft.CognitiveServices.Speech.Audio; using Microsoft.CognitiveServices.Speech.Intent;將提供的
Main()方法取代為下列異步對等專案:public static async Task Main() { await RecognizeIntentAsync(); Console.WriteLine("Please press Enter to continue."); Console.ReadLine(); }建立空的異步方法
RecognizeIntentAsync(),如下所示:static async Task RecognizeIntentAsync() { }在這個新方法的主體中,新增下列程序代碼:
// Creates an instance of a speech config with specified subscription key
// and service region. Note that in contrast to other services supported by
// the Cognitive Services Speech SDK, the Language Understanding service
// requires a specific subscription key from https://www.luis.ai/.
// The Language Understanding service calls the required key 'endpoint key'.
// Once you've obtained it, replace with below with your own Language Understanding subscription key
// and service region (e.g., "westus").
// The default language is "en-us".
var config = SpeechConfig.FromSubscription("YourLanguageUnderstandingSubscriptionKey", "YourLanguageUnderstandingServiceRegion");

// Creates an intent recognizer using microphone as audio input.
using (var recognizer = new IntentRecognizer(config))
{
    // Creates a Language Understanding model using the app id, and adds specific intents from your model
    var model = LanguageUnderstandingModel.FromAppId("YourLanguageUnderstandingAppId");
    recognizer.AddIntent(model, "YourLanguageUnderstandingIntentName1", "id1");
    recognizer.AddIntent(model, "YourLanguageUnderstandingIntentName2", "id2");
    recognizer.AddIntent(model, "YourLanguageUnderstandingIntentName3", "any-IntentId-here");

    // Starts recognizing.
    Console.WriteLine("Say something...");

    // Starts intent recognition, and returns after a single utterance is recognized. The end of a
    // single utterance is determined by listening for silence at the end or until a maximum of 15
    // seconds of audio is processed.  The task returns the recognition text as result.
    // Note: Since RecognizeOnceAsync() returns only a single utterance, it is suitable only for single
    // shot recognition like command or query.
    // For long-running multi-utterance recognition, use StartContinuousRecognitionAsync() instead.
    var result = await recognizer.RecognizeOnceAsync().ConfigureAwait(false);

    // Checks result.
    if (result.Reason == ResultReason.RecognizedIntent)
    {
        Console.WriteLine($"RECOGNIZED: Text={result.Text}");
        Console.WriteLine($"    Intent Id: {result.IntentId}.");
        Console.WriteLine($"    Language Understanding JSON: {result.Properties.GetProperty(PropertyId.LanguageUnderstandingServiceResponse_JsonResult)}.");
    }
    else if (result.Reason == ResultReason.RecognizedSpeech)
    {
        Console.WriteLine($"RECOGNIZED: Text={result.Text}");
        Console.WriteLine($"    Intent not recognized.");
    }
    else if (result.Reason == ResultReason.NoMatch)
    {
        Console.WriteLine($"NOMATCH: Speech could not be recognized.");
    }
    else if (result.Reason == ResultReason.Canceled)
    {
        var cancellation = CancellationDetails.FromResult(result);
        Console.WriteLine($"CANCELED: Reason={cancellation.Reason}");

        if (cancellation.Reason == CancellationReason.Error)
        {
            Console.WriteLine($"CANCELED: ErrorCode={cancellation.ErrorCode}");
            Console.WriteLine($"CANCELED: ErrorDetails={cancellation.ErrorDetails}");
            Console.WriteLine($"CANCELED: Did you update the subscription info?");
        }
    }
}
使用 LUIS 資源金鑰、區域和應用程式識別碼取代此方法中的佔位元,如下所示。
預留位置 Replace with YourLanguageUnderstandingSubscriptionKey您的 LUIS 資源金鑰。 同樣地,您必須從 Azure 儀錶板取得此專案。 您可以在 LUIS 入口網站的應用程式 [Azure 資源] 頁面 ([管理] 下方找到它。 YourLanguageUnderstandingServiceRegionLUIS 資源位於的區域簡短標識碼,例如 westus美國西部。 請參閱 區域。YourLanguageUnderstandingAppIdLUIS 應用程式識別碼。 您可以在 LUIS 入口網站的應用程式 設定 頁面上找到它。
透過進行這些變更,您可以建置 (Control+Shift+B) 並執行應用程式 (F5)。 出現提示時,請嘗試在計算機的麥克風中說「關燈」。 應用程式會在主控台視窗中顯示結果。
下列各節包含程式代碼的討論。
建立意圖辨識器
首先,您需要從 LUIS 預測金鑰和區域建立語音設定。 您可以使用語音設定來為語音 SDK 的各種功能建立辨識器。 語音設定有多種方式可指定您想要使用的資源;在這裡,我們使用 FromSubscription,它會採用資源密鑰和區域。
注意
使用 LUIS 資源的金鑰和區域,而不是語音資源。
接下來,使用 new IntentRecognizer(config)建立意圖辨識器。 由於組態已經知道要使用的資源,因此在建立辨識器時,您不需要再次指定索引鍵。
匯入 LUIS 模型並新增意圖
現在,使用 LanguageUnderstandingModel.FromAppId() 從 LUIS 應用程式匯入模型,並新增您想要透過辨識器方法辨識的 AddIntent() LUIS 意圖。 這兩個步驟可藉由指出使用者可能在其要求中使用的單字,來改善語音辨識的正確性。 如果您不需要在應用程式中辨識所有意圖,就不需要新增所有應用程式的意圖。
若要新增意圖,您必須提供三個自變數:LUIS 模型(名為 model)、意圖名稱和意圖識別碼。 標識碼和名稱之間的差異如下。
AddIntent() 參數 |
目的 |
|---|---|
intentName |
LUIS 應用程式中所定義的意圖名稱。 此值必須完全符合 LUIS 意圖名稱。 |
intentID |
語音 SDK 指派給已辨識意圖的標識碼。 此值可以是任何您想要的值;它不需要對應至 LUIS 應用程式中定義的意圖名稱。 例如,如果相同程式代碼會處理多個意圖,您可以針對它們使用相同的標識碼。 |
家用自動化 LUIS 應用程式有兩個意圖:一個用於開啟裝置,另一個用於關閉裝置。 下列幾行會將這些意圖新增至辨識器;以這個程式代碼取代 方法中的RecognizeIntentAsync()三AddIntent行。
recognizer.AddIntent(model, "HomeAutomation.TurnOff", "off");
recognizer.AddIntent(model, "HomeAutomation.TurnOn", "on");
除了新增個別意圖,您也可以使用 AddAllIntents 方法,將模型中的所有意圖新增至辨識器。
開始辨識
建立辨識器並新增意圖之後,就可以開始辨識。 語音 SDK 支援單次和連續辨識。
| 辨識模式 | 要呼叫的方法 | 結果 |
|---|---|---|
| 單次 | RecognizeOnceAsync() |
傳回已辨識的意圖,如果有的話,在一個語句之後。 |
| 連續 | StartContinuousRecognitionAsync()StopContinuousRecognitionAsync() |
辨識多個語句;當結果可供使用時,會發出事件(例如 IntermediateResultReceived)。 |
應用程式會使用單次模式,因此呼叫 RecognizeOnceAsync() 開始辨識。 結果是 IntentRecognitionResult 物件,其中包含已辨識意圖的相關信息。 您可以使用下列運算式來擷取 LUIS JSON 回應:
result.Properties.GetProperty(PropertyId.LanguageUnderstandingServiceResponse_JsonResult)
應用程式不會剖析 JSON 結果。 它只會在主控台視窗中顯示 JSON 文字。

指定辨識語言
根據預設,LUIS 會以美式英文辨識意圖(en-us)。 藉由將地區設定程式碼指派給 SpeechRecognitionLanguage 語音組態的 屬性,即可辨識其他語言的意圖。 例如,在建立辨識器以辨識德文意圖之前,請在應用程式中新增 config.SpeechRecognitionLanguage = "de-de"; 。 如需詳細資訊,請參閱 LUIS 語言支援。
從檔案連續辨識
下列程式代碼說明另外兩個使用語音 SDK 的意圖辨識功能。 先前提到的第一個是連續辨識,其中辨識器會在有結果可用時發出事件。 這些事件會由您提供的事件處理程序處理。 使用連續辨識,您可以呼叫辨識器的 StartContinuousRecognitionAsync() 方法來開始辨識,而不是 RecognizeOnceAsync()。
另一項功能是讀取包含要從WAV檔案處理之語音的音訊。 實作牽涉到建立意圖辨識器時可以使用的音訊組態。 檔案必須是單一通道(mono),取樣率為 16 kHz。
若要試用這些功能,請刪除或批註方法的 RecognizeIntentAsync() 主體,並在其位置新增下列程序代碼。
// Creates an instance of a speech config with specified subscription key
// and service region. Note that in contrast to other services supported by
// the Cognitive Services Speech SDK, the Language Understanding service
// requires a specific subscription key from https://www.luis.ai/.
// The Language Understanding service calls the required key 'endpoint key'.
// Once you've obtained it, replace with below with your own Language Understanding subscription key
// and service region (e.g., "westus").
var config = SpeechConfig.FromSubscription("YourLanguageUnderstandingSubscriptionKey", "YourLanguageUnderstandingServiceRegion");

// Creates an intent recognizer using file as audio input.
// Replace with your own audio file name.
using (var audioInput = AudioConfig.FromWavFileInput("YourAudioFile.wav"))
{
    using (var recognizer = new IntentRecognizer(config, audioInput))
    {
        // The TaskCompletionSource to stop recognition.
        var stopRecognition = new TaskCompletionSource<int>(TaskCreationOptions.RunContinuationsAsynchronously);

        // Creates a Language Understanding model using the app id, and adds specific intents from your model
        var model = LanguageUnderstandingModel.FromAppId("YourLanguageUnderstandingAppId");
        recognizer.AddIntent(model, "YourLanguageUnderstandingIntentName1", "id1");
        recognizer.AddIntent(model, "YourLanguageUnderstandingIntentName2", "id2");
        recognizer.AddIntent(model, "YourLanguageUnderstandingIntentName3", "any-IntentId-here");

        // Subscribes to events.
        recognizer.Recognizing += (s, e) =>
        {
            Console.WriteLine($"RECOGNIZING: Text={e.Result.Text}");
        };

        recognizer.Recognized += (s, e) =>
        {
            if (e.Result.Reason == ResultReason.RecognizedIntent)
            {
                Console.WriteLine($"RECOGNIZED: Text={e.Result.Text}");
                Console.WriteLine($"    Intent Id: {e.Result.IntentId}.");
                Console.WriteLine($"    Language Understanding JSON: {e.Result.Properties.GetProperty(PropertyId.LanguageUnderstandingServiceResponse_JsonResult)}.");
            }
            else if (e.Result.Reason == ResultReason.RecognizedSpeech)
            {
                Console.WriteLine($"RECOGNIZED: Text={e.Result.Text}");
                Console.WriteLine($"    Intent not recognized.");
            }
            else if (e.Result.Reason == ResultReason.NoMatch)
            {
                Console.WriteLine($"NOMATCH: Speech could not be recognized.");
            }
        };

        recognizer.Canceled += (s, e) =>
        {
            Console.WriteLine($"CANCELED: Reason={e.Reason}");

            if (e.Reason == CancellationReason.Error)
            {
                Console.WriteLine($"CANCELED: ErrorCode={e.ErrorCode}");
                Console.WriteLine($"CANCELED: ErrorDetails={e.ErrorDetails}");
                Console.WriteLine($"CANCELED: Did you update the subscription info?");
            }

            stopRecognition.TrySetResult(0);
        };

        recognizer.SessionStarted += (s, e) =>
        {
            Console.WriteLine("\n    Session started event.");
        };

        recognizer.SessionStopped += (s, e) =>
        {
            Console.WriteLine("\n    Session stopped event.");
            Console.WriteLine("\nStop recognition.");
            stopRecognition.TrySetResult(0);
        };


        // Starts continuous recognition. Uses StopContinuousRecognitionAsync() to stop recognition.
        await recognizer.StartContinuousRecognitionAsync().ConfigureAwait(false);

        // Waits for completion.
        // Use Task.WaitAny to keep the task rooted.
        Task.WaitAny(new[] { stopRecognition.Task });

        // Stops recognition.
        await recognizer.StopContinuousRecognitionAsync().ConfigureAwait(false);
    }
}
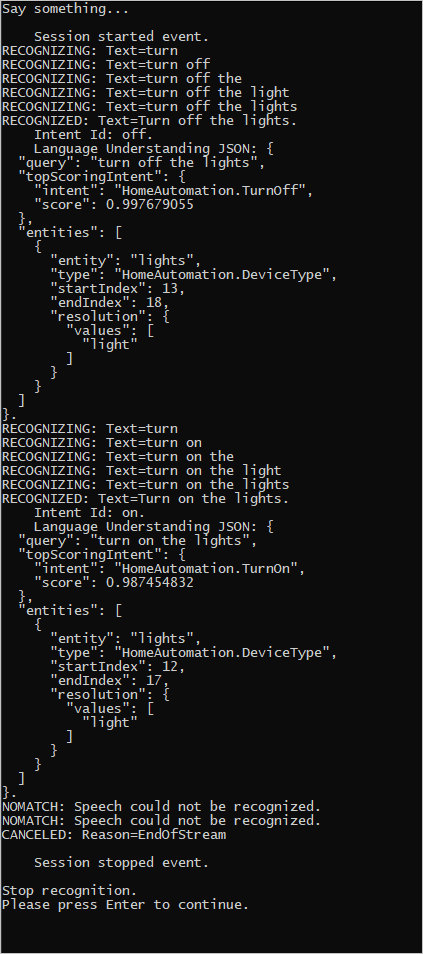
修改程式代碼以包含 LUIS 預測金鑰、區域和應用程式識別碼,以及新增家用自動化意圖,如下所示。 變更 whatstheweatherlike.wav 為錄製的音訊檔案名稱。 然後建置、將音訊檔案複製到組建目錄,然後執行應用程式。
例如,如果您說「關閉燈光」、暫停,然後在錄製的音訊檔案中說「開啟燈光」,控制台輸出可能會如下所示:
語音 SDK 小組會主動維護開放原始碼存放庫中的一組大型範例。 如需範例原始程式碼存放庫,請參閱 GitHub 上的 Azure AI 語音 SDK。 C#、C++、Java、Python、Objective-C、Swift、JavaScript、UWP、Unity 和 Xamarin 有範例。 在 samples/csharp/sharedcontent/console 資料夾中尋找本文中的程序代碼。