教學課程:於認可原始程式碼時在雲端自動執行容器映像建置
除了快速工作之外,ACR 工作還能在您將原始程式碼認可至 Git 存放庫時,自動化雲端中的 Docker 容器映像建置。 ACR 工作支援的 Git 內容包括公用或私人 GitHub 或 Azure 存放庫。
注意
目前,ACR 工作不支援 GitHub Enterprise 存放庫中的認可或提取要求觸發程序。
在本教學課程中,當您將原始程式碼認可至 Git 存放庫時,ACR 工作會建置並推送在 Dockerfile 中指定的單一容器映像。 若要建立使用 YAML 檔案定義在程式碼認可時建置、推送和選擇性測試多個容器的步驟的多步驟工作,請參閱教學課程:認可原始程式碼時在雲端中執行多步驟容器工作流程。 如需 ACR 工作的概觀,請參閱使用 ACR 工作自動化作業系統和架構修補
在本教學課程中:
- 建立工作
- 測試工作
- 檢視工作狀態
- 透過程式碼認可觸發工作
本教學課程假設您已完成上一個教學課程中的步驟。 如果您尚未完成上一個教學課程的必要條件一節中的步驟,請先加以完成,再繼續操作。
必要條件
取得範例程式碼
本教學課程假設您已完成上一個教學課程中的步驟,並已派生和複製範例存放庫。 如果您尚未完成上一個教學課程的必要條件一節中的步驟,請先加以完成,再繼續操作。
Container Registry:
您的 Azure 訂用帳戶中必須要有 Azure 容器登錄,才能完成本教學課程。 如果您需要登錄,請參閱上一個教學課程或快速入門:使用 Azure CLI 建立容器登錄。
建立 GitHub 個人存取權杖
為了在認可至 Git 存放庫時觸發工作,ACR 工作需要以個人存取權杖 (PAT) 存取存放庫。 如果您還沒有 PAT,請依照下列步驟在 GitHub 中產生 PAT:
瀏覽至 GitHub 上的 PAT 建立頁面 (https://github.com/settings/tokens/new)
輸入權杖的簡短說明,例如「ACR 工作示範」
選取 ACR 的範圍以存取存放庫。 若要如同本教學課程一般地存取公用存放庫,請在存放庫底下,啟用 repo:status 和 public_repo
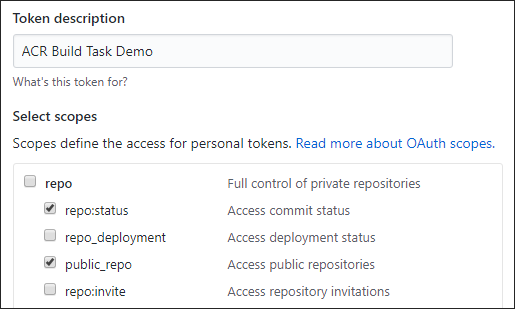
注意
若要產生 PAT 以存取「私人」存放庫,請選取完整存放庫控制的範圍。
選取 [產生權杖] 按鈕 (系統可能會要求您確認密碼)
在安全的位置複製並儲存產生的權杖 (當您在下一節定義工作時,將會使用此權杖)

備妥環境以使用 Azure CLI
在 Azure Cloud Shell 中使用 Bash 環境。 如需詳細資訊,請參閱 Azure Cloud Shell 中的 Bash 快速入門。

若要在本地執行 CLI 參考命令,請安裝 Azure CLI。 若您在 Windows 或 macOS 上執行,請考慮在 Docker 容器中執行 Azure CLI。 如需詳細資訊,請參閱〈如何在 Docker 容器中執行 Azure CLI〉。
如果您使用的是本機安裝,請使用 az login 命令,透過 Azure CLI 來登入。 請遵循您終端機上顯示的步驟,完成驗證程序。 如需其他登入選項,請參閱使用 Azure CLI 登入。
出現提示時,請在第一次使用時安裝 Azure CLI 延伸模組。 如需擴充功能詳細資訊,請參閱使用 Azure CLI 擴充功能。
執行 az version 以尋找已安裝的版本和相依程式庫。 若要升級至最新版本,請執行 az upgrade。
建立建置工作
現在,您已完成啟用 ACR 工作以讀取認可狀態以及在存放庫中建立 Webhook 所需的步驟,接下來可以建立工作,以在認可至存放庫時觸發容器映像建置。
首先,請在這些殼層環境變數中填入您的環境適用的值。 此步驟並不是必要動作,但可簡化在本教學課程中執行多行 Azure CLI 命令的作業。 若未填入這些環境變數,則必須手動取代命令範例中出現的每個值。
ACR_NAME=<registry-name>        # The name of your Azure container registry
GIT_USER=<github-username>      # Your GitHub user account name
GIT_PAT=<personal-access-token> # The PAT you generated in the previous section
現在,請執行下列 az acr task create 命令以建立工作。
注意
下列範例中使用的 Dockerfile 相依於 Docker Hub 的公用基礎容器映像。 使用公用內容時,若要在改善可靠性,請在私人 Azure 容器登錄中匯入和管理映像,並更新 Dockerfile,即可使用私人受控基礎映像。 深入了解公用映像的使用方式。
az acr task create \
    --registry $ACR_NAME \
    --name taskhelloworld \
    --image helloworld:{{.Run.ID}} \
    --context https://github.com/$GIT_USER/acr-build-helloworld-node.git#master \
    --file Dockerfile \
    --git-access-token $GIT_PAT
此工作會指定只要有程式碼認可至 --context 所指定之存放庫中的「主要」分支,ACR 工作即會從該分支中的程式碼建置容器映像。 系統會使用 --file 所指定、位於存放庫根目錄中的 Dockerfile 來建置映像。 --image 引數會針對映像標記的版本部分指定 {{.Run.ID}} 的參數化值,以確保建置的映像會與特定的組建相互關聯,並加上唯一標記。
成功執行的 az acr task create 命令會產生如下的輸出:
{
  "agentConfiguration": {
    "cpu": 2
  },
  "creationDate": "2010-11-19T22:42:32.972298+00:00",
  "id": "/subscriptions/<Subscription ID>/resourceGroups/myregistry/providers/Microsoft.ContainerRegistry/registries/myregistry/tasks/taskhelloworld",
  "location": "westcentralus",
  "name": "taskhelloworld",
  "platform": {
    "architecture": "amd64",
    "os": "Linux",
    "variant": null
  },
  "provisioningState": "Succeeded",
  "resourceGroup": "myregistry",
  "status": "Enabled",
  "step": {
    "arguments": [],
    "baseImageDependencies": null,
    "contextPath": "https://github.com/gituser/acr-build-helloworld-node#main",
    "dockerFilePath": "Dockerfile",
    "imageNames": [
      "helloworld:{{.Run.ID}}"
    ],
    "isPushEnabled": true,
    "noCache": false,
    "type": "Docker"
  },
  "tags": null,
  "timeout": 3600,
  "trigger": {
    "baseImageTrigger": {
      "baseImageTriggerType": "Runtime",
      "name": "defaultBaseimageTriggerName",
      "status": "Enabled"
    },
    "sourceTriggers": [
      {
        "name": "defaultSourceTriggerName",
        "sourceRepository": {
          "branch": "main",
          "repositoryUrl": "https://github.com/gituser/acr-build-helloworld-node#main",
          "sourceControlAuthProperties": null,
          "sourceControlType": "GitHub"
        },
        "sourceTriggerEvents": [
          "commit"
        ],
        "status": "Enabled"
      }
    ]
  },
  "type": "Microsoft.ContainerRegistry/registries/tasks"
}
測試建置工作
現在,您已有定義組建的工作。 若要測試組建管線,請執行 az acr task run 命令以手動觸發建置:
az acr task run --registry $ACR_NAME --name taskhelloworld
根據預設,az acr task run 命令會在您執行命令時將記錄輸出串流處理至主控台。 輸出會扼要地顯示關鍵步驟。
2020/11/19 22:51:00 Using acb_vol_9ee1f28c-4fd4-43c8-a651-f0ed027bbf0e as the home volume
2020/11/19 22:51:00 Setting up Docker configuration...
2020/11/19 22:51:02 Successfully set up Docker configuration
2020/11/19 22:51:02 Logging in to registry: myregistry.azurecr.io
2020/11/19 22:51:03 Successfully logged in
2020/11/19 22:51:03 Executing step: build
2020/11/19 22:51:03 Obtaining source code and scanning for dependencies...
2020/11/19 22:51:05 Successfully obtained source code and scanned for dependencies
Sending build context to Docker daemon  23.04kB
Step 1/5 : FROM node:15-alpine
[...]
Step 5/5 : CMD ["node", "/src/server.js"]
 ---> Running in 7382eea2a56a
Removing intermediate container 7382eea2a56a
 ---> e33cd684027b
Successfully built e33cd684027b
Successfully tagged myregistry.azurecr.io/helloworld:da2
2020/11/19 22:51:11 Executing step: push
2020/11/19 22:51:11 Pushing image: myregistry.azurecr.io/helloworld:da2, attempt 1
The push refers to repository [myregistry.azurecr.io/helloworld]
4a853682c993: Preparing
[...]
4a853682c993: Pushed
[...]
da2: digest: sha256:c24e62fd848544a5a87f06ea60109dbef9624d03b1124bfe03e1d2c11fd62419 size: 1366
2020/11/19 22:51:21 Successfully pushed image: myregistry.azurecr.io/helloworld:da2
2020/11/19 22:51:21 Step id: build marked as successful (elapsed time in seconds: 7.198937)
2020/11/19 22:51:21 Populating digests for step id: build...
2020/11/19 22:51:22 Successfully populated digests for step id: build
2020/11/19 22:51:22 Step id: push marked as successful (elapsed time in seconds: 10.180456)
The following dependencies were found:
- image:
    registry: myregistry.azurecr.io
    repository: helloworld
    tag: da2
    digest: sha256:c24e62fd848544a5a87f06ea60109dbef9624d03b1124bfe03e1d2c11fd62419
  runtime-dependency:
    registry: registry.hub.docker.com
    repository: library/node
    tag: 9-alpine
    digest: sha256:8dafc0968fb4d62834d9b826d85a8feecc69bd72cd51723c62c7db67c6dec6fa
  git:
    git-head-revision: 68cdf2a37cdae0873b8e2f1c4d80ca60541029bf


Run ID: ca6 was successful after 27s
透過認可觸發建置
現在您已藉由手動執行測試了工作,接下來請透過原始程式碼的變更自動加以觸發。
首先,請確定您位於存放庫的本機複本所在的目錄中:
cd acr-build-helloworld-node
接著,執行下列命令以建立新檔案,然後將其認可並推送至 GitHub 上的存放庫分支:
echo "Hello World!" > hello.txt
git add hello.txt
git commit -m "Testing ACR Tasks"
git push origin main
在您執行 git push 命令時,系統可能會要求您提供 GitHub 認證。 請提供您的 GitHub 使用者名稱,並輸入您先前為密碼建立的個人存取權杖 (PAT)。
Username for 'https://github.com': <github-username>
Password for 'https://githubuser@github.com': <personal-access-token>
在您將認可推送至存放庫後,ACR 工作所建立的 Webhook 即會在 Azure Container Registry 中引發並啟動建置。 請顯示目前所執行工作的記錄,以確認並監視建置進度:
az acr task logs --registry $ACR_NAME
輸出會類似於下列內容,顯示目前正在執行 (或最後執行) 的工作:
Showing logs of the last created run.
Run ID: ca7

[...]

Run ID: ca7 was successful after 38s
列出建置
若要查看 ACR 工作已為登錄完成的工作流程執行,請執行 az acr task list-runs 命令:
az acr task list-runs --registry $ACR_NAME --output table
此命令的輸出應類似於下列內容。 ACR 工作已執行的流程執行會顯示出來,且最新工作的 [觸發程序] 資料行中會出現「Git 認可」:
RUN ID    TASK            PLATFORM    STATUS     TRIGGER    STARTED               DURATION
--------  --------------  ----------  ---------  ---------  --------------------  ----------
ca7       taskhelloworld  linux       Succeeded  Commit     2020-11-19T22:54:34Z  00:00:29
ca6       taskhelloworld  linux       Succeeded  Manual     2020-11-19T22:51:47Z  00:00:24
ca5                       linux       Succeeded  Manual     2020-11-19T22:23:42Z  00:00:23
下一步
在本教學課程中,您已了解如何使用工作,在將原始程式碼認可至 Git 存放庫時於 Azure 中自動觸發容器映像建置。 請進入下一個教學課程,以了解如何建立會在容器映像的基底映像更新時觸發建置的工作。