持續整合和傳遞的自動化發佈 (CI/CD)
適用於: Azure Data Factory
  Azure Synapse Analytics
提示
試用 Microsoft Fabric 中的 Data Factory,這是適用於企業的全方位分析解決方案。 Microsoft Fabric 涵蓋從資料移動到資料科學、即時分析、商業智慧和報告等所有項目。 了解如何免費啟動新的試用版!
注意
Synapse Analytics 也支援 CI/CD。 如需詳細資訊, 請參閱 Synapse Analytics CI/CD 檔 。
概觀
持續整合是指進行相關實作,以自動測試對您的程式碼基底所做的每項變更。 儘早持續傳遞會遵循持續整合期間發生的測試,並將變更推送至預備或生產系統。
在 Azure Data Factory 中,CI/CD 表示將 Data Factory 管線從開發、測試和生產環境等環境移至另一個環境。 Data Factory 會使用 Azure Resource Manager 範本 (ARM 範本) 來儲存各種 Data Factory 實體的設定,例如管線、數據集和數據流。
有兩個建議的方法可將資料處理站升級至另一個環境:
- 使用 Data Factory 與 Azure Pipelines 整合進行自動化部署。
- 使用 Data Factory 用戶體驗與 Azure Resource Manager 整合,手動上傳 ARM 範本。
如需詳細資訊,請參閱 Azure Data Factory 中的持續整合和傳遞。
本文著重於持續部署改善和 CI/CD 的自動化發佈功能。
持續部署改善
自動化發佈功能會採用 Data Factory 使用者體驗中驗證和導出 ARM 範本功能,並透過公開可用的 npm 套件來取用邏輯,@microsoft/azure-data-factory-utilities。 基於這個理由,您可以以程序設計方式觸發這些動作,而不需移至 Data Factory UI 並手動選取按鈕。 這項功能可讓您的 CI/CD 管線 truer 持續整合體驗。
注意
請務必使用節點 18.x 版及其相容版本,以避免因為套件與舊版不相容而可能發生的錯誤。
目前的 CI/CD 流程
- 每個使用者在其私人分支中進行變更。
- 不允許推送至主圖形。 用戶必須建立提取要求,才能進行變更。
- 用戶必須載入 Data Factory UI,然後選取 [發佈 ] 以將變更部署到 Data Factory,並在發佈分支中產生 ARM 範本。
- DevOps 發行管線已設定為建立新版本,並在每次將新的變更推送至發佈分支時部署 ARM 範本。
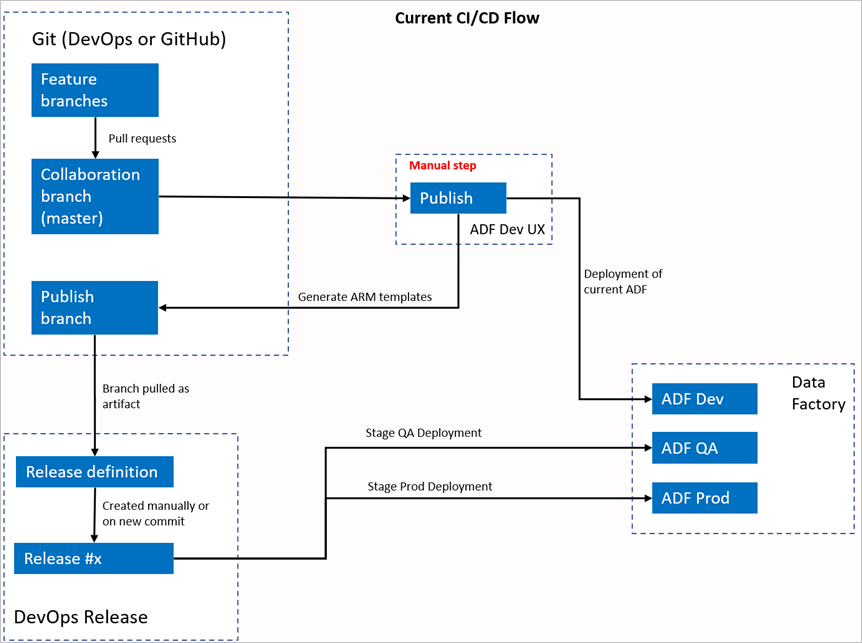
手動步驟
在目前的 CI/CD 流程中,用戶體驗是建立 ARM 範本的媒介。 因此,用戶必須移至 Data Factory UI,然後手動選取 [發佈 ] 以啟動 ARM 範本產生,並將它放在發佈分支中。
新的 CI/CD 流程
- 每個使用者在其私人分支中進行變更。
- 不允許推送至主圖形。 用戶必須建立提取要求,才能進行變更。
- 每次對 master 進行新的認可時,就會觸發 Azure DevOps 管線組建。 它會驗證資源,並在驗證成功時產生ARM樣本作為成品。
- DevOps 發行管線已設定為建立新版本,並在每次有新的組建可用時部署 ARM 範本。

變更的項目為何?
- 我們現在有一個使用DevOps建置管線的建置程式。
- 建置管線會使用ADFUtilities NPM 套件,它會驗證所有資源併產生ARM範本。 這些範本可以是單一和連結。
- 建置管線負責驗證 Data Factory 資源,併產生 ARM 範本,而不是 Data Factory UI (發佈 ] 按鈕。
- DevOps 發行定義現在會取用這個新的組建管線,而不是 Git 成品。
注意
您可以繼續使用現有的機制,也就是 adf_publish 分支,也可以使用新的流程。 支援這兩者。
套件概觀
套件中目前提供兩個命令:
- 匯出ARM範本
- Validate
匯出ARM範本
執行 npm run build export <rootFolder> <factoryId> [outputFolder] 以使用指定資料夾的資源匯出ARM樣本。 此命令也會在產生 ARM 範本之前執行驗證檢查。 以下是使用名為 testResourceGroup 的資源群組的範例:
npm run build export C:\DataFactories\DevDataFactory /subscriptions/xxxxxxxx-xxxx-xxxx-xxxx-xxxxxxxxxxxx/resourceGroups/testResourceGroup/providers/Microsoft.DataFactory/factories/DevDataFactory ArmTemplateOutput
RootFolder是代表Data Factory資源所在位置的強制欄位。FactoryId是一個強制欄位,表示格式/subscriptions/<subId>/resourceGroups/<rgName>/providers/Microsoft.DataFactory/factories/<dfName>為的 Data Factory 資源識別碼。OutputFolder是選擇性參數,指定要儲存所產生ARM範本的相對路徑。
只有更新的觸發程式停止/啟動功能現已正式推出,並合併至上述命令。
注意
產生的 ARM 範本不會發布至 Factory 的即時版本。 部署應該使用 CI/CD 管線來完成。
Validate
執行 npm run build validate <rootFolder> <factoryId> 以驗證指定資料夾的所有資源。 以下是範例:
npm run build validate C:\DataFactories\DevDataFactory /subscriptions/xxxxxxxx-xxxx-xxxx-xxxx-xxxxxxxxxxxx/resourceGroups/testResourceGroup/providers/Microsoft.DataFactory/factories/DevDataFactory
RootFolder是代表Data Factory資源所在位置的強制欄位。FactoryId是一個強制欄位,表示格式/subscriptions/<subId>/resourceGroups/<rgName>/providers/Microsoft.DataFactory/factories/<dfName>為的 Data Factory 資源識別碼。
建立 Azure 管線
雖然 npm 套件可以透過各種方式取用,但其中一個主要優點是透過 Azure Pipeline 取用。 在每個合併到共同作業分支時,可以觸發管線,先驗證所有程式代碼,然後將ARM範本匯出至 發行管線可以使用的組建成品 。 它與目前的 CI/CD 程式有何不同,就是您將 發行管線指向此成品,而不是現有的 adf_publish 分支。
遵循下列步驟以開始使用:
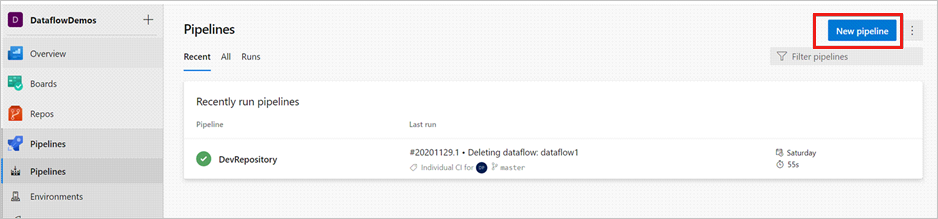
開啟 Azure DevOps 專案,然後移至 [管線]。 選取 [新增管線]。
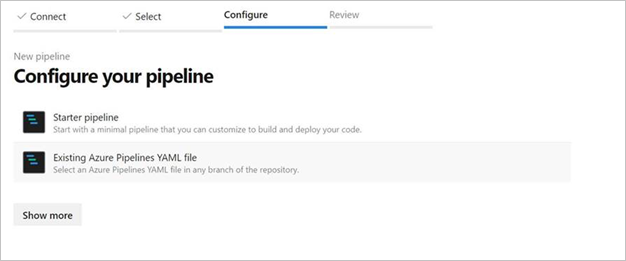
選取您要儲存管線 YAML 腳本的存放庫。 建議您將其儲存在 Data Factory 資源的相同存放庫中的組建資料夾中。 請確定存放庫中有包含 套件名稱的package.json 檔案,如下列範例所示:
{
    "scripts":{
        "build":"node node_modules/@microsoft/azure-data-factory-utilities/lib/index"
    },
    "dependencies":{
        "@microsoft/azure-data-factory-utilities":"^1.0.0"
    }
}
選取 [入門管線]。 如果您已上傳或合併 YAML 檔案,如下列範例所示,您也可以直接指向該檔案並加以編輯。
# Sample YAML file to validate and export an ARM template into a build artifact
# Requires a package.json file located in the target repository

trigger:
- main #collaboration branch

pool:
  vmImage: 'ubuntu-latest'

steps:

# Installs Node and the npm packages saved in your package.json file in the build

- task: UseNode@1
  inputs:
    version: '18.x'
  displayName: 'Install Node.js'

- task: Npm@1
  inputs:
    command: 'install'
    workingDir: '$(Build.Repository.LocalPath)/<folder-of-the-package.json-file>' #replace with the package.json folder
    verbose: true
  displayName: 'Install npm package'

# Validates all of the Data Factory resources in the repository. You'll get the same validation errors as when "Validate All" is selected.
# Enter the appropriate subscription and name for the source factory. Either of the "Validate" or "Validate and Generate ARM temmplate" options are required to perform validation. Running both is unnecessary.

- task: Npm@1
  inputs:
    command: 'custom'
    workingDir: '$(Build.Repository.LocalPath)/<folder-of-the-package.json-file>' #replace with the package.json folder
    customCommand: 'run build validate $(Build.Repository.LocalPath)/<Root-folder-from-Git-configuration-settings-in-ADF> /subscriptions/xxxxxxxx-xxxx-xxxx-xxxx-xxxxxxxxxxxx/resourceGroups/<Your-ResourceGroup-Name>/providers/Microsoft.DataFactory/factories/<Your-Factory-Name>'
  displayName: 'Validate'

# Validate and then generate the ARM template into the destination folder, which is the same as selecting "Publish" from the UX.
# The ARM template generated isn't published to the live version of the factory. Deployment should be done by using a CI/CD pipeline.

- task: Npm@1
  inputs:
    command: 'custom'
    workingDir: '$(Build.Repository.LocalPath)/<folder-of-the-package.json-file>' #replace with the package.json folder
    customCommand: 'run build export $(Build.Repository.LocalPath)/<Root-folder-from-Git-configuration-settings-in-ADF> /subscriptions/xxxxxxxx-xxxx-xxxx-xxxx-xxxxxxxxxxxx/resourceGroups/<Your-ResourceGroup-Name>/providers/Microsoft.DataFactory/factories/<Your-Factory-Name> "ArmTemplate"'
#For using preview that allows you to only stop/ start triggers that are modified, please comment out the above line and uncomment the below line. Make sure the package.json contains the build-preview command.
 #customCommand: 'run build-preview export $(Build.Repository.LocalPath) /subscriptions/222f1459-6ebd-4896-82ab-652d5f6883cf/resourceGroups/GartnerMQ2021/providers/Microsoft.DataFactory/factories/Dev-GartnerMQ2021-DataFactory "ArmTemplate"'
  displayName: 'Validate and Generate ARM template'

# Publish the artifact to be used as a source for a release pipeline.

- task: PublishPipelineArtifact@1
  inputs:
    targetPath: '$(Build.Repository.LocalPath)/<folder-of-the-package.json-file>/ArmTemplate' #replace with the package.json folder
    artifact: 'ArmTemplates'
    publishLocation: 'pipeline'
輸入您的 YAML 程式代碼。 我們建議您使用 YAML 檔案作為起點。
儲存並執行。 如果您使用 YAML,則會在每次更新主要分支時觸發它。
注意
產生的成品已經包含觸發程式的預先和部署後腳本,因此不需要手動新增這些成品。 不過,部署時,仍然需要參考 停止和啟動觸發 程序的檔,以執行提供的腳本。
相關內容
深入瞭解 Data Factory 中的持續整合和傳遞: Azure Data Factory 中的持續整合和傳遞。