建置靜態 Web 應用程式並將其部署至 Azure
在本教學課程中,使用 GitHub 動作,在本機建置 React/TypeScript 用戶端應用程式並將其部署至 Azure Static Web 應用程式。 React 應用程式可讓您使用認知服務 電腦視覺 來分析影像。
建立或使用現有的 Azure 訂用帳戶
您需要具有作用中訂用帳戶的 Azure 用戶帳戶。 免費建立一個。
必要條件
- Node.js和 npm - 安裝到本機計算機。
- Visual Studio Code - 安裝到本機電腦。
- Azure Static Web Apps - 用來將 React 應用程式部署至 Azure Static Web 應用程式。
- Git - 用來推送至 GitHub - 會啟動 GitHub 動作。
- GitHub 帳戶 - 分支並推送至存放庫
- 使用 Bash 環境使用 Azure Cloud Shell 。
- 您的 Azure 帳戶必須具有已指派的認知服務參與者角色,才能同意負責任 AI 條款並建立資源。 若要將此角色指派給您的帳戶,請遵循指派角色檔中的步驟,或連絡您的系統管理員。
什麼是 Azure 靜態 Web 應用程式
建置靜態 Web 應用程式時,您會根據您感興趣的功能和控制程度,在 Azure 上選擇數個。 本教學課程著重於最簡單的服務,其中包含許多為您所做的選擇,因此您可以專注於前端程序代碼,而不是裝載環境。
React (create-react-app) 提供下列功能:
- 如果找不到認知服務的 Azure 金鑰和端點,則顯示訊息 電腦視覺
- 可讓您使用認知服務 電腦視覺 來分析影像
- 輸入公用影像 URL 或從集合分析影像
- 分析完成時
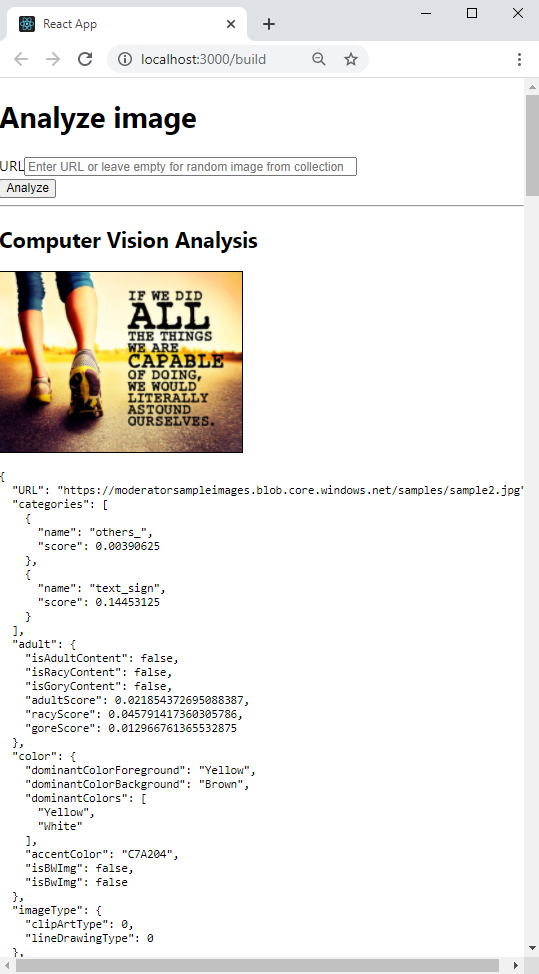
- 顯示影像
- 顯示 JSON 結果 電腦視覺
若要部署靜態 Web 應用程式,請使用 GitHub 動作,此動作會在推送至特定分支時啟動:
- 將 電腦視覺 金鑰和端點的 GitHub 秘密插入組建
- 建置 React (create-react-app) 用戶端
- 將產生的檔案移至您的 Azure 靜態 Web 應用程式 資源
1. 派生範例存放庫
派生存放庫,而不是只將它複製到本機計算機,以便讓自己的 GitHub 存放庫將變更推送至 。
開啟個別的瀏覽器視窗或索引標籤,然後登入 GitHub。
流覽至 GitHub 範例存放 庫。
https://github.com/Azure-Samples/js-e2e-client-cognitive-services在頁面右上方的區段上,選取 [分支]。
選取 [ 程序代碼 ],然後複製分支的位置 URL。

2.建立本機開發環境
在終端機或bash視窗中,將您的分叉複製到本機電腦。 將取代
YOUR-ACCOUNT-NAME為您的 GitHub 帳戶名稱。git clone https://github.com/YOUR-ACCOUNT-NAME/js-e2e-client-cognitive-services變更為新的目錄並安裝相依性。
cd js-e2e-client-cognitive-services && npm install安裝步驟會安裝必要的相依性,包括 @azure/cognitiveservices-computervision。
3.執行本機範例
執行範例。
npm start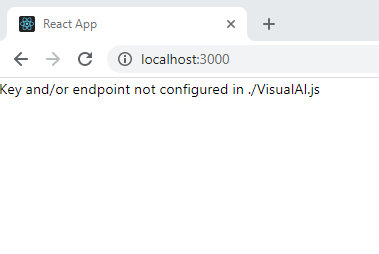
執行應用程式。 關閉終端機視窗,或在終端機中使用
control+c。
4.建立您的資源群組
在終端機或bash殼層中,輸入 Azure CLI 命令以建立名為rg-demo的 Azure 資源群組:
az group create \
    --location eastus \
    --name rg-demo \
    --subscription YOUR-SUBSCRIPTION-NAME-OR-ID
5.建立 電腦視覺 資源
建立資源群組可讓您輕鬆地尋找資源,並在完成時加以刪除。 這種類型的資源要求您同意「負責任使用」合約。 使用下列清單來瞭解如何快速建立正確的資源:
- 您的第一個 電腦視覺 資源 - 同意負責任使用合約
- 其他 電腦視覺 - 已同意負責任使用合約
6.建立您的第一個 電腦視覺 資源
如果這是您的第一個 AI 服務,您必須透過入口網站建立服務,並同意負責任使用合約,作為該資源建立的一部分。 如果這不是第一個需要「負責任使用」合約的資源,您可以使用下一節中找到的 Azure CLI 來建立資源。
使用下表來協助在 Azure 入口網站 內建立資源。
| 設定 | 值 |
|---|---|
| 資源群組 | rg-demo |
| 名稱 | demo-ComputerVision |
| Sku | S1 |
| Location | eastus |
7.建立額外的 電腦視覺 資源
執行下列命令以建立 電腦視覺 資源:
az cognitiveservices account create \
    --name demo-ComputerVision \
    --resource-group rg-demo \
    --kind ComputerVision \
    --sku S1 \
    --location eastus \
    --yes
8.取得 電腦視覺 資源端點和金鑰
在結果中,尋找並複製
properties.endpoint。 您稍後會需要用到。... "properties":{ ... "endpoint": "https://eastus.api.cognitive.microsoft.com/", ... } ...執行下列 命令 以取得金鑰。
az cognitiveservices account keys list \
--name demo-ComputerVision \
--resource-group rg-demo
複製其中一個金鑰,您稍後將需要該金鑰。
{
  "key1": "8eb7f878bdce4e96b26c89b2b8d05319",
  "key2": "c2067cea18254bdda71c8ba6428c1e1a"
}
9.將環境變數新增至本機環境
若要使用您的資源,本機程式代碼必須具有可用的密鑰和端點。 此程式代碼基底會將這些專案儲存在環境變數中:
- REACT_APP_AZURE_COMPUTER_VISION_KEY
- REACT_APP_AZURE_COMPUTER_VISION_ENDPOINT
執行下列命令,將這些變數新增至您的環境。
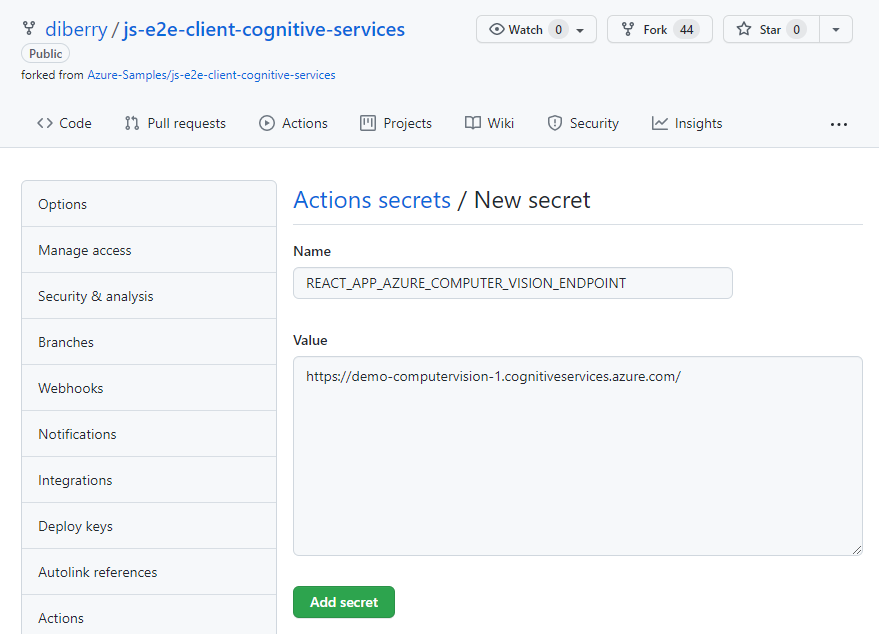
10.將環境變數新增至遠端環境
使用 Azure 靜態 Web 應用程式時,必須將秘密等環境變數從 GitHub 動作傳遞至靜態 Web 應用程式。 GitHub 動作會建置應用程式,包括從該存放庫 GitHub 秘密傳入的 電腦視覺 密鑰和端點,然後將具有環境變數的程式代碼推送至靜態 Web 應用程式。
在網頁瀏覽器中的 GitHub 存放庫上,選取 [設定]、[秘密]、[新增存放庫秘密]。

針對您在上一節中使用的端點輸入相同的名稱和值。 然後,為上一節中使用的密鑰建立具有相同名稱和值的另一個秘密。
11.使用 ComputerVision 資源執行本機 react 應用程式
在命令列再次啟動應用程式:
npm start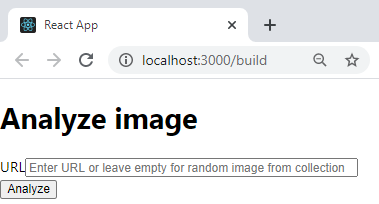
將文字欄位保留空白,以從預設目錄選取影像,然後選取 [ 分析] 按鈕。
從中
./src/DefaultImages.js定義的影像目錄隨機選取影像。繼續選取 [分析] 按鈕以查看其他影像和結果。
12.將本機分支推送至 GitHub
在 Visual Studio Code 終端機中,將本機分支 main 推送至您的遠端存放庫。
git push origin main
您不需要認可任何變更,因為尚未進行任何變更。
13.建立靜態 Web 應用程式資源
選取 Azure 圖示,然後在靜態 Web Apps 服務上按下滑鼠右鍵,然後選取 [建立靜態 Web 應用程式] [進階]。
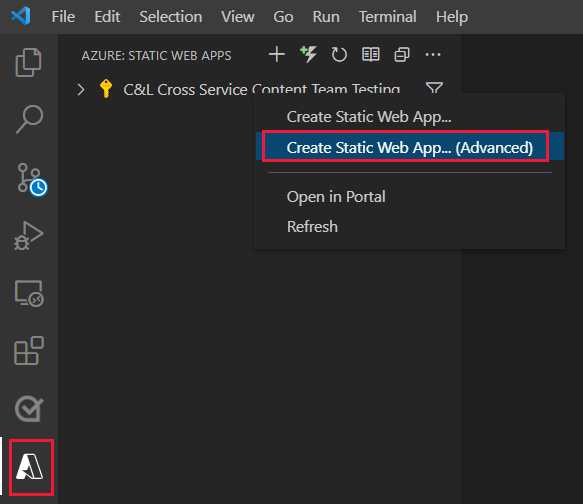
如果彈出視窗詢問您是否要在分支上
main繼續,請選取 [ 繼續]。在後續欄位中輸入下列資訊,一次呈現一個。
欄位名稱 value 選取新資源的資源群組。 選取您為 ComputerVision 資源建立的資源群組。 demo-ComputerVision請輸入新靜態 Web 應用程式的名稱。 Demo-ComputerVisionAnalyzer選取定價選項 選取 [免費]。 選取應用程式程式代碼的位置。 選取您在建立資源群組時選取的相同位置。 eastus選擇 [建置預設] 來設定預設項目結構。 React選擇應用程式程式代碼的位置。 /輸入 Azure Functions 程式代碼的位置。 採用預設值。 輸入相對於應用程式位置的建置輸出路徑。 build
14.使用秘密環境變數更新 GitHub 動作
電腦視覺 金鑰和端點位於存放庫的秘密集合中,但尚未位於 GitHub 動作中。 此步驟會將金鑰和端點新增至動作。
從建立 Azure 資源提取所做的變更,以取得 GitHub 動作檔案。
git pull origin main在 Visual Studio Code 編輯器中,編輯找到的
./.github/workflows/GitHub Action 檔案以新增秘密。name: Azure Static Web Apps CI/CD on: push: branches: - from-local pull_request: types: [opened, synchronize, reopened, closed] branches: - from-local jobs: build_and_deploy_job: if: github.event_name == 'push' || (github.event_name == 'pull_request' && github.event.action != 'closed') runs-on: ubuntu-latest name: Build and Deploy Job steps: - uses: actions/checkout@v2 with: submodules: true - name: Build And Deploy id: builddeploy uses: Azure/static-web-apps-deploy@v0.0.1-preview with: azure_static_web_apps_api_token: ${{ secrets.AZURE_STATIC_WEB_APPS_API_TOKEN_RANDOM_NAME_HERE }} repo_token: ${{ secrets.GITHUB_TOKEN }} # Used for Github integrations (i.e. PR comments) action: "upload" ###### Repository/Build Configurations - These values can be configured to match you app requirements. ###### # For more information regarding Static Web App workflow configurations, please visit: https://aka.ms/swaworkflowconfig app_location: "/" # App source code path api_location: "api" # Api source code path - optional output_location: "build" # Built app content directory - optional ###### End of Repository/Build Configurations ###### env: REACT_APP_AZURE_COMPUTER_VISION_ENDPOINT: ${{secrets.REACT_APP_AZURE_COMPUTER_VISION_ENDPOINT}} REACT_APP_AZURE_COMPUTER_VISION_KEY: ${{secrets.REACT_APP_AZURE_COMPUTER_VISION_KEY}} close_pull_request_job: if: github.event_name == 'pull_request' && github.event.action == 'closed' runs-on: ubuntu-latest name: Close Pull Request Job steps: - name: Close Pull Request id: closepullrequest uses: Azure/static-web-apps-deploy@v0.0.1-preview with: azure_static_web_apps_api_token: ${{ secrets.AZURE_STATIC_WEB_APPS_API_TOKEN_RANDOM_NAME_HERE }} action: "close"將變更新增並認可至本機
main分支。git add . && git commit -m "add secrets to action"將變更推送至遠端存放庫,開始將新的建置和部署動作推送至您的 Azure 靜態 Web 應用程式。
git push origin main
15.檢視 GitHub 動作建置程式
在網頁瀏覽器中,開啟本教學課程的 GitHub 存放庫,然後選取 [ 動作]。
選取清單中的頂端組建,然後選取 左側功能表上的 [建置和部署作業 ],以監看建置程式。 等到 建置和部署 順利完成為止。
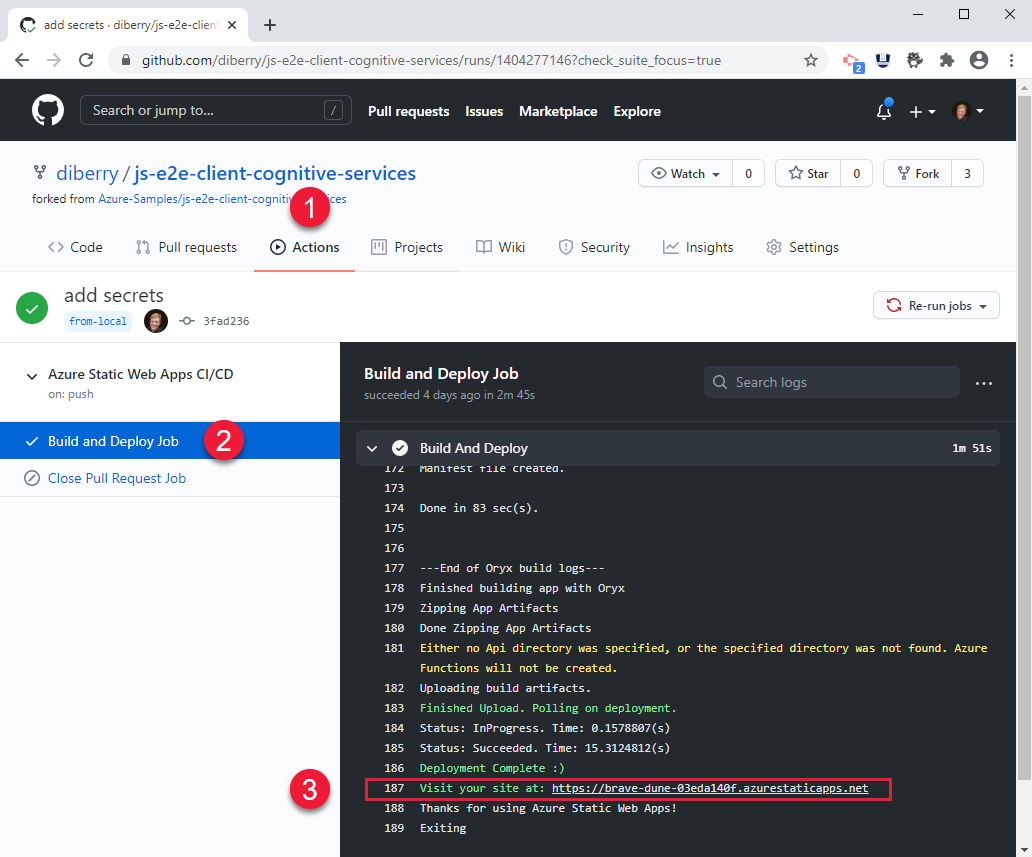
16.在瀏覽器中檢視遠端 Azure 靜態網站
- 在 Visual Studio Code 中,選取最右邊功能表中的 Azure 圖示,然後選取您的靜態 Web 應用程式,然後以滑鼠右鍵按兩下 [瀏覽網站],然後選取 [開啟] 以檢視公用靜態網站。

您也可以在下列位置找到網站的網址:
- 資源 Azure 入口網站,位於 [概觀] 頁面上。
- GitHub 動作的建置和部署輸出在腳本結尾處具有網站 URL
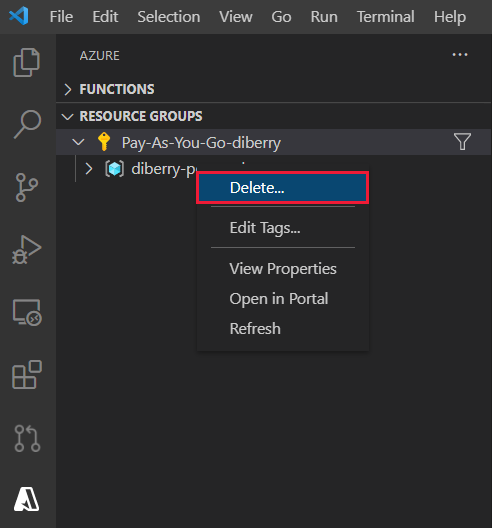
17.清除靜態 Web 應用程式的資源
完成本教學課程之後,您必須移除資源群組,其中包括 電腦視覺 資源和靜態 Web 應用程式,以確保您不會再支付使用量的費用。
在 VS Code 中,選取 Azure 總管,然後以滑鼠右鍵按鍵按兩下列出的資源群組,然後選取 [ 刪除]。

程式代碼:將 電腦視覺 新增至本機 React 應用程式
使用 npm 將 電腦視覺 新增至package.json檔案。
npm install @azure/cognitiveservices-computervision
程序代碼:將 電腦視覺 程式代碼新增為個別模組
電腦視覺 程式代碼包含在名為 ./src/azure-cognitiveservices-computervision.js的個別檔案中。 模組的主要函式會反白顯示。
// ./src/azure-cognitiveservices-computervision.js

// Azure SDK client libraries
import { ComputerVisionClient } from '@azure/cognitiveservices-computervision';
import { ApiKeyCredentials } from '@azure/ms-rest-js';

// List of sample images to use in demo
import RandomImageUrl from './DefaultImages';

// Authentication requirements
const key = process.env.REACT_APP_AZURE_COMPUTER_VISION_KEY;
const endpoint = process.env.REACT_APP_AZURE_COMPUTER_VISION_ENDPOINT;

console.log(`key = ${key}`)
console.log(`endpoint = ${endpoint}`)

// Cognitive service features
const visualFeatures = [
    "ImageType",
    "Faces",
    "Adult",
    "Categories",
    "Color",
    "Tags",
    "Description",
    "Objects",
    "Brands"
];

export const isConfigured = () => {
    const result = (key && endpoint && (key.length > 0) && (endpoint.length > 0)) ? true : false;
    console.log(`key = ${key}`)
    console.log(`endpoint = ${endpoint}`)
    console.log(`ComputerVision isConfigured = ${result}`)
    return result;
}

// Computer Vision detected Printed Text
const includesText = async (tags) => {
    return tags.filter((el) => {
        return el.name.toLowerCase() === "text";
    });
}
// Computer Vision detected Handwriting
const includesHandwriting = async (tags) => {
    return tags.filter((el) => {
        return el.name.toLowerCase() === "handwriting";
    });
}
// Wait for text detection to succeed
const wait = (timeout) => {
    return new Promise(resolve => {
        setTimeout(resolve, timeout);
    });
}

// Analyze Image from URL
export const computerVision = async (url) => {

    // authenticate to Azure service
    const computerVisionClient = new ComputerVisionClient(
        new ApiKeyCredentials({ inHeader: { 'Ocp-Apim-Subscription-Key': key } }), endpoint);

    // get image URL - entered in form or random from Default Images
    const urlToAnalyze = url || RandomImageUrl();

    // analyze image
    const analysis = await computerVisionClient.analyzeImage(urlToAnalyze, { visualFeatures });

    // text detected - what does it say and where is it
    if (includesText(analysis.tags) || includesHandwriting(analysis.tags)) {
        analysis.text = await readTextFromURL(computerVisionClient, urlToAnalyze);
    }

    // all information about image
    return { "URL": urlToAnalyze, ...analysis};
}
// analyze text in image
const readTextFromURL = async (client, url) => {

    let result = await client.read(url);
    let operationID = result.operationLocation.split('/').slice(-1)[0];

    // Wait for read recognition to complete
    // result.status is initially undefined, since it's the result of read
    const start = Date.now();
    console.log(`${start} -${result?.status} `);

    while (result.status !== "succeeded") {
        await wait(500);
        console.log(`${Date.now() - start} -${result?.status} `);
        result = await client.getReadResult(operationID);
    }

    // Return the first page of result.
    // Replace[0] with the desired page if this is a multi-page file such as .pdf or.tiff.
    return result.analyzeResult;
}
程式代碼:將映像目錄新增為個別模組
如果使用者未輸入影像 URL,應用程式會從目錄選取隨機影像。 隨機選取函式會反白顯示
// ./src/DefaultImages.js

const describeURL = 'https://raw.githubusercontent.com/Azure-Samples/cognitive-services-sample-data-files/master/ComputerVision/Images/celebrities.jpg';
const categoryURLImage = 'https://moderatorsampleimages.blob.core.windows.net/samples/sample16.png';
const tagsURL = 'https://moderatorsampleimages.blob.core.windows.net/samples/sample16.png';
const objectURL = 'https://raw.githubusercontent.com/Azure-Samples/cognitive-services-node-sdk-samples/master/Data/image.jpg';
const brandURLImage = 'https://docs.microsoft.com/en-us/azure/cognitive-services/computer-vision/images/red-shirt-logo.jpg';
const facesImageURL = 'https://raw.githubusercontent.com/Azure-Samples/cognitive-services-sample-data-files/master/ComputerVision/Images/faces.jpg';
const printedTextSampleURL = 'https://moderatorsampleimages.blob.core.windows.net/samples/sample2.jpg';
const multiLingualTextURL = 'https://raw.githubusercontent.com/Azure-Samples/cognitive-services-sample-data-files/master/ComputerVision/Images/MultiLingual.png';
const adultURLImage = 'https://raw.githubusercontent.com/Azure-Samples/cognitive-services-sample-data-files/master/ComputerVision/Images/celebrities.jpg';
const colorURLImage = 'https://raw.githubusercontent.com/Azure-Samples/cognitive-services-sample-data-files/master/ComputerVision/Images/celebrities.jpg';
// don't use with picture analysis
// eslint-disable-next-line
const mixedMultiPagePDFURL = 'https://raw.githubusercontent.com/Azure-Samples/cognitive-services-sample-data-files/master/ComputerVision/Images/MultiPageHandwrittenForm.pdf';
const domainURLImage = 'https://raw.githubusercontent.com/Azure-Samples/cognitive-services-sample-data-files/master/ComputerVision/Images/landmark.jpg';
const typeURLImage = 'https://raw.githubusercontent.com/Azure-Samples/cognitive-services-python-sdk-samples/master/samples/vision/images/make_things_happen.jpg';

const DefaultImages = [
    describeURL,
    categoryURLImage,
    tagsURL,
    objectURL,
    brandURLImage,
    facesImageURL,
    adultURLImage,
    colorURLImage,
    domainURLImage,
    typeURLImage,
    printedTextSampleURL,
    multiLingualTextURL,
    //mixedMultiPagePDFURL
];

const RandomImageUrl = () => {
    return DefaultImages[Math.floor(Math.random() * Math.floor(DefaultImages.length))];
}

export default RandomImageUrl;
程式代碼:將自定義 電腦視覺 模組新增至 React 應用程式
將方法新增至 React app.js。 系統會醒目提示影像分析和顯示結果。
// ./src/App.js

import React, { useState } from 'react';
import './App.css';
import { computerVision, isConfigured as ComputerVisionIsConfigured } from './azure-cognitiveservices-computervision';

function App() {

  const [fileSelected, setFileSelected] = useState(null);
  const [analysis, setAnalysis] = useState(null);
  const [processing, setProcessing] = useState(false);

  const handleChange = (e) => {
    setFileSelected(e.target.value)
  }
  const onFileUrlEntered = (e) => {

    // hold UI
    setProcessing(true);
    setAnalysis(null);

    computerVision(fileSelected || null).then((item) => {
      // reset state/form
      setAnalysis(item);
      setFileSelected("");
      setProcessing(false);
    });

  };

  // Display JSON data in readable format
  const PrettyPrintJson = (data) => {
    return (<div><pre>{JSON.stringify(data, null, 2)}</pre></div>);
  }

  const DisplayResults = () => {
    return (
      <div>
        <h2>Computer Vision Analysis</h2>
        <div><img src={analysis.URL} height="200" border="1" alt={(analysis.description && analysis.description.captions && analysis.description.captions[0].text ? analysis.description.captions[0].text : "can't find caption")} /></div>
        {PrettyPrintJson(analysis)}
      </div>
    )
  };

  const Analyze = () => {
    return (
    <div>
      <h1>Analyze image</h1>
      {!processing &&
        <div>
          <div>
            <label>URL</label>
            <input type="text" placeholder="Enter URL or leave empty for random image from collection" size="50" onChange={handleChange}></input>
          </div>
          <button onClick={onFileUrlEntered}>Analyze</button>
        </div>
      }
      {processing && <div>Processing</div>}
      <hr />
      {analysis && DisplayResults()}
      </div>
    )
  }

  const CantAnalyze = () => {
    return (
      <div>Key and/or endpoint not configured in ./azure-cognitiveservices-computervision.js</div>
    )
  }

  function Render() {
    const ready = ComputerVisionIsConfigured();
    if (ready) {
      return <Analyze />;
    }
    return <CantAnalyze />;
  }

  return (
    <div>
      {Render()}
    </div>

  );
}

export default App;
下一步
意見反應
即將登場:在 2024 年,我們將逐步淘汰 GitHub 問題作為內容的意見反應機制,並將它取代為新的意見反應系統。 如需詳細資訊,請參閱:https://aka.ms/ContentUserFeedback。
提交並檢視相關的意見反應