執行 Python 指令碼元件
本文將描述 Azure Machine Learning 設計工具中的「執行 Python 指令碼」元件。
使用此元件來執行 Python 程式碼。 如需 Python 架構和設計原則的詳細資訊,請參閱如何在 Azure Machine Learning 設計工具中執行 Python 程式碼。
透過 Python,您可以執行現有元件不支援的工作,例如:
- 使用
matplotlib將資料視覺化。 - 使用 Python 程式庫來列舉您工作區中的資料集和模型。
- 從匯入資料元件不支援的來源讀取、載入及操作資料。
- 執行您自己的深度學習程式碼。
支援的 Python 套件
Azure Machine Learning 使用 Python 的 Anaconda 發行版本,其中包含許多常用來處理資料的公用程式。 我們會自動更新 Anaconda 版本。 目前的版本為:
- 適用於 Python 3.6 的 Anaconda 4.5 + 發行版本
如需完整清單,請參閱預先安裝的 Python 套件一節。
若要安裝不在預先安裝清單中的套件 (例如 scikit-misc),請將下列程式碼新增至您的指令碼:
import os
os.system(f"pip install scikit-misc")
您可以使用下列程式碼來安裝套件,以獲得更好的效能,尤其在推斷方面:
import importlib.util
package_name = 'scikit-misc'
spec = importlib.util.find_spec(package_name)
if spec is None:
    import os
    os.system(f"pip install scikit-misc")
注意
如果管線包含多個「執行 Python 指令碼」元件,而這些元件需要的套件不在預先安裝清單中,請在每個元件中安裝套件。
警告
「執行 Python 指令碼」元件不支援使用 "apt-get" 之類的命令來安裝相依於額外原生程式庫的套件,例如 Java、PyODBC 等等。這是因為此元件只在預先安裝 Python 且具有非系統管理員權限的簡單環境中執行。
存取目前的工作區和已註冊的資料集
您可以參考下列範例程式碼,以存取工作區中已註冊的資料集:
def azureml_main(dataframe1 = None, dataframe2 = None):

    # Execution logic goes here
    print(f'Input pandas.DataFrame #1: {dataframe1}')
    from azureml.core import Run
    run = Run.get_context(allow_offline=True)
    #access to current workspace
    ws = run.experiment.workspace

    #access to registered dataset of current workspace
    from azureml.core import Dataset
    dataset = Dataset.get_by_name(ws, name='test-register-tabular-in-designer')
    dataframe1 = dataset.to_pandas_dataframe()

    # If a zip file is connected to the third input port,
    # it is unzipped under "./Script Bundle". This directory is added
    # to sys.path. Therefore, if your zip file contains a Python file
    # mymodule.py you can import it using:
    # import mymodule

    # Return value must be of a sequence of pandas.DataFrame
    # E.g.
    #   -  Single return value: return dataframe1,
    #   -  Two return values: return dataframe1, dataframe2
    return dataframe1,
上傳檔案
「執行 Python 指令碼」元件支援使用 Azure Machine Learning Python SDK 來上傳檔案。
下列範例說明如何在「執行 Python 指令碼」元件中上傳影像檔案:
# The script MUST contain a function named azureml_main,
# which is the entry point for this component.
# Imports up here can be used to
import pandas as pd
# The entry point function must have two input arguments:
# Param<dataframe1>: a pandas.DataFrame
# Param<dataframe2>: a pandas.DataFrame
def azureml_main(dataframe1 = None, dataframe2 = None):
# Execution logic goes here
print(f'Input pandas.DataFrame #1: {dataframe1}')
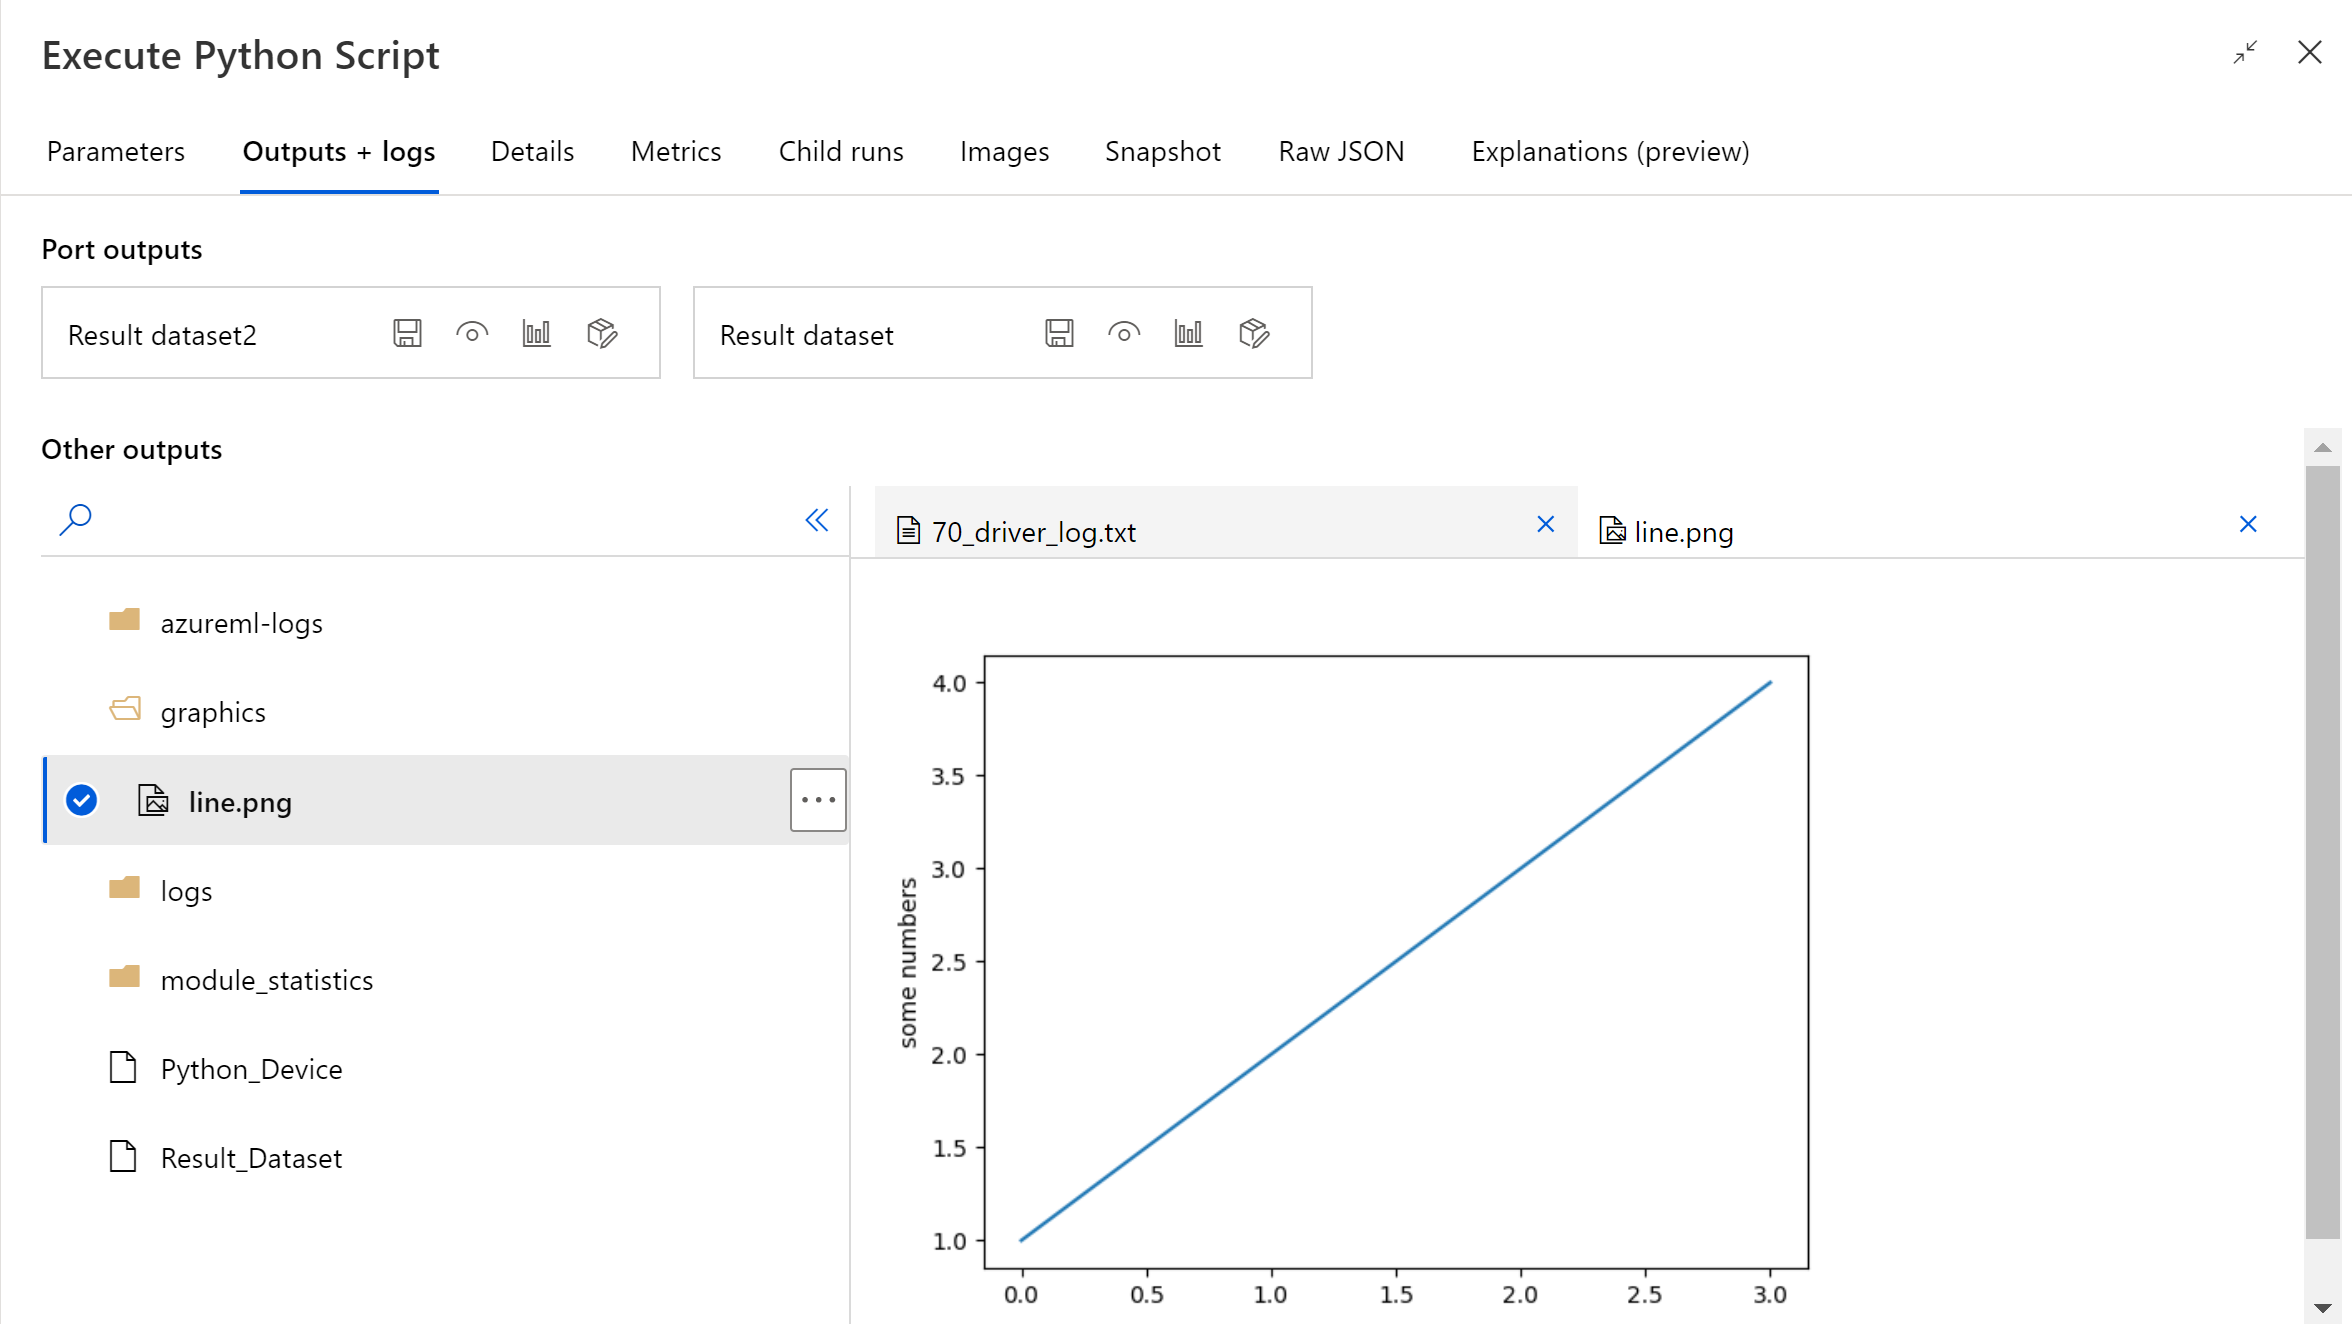
from matplotlib import pyplot as plt
plt.plot([1, 2, 3, 4])
plt.ylabel('some numbers')
img_file = "line.png"
plt.savefig(img_file)
from azureml.core import Run
run = Run.get_context(allow_offline=True)
run.upload_file(f"graphics/{img_file}", img_file)
# Return value must be of a sequence of pandas.DataFrame
# For example:
# - Single return value: return dataframe1,
# - Two return values: return dataframe1, dataframe2
return dataframe1,
管線執行完成之後,您可以在元件的右側面板中預覽影像。
您也可以使用下列程式碼,將檔案上傳到任何資料存放區。 您只能在儲存體帳戶中預覽檔案。
import pandas as pd

# The entry point function MUST have two input arguments.
# If the input port is not connected, the corresponding
# dataframe argument will be None.
#   Param<dataframe1>: a pandas.DataFrame
#   Param<dataframe2>: a pandas.DataFrame
def azureml_main(dataframe1 = None, dataframe2 = None):

    # Execution logic goes here
    print(f'Input pandas.DataFrame #1: {dataframe1}')

    from matplotlib import pyplot as plt
    import os

    plt.plot([1, 2, 3, 4])
    plt.ylabel('some numbers')
    img_file = "line.png"

    # Set path
    path = "./img_folder"
    os.mkdir(path)
    plt.savefig(os.path.join(path,img_file))

    # Get current workspace
    from azureml.core import Run
    run = Run.get_context(allow_offline=True)
    ws = run.experiment.workspace

    # Get a named datastore from the current workspace and upload to specified path
    from azureml.core import Datastore
    datastore = Datastore.get(ws, datastore_name='workspacefilestore')
    datastore.upload(path)

    return dataframe1,
如何設定「執行 Python 指令碼」
「執行 Python 指令碼」元件包含可作為起點的 Python 程式碼範例。 若要設定「執行 Python 指令碼」元件,請提供一組輸入,並在 [Python 指令碼] 文字方塊中提供要執行的 Python 程式碼。
將執行 Python 指令碼元件新增至管線。
在 Dataset1 上,新增並連線至設計工具中要用來當作輸入的資料集。 在您的 Python 指令碼中,將此資料集參照為 DataFrame1。
資料集的使用是選擇性的。 如果您想要使用 Python 產生資料,或使用 Python 程式碼將資料直接匯入元件中,則應使用資料集。
此元件支援在 Dataset2 上新增第二個資料集。 在您的 Python 指令碼中,將第二個資料集參照為 DataFrame2。
使用此元件載入時,儲存在 Azure Machine Learning 中的資料集會自動轉換成 Pandas 資料框架。
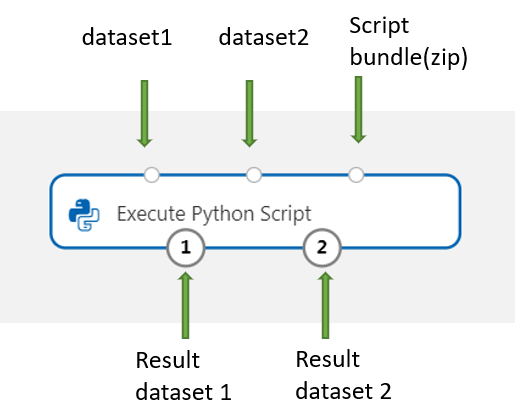
若要包含新的 Python 套件或程式碼,請將包含這些自訂資源的壓縮檔案連線至指令碼套件組合連接埠。 或是,如果指令碼大於 16 KB,請使用指令碼套件組合連接埠,以避免像是「CommandLine 超過 16597 個字元的限制」的錯誤。
- 將指令碼和其他自訂資源組合成 ZIP 檔案。
- 將 ZIP 檔案當作檔案資料集上傳到工作室。
- 在設計工具撰寫頁面的左側元件窗格中,從 [資料集] 清單拖曳資料集元件。
- 將資料集元件連線至執行 Python 指令碼元件的指令碼套件組合連接埠。
管線執行時,可從上傳且壓縮的封存中使用其中任何檔案。 如果封存包含目錄結構,則會保留結構。
重要
針對指令碼套件組合中的檔案,請使用唯一且有意義的名稱,因為有一些常見字詞 (例如
test、app等) 會保留給內建的服務。以下是指令碼本套件組合範例,其中包含 Python 指令檔和 txt 檔案:

以下是
my_script.py的內容:def my_func(dataframe1): return dataframe1以下是示範如何在指令碼套件組合中使用檔案的程式碼範例:
import pandas as pd
from my_script import my_func

def azureml_main(dataframe1 = None, dataframe2 = None):

    # Execution logic goes here
    print(f'Input pandas.DataFrame #1: {dataframe1}')

    # Test the custom defined Python function
    dataframe1 = my_func(dataframe1)

    # Test to read custom uploaded files by relative path
    with open('./Script Bundle/my_sample.txt', 'r') as text_file:
        sample = text_file.read()

    return dataframe1, pd.DataFrame(columns=["Sample"], data=[[sample]])
在 [Python 指令碼] 文字輸入框中,輸入或貼上有效的 Python 指令碼。
注意
請小心撰寫指令碼。 請確定沒有語法錯誤,例如使用未宣告的變數或未匯入的元件或函式。 請特別注意預先安裝的元件清單。 若要匯入未列出的元件,請在您的指令碼中安裝對應的套件,例如:
import os
os.system(f"pip install scikit-misc")
[Python 指令碼] 文字方塊已預先填入註解中的一些指示,以及用於資料存取和輸出的程式碼範例。 您必須編輯或取代此程式碼。 遵循關於縮排和大小寫規定的 Python 慣例:
- 指令碼必須包含名為
azureml_main的函式,以作為此元件的進入點。 - 即使指令碼中不使用輸入引數
Param<dataframe1>和Param<dataframe2>,進入點函式也必須有這兩個引數。 - 連線到第三個輸入連接埠的壓縮檔會解壓縮並儲存在
.\Script Bundle目錄中,也會新增至 Pythonsys.path。
如果您的 .zip 檔案包含
mymodule.py,請使用import mymodule將其匯入。您可以將兩個資料集傳回給設計工具,但必須是
pandas.DataFrame類型的序列。 您可以在 Python 程式碼中建立其他輸出,並將其直接寫入 Azure 儲存體。- 指令碼必須包含名為
提交管線。
如果元件已完成,請檢查輸出是否如預期。
如果元件失敗,則需要進行一些疑難排解。 選取元件,然後開啟右側面板中的 [輸出+記錄]。 開啟70_driver_log.txt 並搜尋 in azureml_main,然後您就可以找到造成錯誤的那一行。 例如,"File "/tmp/tmp01_ID/user_script.py", line 17, in azureml_main",表示您 Python 指令碼的第 17 行發生了錯誤。
結果
內嵌 Python 程式碼所做的任何計算結果都必須以 pandas.DataFrame 形式提供,該形式會自動轉換成 Azure Machine Learning 資料集格式。 然後,您可以將結果與管線中的其他元件搭配使用。
元件會傳回兩個資料集:
結果資料集 1,由 Python 指令碼中第一個傳回的 Pandas 資料框架所定義。
結果資料集 2,由 Python 指令碼中第二個傳回的 Pandas 資料框架所定義。
預先安裝的 Python 套件
預先安裝的套件為:
- adal==1.2.2
- applicationinsights==0.11.9
- attrs==19.3.0
- azure-common==1.1.25
- azure-core==1.3.0
- azure-graphrbac==0.61.1
- azure-identity==1.3.0
- azure-mgmt-authorization==0.60.0
- azure-mgmt-containerregistry==2.8.0
- azure-mgmt-keyvault==2.2.0
- azure-mgmt-resource==8.0.1
- azure-mgmt-storage==8.0.0
- azure-storage-blob==1.5.0
- azure-storage-common==1.4.2
- azureml-core==1.1.5.5
- azureml-dataprep-native==14.1.0
- azureml-dataprep==1.3.5
- azureml-defaults==1.1.5.1
- azureml-designer-classic-modules==0.0.118
- azureml-designer-core==0.0.31
- azureml-designer-internal==0.0.18
- azureml-model-management-sdk==1.0.1b6.post1
- azureml-pipeline-core==1.1.5
- azureml-telemetry==1.1.5.3
- backports.tempfile==1.0
- backports.weakref==1.0.post1
- boto3==1.12.29
- botocore==1.15.29
- cachetools==4.0.0
- certifi==2019.11.28
- cffi==1.12.3
- chardet==3.0.4
- click==7.1.1
- cloudpickle==1.3.0
- configparser==3.7.4
- contextlib2==0.6.0.post1
- cryptography==2.8
- cycler==0.10.0
- dill==0.3.1.1
- distro==1.4.0
- docker==4.2.0
- docutils==0.15.2
- dotnetcore2==2.1.13
- flask==1.0.3
- fusepy==3.0.1
- gensim==3.8.1
- google-api-core==1.16.0
- google-auth==1.12.0
- google-cloud-core==1.3.0
- google-cloud-storage==1.26.0
- google-resumable-media==0.5.0
- googleapis-common-protos==1.51.0
- gunicorn==19.9.0
- idna==2.9
- imbalanced-learn==0.4.3
- isodate==0.6.0
- itsdangerous==1.1.0
- jeepney==0.4.3
- jinja2==2.11.1
- jmespath==0.9.5
- joblib==0.14.0
- json-logging-py==0.2
- jsonpickle==1.3
- jsonschema==3.0.1
- kiwisolver==1.1.0
- liac-arff==2.4.0
- lightgbm==2.2.3
- markupsafe==1.1.1
- matplotlib==3.1.3
- more-itertools==6.0.0
- msal-extensions==0.1.3
- msal==1.1.0
- msrest==0.6.11
- msrestazure==0.6.3
- ndg-httpsclient==0.5.1
- nimbusml==1.6.1
- numpy==1.18.2
- oauthlib==3.1.0
- pandas==0.25.3
- pathspec==0.7.0
- pip==20.0.2
- portalocker==1.6.0
- protobuf==3.11.3
- pyarrow==0.16.0
- pyasn1-modules==0.2.8
- pyasn1==0.4.8
- pycparser==2.20
- pycryptodomex==3.7.3
- pyjwt==1.7.1
- pyopenssl==19.1.0
- pyparsing==2.4.6
- pyrsistent==0.16.0
- python-dateutil==2.8.1
- pytz==2019.3
- requests-oauthlib==1.3.0
- requests==2.23.0
- rsa==4.0
- ruamel.yaml==0.15.89
- s3transfer==0.3.3
- scikit-learn==0.22.2
- scipy==1.4.1
- secretstorage==3.1.2
- setuptools==46.1.1.post20200323
- six==1.14.0
- smart-open==1.10.0
- urllib3==1.25.8
- websocket-client==0.57.0
- werkzeug==0.16.1
- wheel==0.34.2
後續步驟
請參閱 Azure Machine Learning 可用的元件集。