自動調整線上端點
本文內容
適用於: Azure CLI ml 延伸模組 v2 (目前) Python SDK azure-ai-ml v2 (目前)
自動調整會自動執行正確的資源量,以處理應用程式的負載。 線上端點 透過與 Azure 監視器自動調整功能的整合,支援自動調整。
Azure 監視器自動調整支援一組豐富的規則。 您可設定以計量為基礎的調整 (例如:CPU 使用率 > 70%)、以排程為基礎的調整 (例如:尖峰上班時間的調整規則) 或上述兩者的組合。 如需詳細資訊,請參閱Microsoft Azure 自動調整概觀 。
現在,您可以使用 Azure CLI、REST、ARM 或以瀏覽器為基礎的 Azure 入口網站來管理自動調整。 其他 Azure Machine Learning SDK (例如 Python SDK) 將會在一段時間後新增支援。
必要條件
定義自動調整設定檔
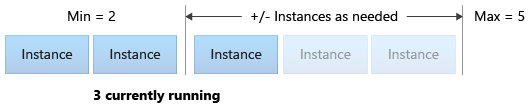
如要對端點啟用自動調整,您必須先定義自動調整設定檔。 此設定檔會定義預設、最小和最大擴展集容量。 下列範例會將預設和最小容量設定為兩個 VM 執行個體,而最大容量則設為五個:
適用於: Azure CLI ml 延伸模組 v2 (目前)
下列程式碼片段會設定端點和部署名稱:
# set your existing endpoint name
ENDPOINT_NAME=your-endpoint-name
DEPLOYMENT_NAME=blue
接下來,取得部署和端點的 Azure Resource Manager 識別碼:
# ARM id of the deployment
DEPLOYMENT_RESOURCE_ID=$(az ml online-deployment show -e $ENDPOINT_NAME -n $DEPLOYMENT_NAME -o tsv --query "id")
# ARM id of the deployment. todo: change to --query "id"
ENDPOINT_RESOURCE_ID=$(az ml online-endpoint show -n $ENDPOINT_NAME -o tsv --query "properties.\"azureml.onlineendpointid\"")
# set a unique name for autoscale settings for this deployment. The below will append a random number to make the name unique.
AUTOSCALE_SETTINGS_NAME=autoscale-$ENDPOINT_NAME-$DEPLOYMENT_NAME-`echo $RANDOM`
下列程式碼片段會建立自動調整設定檔:
az monitor autoscale create \
  --name $AUTOSCALE_SETTINGS_NAME \
  --resource $DEPLOYMENT_RESOURCE_ID \
  --min-count 2 --max-count 5 --count 2
適用於 :Python SDK azure-ai-ml v2 (目前)
匯入模組:
from azure.ai.ml import MLClient
from azure.identity import DefaultAzureCredential
from azure.mgmt.monitor import MonitorManagementClient
from azure.mgmt.monitor.models import AutoscaleProfile, ScaleRule, MetricTrigger, ScaleAction, Recurrence, RecurrentSchedule
import random
import datetime
定義工作區、端點和部署的變數:
subscription_id = "<YOUR-SUBSCRIPTION-ID>"
resource_group = "<YOUR-RESOURCE-GROUP>"
workspace = "<YOUR-WORKSPACE>"

endpoint_name = "<YOUR-ENDPOINT-NAME>"
deployment_name = "blue"
取得 Azure Machine Learning 和 Azure 監視器用戶端:
credential = DefaultAzureCredential()
ml_client = MLClient(
    credential, subscription_id, resource_group, workspace
)

mon_client = MonitorManagementClient(
    credential, subscription_id
)
取得端點和部署物件:
deployment = ml_client.online_deployments.get(
    deployment_name, endpoint_name
)

endpoint = ml_client.online_endpoints.get(
    endpoint_name
)
建立自動調整設定檔:
# Set a unique name for autoscale settings for this deployment. The below will append a random number to make the name unique.
autoscale_settings_name = f"autoscale-{endpoint_name}-{deployment_name}-{random.randint(0,1000)}"

mon_client.autoscale_settings.create_or_update(
    resource_group,
    autoscale_settings_name,
    parameters = {
        "location" : endpoint.location,
        "target_resource_uri" : deployment.id,
        "profiles" : [
            AutoscaleProfile(
                name="my-scale-settings",
                capacity={
                    "minimum" : 2,
                    "maximum" : 5,
                    "default" : 2
                },
                rules = []
            )
        ]
    }
)
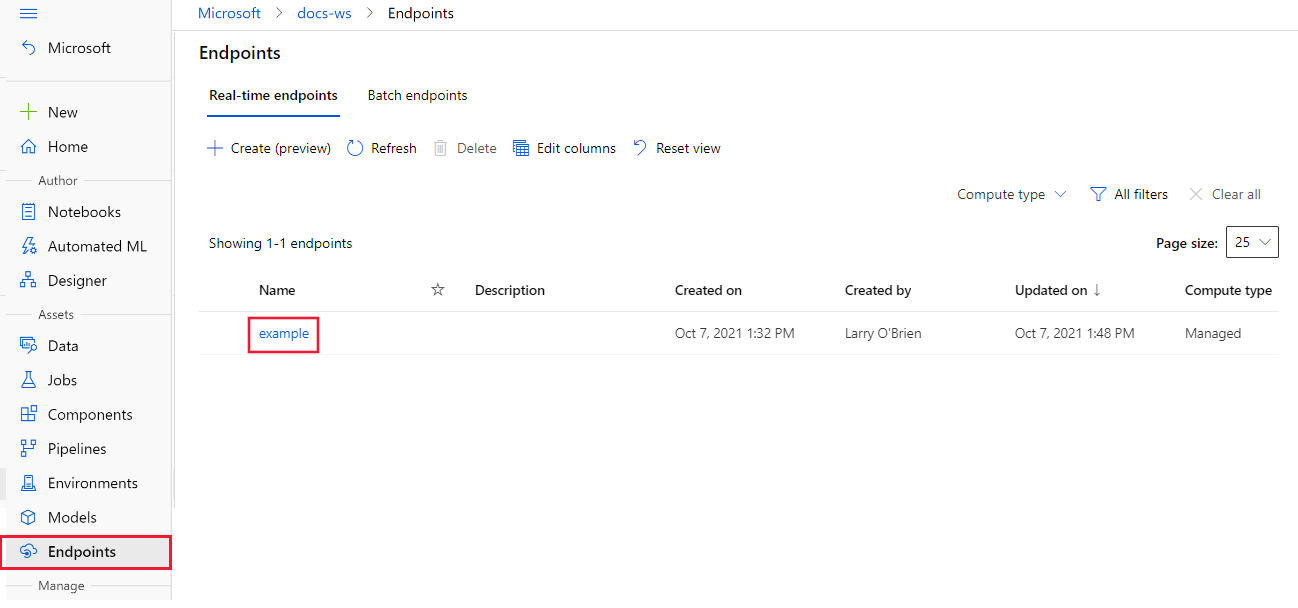
在 Azure Machine Learning 工作室 中選取工作區,然後在頁面左側選取 [端點]
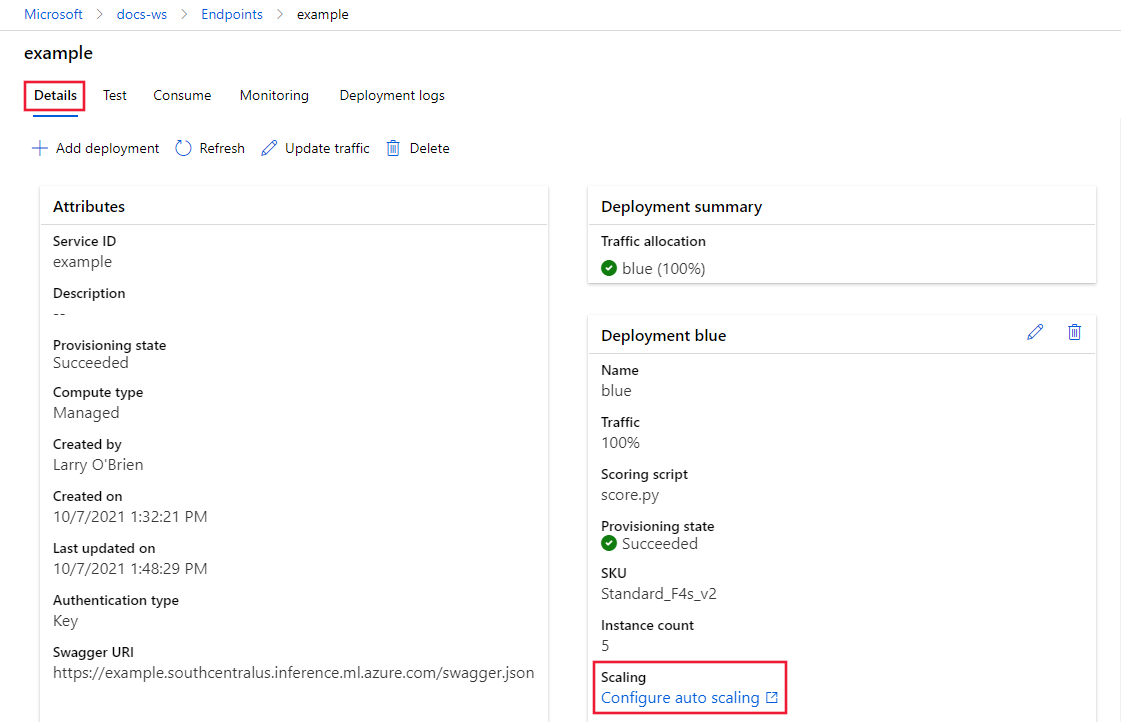
從端點的 [詳細資訊]
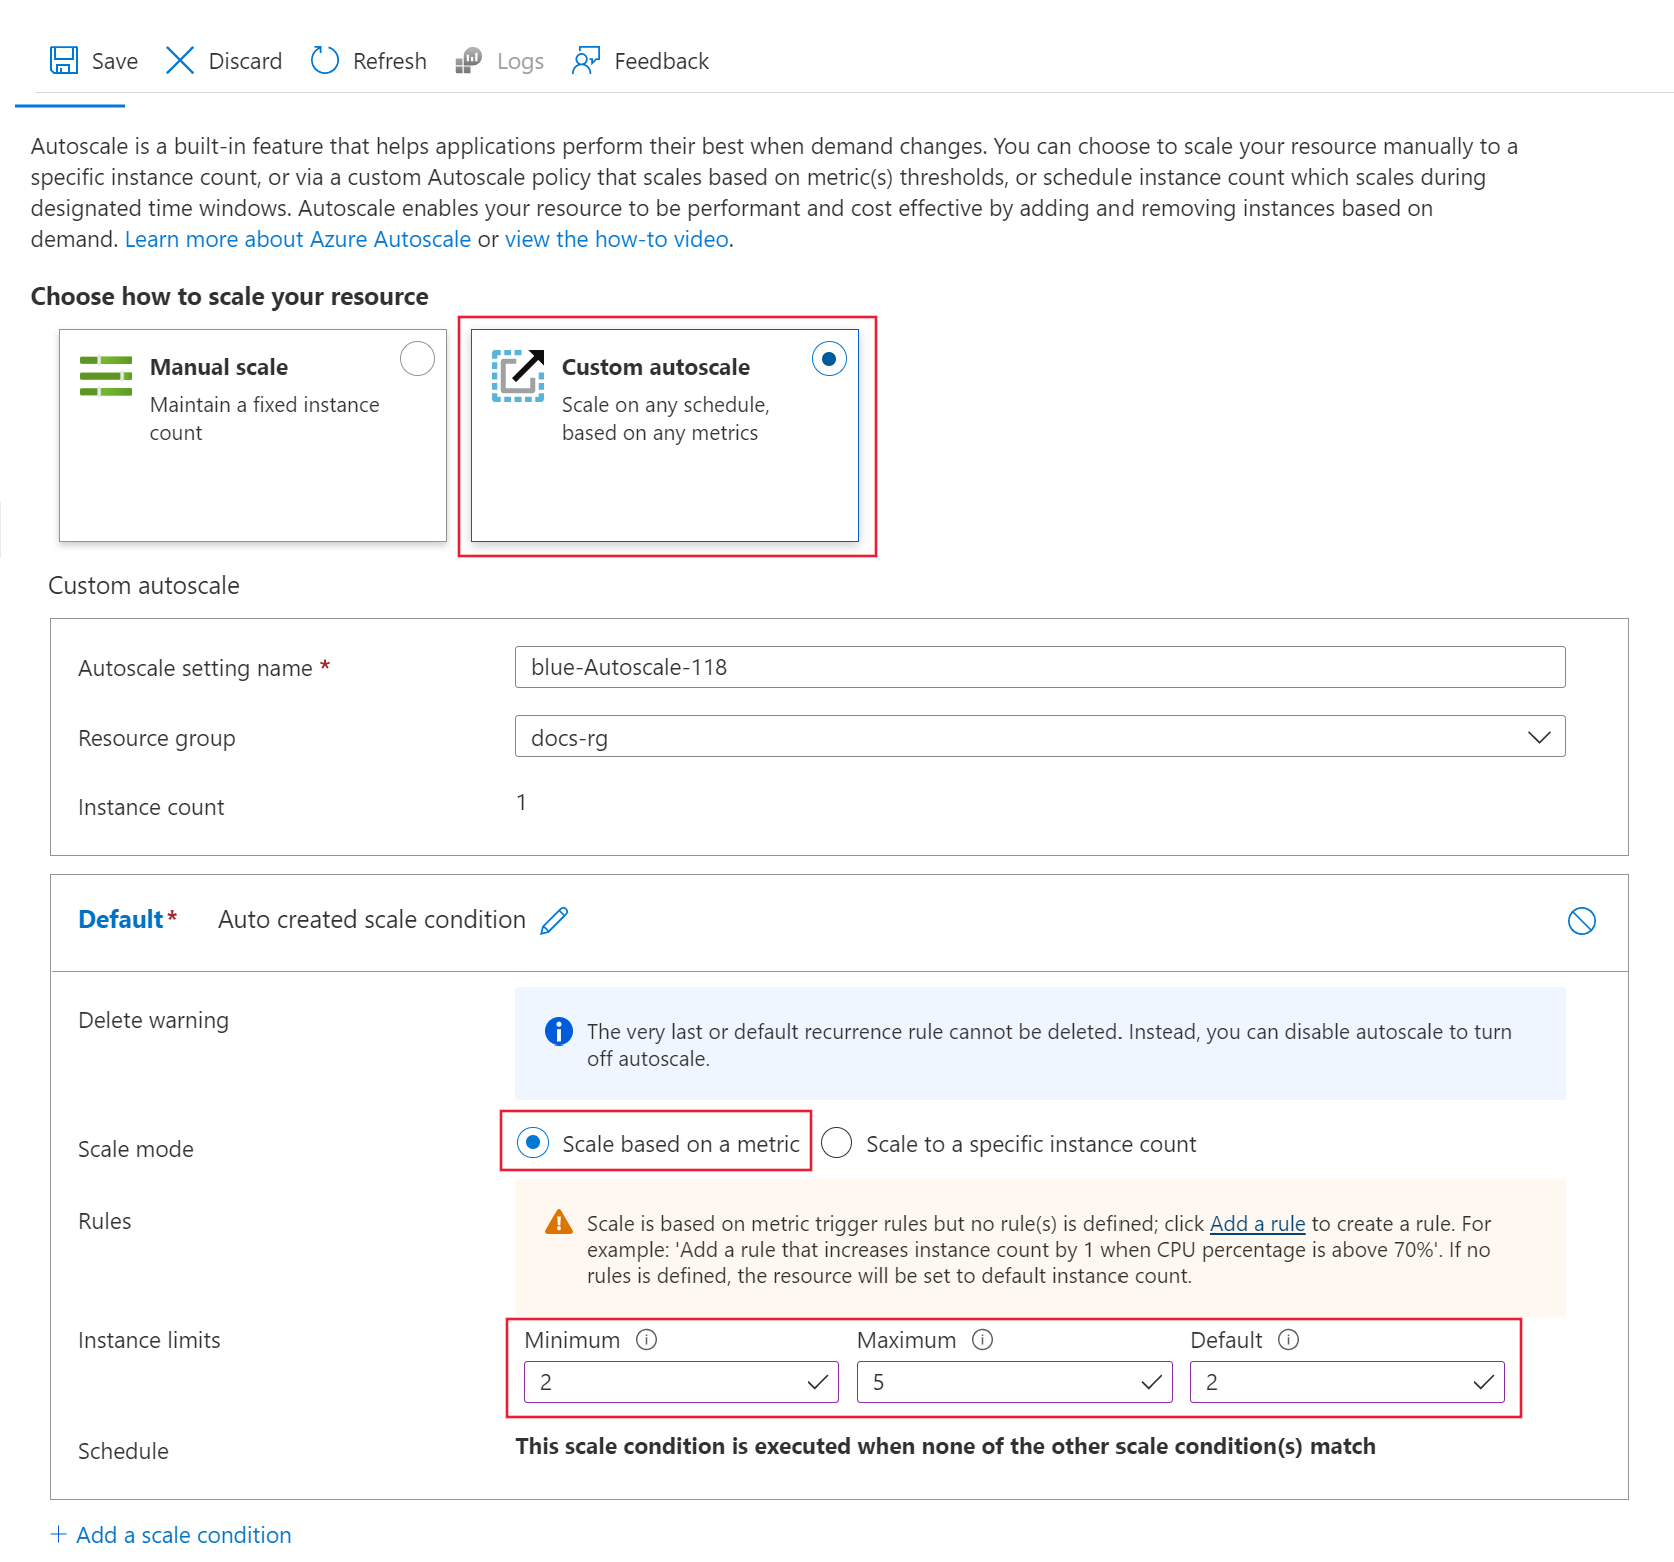
在 [選擇調整資源的方式]
將 [調整模式]
將 [最小值]
將 [最大值]
將 [預設值]
建立規則以使用計量來擴增
常見的擴增規則是當平均 CPU 負載很高時,會增加 VM 執行個體的數目。 下列範例會在 CPU 平均負載 70% 超過五分鐘時,配置兩個以上的節點 (不超過最大值):
適用於: Azure CLI ml 延伸模組 v2 (目前)
az monitor autoscale rule create \
  --autoscale-name $AUTOSCALE_SETTINGS_NAME \
  --condition "CpuUtilizationPercentage > 70 avg 5m" \
  --scale out 2
規則是 my-scale-settings 設定檔的一部分 (autoscale-name 符合設定檔的 name)。 其 condition 引數的值表示「VM 執行個體之間的平均 CPU 耗用量超過 70% 五分鐘」時,應觸發此規則。滿足該條件時,系統會多配置兩個 VM 執行個體。
適用於 :Python SDK azure-ai-ml v2 (目前)
建立規則定義:
rule_scale_out = ScaleRule(
    metric_trigger = MetricTrigger(
        metric_name="CpuUtilizationPercentage",
        metric_resource_uri = deployment.id,
        time_grain = datetime.timedelta(minutes = 1),
        statistic = "Average",
        operator = "GreaterThan",
        time_aggregation = "Last",
        time_window = datetime.timedelta(minutes = 5),
        threshold = 70
    ),
    scale_action = ScaleAction(
        direction = "Increase",
        type = "ChangeCount",
        value = 2,
        cooldown = datetime.timedelta(hours = 1)
    )
)
此規則是指引數 metric_name、time_window 和 time_aggregation 中的 CPUUtilizationpercentage 最後 5 分鐘的平均值。 當計量的值大於 threshold 70 時,將會再配置兩個 VM 執行個體。
更新 my-scale-settings 設定檔以納入此規則:
mon_client.autoscale_settings.create_or_update(
    resource_group,
    autoscale_settings_name,
    parameters = {
        "location" : endpoint.location,
        "target_resource_uri" : deployment.id,
        "profiles" : [
            AutoscaleProfile(
                name="my-scale-settings",
                capacity={
                    "minimum" : 2,
                    "maximum" : 5,
                    "default" : 2
                },
                rules = [
                    rule_scale_out
                ]
            )
        ]
    }
)
在 [規則]
將 [計量名稱]
將 [運算子]
將 [持續時間 (分鐘)]
將 [運算]
最後,選取 [新增]
使用計量來建立縮減規則
當負載較輕時,規則中的調整可以減少 VM 執行個體的數目。 下列範例會在 CPU 負載有 5 分鐘時間小於 30% 時,將單一節點釋放至最小值 2:
適用於: Azure CLI ml 延伸模組 v2 (目前)
az monitor autoscale rule create \
  --autoscale-name $AUTOSCALE_SETTINGS_NAME \
  --condition "CpuUtilizationPercentage < 25 avg 5m" \
  --scale in 1
適用於 :Python SDK azure-ai-ml v2 (目前)
建立規則定義:
rule_scale_in = ScaleRule(
    metric_trigger = MetricTrigger(
        metric_name="CpuUtilizationPercentage",
        metric_resource_uri = deployment.id,
        time_grain = datetime.timedelta(minutes = 1),
        statistic = "Average",
        operator = "LessThan",
        time_aggregation = "Last",
        time_window = datetime.timedelta(minutes = 5),
        threshold = 30
    ),
    scale_action = ScaleAction(
        direction = "Increase",
        type = "ChangeCount",
        value = 1,
        cooldown = datetime.timedelta(hours = 1)
    )
)
更新 my-scale-settings 設定檔以納入此規則:
mon_client.autoscale_settings.create_or_update(
    resource_group,
    autoscale_settings_name,
    parameters = {
        "location" : endpoint.location,
        "target_resource_uri" : deployment.id,
        "profiles" : [
            AutoscaleProfile(
                name="my-scale-settings",
                capacity={
                    "minimum" : 2,
                    "maximum" : 5,
                    "default" : 2
                },
                rules = [
                    rule_scale_out,
                    rule_scale_in
                ]
            )
        ]
    }
)
在 [規則]
將 [計量名稱]
將 [運算子]
將 [持續時間 (分鐘)]
將 [運算]
最後,選取 [新增]
若您同時具有擴增與縮減規則,則規則看起來會類似下列螢幕擷取畫面。 您已指定若平均 CPU 負載超過 70% 達 5 分鐘,即應配置 2 個以上的節點,上限為 5 個。 若 CPU 負載小於 30% 達 5 分鐘,則應釋放一個節點,下限為 2 個。
根據端點計量建立調整規則
先前的規則已套用至部署。 現在要新增套用至端點的規則。 在此範例中,若要求延遲平均值大於 70 毫秒達 5 分鐘,則系統會配置另一個節點。
適用於: Azure CLI ml 延伸模組 v2 (目前)
az monitor autoscale rule create \
 --autoscale-name $AUTOSCALE_SETTINGS_NAME \
 --condition "RequestLatency > 70 avg 5m" \
 --scale out 1 \
 --resource $ENDPOINT_RESOURCE_ID
適用於 :Python SDK azure-ai-ml v2 (目前)
建立規則定義:
rule_scale_out_endpoint = ScaleRule(
    metric_trigger = MetricTrigger(
        metric_name="RequestLatency",
        metric_resource_uri = endpoint.id,
        time_grain = datetime.timedelta(minutes = 1),
        statistic = "Average",
        operator = "GreaterThan",
        time_aggregation = "Last",
        time_window = datetime.timedelta(minutes = 5),
        threshold = 70
    ),
    scale_action = ScaleAction(
        direction = "Increase",
        type = "ChangeCount",
        value = 1,
        cooldown = datetime.timedelta(hours = 1)
    )
)
此規則的 metric_resource_uri 欄位現在是指端點,而不是部署。
更新 my-scale-settings 設定檔以納入此規則:
mon_client.autoscale_settings.create_or_update(
    resource_group,
    autoscale_settings_name,
    parameters = {
        "location" : endpoint.location,
        "target_resource_uri" : deployment.id,
        "profiles" : [
            AutoscaleProfile(
                name="my-scale-settings",
                capacity={
                    "minimum" : 2,
                    "maximum" : 5,
                    "default" : 2
                },
                rules = [
                    rule_scale_out,
                    rule_scale_in,
                    rule_scale_out_endpoint
                ]
            )
        ]
    }
)
從頁面底部選取 [+ 新增調整條件]
選取 [根據計量調整]
將 [計量來源]
將 [資源類型]
將 [資源]
將 [計量名稱]
將 [運算子]
將 [持續時間 (分鐘)]
將 [運算]
根據排程建立調整規則
您也可以建立只在特定日期或時間套用的規則。 在此範例中,將節點計數在週末設定為 2。
適用於: Azure CLI ml 延伸模組 v2 (目前)
az monitor autoscale profile create \
  --name weekend-profile \
  --autoscale-name $AUTOSCALE_SETTINGS_NAME \
  --min-count 2 --count 2 --max-count 2 \
  --recurrence week sat sun --timezone "Pacific Standard Time"
適用於 :Python SDK azure-ai-ml v2 (目前)
mon_client.autoscale_settings.create_or_update(
    resource_group,
    autoscale_settings_name,
    parameters = {
        "location" : endpoint.location,
        "target_resource_uri" : deployment.id,
        "profiles" : [
            AutoscaleProfile(
                name="Default",
                capacity={
                    "minimum" : 2,
                    "maximum" : 2,
                    "default" : 2
                },
                recurrence = Recurrence(
                    frequency = "Week",
                    schedule = RecurrentSchedule(
                        time_zone = "Pacific Standard Time",
                        days = ["Saturday", "Sunday"],
                        hours = [],
                        minutes = []
                    )
                )
            )
        ]
    }
)
從頁面底部選取 [+ 新增調整條件]
選取 [調整為特定執行個體計數]
將 [執行個體計數]2 。
將 [排程]
將排程設為 [重複每個]
刪除資源
若您不打算使用部署,請將其刪除:
適用於: Azure CLI ml 延伸模組 v2 (目前)
# delete the autoscaling profile
az monitor autoscale delete -n "$AUTOSCALE_SETTINGS_NAME"

# delete the endpoint
az ml online-endpoint delete --name $ENDPOINT_NAME --yes --no-wait
適用於 :Python SDK azure-ai-ml v2 (目前)
mon_client.autoscale_settings.delete(
    resource_group,
    autoscale_settings_name
)

ml_client.online_endpoints.begin_delete(endpoint_name)
下一步
如要深入瞭解 Azure 監視器的自動調整,請參閱下列文章:
 Azure CLI ml 延伸模組 v2 (目前)