從部署以進行即時推斷的模型收集生產資料
適用於: Azure CLI ml 延伸模組 v2 (目前)Python SDK azure-ai-ml v2 (目前)
在本文中,您將瞭解如何使用 Azure Machine Learning 資料收集器,從部署到 Azure Machine Learning 受控線上端點或 Kubernetes 線上端點的模型收集生產推斷資料。
您可以為新的或現有的線上端點部署啟用資料收集。 Azure Machine Learning 資料收集器會將推斷資料記錄到 Azure Blob 儲存體中。 使用 Python SDK 收集的資料會自動註冊為 Azure Machine Learning 工作區中的資料資產。 此資料資產可用於模型監視。
如果您想要針對部署到即時端點的 MLflow 模型收集生產推斷資料,請參閱 MLflow 模型的資料收集。
必要條件
遵循本文中的步驟之前,請確定您已滿足下列必要條件:
Azure CLI 和 Azure CLI 的
ml擴充功能。 如需詳細資訊,請參閱安裝、設定和使用 CLI (v2)。重要
本文中的 CLI 範例假設您使用 Bash (或相容的) 殼層。 例如,從 Linux 系統或 Windows 子系統 Linux 版。
Azure Machine Learning 工作區。 如果沒有,請依安裝、設定和使用 CLI (v2) 中的步驟建立。
- Azure 角色型存取控制 (Azure RBAC) 可用來授與 Azure Machine Learning 作業的存取權。 若要執行本文中的步驟,您必須為使用者帳戶指派 Azure Machine Learning 工作區的擁有者或參與者角色,或允許
Microsoft.MachineLearningServices/workspaces/onlineEndpoints/*的自訂角色。 如需詳細資訊,請參閱管理對 Azure Machine Learning 工作區的存取。
擁有可用於部署的已註冊模型。 如果您沒有已註冊的模型,請參閱將模型註冊為 Machine Learning 中的資產。
建立 Azure Machine Learning 線上端點。 如果您目前沒有線上端點,請參閱使用線上端點部署和評分機器學習模型。
執行模型監視的自訂記錄
含自訂記錄的資料收集可讓您在任何資料轉換期間和前後直接從評分指令碼記錄 pandas 資料框架。 使用自訂記錄,表格式資料會即時記錄到您的工作區 Blob 儲存體或自訂 Blob 儲存體容器。 您的模型監視器可以從儲存體取用資料。
使用自訂記錄程式碼更新評分指令碼
若要開始,請將自訂記錄程式碼新增至評分指令碼 (score.py)。 針對自訂記錄,您需要 azureml-ai-monitoring 套件。 如需此套件的詳細資訊,請參閱完整的資料收集器 SDK 的 PyPI 頁面。
將下列程式碼行新增至評分指令碼頂端,以匯入
azureml-ai-monitoring套件:from azureml.ai.monitoring import Collector在
init()函式中宣告資料收集變數 (最多五個):注意
如果您在
Collector物件使用名稱model_inputs和model_outputs,模型監視系統會自動辨識自動註冊的資料資產,以提供更順暢的模型監視體驗。global inputs_collector, outputs_collector inputs_collector = Collector(name='model_inputs') outputs_collector = Collector(name='model_outputs')根據預設,如果資料收集期間發生失敗,Azure Machine Learning 就會引發例外狀況。 您可以選擇性地使用
on_error參數來指定函式,以在記錄失敗發生時執行。 例如,在下列程式碼中使用on_error參數,Azure Machine Learning 將記錄錯誤,而不是擲回例外狀況:inputs_collector = Collector(name='model_inputs', on_error=lambda e: logging.info("ex:{}".format(e)))在您的
run()函式中,使用collect()函式來記錄評分前後的資料框架。 第一次呼叫collect()將傳回context,其中包含稍後將模型輸入和模型輸出相互關聯的資訊。context = inputs_collector.collect(data) result = model.predict(data) outputs_collector.collect(result, context)注意
目前,
collect()API 只會記錄 pandas 資料框架。 如果資料在傳遞至collect()時不在資料框架中,則不會記錄到儲存體,且會回報錯誤。
下列程式碼是使用自訂記錄 Python SDK 的完整評分指令碼範例 (score.py)。
import pandas as pd
import json
from azureml.ai.monitoring import Collector

def init():
  global inputs_collector, outputs_collector, inputs_outputs_collector

  # instantiate collectors with appropriate names, make sure align with deployment spec
  inputs_collector = Collector(name='model_inputs')
  outputs_collector = Collector(name='model_outputs')

def run(data):
  # json data: { "data" : {  "col1": [1,2,3], "col2": [2,3,4] } }
  pdf_data = preprocess(json.loads(data))

  # tabular data: {  "col1": [1,2,3], "col2": [2,3,4] }
  input_df = pd.DataFrame(pdf_data)

  # collect inputs data, store correlation_context
  context = inputs_collector.collect(input_df)

  # perform scoring with pandas Dataframe, return value is also pandas Dataframe
  output_df = predict(input_df)

  # collect outputs data, pass in correlation_context so inputs and outputs data can be correlated later
  outputs_collector.collect(output_df, context)

  return output_df.to_dict()

def preprocess(json_data):
  # preprocess the payload to ensure it can be converted to pandas DataFrame
  return json_data["data"]

def predict(input_df):
  # process input and return with outputs
  ...

  return output_df
更新評分腳本以記錄自定義唯一標識碼
除了直接在評分腳本中記錄 pandas DataFrame,您還可以使用您選擇的唯一標識符來記錄數據。 這些標識碼可以來自您的應用程式、外部系統,或您可以產生這些標識碼。 如果您未提供自定義標識碼,如本節所述,數據收集器將會自動產生唯 correlationid 一的標識碼,以協助您稍後將模型的輸入和輸出相互關聯。 如果您提供自定義識別碼, correlationid 記錄數據中的欄位將會包含您提供的自定義識別碼值。
請先完成上一節中的步驟,然後將下列程式代碼行新增至評分腳本,以匯
azureml.ai.monitoring.context入套件:from azureml.ai.monitoring.context import BasicCorrelationContext在您的評分文稿中,具現化
BasicCorrelationContext物件,並傳入id您想要記錄該資料列的 。 我們建議這是id您系統的唯一標識符,因此您可以唯一識別 Blob 儲存體 的每一個記錄數據列。 將此物件傳遞至 APIcollect()呼叫做為參數:# create a context with a custom unique id artificial_context = BasicCorrelationContext(id='test') # collect inputs data, store correlation_context context = inputs_collector.collect(input_df, artificial_context)請確定您傳入內容,
outputs_collector讓模型輸入和輸出記錄了相同的唯一標識碼,而且稍後可以輕鬆地相互關聯:# collect outputs data, pass in context so inputs and outputs data can be correlated later outputs_collector.collect(output_df, context)
下列程式代碼是記錄自定義唯一標識碼的完整評分腳本 (score.py) 範例。
import pandas as pd
import json
from azureml.ai.monitoring import Collector
from azureml.ai.monitoring.context import BasicCorrelationContext
def init():
global inputs_collector, outputs_collector, inputs_outputs_collector
# instantiate collectors with appropriate names, make sure align with deployment spec
inputs_collector = Collector(name='model_inputs')
outputs_collector = Collector(name='model_outputs')
def run(data):
# json data: { "data" : { "col1": [1,2,3], "col2": [2,3,4] } }
pdf_data = preprocess(json.loads(data))
# tabular data: { "col1": [1,2,3], "col2": [2,3,4] }
input_df = pd.DataFrame(pdf_data)
  # create a context with a custom unique id
  artificial_context = BasicCorrelationContext(id='test')

  # collect inputs data, store correlation_context
  context = inputs_collector.collect(input_df, artificial_context)
# perform scoring with pandas Dataframe, return value is also pandas Dataframe
output_df = predict(input_df)
  # collect outputs data, pass in context so inputs and outputs data can be correlated later
  outputs_collector.collect(output_df, context)
return output_df.to_dict()
def preprocess(json_data):
# preprocess the payload to ensure it can be converted to pandas DataFrame
return json_data["data"]
def predict(input_df):
# process input and return with outputs
...
return output_df
收集模型效能監視的數據
如果您想要使用收集的數據進行模型效能監視,當這類數據可供使用時,每個記錄的數據列都有唯 correlationid 一的數據,可用來將數據與地面真相數據相互關聯。 數據收集器會針對每個記錄的數據列自動產生唯 correlationid 一的標識碼,並將這個自動產生的標識元 correlationid 包含在 JSON 物件中的欄位中。 如需 JSON 架構的詳細資訊,請參閱 將收集的數據儲存在 Blob 記憶體中。
如果您想要使用自己的唯一標識符來記錄生產數據,建議您將此標識碼記錄為 pandas DataFrame 中的個別數據行,因為 數據收集器會批處理彼此接近的要求 。 藉由將 記錄 correlationid 為個別數據行,即可在下游輕鬆取得,以便與地面真相數據整合。
更新您的相依性
您必須先使用基底映像 mcr.microsoft.com/azureml/openmpi4.1.0-ubuntu20.04 和適當的 conda 相依性建立環境,才能使用更新的評分指令碼來建立部署。 之後,您可以使用下列 YAML 中的規格來建置環境。
channels:
  - conda-forge
dependencies:
  - python=3.8
  - pip=22.3.1
  - pip:
      - azureml-defaults==1.38.0
      - azureml-ai-monitoring~=0.1.0b1
name: model-env
更新您的部署 YAML
接下來,您會建立部署 YAML。 若要建立部署 YAML,請包含 data_collector 屬性,並啟用您稍早透過自訂記錄 Python SDK 具現化之 Collector 物件 model_inputs 和 model_outputs 的資料收集:
data_collector:
  collections:
    model_inputs:
      enabled: 'True'
    model_outputs:
      enabled: 'True'
下列程式碼是受控線上端點部署的完整部署 YAML 範例。 您應該根據您的案例更新部署 YAML。 如需如何格式化部署 YAML 以進行推斷資料記錄的更多範例,請參閱 Azure 模型資料收集器範例。
$schema: https://azuremlschemas.azureedge.net/latest/managedOnlineDeployment.schema.json
name: blue
endpoint_name: my_endpoint
model: azureml:iris_mlflow_model@latest
environment:
  image: mcr.microsoft.com/azureml/openmpi4.1.0-ubuntu20.04
  conda_file: model/conda.yaml
code_configuration:
  code: scripts
  scoring_script: score.py
instance_type: Standard_F2s_v2
instance_count: 1
data_collector:
  collections:
    model_inputs:
      enabled: 'True'
    model_outputs:
      enabled: 'True'
您可以選擇性地調整 data_collector 的下列額外參數:
data_collector.rolling_rate:分割儲存體中資料的速率。 可選擇的值:Minute、Hour、Day、Month或Year。data_collector.sampling_rate:要收集的資料的百分比 (以十進位率表示)。 例如,1.0的值代表收集 100% 的資料。data_collector.collections.<collection_name>.data.name:收集的資料要註冊的資料資產名稱。data_collector.collections.<collection_name>.data.path:應將收集的資料註冊為資料資產的完整 Azure Machine Learning 資料存放區路徑。data_collector.collections.<collection_name>.data.version:Blob 儲存體中收集的資料要註冊的資料資產版本。
將資料收集至自訂的 Blob 儲存體容器
您可以使用資料收集器將生產推斷資料收集到自訂 Blob 儲存體容器,遵循下列步驟:
將儲存體容器連線至 Azure Machine Learning 資料存放區。 如需將儲存體容器連線至 Azure Machine Learning 資料存放區的詳細資訊,請參閱建立資料存放區。
檢查您的 Azure Machine Learning 端點是否具有寫入資料存放區目的地的必要權限。
資料收集器同時支援系統指派的受控識別 (SAMI) 和使用者指派的受控識別 (UAM)。 將身分識別新增至您的端點。 使用要作為資料目的地的 Blob 儲存體容器,將
Storage Blob Data Contributor角色指派給此身分識別。 若要了解如何在 Azure 中使用受控識別,請參閱將 Azure 角色指派給受控識別。更新您的部署 YAML,以在每個集合中包含
data屬性。- 必要參數
data.name指定收集的資料要註冊的資料資產名稱。 - 必要參數
data.path指定連線至 Azure Blob 儲存體容器的完整 Azure Machine Learning 資料存放區路徑。 - 選擇性參數
data.version指定資料資產的版本 (預設值為 1)。
下列 YAML 設定顯示如何在每個集合中包含
data屬性的範例。data_collector: collections: model_inputs: enabled: 'True' data: name: my_model_inputs_data_asset path: azureml://datastores/workspaceblobstore/paths/modelDataCollector/my_endpoint/blue/model_inputs version: 1 model_outputs: enabled: 'True' data: name: my_model_outputs_data_asset path: azureml://datastores/workspaceblobstore/paths/modelDataCollector/my_endpoint/blue/model_outputs version: 1注意
您也可以使用
data.path參數來指向不同 Azure 訂用帳戶中的資料存放區,方法是提供下列格式的路徑:azureml://subscriptions/<sub_id>/resourcegroups/<rg_name>/workspaces/<ws_name>/datastores/<datastore_name>/paths/<path>- 必要參數
使用資料收集建立您的部署
部署已啟用自訂記錄的模型:
$ az ml online-deployment create -f deployment.YAML
如需如何使用 Kubernetes 線上端點來格式化部署 YAML 以進行資料收集的詳細資訊,請參閱 CLI (v2) 已啟用 Azure Arc 的 Kubernetes 線上部署 YAML 結構描述。
如需如何使用受控線上端點來格式化部署 YAML 以進行資料收集的詳細資訊,請參閱 CLI (v2) 受控線上部署 YAML 結構描述。
執行承載記錄
除了使用提供的 Python SDK 進行自訂記錄之外,您還可以直接收集要求和回應 HTTP 承載資料,而不需要增強評分指令碼 (score.py)。
若要啟用承載記錄,請在部署 YAML 中使用名稱
request和response:$schema: http://azureml/sdk-2-0/OnlineDeployment.json endpoint_name: my_endpoint name: blue model: azureml:my-model-m1:1 environment: azureml:env-m1:1 data_collector: collections: request: enabled: 'True' response: enabled: 'True'部署已啟用自訂記錄的模型:
$ az ml online-deployment create -f deployment.YAML
使用承載記錄時,所收集的資料不保證為表格式格式。 因此,如果您想要搭配模型監視使用收集的承載資料,您必須提供前置處理元件,使資料成為表格式。 如果您對流暢的模型監視體驗感興趣,建議使用自訂記錄 Python SDK。
使用您的部署時,收集的資料會流向工作區 Blob 儲存體。 下列 JSON 程式碼是收集的 HTTP 要求的範例:
{"specversion":"1.0",
"id":"19790b87-a63c-4295-9a67-febb2d8fbce0",
"source":"/subscriptions/d511f82f-71ba-49a4-8233-d7be8a3650f4/resourceGroups/mire2etesting/providers/Microsoft.MachineLearningServices/workspaces/mirmasterenvws/onlineEndpoints/localdev-endpoint/deployments/localdev",
"type":"azureml.inference.request",
"datacontenttype":"application/json",
"time":"2022-05-25T08:59:48Z",
"data":{"data": [  [1,2,3,4,5,6,7,8,9,10], [10,9,8,7,6,5,4,3,2,1]]},
"path":"/score",
"method":"POST",
"contentrange":"bytes 0-59/*",
"correlationid":"f6e806c9-1a9a-446b-baa2-901373162105","xrequestid":"f6e806c9-1a9a-446b-baa2-901373162105"}
此外,下列 JSON 程式碼是收集的 HTTP 回應的另一個範例:
{"specversion":"1.0",
"id":"bbd80e51-8855-455f-a719-970023f41e7d",
"source":"/subscriptions/d511f82f-71ba-49a4-8233-d7be8a3650f4/resourceGroups/mire2etesting/providers/Microsoft.MachineLearningServices/workspaces/mirmasterenvws/onlineEndpoints/localdev-endpoint/deployments/localdev",
"type":"azureml.inference.response",
"datacontenttype":"application/json",
"time":"2022-05-25T08:59:48Z",
"data":[11055.977245525679, 4503.079536107787],
"contentrange":"bytes 0-38/39",
"correlationid":"f6e806c9-1a9a-446b-baa2-901373162105","xrequestid":"f6e806c9-1a9a-446b-baa2-901373162105"}
將收集的數據儲存在 Blob 記憶體中
數據收集可讓您將生產推斷數據記錄到您選擇的 Blob 記憶體目的地。 數據目的地設定可在 層級進行 collection_name 設定。
Blob 儲存體輸出/格式:
根據預設,收集的資料會儲存在工作區 Blob 儲存體中的下列路徑:
azureml://datastores/workspaceblobstore/paths/modelDataCollector。Blob 中的最後一個路徑會附加
{endpoint_name}/{deployment_name}/{collection_name}/{yyyy}/{MM}/{dd}/{HH}/{instance_id}.jsonl。檔案中的每個行都是 JSON 物件,代表記錄的單一推斷要求/回應。
注意
collection_name 是指資料收集名稱 (例如 model_inputs 或 model_outputs)。
instance_id 是識別記錄資料群組的唯一識別碼。
收集的資料會遵循下列 JSON 結構描述。 收集的資料可從 data 金鑰取得,並提供額外的中繼資料。
{"specversion":"1.0",
"id":"725aa8af-0834-415c-aaf5-c76d0c08f694",
"source":"/subscriptions/636d700c-4412-48fa-84be-452ac03d34a1/resourceGroups/mire2etesting/providers/Microsoft.MachineLearningServices/workspaces/mirmasterws/onlineEndpoints/localdev-endpoint/deployments/localdev",
"type":"azureml.inference.inputs",
"datacontenttype":"application/json",
"time":"2022-12-01T08:51:30Z",
"data":[{"label":"DRUG","pattern":"aspirin"},{"label":"DRUG","pattern":"trazodone"},{"label":"DRUG","pattern":"citalopram"}],
"correlationid":"3711655d-b04c-4aa2-a6c4-6a90cbfcb73f","xrequestid":"3711655d-b04c-4aa2-a6c4-6a90cbfcb73f",
"modelversion":"default",
"collectdatatype":"pandas.core.frame.DataFrame",
"agent":"monitoring-sdk/0.1.2",
"contentrange":"bytes 0-116/117"}
提示
僅針對可讀性顯示分行符號。 在收集的 .jsonl 檔案中,不會有任何分行符號。
儲存大型承載
如果數據的承載大於 4 MB,則會在指向源文件路徑的路徑中包含的檔案中{instance_id}.jsonl發生事件,其路徑應具有下列路徑:blob_url/{blob_container}/{blob_path}/{endpoint_name}/{deployment_name}/{rolled_time}/{instance_id}.jsonl。{endpoint_name}/{deployment_name}/request/.../{instance_id}.jsonl 收集的資料存在於此路徑。
儲存二進位資料
透過收集的二進位資料,我們直接顯示原始檔案,檔案名稱為 instance_id。 二進位資料會根據 rolling_rate 放在與要求來源群組路徑相同的資料夾中。 下列範例反映資料欄位中的路徑。 格式為 json,且僅針對可讀性顯示分行符號:
{
"specversion":"1.0",
"id":"ba993308-f630-4fe2-833f-481b2e4d169a",
"source":"/subscriptions//resourceGroups//providers/Microsoft.MachineLearningServices/workspaces/ws/onlineEndpoints/ep/deployments/dp",
"type":"azureml.inference.request",
"datacontenttype":"text/plain",
"time":"2022-02-28T08:41:07Z",
"data":"https://masterws0373607518.blob.core.windows.net/modeldata/mdc/%5Byear%5D%5Bmonth%5D%5Bday%5D-%5Bhour%5D_%5Bminute%5D/ba993308-f630-4fe2-833f-481b2e4d169a",
"path":"/score?size=1",
"method":"POST",
"contentrange":"bytes 0-80770/80771",
"datainblob":"true"
}
數據收集器批處理
如果在彼此的短時間間隔內傳送要求,數據收集器會將要求分批到相同的 JSON 物件中。 例如,如果您執行腳本以將範例數據傳送至端點,且部署已啟用數據收集,則部分要求可以一起批處理,視它們之間的時間間隔而定。 如果您使用數據收集搭配 Azure 機器學習 模型監視,模型監視服務會獨立處理每個要求。 不過,如果您預期每個記錄的數據列都有自己的唯 correlationid一數據列,則可以將 包含在 correlationid pandas DataFrame 中,您正使用數據收集器記錄的數據行。 如需如何在 pandas DataFrame 中包含唯 correlationid 一數據行的詳細資訊,請參閱 收集模型效能監視的數據。
以下是兩個記錄的要求範例,這些要求會批處理在一起:
{"specversion":"1.0",
"id":"720b8867-54a2-4876-80eb-1fd6a8975770",
"source":"/subscriptions/79a1ba0c-35bb-436b-bff2-3074d5ff1f89/resourceGroups/rg-bozhlinmomoignite/providers/Microsoft.MachineLearningServices/workspaces/momo-demo-ws/onlineEndpoints/credit-default-mdc-testing-4/deployments/main2",
"type":"azureml.inference.model_inputs",
"datacontenttype":"application/json",
"time":"2024-03-05T18:16:25Z",
"data":[{"LIMIT_BAL":502970,"AGE":54,"BILL_AMT1":308068,"BILL_AMT2":381402,"BILL_AMT3":442625,"BILL_AMT4":320399,"BILL_AMT5":322616,"BILL_AMT6":397534,"PAY_AMT1":17987,"PAY_AMT2":78764,"PAY_AMT3":26067,"PAY_AMT4":24102,"PAY_AMT5":-1155,"PAY_AMT6":2154,"SEX":2,"EDUCATION":2,"MARRIAGE":2,"PAY_0":0,"PAY_2":0,"PAY_3":0,"PAY_4":0,"PAY_5":0,"PAY_6":0},{"LIMIT_BAL":293458,"AGE":35,"BILL_AMT1":74131,"BILL_AMT2":-71014,"BILL_AMT3":59284,"BILL_AMT4":98926,"BILL_AMT5":110,"BILL_AMT6":1033,"PAY_AMT1":-3926,"PAY_AMT2":-12729,"PAY_AMT3":17405,"PAY_AMT4":25110,"PAY_AMT5":7051,"PAY_AMT6":1623,"SEX":1,"EDUCATION":3,"MARRIAGE":2,"PAY_0":-2,"PAY_2":-2,"PAY_3":-2,"PAY_4":-2,"PAY_5":-1,"PAY_6":-1}],
"contentrange":"bytes 0-6794/6795",
"correlationid":"test",
"xrequestid":"test",
"modelversion":"default",
"collectdatatype":"pandas.core.frame.DataFrame",
"agent":"azureml-ai-monitoring/0.1.0b4"}
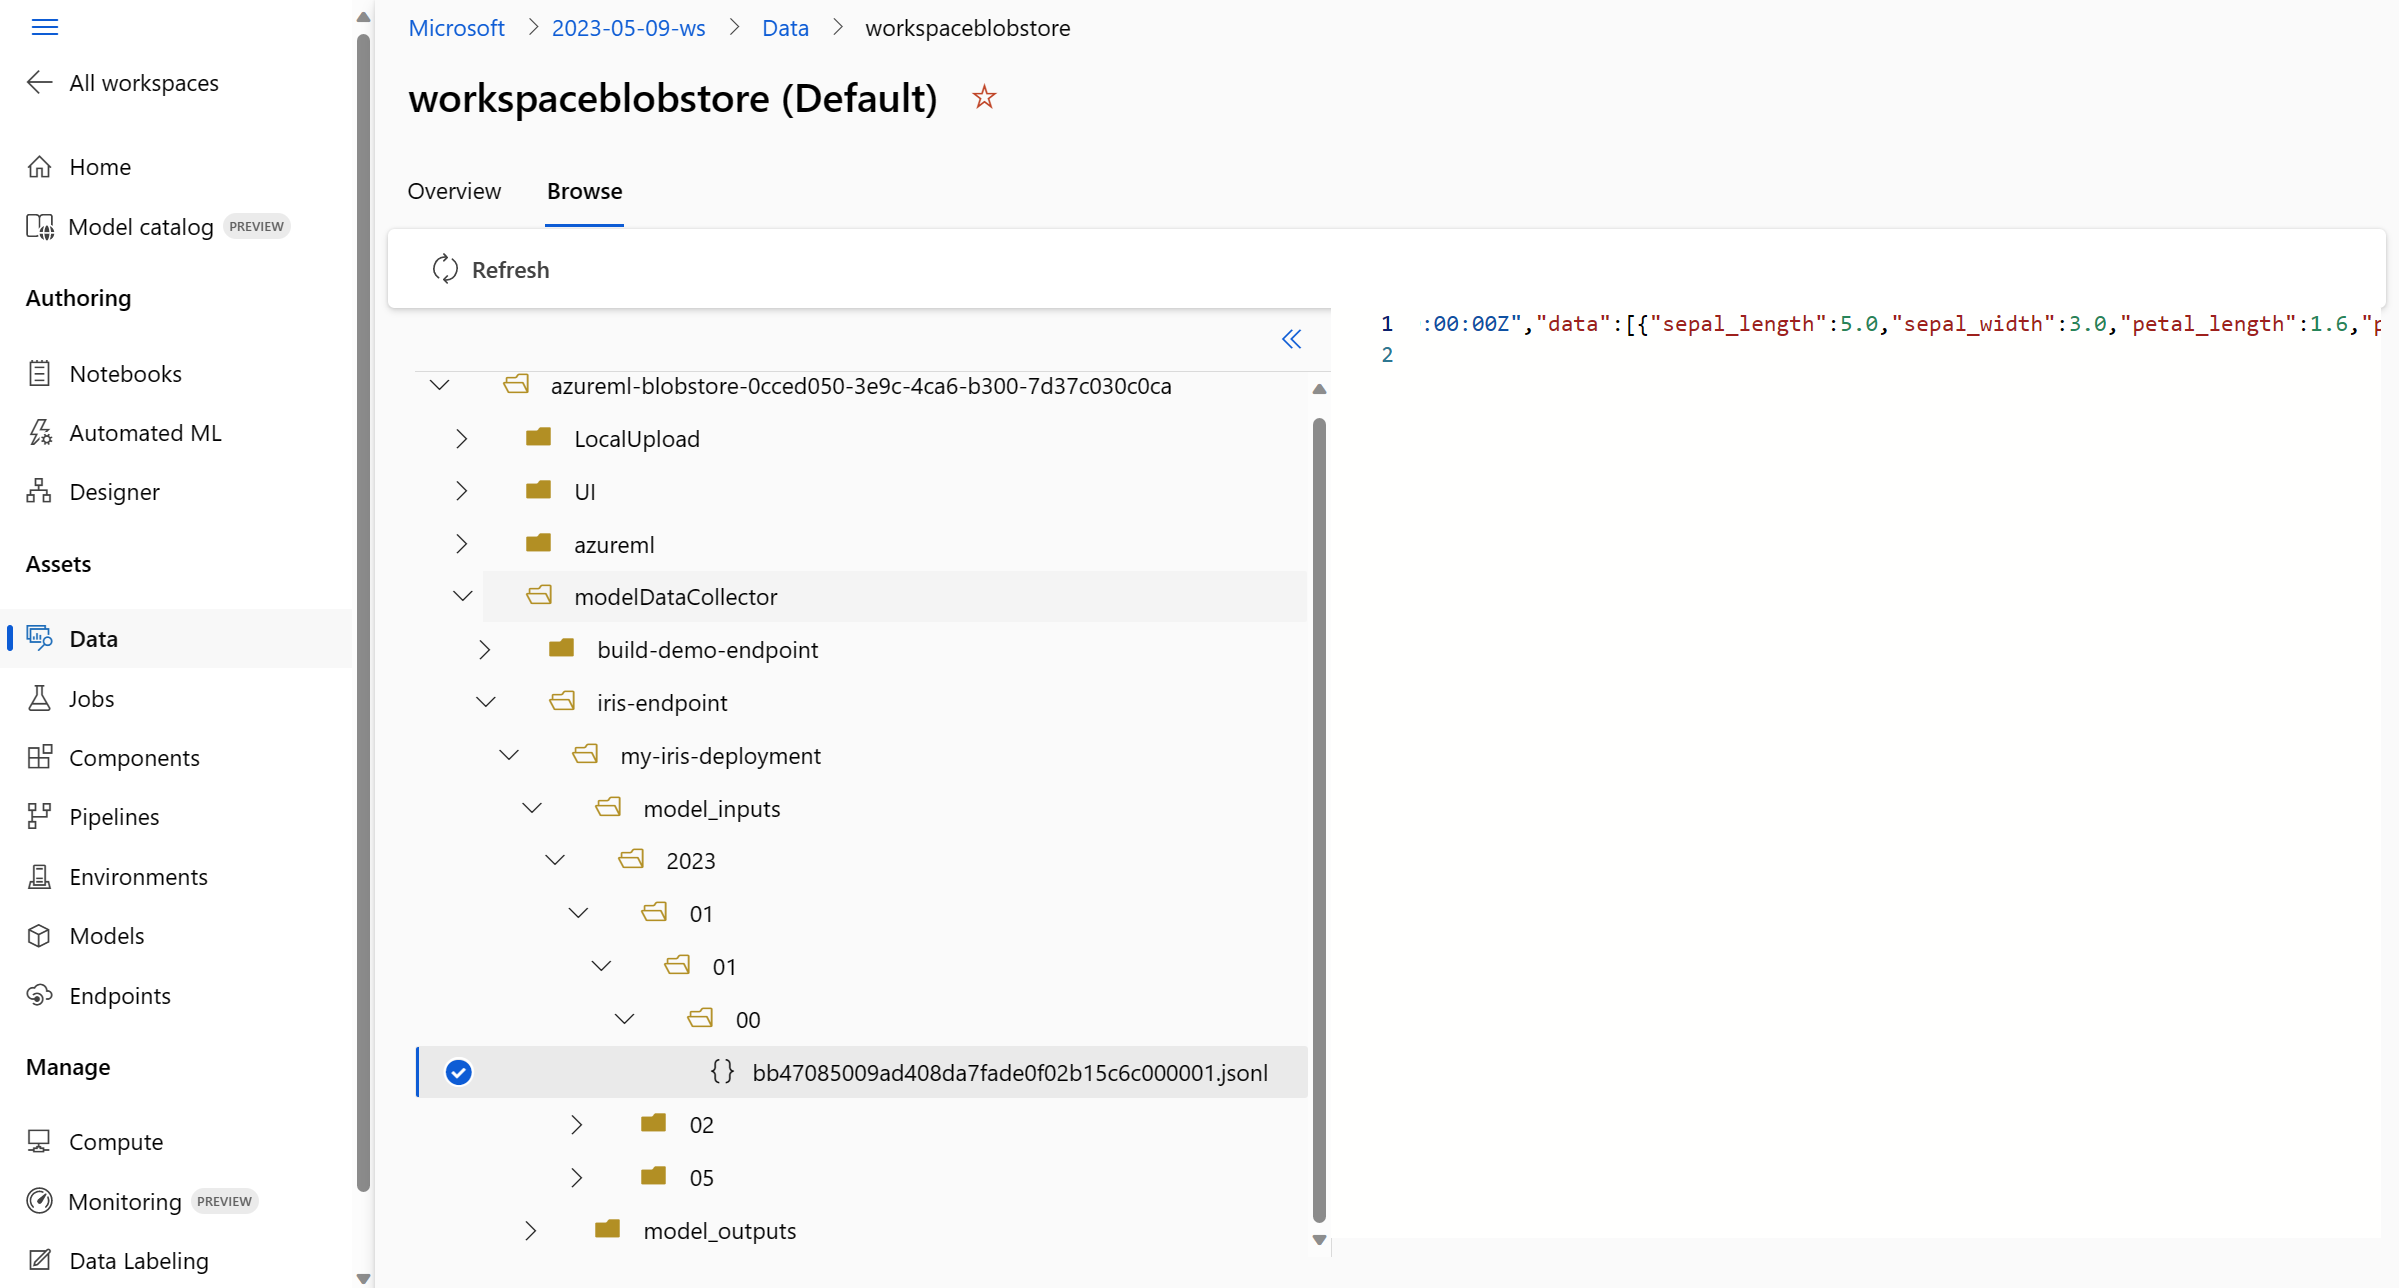
在 Studio UI 中檢視資料
從 Studio UI 檢視 Blob 儲存體中收集的資料:
移至 Azure 機器學習 工作區中的 [資料] 索引標籤:

瀏覽至 [資料存放區],然後選取您的 [workspaceblobstore](預設)]:

使用 [瀏覽] 功能表檢視收集的生產資料:


收集 MLflow 模型的資料
如果您將 MLflow 模型部署到 Azure Machine Learning 線上端點,您可以使用 studio UI 中的單一切換來啟用生產推斷資料收集。 如果開啟資料收集,Azure Machine Learning 會使用自訂記錄程式碼自動檢測評分指令碼,以確保生產資料會記錄到您的工作區 Blob 儲存體。 然後,您的模型監視器可以使用資料來監視生產環境中 MLflow 模型的效能。
當您設定模型的部署時,可以啟用生產資料收集。 在 [部署] 索引標籤下,選取 [已為數據收集啟用]。
啟用資料收集之後,生產推斷資料便會記錄到您的 Azure Machine Learning 工作區 Blob 儲存體,並建立兩個名稱為 <endpoint_name>-<deployment_name>-model_inputs 和 <endpoint_name>-<deployment_name>-model_outputs 的資料資產。 當您在生產環境中使用部署時,這些資料資產會即時更新。 然後,您的模型監視器可以使用資料資產來監視生產環境中模型的效能。