將 MLflow 模型部署至線上端點
在本文中,了解如何將您的 MLflow 模型部署至線上端點以進行即時推斷。 當您將 MLflow 模型部署到線上端點時,您不需要指定評分指令碼或環境,此功能稱為無程式碼部署。
針對無程式碼部署,Azure Machine Learning 會:
- 動態安裝
conda.yaml檔案中提供的 Python 套件。 因此,相依性會在容器執行階段期間安裝。 - 提供包含下列項目的 MLflow 基礎映像/策展環境:
azureml-inference-server-httpmlflow-skinny- 推斷的評分指令碼。
提示
沒有公用網路存取的工作區:您必須先封裝模型 (預覽版),才能將 MLflow 模型部署至沒有輸出連線能力的線上端點。 透過模型封裝,可避免網際網路連線需求,否則 Azure Machine Learning 需要網際網路連線來動態安裝 MLflow 模型所需的 Python 套件。
關於範例
此範例示範如何將 MLflow 模型部署到線上端點以執行預測。 此範例會使用以糖尿病資料集為基礎的 MLflow 模型。 此資料集包含 10 個基準變數:年齡、性別、身體質量指數、平均血壓和 442 名糖尿病患者獲得的 6 種血液血清測量值。 它還包含感興趣的反應,並包含在基準後一年疾病進展的量化量值。
模型已使用 scikit-learn 迴歸輸入變數進行訓練,而且所有必要的前置處理都已封裝為管線,讓此模型成為從原始資料到預測的端對端管線。
本文中的資訊是以 azureml-examples 存放庫中包含的程式碼範例為基礎。 若要在本機執行命令,而不需要複製/貼上 YAML 和其他檔案,請複製存放庫,然後將目錄變更為 cli (如果您使用 Azure CLI)。 如果您使用適用於 Python 的 Azure Machine Learning SDK,請將目錄變更為 sdk/python/endpoints/online/mlflow。
git clone https://github.com/Azure/azureml-examples --depth 1
cd azureml-examples/cli
在 Jupyter Notebook 中跟著做
您可以在複製的存放庫中開啟將 MLflow 模型部署至線上端點筆記本,以遵循使用 Azure Machine Learning Python SDK 的步驟。
必要條件
遵循本文中的步驟之前,請確定您已滿足下列必要條件:
Azure 訂用帳戶。 如果您沒有 Azure 訂用帳戶,請在開始前建立免費帳戶。 試用免費或付費版本的 Azure Machine Learning。
Azure 角色型存取控制 (Azure RBAC) 可用來授與 Azure Machine Learning 作業的存取權。 若要執行本文中的步驟,您必須為使用者帳戶指派 Azure Machine Learning 工作區的擁有者或參與者角色,或允許
Microsoft.MachineLearningServices/workspaces/onlineEndpoints/*的自訂角色。 如需角色的詳細資訊,請參閱管理對 Azure Machine Learning 工作區的存取。您必須在工作區中註冊 MLflow 模型。 本文會在工作區中註冊針對糖尿病資料集定型的模型。
此外,您需要:
- 安裝 Azure CLI 和 Azure CLI 的
ml延伸模組。 如需安裝 CLI 的詳細資訊,請參閱安裝和設定 CLI (v2)。
- 安裝 Azure CLI 和 Azure CLI 的
連線到您的工作區
首先,連線到您將在其中工作的 Azure Machine Learning 工作區。
az account set --subscription <subscription>
az configure --defaults workspace=<workspace> group=<resource-group> location=<location>
註冊模型
您只能將已註冊的模型部署到線上端點。 在此案例中,您的存放庫已有模型的本機複本,所以你只要在工作區的登錄中發佈模型即可。 如果您已註冊您嘗試部署的模型,則可以略過此步驟。
MODEL_NAME='sklearn-diabetes'
az ml model create --name $MODEL_NAME --type "mlflow_model" --path "endpoints/online/ncd/sklearn-diabetes/model"
如果您的模型是在執行中記錄的,該怎麼辦?
如果您的模型是在執行內記錄的,您可以直接註冊模型。
若要註冊模型,您必須知道儲存模型的位置。 如果您使用 MLflow 的 autolog 功能,則模型的路徑取決於模型類型和架構。 您應該檢查作業輸出,以識別模型資料夾的名稱。 此資料夾包含名稱為 MLModel 的檔案。
如果您使用 log_model 方法來手動記錄模型,請將路徑作為方法的引數傳遞至模型。 例如,如果您使用 mlflow.sklearn.log_model(my_model, "classifier") 記錄模型,則儲存模型的路徑稱為 classifier。
使用 Azure Machine Learning CLI v2 從定型作業輸出建立模型。 在下列範例中,名為 $MODEL_NAME 的模型是使用識別碼 $RUN_ID 的工作構件來登錄。 儲存模型的路徑為 $MODEL_PATH。
az ml model create --name $MODEL_NAME --path azureml://jobs/$RUN_ID/outputs/artifacts/$MODEL_PATH
注意
路徑 $MODEL_PATH 是模型儲存在執行中的位置。
將 MLflow 模型部署到線上端點
設定將用來部署模型的端點。 下列範例會設定端點的名稱和驗證模式:
設定端點名稱,方法是執行下列命令 (唯一的名稱取代
YOUR_ENDPOINT_NAME):export ENDPOINT_NAME="<YOUR_ENDPOINT_NAME>"設定端點:
create-endpoint.yaml
$schema: https://azuremlschemas.azureedge.net/latest/managedOnlineEndpoint.schema.json name: my-endpoint auth_mode: key建立端點:
az ml online-endpoint create --name $ENDPOINT_NAME -f endpoints/online/ncd/create-endpoint.yaml設定部署。 部署是託管執行實際推斷模型所需的一組資源。
sklearn-deployment.yaml
$schema: https://azuremlschemas.azureedge.net/latest/managedOnlineDeployment.schema.json name: sklearn-deployment endpoint_name: my-endpoint model: name: mir-sample-sklearn-ncd-model version: 1 path: sklearn-diabetes/model type: mlflow_model instance_type: Standard_DS3_v2 instance_count: 1注意
scoring_script和environment的自動產生僅支援pyfunc模型變體。 若要使用不同的模型變體,請參閱自訂 MLflow 模型部署。建立部署:
az ml online-deployment create --name sklearn-deployment --endpoint $ENDPOINT_NAME -f endpoints/online/ncd/sklearn-deployment.yaml --all-traffic如果您的端點沒有輸出連線,請透過包含旗標
--with-package使用模型封裝 (預覽):az ml online-deployment create --with-package --name sklearn-deployment --endpoint $ENDPOINT_NAME -f endpoints/online/ncd/sklearn-deployment.yaml --all-traffic將所有流量指派給部署。 到目前為止,端點有一個部署,但不會為其指派任何流量。
Azure CLI 中不需要此步驟,因為您在建立期間使用了
--all-traffic旗標。 如果您需要變更流量,您可以使用命令az ml online-endpoint update --traffic。 如需如何更新流量的詳細資訊,請參閱漸進式更新流量。更新端點組態:
Azure CLI 中不需要此步驟,因為您在建立期間使用了
--all-traffic旗標。 如果您需要變更流量,您可以使用命令az ml online-endpoint update --traffic。 如需如何更新流量的詳細資訊,請參閱漸進式更新流量。
叫用端點
部署準備就緒後,您可以使用它來提供要求。 測試部署的其中一種方式是在您使用的部署用戶端中使用內建叫用功能。 下列 JSON 是部署的範例要求。
sample-request-sklearn.json
{"input_data": {
    "columns": [
      "age",
      "sex",
      "bmi",
      "bp",
      "s1",
      "s2",
      "s3",
      "s4",
      "s5",
      "s6"
    ],
    "data": [
      [ 1.0,2.0,3.0,4.0,5.0,6.0,7.0,8.0,9.0,10.0 ],
      [ 10.0,2.0,9.0,8.0,7.0,6.0,5.0,4.0,3.0,2.0]
    ],
    "index": [0,1]
  }}
注意
input_data 會用於此範例,而不是用於 MLflow 服務的 inputs。 這是因為 Azure Machine Learning 需要不同的輸入格式,才能自動產生端點的 Swagger 合約。 如需預期輸入格式的詳細資訊,請參閱在 Azure Machine Learning 和 MLflow 內建伺服器中部署的模型之間的差異。
將要求提交至端點,如下所示:
az ml online-endpoint invoke --name $ENDPOINT_NAME --request-file endpoints/online/ncd/sample-request-sklearn.json
回應類似以下文字:
[
  11633.100167144921,
  8522.117402884991
]
重要
針對 MLflow 無程式碼部署,目前不支援透過本機端點進行測試。
自訂 MLflow 模型部署
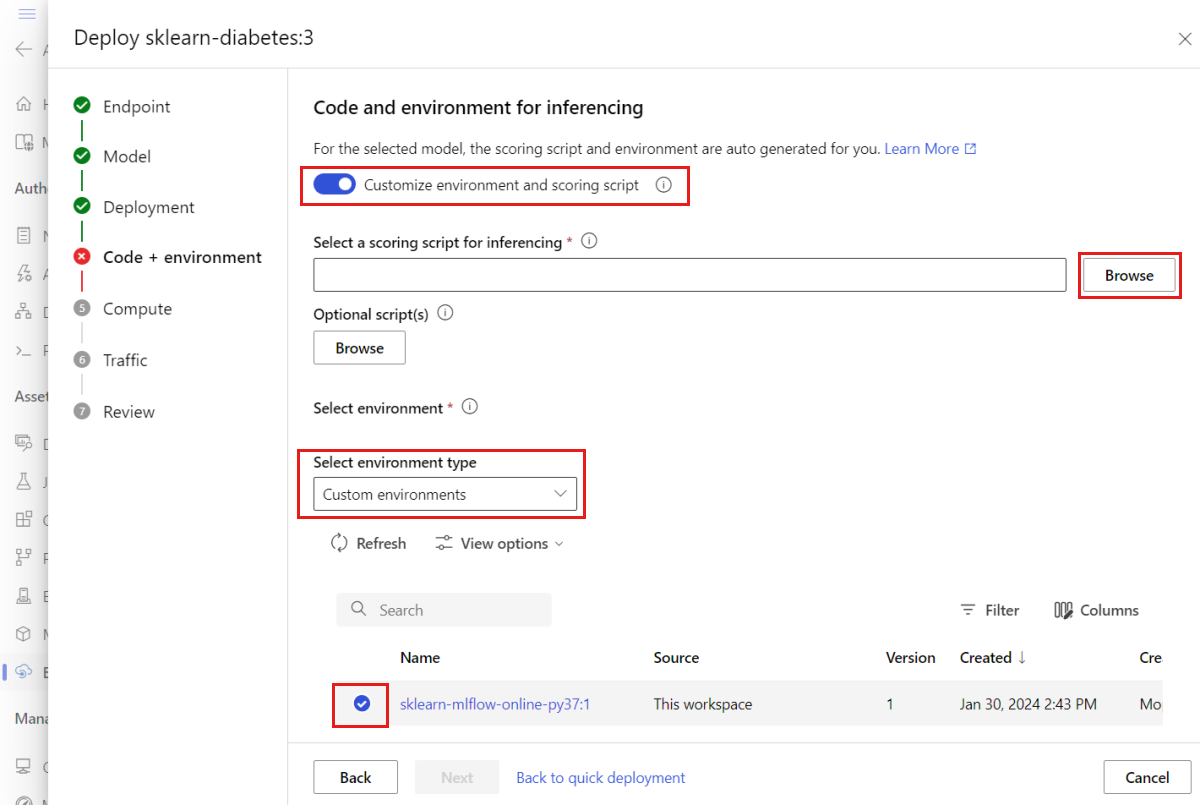
您不需要在 MLflow 模型到線上端點的部署定義中指定評分指令碼。 不過,您可以選擇這樣做,並自訂推斷的執行方式。
發生下列情況時,您通常會想要自訂 MLflow 模型部署時:
- 模型上沒有
PyFunc變體。 - 您必須自訂模型執行的方式,例如,使用特定變體搭配並使用
mlflow.<flavor>.load_model()來載入模型。 - 當模型本身未完成前置/後置處理時,您必須在評分常式中執行該處理。
- 模型輸出無法在表格式資料中正確表示。 例如,呈現影像的張量。
重要
如果您選擇指定 MLflow 模型部署的評分指令碼,您也必須指定部署執行所在的環境。
步驟
若要使用自訂評分指令碼部署 MLflow 模型:
識別放置 MLflow 模型的資料夾。
a. 移至 Azure Machine Learning Studio。
b. 移至 [模型] 區段。
c. 選取您嘗試部署的模型,然後移至其 [成品] 索引標籤。
d. 記下所顯示的資料夾。 註冊模型時會指定此資料夾。
建立評分指令碼。 請注意您先前識別的資料夾名稱
model如何包含在init()函式中。提示
下列評分指令碼是作為如何使用 MLflow 模型執行推斷的範例來提供。 您可以調整此指令碼以符合您的需求,或變更其中任何部分,以反映您的案例。
score.py
import logging
import os
import json
import mlflow
from io import StringIO
from mlflow.pyfunc.scoring_server import infer_and_parse_json_input, predictions_to_json


def init():
    global model
    global input_schema
    # "model" is the path of the mlflow artifacts when the model was registered. For automl
    # models, this is generally "mlflow-model".
    model_path = os.path.join(os.getenv("AZUREML_MODEL_DIR"), "model")
    model = mlflow.pyfunc.load_model(model_path)
    input_schema = model.metadata.get_input_schema()


def run(raw_data):
    json_data = json.loads(raw_data)
    if "input_data" not in json_data.keys():
        raise Exception("Request must contain a top level key named 'input_data'")

    serving_input = json.dumps(json_data["input_data"])
    data = infer_and_parse_json_input(serving_input, input_schema)
    predictions = model.predict(data)

    result = StringIO()
    predictions_to_json(predictions, result)
    return result.getvalue()
警告
MLflow 2.0 諮詢:提供的評分指令碼將同時與 MLflow 1.X 和 MLflow 2.X 搭配運作。 不過,請注意,這些版本的預期輸入/輸出格式可能會有所不同。 檢查用來確保您使用預期 MLflow 版本的環境定義。 請注意,只有 Python 3.8+支援 MLflow 2.0。
建立可執行評分指令碼的環境。 由於模型是 MLflow 模型,因此也會在模型套件中指定 Conda 需求。 如需 MLflow 模型中所包含檔案的更多詳細資料,請參閱 MLmodel 格式。 接著,您將使用檔案中的 Conda 相依性來建置環境。 不過,您也必須包含套件
azureml-inference-server-http,這是 Azure Machine Learning 中線上部署的必要項目。Conda 定義檔案如下所示:
conda.yml
channels:
- conda-forge
dependencies:
- python=3.9
- pip
- pip:
  - mlflow
  - scikit-learn==1.2.2
  - cloudpickle==2.2.1
  - psutil==5.9.4
  - pandas==2.0.0
  - azureml-inference-server-http
name: mlflow-env
注意
azureml-inference-server-http套件已新增至原始 Conda 相依性檔案。您將使用此 Conda 相依性檔案來建立環境:
環境將會在部署組態中內嵌建立。
建立部署:
建立部署組態檔 deployment.yml:
$schema: https://azuremlschemas.azureedge.net/latest/managedOnlineDeployment.schema.json
name: sklearn-diabetes-custom
endpoint_name: my-endpoint
model: azureml:sklearn-diabetes@latest
environment:
  image: mcr.microsoft.com/azureml/openmpi4.1.0-ubuntu22.04
  conda_file: sklearn-diabetes/environment/conda.yml
code_configuration:
  code: sklearn-diabetes/src
  scoring_script: score.py
instance_type: Standard_F2s_v2
instance_count: 1
建立部署:
az ml online-deployment create -f deployment.yml部署完成之後,即可提供要求。 測試部署的其中一種方式是使用範例要求檔案和
invoke方法。sample-request-sklearn.json
{"input_data": {
    "columns": [
      "age",
      "sex",
      "bmi",
      "bp",
      "s1",
      "s2",
      "s3",
      "s4",
      "s5",
      "s6"
    ],
    "data": [
      [ 1.0,2.0,3.0,4.0,5.0,6.0,7.0,8.0,9.0,10.0 ],
      [ 10.0,2.0,9.0,8.0,7.0,6.0,5.0,4.0,3.0,2.0]
    ],
    "index": [0,1]
  }}
將要求提交至端點,如下所示:
az ml online-endpoint invoke --name $ENDPOINT_NAME --request-file endpoints/online/ncd/sample-request-sklearn.json回應類似以下文字:
{
  "predictions": [
    11633.100167144921,
    8522.117402884991
  ]
}
警告
MLflow 2.0 諮詢:在 MLflow 1.X 中,
predictions索引鍵將會遺失。
清除資源
使用端點完成之後,請刪除其相關聯的資源:
az ml online-endpoint delete --name $ENDPOINT_NAME --yes


![顯示 [端點 UI] 頁面上 [建立] 選項的螢幕快照。](media/how-to-deploy-mlflow-models-online-endpoints/create-from-endpoints.png?view=azureml-api-2)


