檢視自動化 ML 模型的定型程式碼
在本文中,您會了解如何從任何自動化機器學習定型模型中檢視產生的定型程式碼。
自動化 ML 定型模型的程式碼產生可讓您查看下列詳細資料,自動化 ML 用來定型和建置特定執行的模型。
- 資料前置處理
- 演算法選擇
- 特徵化
- 超參數
您可以選取任何自動化 ML 定型模型、建議的執行或子執行,以及檢視產生的 Python 定型程式碼,其中已建立該特定模型。
使用產生的模型定型程式碼,您可以:
- 了解模型演算法使用哪個特徵化流程和哪些超參數。
- 追蹤/版本設定/稽核定型模型。 儲存已設定版本的程式碼,以追蹤使用哪個特定的定型程式碼,搭配要部署到生產環境的模型。
- 變更超參數或套用您的 ML 和演算法技能/體驗來自訂定型程式碼,並使用您的自訂程式碼重新定型新的模型。
下圖說明您可以針對具有所有工作類型的自動化 ML 實驗產生程式碼。 首先選取模型。 所選的模型會醒目提示,Azure Machine Learning 會複製用來建立模型的程式碼檔案,並將其顯示至筆記本共用資料夾中。 從這裡,您可以視需要檢視和自訂程式碼。
必要條件
Azure Machine Learning 工作區。 若要建立工作區,請參閱建立工作區資源。
自動產生 ML 程式碼僅適用於在遠端 Azure Machine Learning 計算目標上執行的實驗。 本機執行不支援程式碼產生。
所有透過 Azure Machine Learning 工作室、SDKv2 或 CLIv2 觸發的自動化 ML 執行都會啟用程式碼產生。
取得產生的程式碼和模型成品
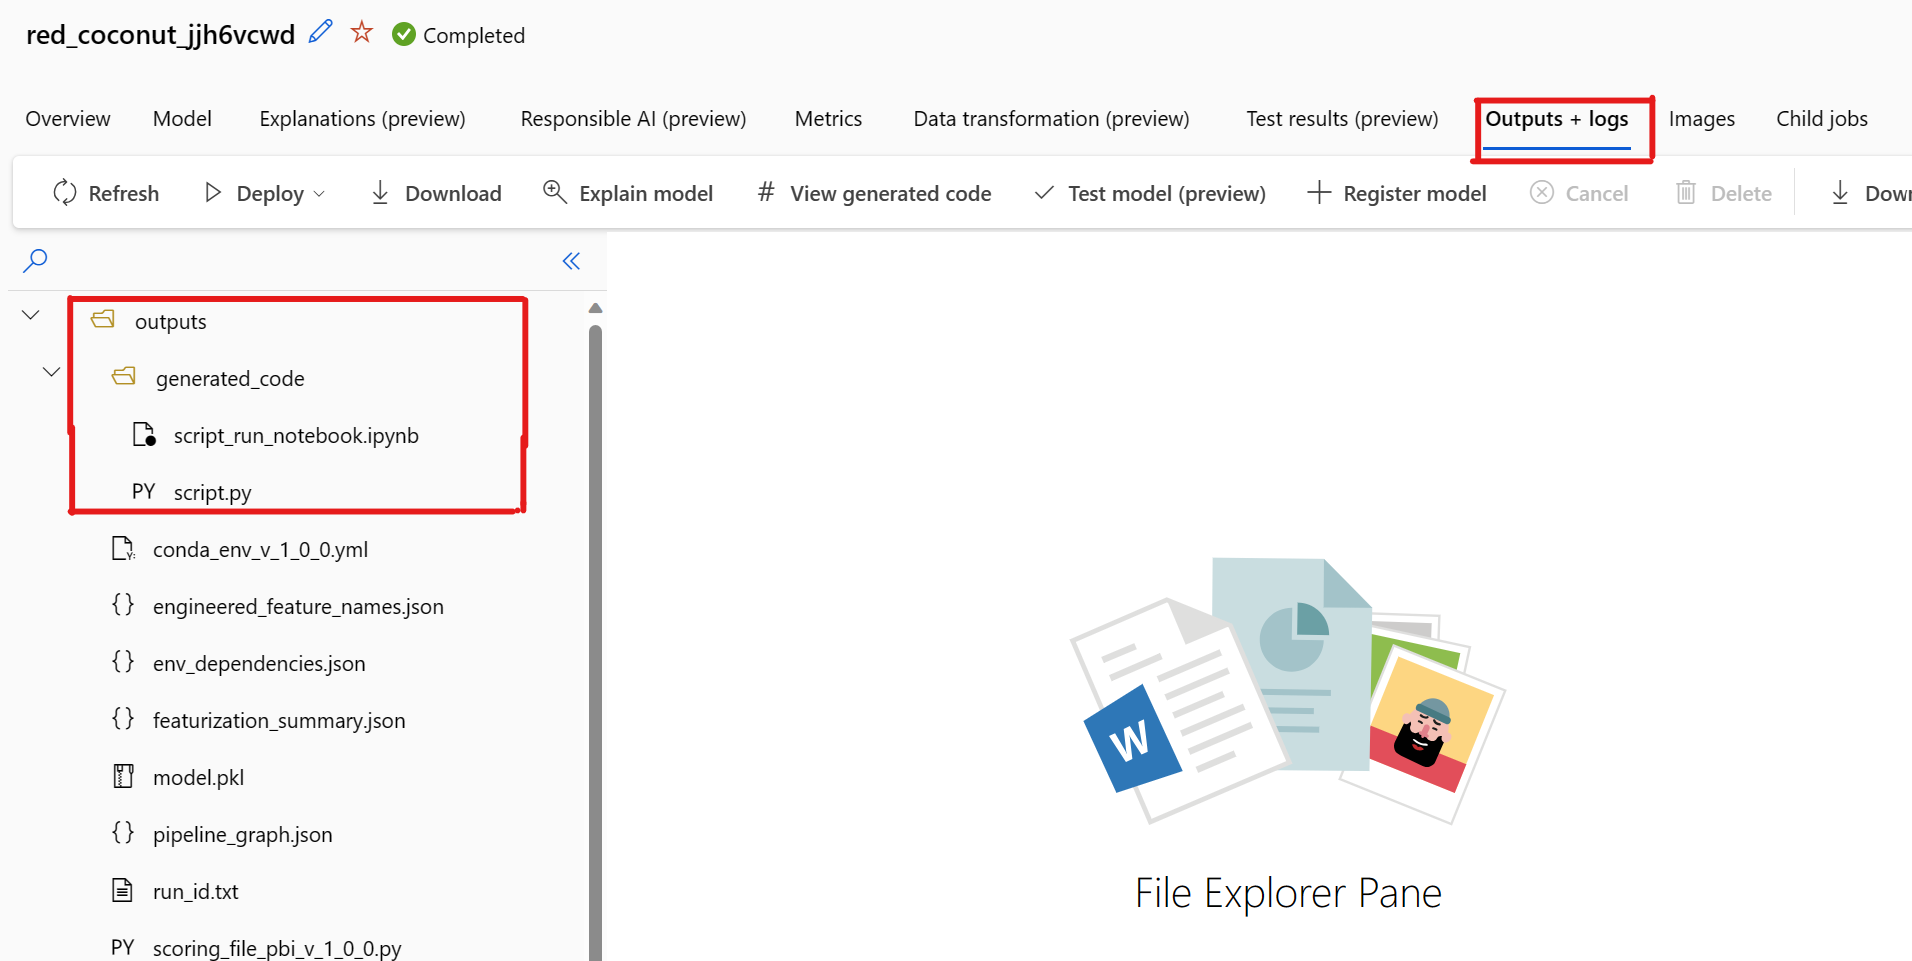
依預設,每個自動化 ML 定型模型會在定型完成之後產生其定型程式碼。 自動化 ML 會針對該特定模型將此程式碼儲存在實驗的 outputs/generated_code 中。 在 Azure Machine Learning 工作室 UI 中,您可以在所選取模型的 [輸出 + 記錄] 索引標籤上檢視它們。
script.py 這是模型的定型程式碼,您可能想要透過特徵化步驟、使用的特定演算法和超參數,來分析此定型程式碼。
script_run_notebook.ipynb 具有樣板程式碼的筆記本,可透過 Azure Machine Learning SDKv2 在 Azure Machine Learning 計算中執行模型的定型程式碼 (script.py)。
自動化 ML 定型執行完成之後,您就可以透過 Azure Machine Learning 工作室 UI 存取 script.py 和 script_run_notebook.ipynb 檔案。
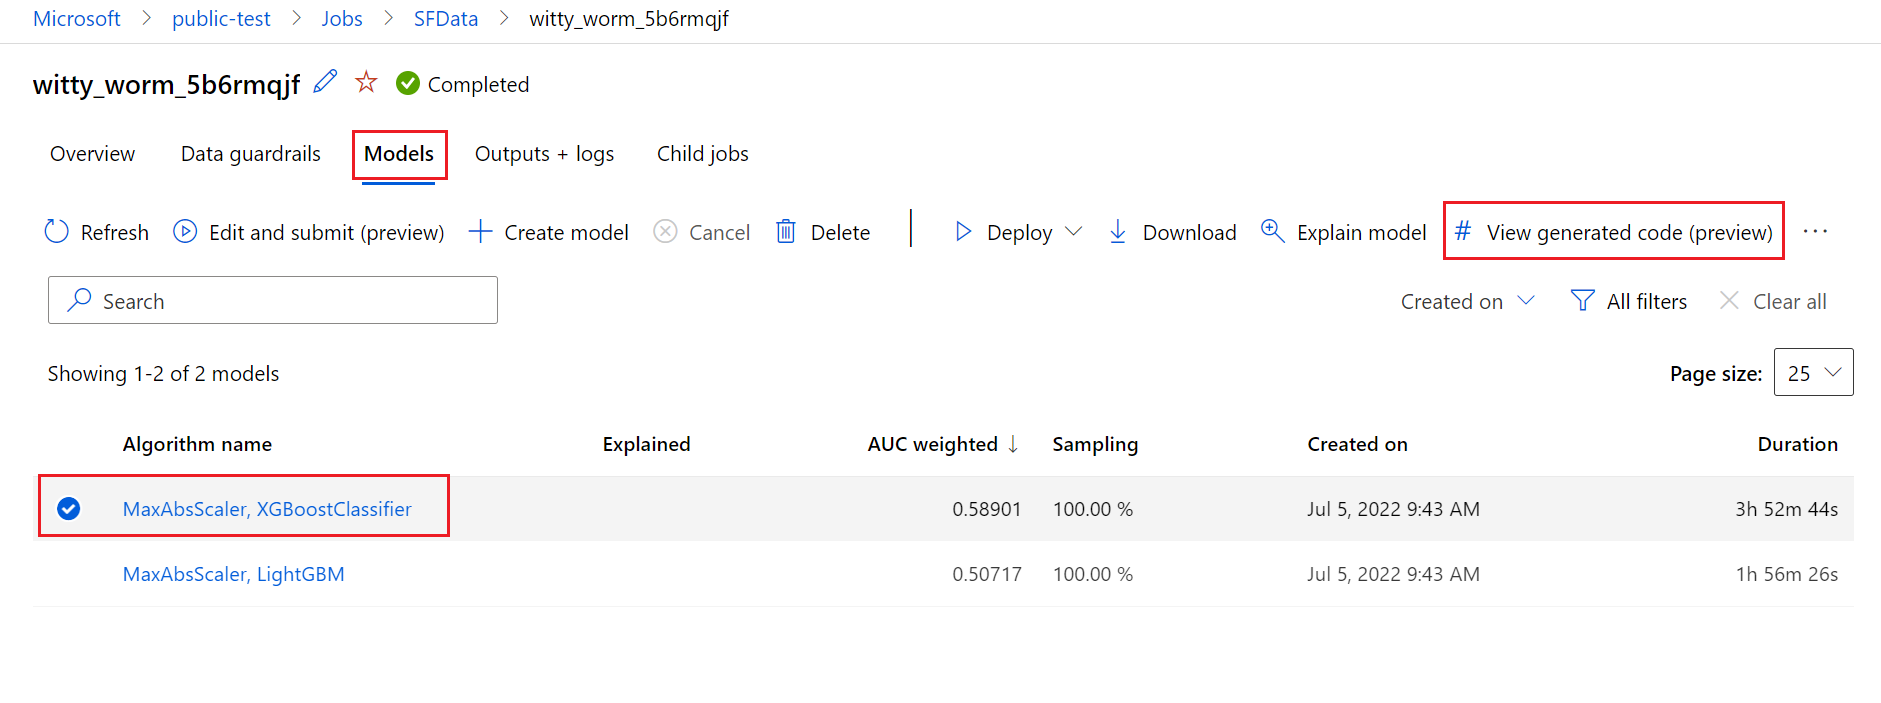
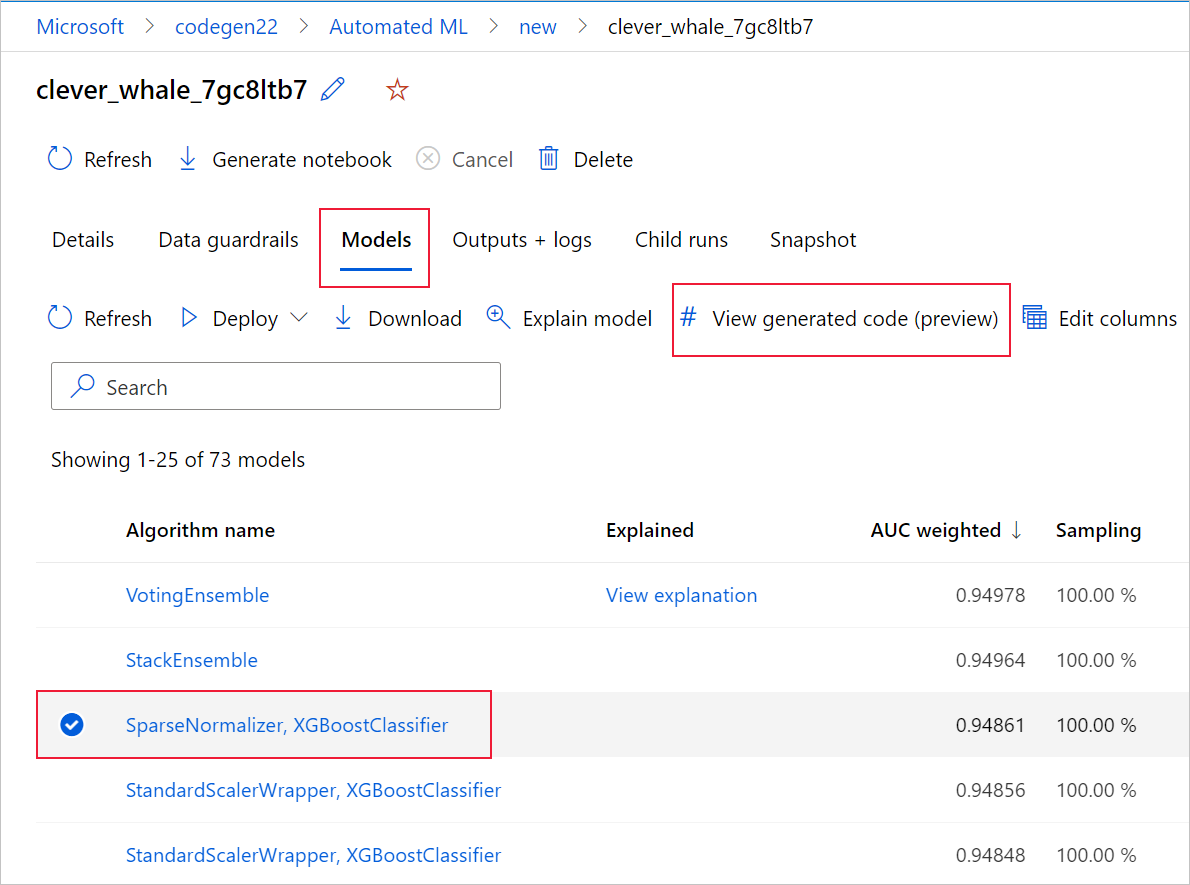
若要這樣做,請瀏覽至自動化 ML 實驗父執行頁面的 [模型] 索引標籤。 在選取其中一個定型的模型之後,您可以選取 [檢視產生的程式碼] 按鈕。 此按鈕會將您重新導向至 Notebooks 入口網站延伸模組,您可以在其中檢視、編輯和執行針對該特定選取模型產生的程式碼。
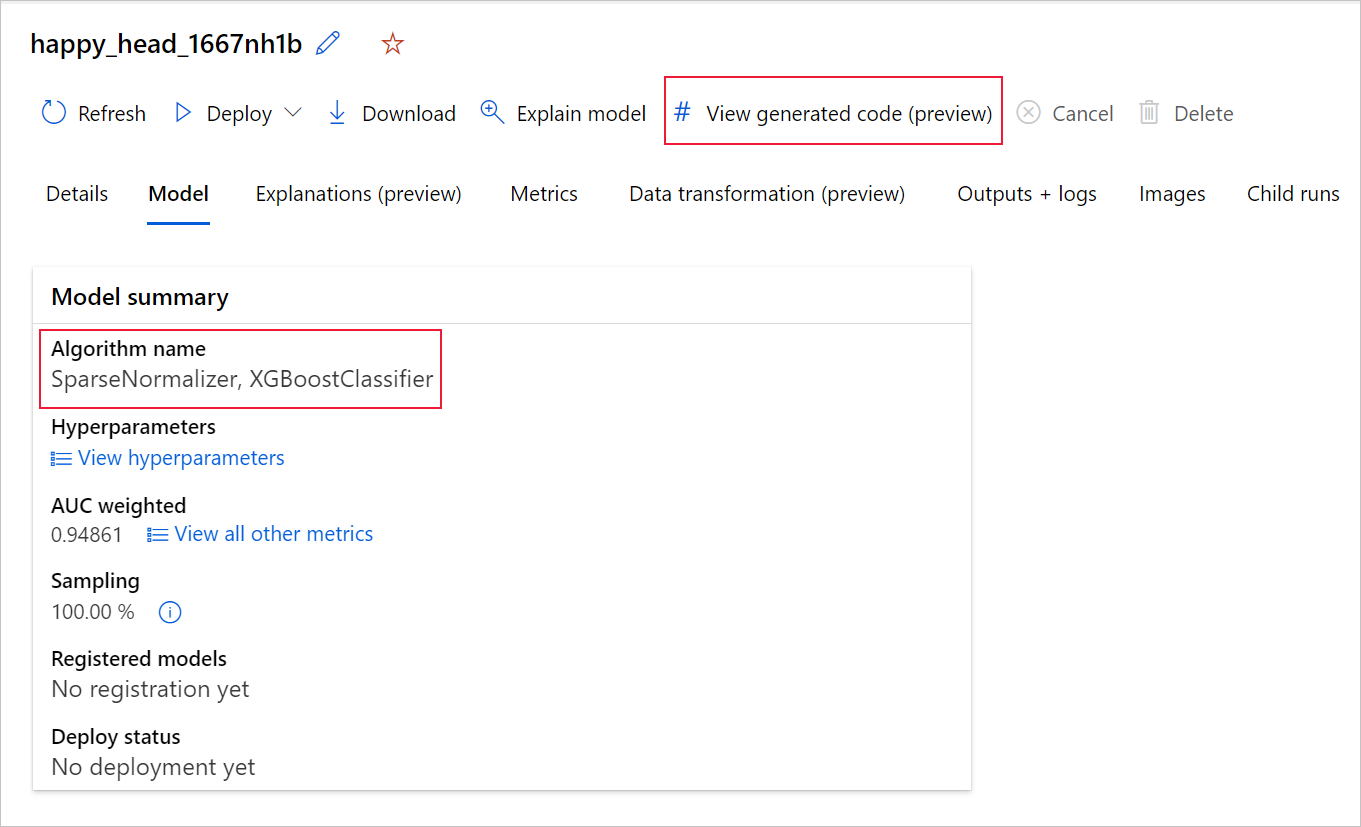
一旦您瀏覽至特定模型的子執行頁面時,也可以從該子執行頁面頂端存取模型產生的程式碼。
如果您使用 Python SDKv2,則也可以藉由透過 MLFlow 擷取最佳執行並下載所產生的成品,來下載「script.py」和「script_run_notebook.ipynb」。
限制
選取 [檢視產生的程式碼] 時有已知問題。 當儲存體位於 VNet 後方時,此動作無法重新導向至 Notebooks 入口網站。 因應措施是,使用者可以藉由瀏覽至 [輸出] > [generated_code] 資料夾下的 [輸出 + 記錄] 索引標籤,手動下載 script.py 和 script_run_notebook.ipynb 檔案。 這些檔案可以手動上傳至 [筆記本] 資料夾,來加以執行或編輯。 請遵循此連結以深入了解 Azure Machine Learning 中的 VNet。
script.py
script.py 檔案包含搭配先前使用的超參數來定型模型所需的核心邏輯。 雖然打算在 Azure Machine Learning 指令碼執行的內容中執行,並進行一些修改,但模型的定型程式碼也可以在您自己的內部部署環境中獨立執行。
指令碼大致可以細分成下列幾個部分:資料載入、資料準備、資料特徵化、前置處理器/演算法規格,以及定型。
載入資料
get_training_dataset() 函式會載入先前使用的資料集。 其假設指令碼是在 Azure Machine Learning 指令碼中執行,而後者指令碼是在與原始實驗相同的工作區下執行。
def get_training_dataset(dataset_id):
    from azureml.core.dataset import Dataset
    from azureml.core.run import Run

    logger.info("Running get_training_dataset")
    ws = Run.get_context().experiment.workspace
    dataset = Dataset.get_by_id(workspace=ws, id=dataset_id)
    return dataset.to_pandas_dataframe()
在指令碼執行過程中執行時,Run.get_context().experiment.workspace 會擷取正確的工作區。 不過,如果此指令碼是在不同的工作區內執行或在本機執行,您就必須修改指令碼來明確指定適當的工作區。
一旦擷取了工作區,原始資料集就會依其識別碼擷取。 具有完全相同結構的另一個資料集,也可以分別透過識別碼或名稱,搭配 get_by_id() 或 get_by_name() 來指定。 您稍後可以在指令碼中找到識別碼,其位於與下列程式碼類似的區段中。
if __name__ == '__main__':
    parser = argparse.ArgumentParser()
    parser.add_argument('--training_dataset_id', type=str, default='xxxxxxxx-xxxx-xxxx-xxxx-xxxxxxxxxxx', help='Default training dataset id is populated from the parent run')
    args = parser.parse_args()

    main(args.training_dataset_id)
您也可以選擇將這個整個函式取代為您自己的資料載入機制;唯一的條件約束是傳回值必須是 Pandas 資料框架,而且資料必須具有與原始實驗中相同的圖形。
資料準備程式碼
prepare_data() 函式會清除資料、分割特徵和範例加權資料行,以及準備資料以供定型使用。
此函式可能會有所不同,取決於資料集類型和實驗工作類型:分類、迴歸、時間序列預測、映像或 NLP 工作。
下列範例顯示,一般而言,系統會傳入來自資料載入步驟的資料框架。 系統會擷取標籤資料行和範例加權 (如果原本已指定),以及從輸入資料中卸除包含 NaN 的資料列。
def prepare_data(dataframe):
    from azureml.training.tabular.preprocessing import data_cleaning

    logger.info("Running prepare_data")
    label_column_name = 'y'

    # extract the features, target and sample weight arrays
    y = dataframe[label_column_name].values
    X = dataframe.drop([label_column_name], axis=1)
    sample_weights = None
    X, y, sample_weights = data_cleaning._remove_nan_rows_in_X_y(X, y, sample_weights,
     is_timeseries=False, target_column=label_column_name)

    return X, y, sample_weights
如果您想要再進行任何資料準備,則可以藉由新增自訂資料準備程式碼,在此步驟中進行。
資料特徵化程式碼
generate_data_transformation_config() 函式會指定最終 scikit-learn 管線中的特徵化步驟。 來自原始實驗中的特徵化工具會在這裡重現,以及其參數。
例如,可以在此函式中發生的可能資料轉換,其可以基於 SimpleImputer() 和 CatImputer() 之類的插補器或 StringCastTransformer() 和 LabelEncoderTransformer() 之類的轉換器。
以下是 StringCastTransformer() 類型的轉換器,可用來轉換一組資料行。 在此情況下,此集合是以 column_names 表示。
def get_mapper_0(column_names):
    # ... Multiple imports to package dependencies, removed for simplicity ...

    definition = gen_features(
        columns=column_names,
        classes=[
            {
                'class': StringCastTransformer,
            },
            {
                'class': CountVectorizer,
                'analyzer': 'word',
                'binary': True,
                'decode_error': 'strict',
                'dtype': numpy.uint8,
                'encoding': 'utf-8',
                'input': 'content',
                'lowercase': True,
                'max_df': 1.0,
                'max_features': None,
                'min_df': 1,
                'ngram_range': (1, 1),
                'preprocessor': None,
                'stop_words': None,
                'strip_accents': None,
                'token_pattern': '(?u)\\b\\w\\w+\\b',
                'tokenizer': wrap_in_lst,
                'vocabulary': None,
            },
        ]
    )
    mapper = DataFrameMapper(features=definition, input_df=True, sparse=True)

    return mapper
如果您有許多資料行需要套用相同的特徵化/轉換 (例如,數個資料行群組中的 50 個資料行),這些資料行會藉由根據類型進行分組來處理。
在下列範例中,請注意,每個群組都已套用唯一的對應工具。 此對應工具接著會套用至該群組的每個資料行。
def generate_data_transformation_config():
    from sklearn.pipeline import FeatureUnion

    column_group_1 = [['id'], ['ps_reg_01'], ['ps_reg_02'], ['ps_reg_03'], ['ps_car_11_cat'], ['ps_car_12'], ['ps_car_13'], ['ps_car_14'], ['ps_car_15'], ['ps_calc_01'], ['ps_calc_02'], ['ps_calc_03']]

    column_group_2 = ['ps_ind_06_bin', 'ps_ind_07_bin', 'ps_ind_08_bin', 'ps_ind_09_bin', 'ps_ind_10_bin', 'ps_ind_11_bin', 'ps_ind_12_bin', 'ps_ind_13_bin', 'ps_ind_16_bin', 'ps_ind_17_bin', 'ps_ind_18_bin', 'ps_car_08_cat', 'ps_calc_15_bin', 'ps_calc_16_bin', 'ps_calc_17_bin', 'ps_calc_18_bin', 'ps_calc_19_bin', 'ps_calc_20_bin']

    column_group_3 = ['ps_ind_01', 'ps_ind_02_cat', 'ps_ind_03', 'ps_ind_04_cat', 'ps_ind_05_cat', 'ps_ind_14', 'ps_ind_15', 'ps_car_01_cat', 'ps_car_02_cat', 'ps_car_03_cat', 'ps_car_04_cat', 'ps_car_05_cat', 'ps_car_06_cat', 'ps_car_07_cat', 'ps_car_09_cat', 'ps_car_10_cat', 'ps_car_11', 'ps_calc_04', 'ps_calc_05', 'ps_calc_06', 'ps_calc_07', 'ps_calc_08', 'ps_calc_09', 'ps_calc_10', 'ps_calc_11', 'ps_calc_12', 'ps_calc_13', 'ps_calc_14']

    feature_union = FeatureUnion([
        ('mapper_0', get_mapper_0(column_group_1)),
        ('mapper_1', get_mapper_1(column_group_3)),
        ('mapper_2', get_mapper_2(column_group_2)),
    ])
    return feature_union
這種方法可讓您具有更簡化的程式碼,因為每個資料行沒有轉換器的程式碼區塊,即使您的資料集中有數十或數百個資料行,這也可能特別麻煩。
使用分類和迴歸工作時,[FeatureUnion] 會用於特徵化工具。
針對時間序列預測模型,多個時間序列感知特徵化工具會收集成 scikit-learn 管線,然後包裝在 TimeSeriesTransformer 中。
任何使用者為時間序列預測模型提供的特徵化,都會在自動化 ML 所提供的特徵化之前發生。
前置處理器規格程式碼
generate_preprocessor_config() 函式 (如果存在) 會指定要在最終 scikit-learn 管線中進行特徵化之後完成的前置處理步驟。
正常情況下,這個前置處理步驟只包含使用 sklearn.preprocessing 完成的資料標準化/正規化。
自動化 ML 只會指定非整體分類和迴歸模型的前置處理步驟。
以下是所產生前置處理器程式碼的範例:
def generate_preprocessor_config():
    from sklearn.preprocessing import MaxAbsScaler

    preproc = MaxAbsScaler(
        copy=True
    )

    return preproc
演算法和超參數規格程式碼
演算法和超參數規格程式碼可能是許多 ML 專業人員最感興趣的程式碼。
generate_algorithm_config() 函式會指定將模型定型為最終 scikit-learn 管線最後階段的實際演算法和超參數。
下列範例會搭配特定超參數使用 XGBoostClassifier 演算法。
def generate_algorithm_config():
    from xgboost.sklearn import XGBClassifier

    algorithm = XGBClassifier(
        base_score=0.5,
        booster='gbtree',
        colsample_bylevel=1,
        colsample_bynode=1,
        colsample_bytree=1,
        gamma=0,
        learning_rate=0.1,
        max_delta_step=0,
        max_depth=3,
        min_child_weight=1,
        missing=numpy.nan,
        n_estimators=100,
        n_jobs=-1,
        nthread=None,
        objective='binary:logistic',
        random_state=0,
        reg_alpha=0,
        reg_lambda=1,
        scale_pos_weight=1,
        seed=None,
        silent=None,
        subsample=1,
        verbosity=0,
        tree_method='auto',
        verbose=-10
    )

    return algorithm
在大部分情況下,產生的程式碼會使用開放原始碼軟體 (OSS) 套件和類別。 有一些執行個體,中繼包裝函式類別用來簡化更複雜的程式碼。 例如,可以套用 XGBoost 分類器和其他常用的程式庫,例如 LightGBM 或Scikit-Learn演算法。
身為 ML 專業人員,您能夠自訂該演算法的設定程式碼,方法為視需要根據該演算法的技能和經驗,以及特定 ML 問題來調整該演算法的超參數。
針對整體模型,generate_preprocessor_config_N() (如有需要) 和 generate_algorithm_config_N() 是針對整體模型中的每個學習模組所定義的,其中 N 代表每個學習模組在整體模型清單中的放置位置。 針對堆疊整體模型,會定義中繼學習模組 generate_algorithm_config_meta()。
端對端定型程式碼
程式碼產生會發出 build_model_pipeline() 和 train_model(),用於定義 scikit-learn 管線,以及分別在其上呼叫 fit()。
def build_model_pipeline():
    from sklearn.pipeline import Pipeline

    logger.info("Running build_model_pipeline")
    pipeline = Pipeline(
        steps=[
            ('featurization', generate_data_transformation_config()),
            ('preproc', generate_preprocessor_config()),
            ('model', generate_algorithm_config()),
        ]
    )

    return pipeline
scikit-learn 管線包含特徵化步驟、前置處理器 (如果已使用),以及演算法或模型。
針對時間序列預測模型,scikit-learn 管線會包裝在 ForecastingPipelineWrapper 中,此管線具有一些適當處理時間序列資料所需的其他步驟,取決於套用的演算法。
針對所有工作類型,我們會在需要編碼標籤資料行的情況下使用 PipelineWithYTransformer。
一旦您具有 scikit-Learn 管線,剩下要做的只是呼叫 fit() 方法來定型模型:
def train_model(X, y, sample_weights):

    logger.info("Running train_model")
    model_pipeline = build_model_pipeline()

    model = model_pipeline.fit(X, y)
    return model
train_model() 的傳回值是根據輸入資料調整/定型的模型。
執行所有先前函式的主要程式碼如下:
def main(training_dataset_id=None):
    from azureml.core.run import Run

    # The following code is for when running this code as part of an Azure Machine Learning script run.
    run = Run.get_context()
    setup_instrumentation(run)

    df = get_training_dataset(training_dataset_id)
    X, y, sample_weights = prepare_data(df)
    split_ratio = 0.1
    try:
        (X_train, y_train, sample_weights_train), (X_valid, y_valid, sample_weights_valid) = split_dataset(X, y, sample_weights, split_ratio, should_stratify=True)
    except Exception:
        (X_train, y_train, sample_weights_train), (X_valid, y_valid, sample_weights_valid) = split_dataset(X, y, sample_weights, split_ratio, should_stratify=False)

    model = train_model(X_train, y_train, sample_weights_train)

    metrics = calculate_metrics(model, X, y, sample_weights, X_test=X_valid, y_test=y_valid)

    print(metrics)
    for metric in metrics:
        run.log(metric, metrics[metric])
一旦您具有定型的模型,就可以搭配 predict() 方法將其用於進行預測。 如果您的實驗適用於時間序列模型,請使用 forecast() 方法進行預測。
y_pred = model.predict(X)
最後,模型會序列化並儲存為名為 "model.pkl" 的 .pkl 檔案:
    with open('model.pkl', 'wb') as f:
        pickle.dump(model, f)
    run.upload_file('outputs/model.pkl', 'model.pkl')
script_run_notebook.ipynb
script_run_notebook.ipynb 筆記本可作為在 Azure Machine Learning 計算上執行 script.py 的簡易方式。
不過,此筆記本與現有的自動化 ML 範例筆記本類似,但下列各節會說明幾個主要差異。
Environment
一般而言,SDK 會自動設定自動化 ML 執行的定型環境。 不過,執行自訂指令碼就像產生的程式碼一樣執行時,自動化 ML 不再驅動流程,因此必須指定環境,命令作業才能成功。
可能的話,程式碼產生會重複使用原始自動化 ML 實驗中所使用的環境。 這麼做可確保定型指令碼執行不會由於缺少相依性而失敗,而且有不需要 Docker 映像重建的附帶好處,這可節省時間和計算資源。
如果您對需要其他相依性的 script.py 進行變更,或想要使用自己的環境,則需要據以更新 script_run_notebook.ipynb 中的環境。
提交實驗
由於產生的程式碼不再由自動化 ML 所驅動,因此您並非建立及提交 AutoML 作業,而是必須建立 Command Job,並對其提供所產生的程式碼 (script.py)。
下列範例包含執行命令作業 (例如計算、環境等) 所需的參數和一般相依性。
from azure.ai.ml import command, Input

# To test with new training / validation datasets, replace the default dataset id(s) taken from parent run below
training_dataset_id = '<DATASET_ID>'

dataset_arguments = {'training_dataset_id': training_dataset_id}
command_str = 'python script.py --training_dataset_id ${{inputs.training_dataset_id}}'

command_job = command(
    code=project_folder,
    command=command_str,
    environment='AutoML-Non-Prod-DNN:25',
    inputs=dataset_arguments,
    compute='automl-e2e-cl2',
    experiment_name='build_70775722_9249eda8'
)

returned_job = ml_client.create_or_update(command_job)
print(returned_job.studio_url) # link to naviagate to submitted run in Azure Machine Learning Studio
下一步
- 深入了解模型部署的方式和位置。
- 請了解如何在自動化 ML 實驗內特別啟用可解釋性功能。