教學課程:調整材質、光源和效果
在本教學課程中,您會了解如何:
- 反白顯示與外框模型和模型元件
- 將不同材質套用至模型
- 使用切割平面的模型配量
- 為遠端轉譯物件新增簡單的動畫
必要條件
- 本教學課程的建置基礎為教學課程:操作模型。
反白顯示和大綱
在任何應用程式中,為使用者提供視覺化的意見反應都是使用者體驗的重要部分。 Azure 遠端轉譯會透過階層式狀態覆寫,提供視覺化的意見反應機制。 階層式狀態覆寫會使用附加至模型本機執行個體的元件來實作。 我們已了解如何在將遠端物件圖形同步處理至 Unity 階層中,建立這些本機執行個體。
首先,我們會建立 HierarchicalStateOverrideComponent 元件的包裝函式。 HierarchicalStateOverrideComponent 是控制遠端實體覆寫的本機指令碼。 教學課程資產包含名為 BaseEntityOverrideController 的抽象基底類別,我們將會擴充以建立包裝函式。
建立名為 EntityOverrideController 的新指令碼,並將其內容取代為下列程式碼:
// Copyright (c) Microsoft Corporation. All rights reserved.
// Licensed under the MIT License. See LICENSE in the project root for license information.

using Microsoft.Azure.RemoteRendering;
using Microsoft.Azure.RemoteRendering.Unity;
using System;
using UnityEngine;

public class EntityOverrideController : BaseEntityOverrideController
{
    public override event Action<HierarchicalStates> FeatureOverrideChange;

    private ARRHierarchicalStateOverrideComponent localOverride;
    public override ARRHierarchicalStateOverrideComponent LocalOverride
    {
        get
        {
            if (localOverride == null)
            {
                localOverride = gameObject.GetComponent<ARRHierarchicalStateOverrideComponent>();
                if (localOverride == null)
                {
                    localOverride = gameObject.AddComponent<ARRHierarchicalStateOverrideComponent>();
                }

                var remoteStateOverride = TargetEntity.Entity.FindComponentOfType<HierarchicalStateOverrideComponent>();

                if (remoteStateOverride == null)
                {
                    // if there is no HierarchicalStateOverrideComponent on the remote side yet, create one
                    localOverride.Create(RemoteManagerUnity.CurrentSession);
                }
                else
                {
                    // otherwise, bind our local stateOverride component to the remote component
                    localOverride.Bind(remoteStateOverride);

                }
            }
            return localOverride;
        }
    }

    private RemoteEntitySyncObject targetEntity;
    public override RemoteEntitySyncObject TargetEntity
    {
        get
        {
            if (targetEntity == null)
                targetEntity = gameObject.GetComponent<RemoteEntitySyncObject>();
            return targetEntity;
        }
    }

    private HierarchicalEnableState ToggleState(HierarchicalStates feature)
    {
        HierarchicalEnableState setToState = HierarchicalEnableState.InheritFromParent;
        switch (LocalOverride.RemoteComponent.GetState(feature))
        {
            case HierarchicalEnableState.ForceOff:
            case HierarchicalEnableState.InheritFromParent:
                setToState = HierarchicalEnableState.ForceOn;
                break;
            case HierarchicalEnableState.ForceOn:
                setToState = HierarchicalEnableState.InheritFromParent;
                break;
        }

        return SetState(feature, setToState);
    }

    private HierarchicalEnableState SetState(HierarchicalStates feature, HierarchicalEnableState enableState)
    {
        if (GetState(feature) != enableState) //if this is actually different from the current state, act on it
        {
            LocalOverride.RemoteComponent.SetState(feature, enableState);
            FeatureOverrideChange?.Invoke(feature);
        }

        return enableState;
    }

    public override HierarchicalEnableState GetState(HierarchicalStates feature) => LocalOverride.RemoteComponent.GetState(feature);

    public override void ToggleHidden() => ToggleState(HierarchicalStates.Hidden);

    public override void ToggleSelect() => ToggleState(HierarchicalStates.Selected);

    public override void ToggleSeeThrough() => ToggleState(HierarchicalStates.SeeThrough);

    public override void ToggleTint(Color tintColor = default)
    {
        if (tintColor != default) LocalOverride.RemoteComponent.TintColor = tintColor.toRemote();
        ToggleState(HierarchicalStates.UseTintColor);
    }

    public override void ToggleDisabledCollision() => ToggleState(HierarchicalStates.DisableCollision);

    public override void RemoveOverride()
    {
        var remoteStateOverride = TargetEntity.Entity.FindComponentOfType<HierarchicalStateOverrideComponent>();
        if (remoteStateOverride != null)
        {
            remoteStateOverride.Destroy();
        }

        if (localOverride == null)
            localOverride = gameObject.GetComponent<ARRHierarchicalStateOverrideComponent>();

        if (localOverride != null)
        {
            Destroy(localOverride);
        }
    }
}
LocalOverride 的主要作業是建立其本身與其 RemoteComponent 之間的連結。 接著,LocalOverride 可讓我們在本機元件上設定已繫結至遠端實體的狀態旗標。 階層式狀態覆寫頁面中會說明覆寫及其狀態。
這個實作一次只會切換一個狀態。 不過,您可以在單一實體上合併多個覆寫,並在階層中的不同層級建立組合。 例如,結合單一元件上的 Selected 和 SeeThrough 可為其提供外框,同時也讓其成為透明。 或者,在將子實體的 Hidden 覆寫至 ForceOff 時,將根實體 Hidden 覆寫設定為 ForceOn,將會隱藏除了具有覆寫子系以外的所有項目。
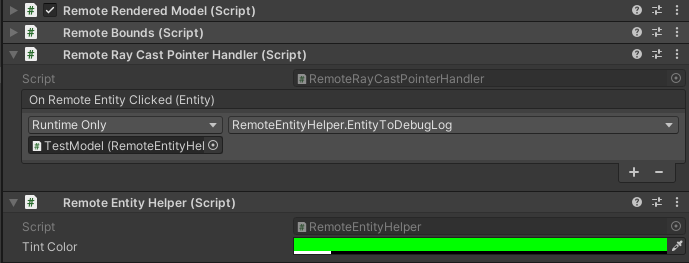
若要將狀態套用至實體,我們可以修改先前建立的 RemoteEntityHelper。
修改 RemoteEntityHelper 類別,以實作 BaseRemoteEntityHelper 抽象類別。 這項修改可讓您使用 [教學課程資產] 中提供的視圖控制器。 修改後看起來應該如下所示:
public class RemoteEntityHelper : BaseRemoteEntityHelper使用下列程式碼覆寫抽象方法:
public override BaseEntityOverrideController EnsureOverrideComponent(Entity entity)
{
    var entityGameObject = entity.GetOrCreateGameObject(UnityCreationMode.DoNotCreateUnityComponents);
    var overrideComponent = entityGameObject.GetComponent<EntityOverrideController>();
    if (overrideComponent == null)
        overrideComponent = entityGameObject.AddComponent<EntityOverrideController>();
    return overrideComponent;
}

public override HierarchicalEnableState GetState(Entity entity, HierarchicalStates feature)
{
    var overrideComponent = EnsureOverrideComponent(entity);
    return overrideComponent.GetState(feature);
}

public override void ToggleHidden(Entity entity)
{
    var overrideComponent = EnsureOverrideComponent(entity);
    overrideComponent.ToggleHidden();
}

public override void ToggleSelect(Entity entity)
{
    var overrideComponent = EnsureOverrideComponent(entity);
    overrideComponent.ToggleSelect();
}

public override void ToggleSeeThrough(Entity entity)
{
    var overrideComponent = EnsureOverrideComponent(entity);
    overrideComponent.ToggleSeeThrough();
}

public Color TintColor = new Color(0.0f, 1.0f, 0.0f, 0.1f);
public override void ToggleTint(Entity entity)
{
    var overrideComponent = EnsureOverrideComponent(entity);
    overrideComponent.ToggleTint(TintColor);
}

public override void ToggleDisableCollision(Entity entity)
{
    var overrideComponent = EnsureOverrideComponent(entity);
    overrideComponent.ToggleHidden();
}

public override void RemoveOverrides(Entity entity)
{
    var entityGameObject = entity.GetOrCreateGameObject(UnityCreationMode.DoNotCreateUnityComponents);
    var overrideComponent = entityGameObject.GetComponent<EntityOverrideController>();
    if (overrideComponent != null)
    {
        overrideComponent.RemoveOverride();
        Destroy(overrideComponent);
    }
}
此程式碼可確保 EntityOverrideController 元件新增至目標實體,然後呼叫其中一個切換方法。 如有需要,您可以在 TestModel GameObject 上呼叫這些 helper 方法,藉以新增 RemoteEntityHelper 做為 RemoteRayCastPointerHandler 元件上的 OnRemoteEntityClicked 事件回呼。
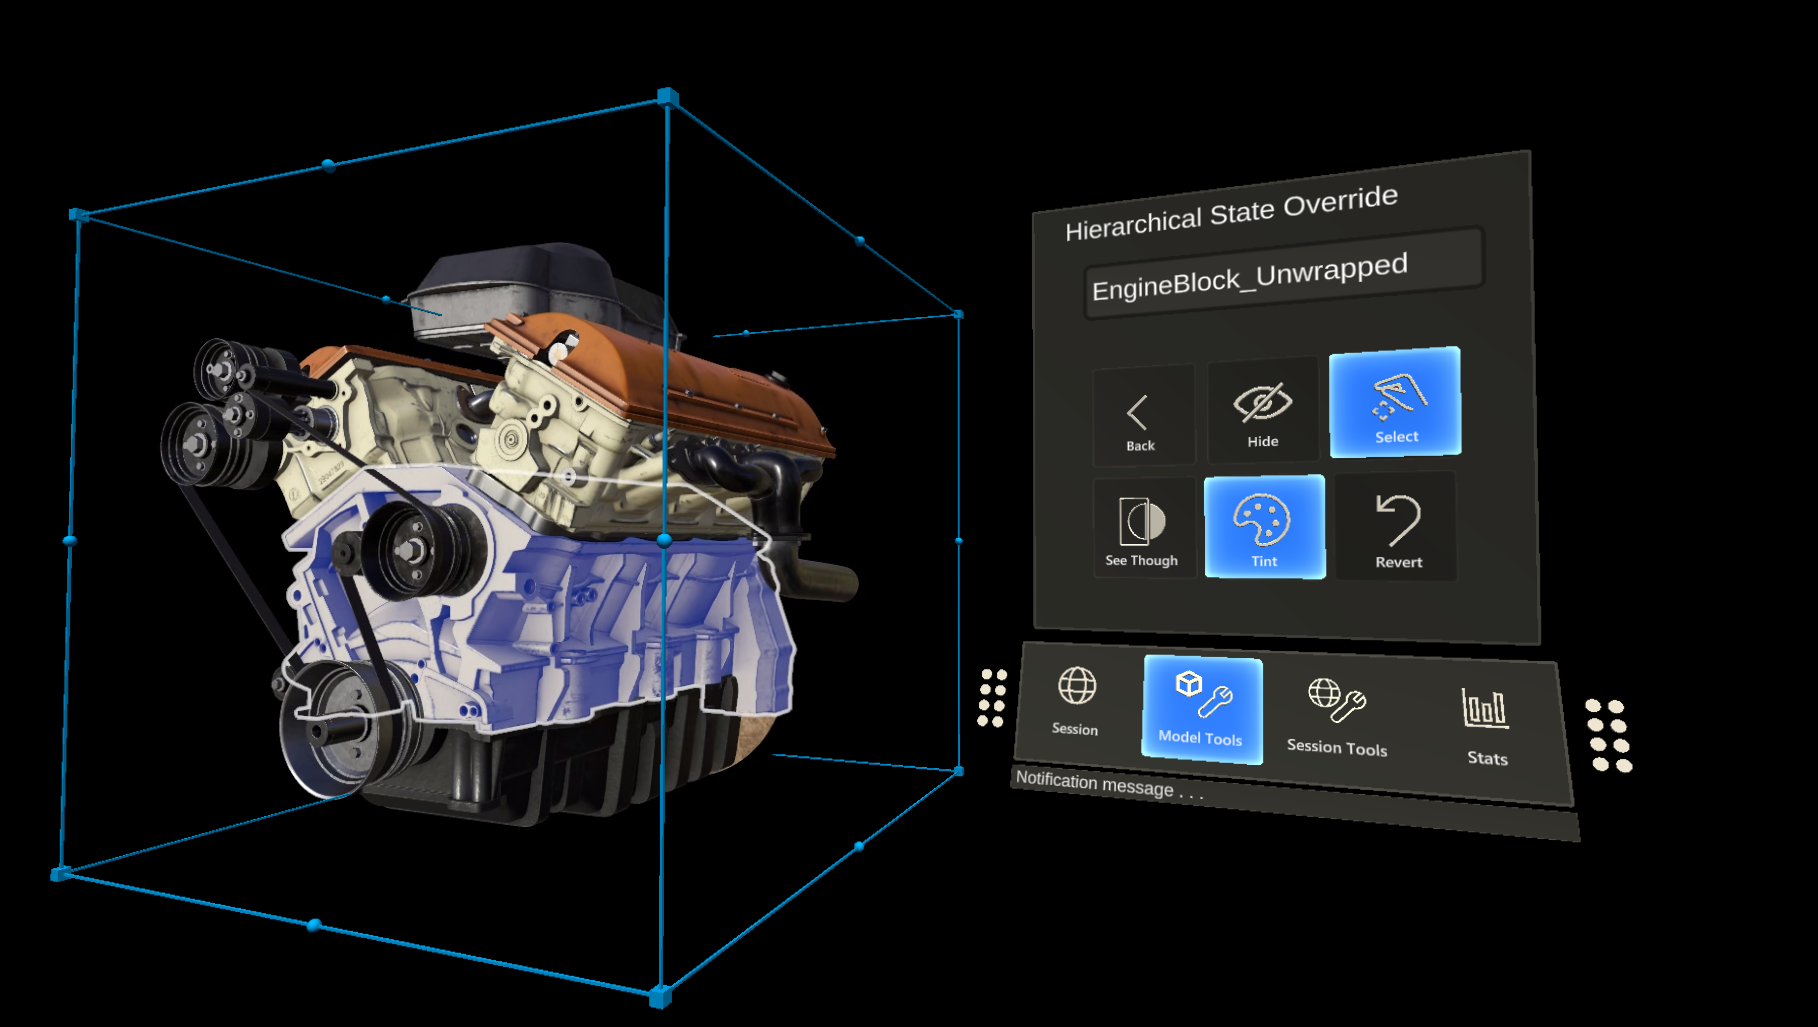
既然這些指令碼已新增至模型,一旦連線到執行階段,AppMenu 視圖控制器應該啟用其他介面,以便與 EntityOverrideController 指令碼互動。 查看 [模型工具] 功能表,以參閱未鎖定的視圖控制器。
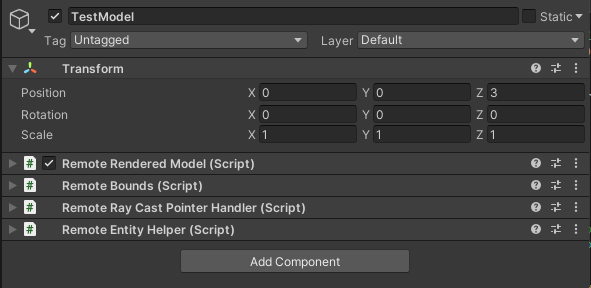
此時,您 TestModel GameObject 的元件看起來應該像這樣:
以下是單一實體上堆疊覆寫的範例。 我們使用 Select 和 Tint 來提供外框和顏色標示:
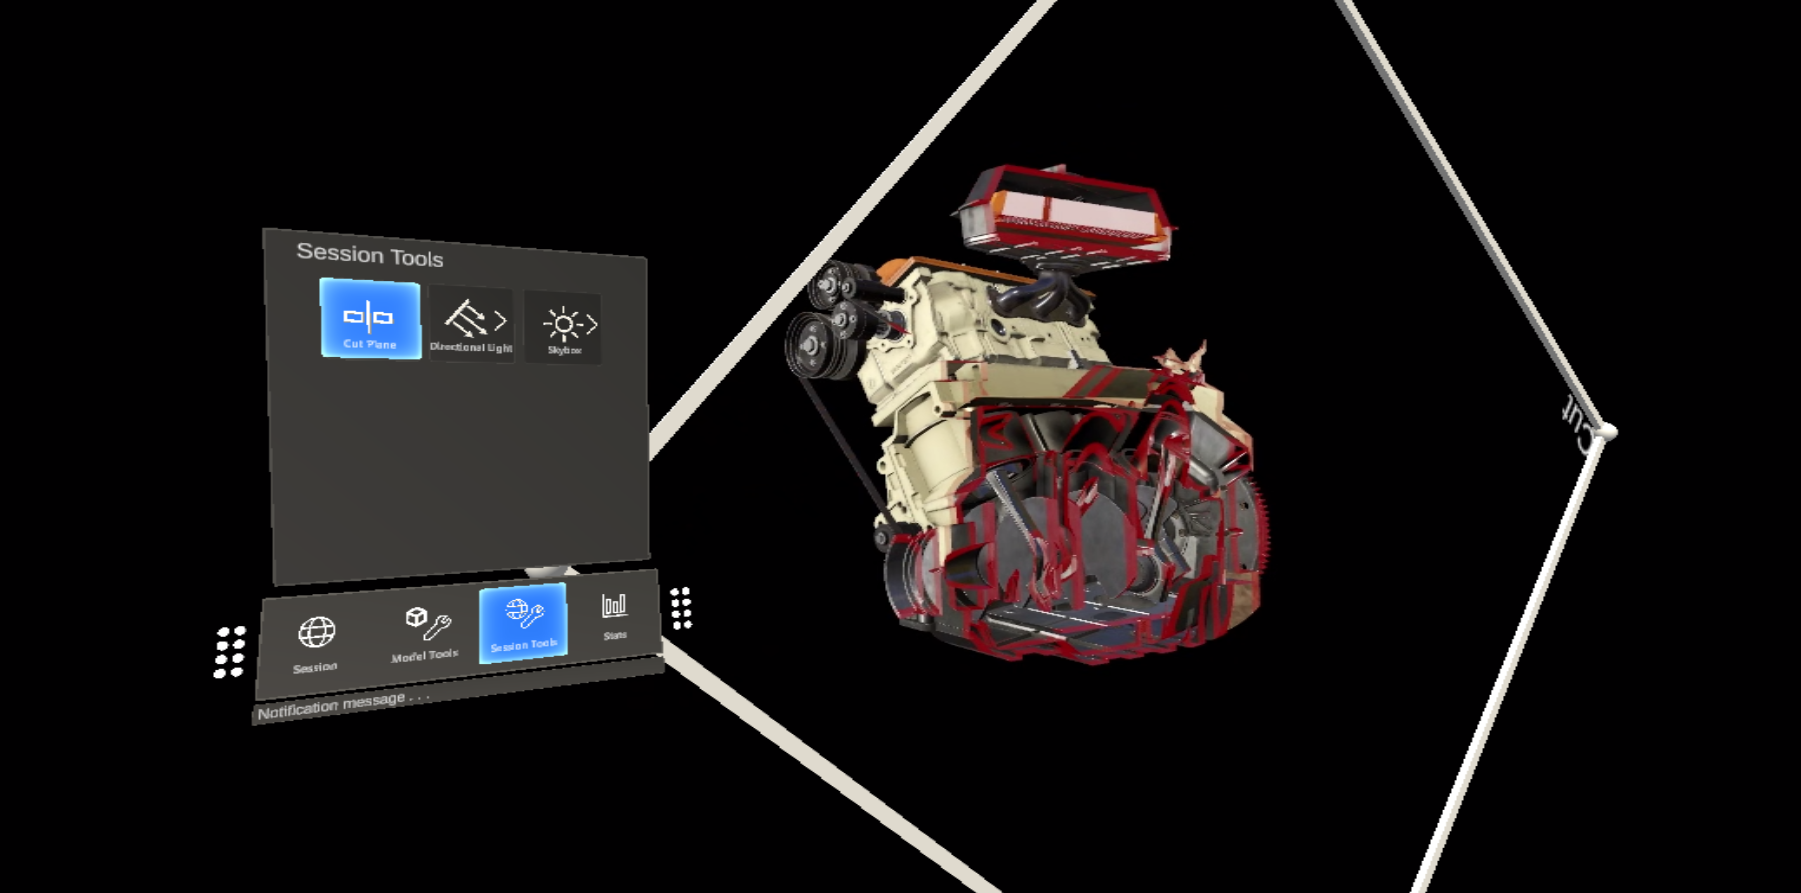
切割平面
切割平面是可新增至任何遠端實體的功能。 最常見的情況是,您會建立與任何網格資料都沒有關聯的新遠端實體,來保存切割平面元件。 切割平面的位置和方向取決於其所附加遠端實體的位置和方向。
我們將建立指令碼,以自動建立遠端實體、新增切割平面元件,並同步處理本機物件與切割平面實體的轉換。 然後,我們可以使用 CutPlaneViewController,將切割平面包裝在介面中,以讓我們進行操作。
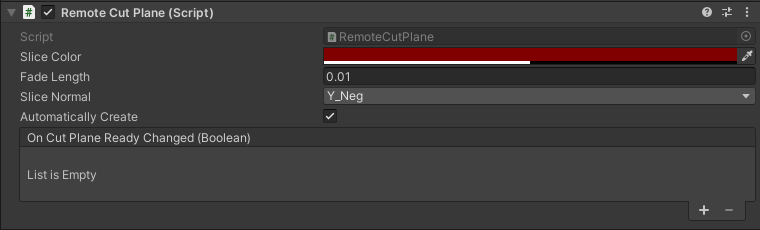
建立名為 RemoteCutPlane 的新指令碼,並將其程式碼取代為下列程式碼:
// Copyright (c) Microsoft Corporation. All rights reserved.
// Licensed under the MIT License. See LICENSE in the project root for license information.

using Microsoft.Azure.RemoteRendering;
using Microsoft.Azure.RemoteRendering.Unity;
using System;
using UnityEngine;

public class RemoteCutPlane : BaseRemoteCutPlane
{
    public Color SliceColor = new Color(0.5f, 0f, 0f, .5f);
    public float FadeLength = 0.01f;
    public Axis SliceNormal = Axis.NegativeY;

    public bool AutomaticallyCreate = true;

    private CutPlaneComponent remoteCutPlaneComponent;
    private bool cutPlaneReady = false;

    public override bool CutPlaneReady
    {
        get => cutPlaneReady;
        set
        {
            cutPlaneReady = value;
            CutPlaneReadyChanged?.Invoke(cutPlaneReady);
        }
    }

    public override event Action<bool> CutPlaneReadyChanged;

    public UnityBoolEvent OnCutPlaneReadyChanged = new UnityBoolEvent();

    public void Start()
    {
        // Hook up the event to the Unity event
        CutPlaneReadyChanged += (ready) => OnCutPlaneReadyChanged?.Invoke(ready);

        RemoteRenderingCoordinator.CoordinatorStateChange += RemoteRenderingCoordinator_CoordinatorStateChange;
        RemoteRenderingCoordinator_CoordinatorStateChange(RemoteRenderingCoordinator.instance.CurrentCoordinatorState);
    }

    private void RemoteRenderingCoordinator_CoordinatorStateChange(RemoteRenderingCoordinator.RemoteRenderingState state)
    {
        switch (state)
        {
            case RemoteRenderingCoordinator.RemoteRenderingState.RuntimeConnected:
                if (AutomaticallyCreate)
                    CreateCutPlane();
                break;
            default:
                DestroyCutPlane();
                break;
        }
    }

    public override void CreateCutPlane()
    {
        //Implement me
    }

    public override void DestroyCutPlane()
    {
        //Implement me
    }
}
此程式碼會擴充 [教學課程資產] 中所包含的 BaseRemoteCutPlane 類別。 類似於遠端轉譯的模型,此指令碼會附加並接聽來自遠端協調器的
RemoteRenderingState變更。 當協調器達到RuntimeConnected狀態時,其會嘗試自動連線 (如果應該這麼做)。 此外,我們也會追蹤CutPlaneComponent變數。 這是與遠端工作階段內切割平面同步的 Azure 遠端轉譯元件。 讓我們看看要如何建立切割平面。以下列已完成的版本取代
CreateCutPlane()方法:public override void CreateCutPlane() { if (remoteCutPlaneComponent != null) return; //Nothing to do! //Create a root object for the cut plane var cutEntity = RemoteRenderingCoordinator.CurrentSession.Connection.CreateEntity(); //Bind the remote entity to this game object cutEntity.BindToUnityGameObject(this.gameObject); //Sync the transform of this object so we can move the cut plane var syncComponent = this.gameObject.GetComponent<RemoteEntitySyncObject>(); syncComponent.SyncEveryFrame = true; //Add a cut plane to the entity remoteCutPlaneComponent = RemoteRenderingCoordinator.CurrentSession.Connection.CreateComponent(ObjectType.CutPlaneComponent, cutEntity) as CutPlaneComponent; //Configure the cut plane remoteCutPlaneComponent.Normal = SliceNormal; remoteCutPlaneComponent.FadeColor = SliceColor.toRemote(); remoteCutPlaneComponent.FadeLength = FadeLength; CutPlaneReady = true; }在這裡,我們將建立遠端實體,並將其繫結至本機 GameObject。 我們會將
SyncEveryFrame設定為true,確保遠端實體會將其轉換同步處理至本機轉換。 然後,我們會使用CreateComponent呼叫,將CutPlaneComponent新增至遠端物件。 最後,我們會使用 MonoBehaviour 頂端定義的設定來設定切割平面。 讓我們了解如何藉由實作DestroyCutPlane()方法來清除切割平面所需的內容。以下列已完成的版本取代
DestroyCutPlane()方法:public override void DestroyCutPlane() { if (remoteCutPlaneComponent == null) return; //Nothing to do! remoteCutPlaneComponent.Owner.Destroy(); remoteCutPlaneComponent = null; CutPlaneReady = false; }
由於遠端物件相當簡單,且我們只會清除遠端 (並保留我們的本機物件),因此只要在遠端物件上呼叫 Destroy,並清除對其的參考即可。
AppMenu 包含的視圖控制器會自動附加至您的切割平面,並可讓您與其進行互動。 您不一定要使用 AppMenu 或任何視圖控制器,而其可以獲得更好的體驗。 現在,測試切割平面及其視圖控制器。
在場景中建立新的空白 GameObject,並將其命名為 CutPlane。
將 RemoteCutPlane 元件新增至 CutPlane GameObject。
在 Unity 編輯器中按下 [播放],以載入並連線到遠端工作階段。
使用 MRTK 的手部模擬,抓取及旋轉 (按住 Ctrl 鍵以旋轉) CutPlane,將其移到場景周圍。 觀看其配量至 TestModel,以顯示內部元件。
設定遠端光源
遠端轉譯工作階段支援完整範圍的光源選項。 我們將建立天空紋理的指令碼,以及兩個 Unity 光源類型的簡單貼圖,以與遠端轉譯搭配使用。
天空紋理
在變更天空紋理時,有一些內建的立方體貼圖可供選擇。 這些會載入工作階段,並套用至天空紋理。 您也可以載入自己的紋理以做為天空光源。
我們將建立一個 RemoteSky 指令碼,其中具有載入參數形式的內建可用立方體貼圖清單。 然後,我們將允許使用者選取並載入其中一個選項。
建立名為 RemoteSky 的新指令碼,並以下列程式碼取代其整個內容:
// Copyright (c) Microsoft Corporation. All rights reserved.
// Licensed under the MIT License. See LICENSE in the project root for license information.

using Microsoft.Azure.RemoteRendering;
using System;
using System.Collections.Generic;
using UnityEngine;

public class RemoteSky : BaseRemoteSky
{
    public override Dictionary<string, LoadTextureFromSasOptions> AvailableCubemaps => builtInTextures;

    private bool canSetSky;
    public override bool CanSetSky
    {
        get => canSetSky;
        set
        {
            canSetSky = value;
            CanSetSkyChanged?.Invoke(canSetSky);
        }
    }

    private string currentSky = "DefaultSky";
    public override string CurrentSky
    {
        get => currentSky;
        protected set
        {
            currentSky = value;
            SkyChanged?.Invoke(value);
        }
    }

    private Dictionary<string, LoadTextureFromSasOptions> builtInTextures = new Dictionary<string, LoadTextureFromSasOptions>()
    {
        {"Autoshop",new LoadTextureFromSasOptions("builtin://Autoshop", TextureType.CubeMap)},
        {"BoilerRoom",new LoadTextureFromSasOptions("builtin://BoilerRoom", TextureType.CubeMap)},
        {"ColorfulStudio",new LoadTextureFromSasOptions("builtin://ColorfulStudio", TextureType.CubeMap)},
        {"Hangar",new LoadTextureFromSasOptions("builtin://Hangar", TextureType.CubeMap)},
        {"IndustrialPipeAndValve",new LoadTextureFromSasOptions("builtin://IndustrialPipeAndValve", TextureType.CubeMap)},
        {"Lebombo",new LoadTextureFromSasOptions("builtin://Lebombo", TextureType.CubeMap)},
        {"SataraNight",new LoadTextureFromSasOptions("builtin://SataraNight", TextureType.CubeMap)},
        {"SunnyVondelpark",new LoadTextureFromSasOptions("builtin://SunnyVondelpark", TextureType.CubeMap)},
        {"Syferfontein",new LoadTextureFromSasOptions("builtin://Syferfontein", TextureType.CubeMap)},
        {"TearsOfSteelBridge",new LoadTextureFromSasOptions("builtin://TearsOfSteelBridge", TextureType.CubeMap)},
        {"VeniceSunset",new LoadTextureFromSasOptions("builtin://VeniceSunset", TextureType.CubeMap)},
        {"WhippleCreekRegionalPark",new LoadTextureFromSasOptions("builtin://WhippleCreekRegionalPark", TextureType.CubeMap)},
        {"WinterRiver",new LoadTextureFromSasOptions("builtin://WinterRiver", TextureType.CubeMap)},
        {"DefaultSky",new LoadTextureFromSasOptions("builtin://DefaultSky", TextureType.CubeMap)}
    };

    public UnityBoolEvent OnCanSetSkyChanged;
    public override event Action<bool> CanSetSkyChanged;

    public UnityStringEvent OnSkyChanged;
    public override event Action<string> SkyChanged;

    public void Start()
    {
        // Hook up the event to the Unity event
        CanSetSkyChanged += (canSet) => OnCanSetSkyChanged?.Invoke(canSet);
        SkyChanged += (key) => OnSkyChanged?.Invoke(key);

        RemoteRenderingCoordinator.CoordinatorStateChange += ApplyStateToView;
        ApplyStateToView(RemoteRenderingCoordinator.instance.CurrentCoordinatorState);
    }

    private void ApplyStateToView(RemoteRenderingCoordinator.RemoteRenderingState state)
    {
        switch (state)
        {
            case RemoteRenderingCoordinator.RemoteRenderingState.RuntimeConnected:
                CanSetSky = true;
                break;
            default:
                CanSetSky = false;
                break;
        }
    }

    public override async void SetSky(string skyKey)
    {
        if (!CanSetSky)
        {
            Debug.Log("Unable to set sky right now");
            return;
        }

        if (AvailableCubemaps.ContainsKey(skyKey))
        {
            Debug.Log("Setting sky to " + skyKey);
            //Load the texture into the session
            var texture = await RemoteRenderingCoordinator.CurrentSession.Connection.LoadTextureFromSasAsync(AvailableCubemaps[skyKey]);

            //Apply the texture to the SkyReflectionSettings
            RemoteRenderingCoordinator.CurrentSession.Connection.SkyReflectionSettings.SkyReflectionTexture = texture;
            SkyChanged?.Invoke(skyKey);
        }
        else
        {
            Debug.Log("Invalid sky key");
        }
    }
}
這段程式碼最重要的部分只有幾行:
//Load the texture into the session
var texture = await RemoteRenderingCoordinator.CurrentSession.Connection.LoadTextureFromSasAsync(AvailableCubemaps[skyKey]);

//Apply the texture to the SkyReflectionSettings
RemoteRenderingCoordinator.CurrentSession.Connection.SkyReflectionSettings.SkyReflectionTexture = texture;
在這裡,我們會從內建的 Blob 儲存體將其載入工作階段,以取得要使用的紋理參考。 然後,我們只需要將該紋理指派給工作階段的
SkyReflectionTexture來加以套用。在您場景中建立空的 GameObject,並將其命名為 SkyLight。
將 RemoteSky 指令碼新增至您的 SkyLight GameObject。
使用
AvailableCubemaps中定義的其中一個字串索引鍵來呼叫SetSky,即可在天空光源之間進行切換。 AppMenu內建的檢視控制器會自動建立按鈕,並連結其事件以與其各自的索引鍵呼叫SetSky。在 Unity 編輯器中按下 [播放] 並授權連線。
將本機執行時間連線到遠端會話之後,流覽 AppMenu - > 會話工具 - > 遠端 Sky 以探索不同的 Sky 選項,並查看它們如何影響 TestModel。
場景光源
遠端場景光源包括:點、位置和方向。 這些場景光源與我們先前建立的切割平面類似,是已附加元件的遠端實體。 當您的遠端場景光源嘗試符合您本機場景光線時的重要考量。 此策略並不一定可行,因為 HoloLens 2 的許多 Unity 應用程式不會針對本機轉譯的物件使用以實體為基礎的轉譯。 不過,在特定層級中,我們可以模擬 Unity 較簡單的預設光源。
建立名為 RemoteLight 的新指令碼,並將其程式碼取代為下列程式碼:
// Copyright (c) Microsoft Corporation. All rights reserved.
// Licensed under the MIT License. See LICENSE in the project root for license information.

using Microsoft.Azure.RemoteRendering;
using Microsoft.Azure.RemoteRendering.Unity;
using System;
using UnityEngine;

[RequireComponent(typeof(Light))]
public class RemoteLight : BaseRemoteLight
{
    public bool AutomaticallyCreate = true;

    private bool lightReady = false;
    public override bool LightReady
    {
        get => lightReady;
        set
        {
            lightReady = value;
            LightReadyChanged?.Invoke(lightReady);
        }
    }

    private ObjectType remoteLightType = ObjectType.Invalid;
    public override ObjectType RemoteLightType => remoteLightType;

    public UnityBoolEvent OnLightReadyChanged;

    public override event Action<bool> LightReadyChanged;

    private Light localLight; //Unity Light

    private Entity lightEntity;
    private LightComponentBase remoteLightComponent; //Remote Rendering Light

    private void Awake()
    {
        localLight = GetComponent<Light>();
        switch (localLight.type)
        {
            case LightType.Directional:
                remoteLightType = ObjectType.DirectionalLightComponent;
                break;
            case LightType.Point:
                remoteLightType = ObjectType.PointLightComponent;
                break;
            case LightType.Spot:
            case LightType.Area:
                //Not supported in tutorial
            case LightType.Disc:
                // No direct analog in remote rendering
                remoteLightType = ObjectType.Invalid;
                break;
        }
    }

    public void Start()
    {
        // Hook up the event to the Unity event
        LightReadyChanged += (ready) => OnLightReadyChanged?.Invoke(ready);

        RemoteRenderingCoordinator.CoordinatorStateChange += RemoteRenderingCoordinator_CoordinatorStateChange;
        RemoteRenderingCoordinator_CoordinatorStateChange(RemoteRenderingCoordinator.instance.CurrentCoordinatorState);
    }

    public void OnDestroy()
    {
        lightEntity?.Destroy();
    }

    private void RemoteRenderingCoordinator_CoordinatorStateChange(RemoteRenderingCoordinator.RemoteRenderingState state)
    {
        switch (state)
        {
            case RemoteRenderingCoordinator.RemoteRenderingState.RuntimeConnected:
                if (AutomaticallyCreate)
                    CreateLight();
                break;
            default:
                DestroyLight();
                break;
        }
    }

    public override void CreateLight()
    {
        if (remoteLightComponent != null)
            return; //Nothing to do!

        //Create a root object for the light
        if(lightEntity == null)
            lightEntity = RemoteRenderingCoordinator.CurrentSession.Connection.CreateEntity();

        //Bind the remote entity to this game object
        lightEntity.BindToUnityGameObject(this.gameObject);

        //Sync the transform of this object so we can move the light
        var syncComponent = this.gameObject.GetComponent<RemoteEntitySyncObject>();
        syncComponent.SyncEveryFrame = true;

        //Add a light to the entity
        switch (RemoteLightType)
        {
            case ObjectType.DirectionalLightComponent:
                var remoteDirectional = RemoteRenderingCoordinator.CurrentSession.Connection.CreateComponent(ObjectType.DirectionalLightComponent, lightEntity) as DirectionalLightComponent;
                //No additional properties
                remoteLightComponent = remoteDirectional;
                break;

            case ObjectType.PointLightComponent:
                var remotePoint = RemoteRenderingCoordinator.CurrentSession.Connection.CreateComponent(ObjectType.PointLightComponent, lightEntity) as PointLightComponent;
                remotePoint.Radius = 0;
                remotePoint.Length = localLight.range;
                //remotePoint.AttenuationCutoff = //No direct analog in Unity legacy lights
                //remotePoint.ProjectedCubeMap = //No direct analog in Unity legacy lights

                remoteLightComponent = remotePoint;
                break;
            default:
                LightReady = false;
                return;
        }

        // Set the common values for all light types
        UpdateRemoteLightSettings();

        LightReady = true;
    }

    public override void UpdateRemoteLightSettings()
    {
        remoteLightComponent.Color = localLight.color.toRemote();
        remoteLightComponent.Intensity = localLight.intensity;
    }

    public override void DestroyLight()
    {
        if (remoteLightComponent == null)
            return; //Nothing to do!

        remoteLightComponent.Destroy();
        remoteLightComponent = null;
        LightReady = false;
    }

    [ContextMenu("Sync Remote Light Configuration")]
    public override void RecreateLight()
    {
        DestroyLight();
        CreateLight();
    }

    public override void SetIntensity(float intensity)
    {
        localLight.intensity = Mathf.Clamp(intensity, 0, 1);
        UpdateRemoteLightSettings();
    }

    public override void SetColor(Color color)
    {
        localLight.color = color;
        UpdateRemoteLightSettings();
    }
}
此指令碼會根據附加指令碼的本機 Unity 光源類型,建立不同類型的遠端光源。 遠端光源會在其:位置、旋轉、色彩和濃度中複製本機光源。 可能的話,遠端光源也會設定額外的設定。 這不是完美的相符項目,因為 Unity 光源不是 PBR 光源。
在您的場景中尋找 DirectionalLight GameObject。 如果您已從場景移除預設 的 DirectionalLight :從頂端功能表列選取 GameObject - > Light - > DirectionalLight ,以在場景中建立新的光線。
選取 DirectionalLight GameObject,然後使用 [新增元件] 按鈕,新增 RemoteLight 指令碼。
由於此指令碼會實作基底類別
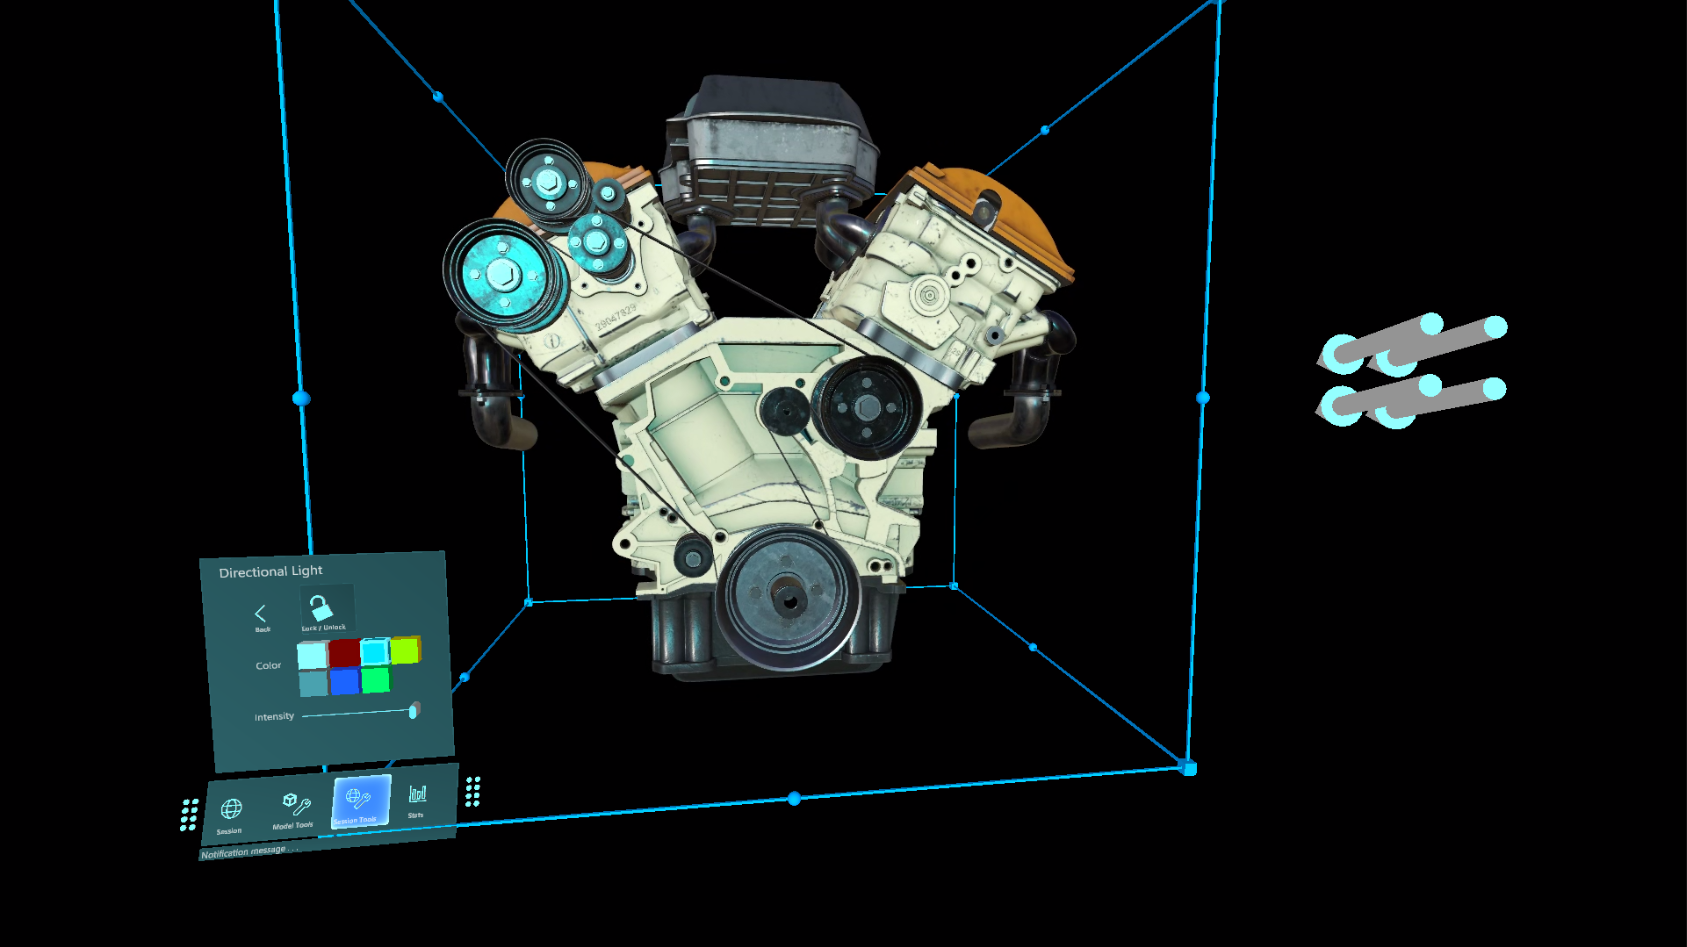
BaseRemoteLight,因此您可以使用所提供的 AppMenu 視圖控制器與遠端光源互動。 流覽至 AppMenu - > 會話工具 - > 方向光線。注意
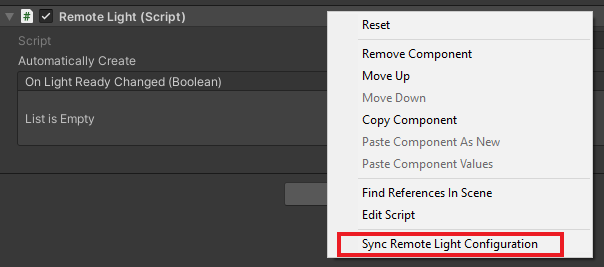
AppMenu 中的 UI 僅限於單一方向光源以加以簡化。 不過,您仍可以新增點光源,並加以附加 RemoteLight 指令碼。 在編輯器中編輯 Unity 光源的屬性,即可修改這些額外的光源。 您必須使用偵測器中的 RemoteLight 操作功能表,手動將本機變更同步至遠端光源:
在 Unity 編輯器中按下 [播放] 並授權連線。
將您的執行階段連線到遠端工作階段之後,請將相機定位並瞄準 (使用 WASD 並以滑鼠右鍵按一下 + 滑鼠移動),讓 [定向光線視圖控制器] 處於 [檢視]。
使用遠端光源視圖控制器來修改光源的屬性。 使用 MRTK 的手部模擬,抓取及旋轉 (按住 Ctrl 鍵以旋轉) 方向光源,以查看場景光源的效果。
編輯材質
遠端轉譯的材質可進行修改,以提供額外的視覺效果、微調轉譯模型的視覺效果,或為使用者提供額外的意見反應。 修改材質有許多方法和原因。 在此,我們將示範如何變更材質的 Albedo 色彩,以及變更 PBR 材質的粗糙度和金屬度。
注意
在許多情況下,如果可以使用 HierarchicalStateOverrideComponent 來實作功能或效果,則最好加以使用,而非修改材質。
我們將建立接受目標實體的指令碼,並設定幾個 OverrideMaterialProperty 物件來變更目標實體材質的屬性。 我們一開始會先取得目標實體的 MeshComponent,其中包含網格上所使用的材質清單。 為了簡單起見,我們只會使用所找到的第一個材質。 這種簡單的策略可能會因內容的撰寫方式而非常容易失敗,因此您可能需要採用更複雜的方法來選取適當的材質。
從材質中,我們可以存取常見的值,例如 Albedo。 首先,必須將材質轉換成適當的類型 (PbrMaterial 或 ColorMaterial) 以擷取其值,如 GetMaterialColor 方法中所示。 一旦參考所需的資料之後,只需設定值,ARR 就會處理本機材質屬性與遠端材質之間的同步處理。
建立名為 EntityMaterialController 的指令碼,並將其內容取代為下列程式碼:
// Copyright (c) Microsoft Corporation. All rights reserved.
// Licensed under the MIT License. See LICENSE in the project root for license information.

using Microsoft.Azure.RemoteRendering;
using Microsoft.Azure.RemoteRendering.Unity;
using System;
using System.Linq;
using UnityEngine;
// to prevent namespace conflicts
using ARRMaterial = Microsoft.Azure.RemoteRendering.Material;

public class EntityMaterialController : BaseEntityMaterialController
{
    public override bool RevertOnEntityChange { get; set; } = true;

    public override OverrideMaterialProperty<Color> ColorOverride { get; set; }
    public override OverrideMaterialProperty<float> RoughnessOverride { get; set; }
    public override OverrideMaterialProperty<float> MetalnessOverride { get; set; }

    private Entity targetEntity;
    public override Entity TargetEntity
    {
        get => targetEntity;
        set
        {
            if (targetEntity != value)
            {
                if (targetEntity != null && RevertOnEntityChange)
                {
                    Revert();
                }

                targetEntity = value;
                ConfigureTargetEntity();
                TargetEntityChanged?.Invoke(value);
            }
        }
    }

    private ARRMaterial targetMaterial;
    private ARRMeshComponent meshComponent;

    public override event Action<Entity> TargetEntityChanged;
    public UnityRemoteEntityEvent OnTargetEntityChanged;

    public void Start()
    {
        // Forward events to Unity events
        TargetEntityChanged += (entity) => OnTargetEntityChanged?.Invoke(entity);

        // If there happens to be a remote RayCaster on this object, assume we should listen for events from it
        if (GetComponent<BaseRemoteRayCastPointerHandler>() != null)
            GetComponent<BaseRemoteRayCastPointerHandler>().RemoteEntityClicked += (entity) => TargetEntity = entity;
    }

    protected override void ConfigureTargetEntity()
    {
        //Get the Unity object, to get the sync object, to get the mesh component, to get the material.
        var targetEntityGameObject = TargetEntity.GetOrCreateGameObject(UnityCreationMode.DoNotCreateUnityComponents);

        var localSyncObject = targetEntityGameObject.GetComponent<RemoteEntitySyncObject>();
        meshComponent = targetEntityGameObject.GetComponent<ARRMeshComponent>();
        if (meshComponent == null)
        {
            var mesh = localSyncObject.Entity.FindComponentOfType<MeshComponent>();
            if (mesh != null)
            {
                targetEntityGameObject.BindArrComponent<ARRMeshComponent>(mesh);
                meshComponent = targetEntityGameObject.GetComponent<ARRMeshComponent>();
            }
        }

        meshComponent.enabled = true;

        targetMaterial = meshComponent.RemoteComponent.Mesh.Materials.FirstOrDefault();
        if (targetMaterial == default)
        {
            return;
        }

        ColorOverride = new OverrideMaterialProperty<Color>(
            GetMaterialColor(targetMaterial), //The original value
            targetMaterial, //The target material
            ApplyMaterialColor); //The action to take to apply the override

        //If the material is a PBR material, we can override some additional values
        if (targetMaterial.MaterialSubType == MaterialType.Pbr)
        {
            var firstPBRMaterial = (PbrMaterial)targetMaterial;

            RoughnessOverride = new OverrideMaterialProperty<float>(
                firstPBRMaterial.Roughness, //The original value
                targetMaterial, //The target material
                ApplyRoughnessValue); //The action to take to apply the override

            MetalnessOverride = new OverrideMaterialProperty<float>(
                firstPBRMaterial.Metalness, //The original value
                targetMaterial, //The target material
                ApplyMetalnessValue); //The action to take to apply the override
        }
        else //otherwise, ensure the overrides are cleared out from any previous entity
        {
            RoughnessOverride = null;
            MetalnessOverride = null;
        }
    }

    public override void Revert()
    {
        if (ColorOverride != null)
            ColorOverride.OverrideActive = false;

        if (RoughnessOverride != null)
            RoughnessOverride.OverrideActive = false;

        if (MetalnessOverride != null)
            MetalnessOverride.OverrideActive = false;
    }

    private Color GetMaterialColor(ARRMaterial material)
    {
        if (material == null)
            return default;

        if (material.MaterialSubType == MaterialType.Color)
            return ((ColorMaterial)material).AlbedoColor.toUnity();
        else
            return ((PbrMaterial)material).AlbedoColor.toUnity();
    }

    private void ApplyMaterialColor(ARRMaterial material, Color color)
    {
        if (material == null)
            return;

        if (material.MaterialSubType == MaterialType.Color)
            ((ColorMaterial)material).AlbedoColor = color.toRemoteColor4();
        else
            ((PbrMaterial)material).AlbedoColor = color.toRemoteColor4();
    }

    private void ApplyRoughnessValue(ARRMaterial material, float value)
    {
        if (material == null)
            return;

        if (material.MaterialSubType == MaterialType.Pbr) //Only PBR has Roughness
            ((PbrMaterial)material).Roughness = value;
    }

    private void ApplyMetalnessValue(ARRMaterial material, float value)
    {
        if (material == null)
            return;

        if (material.MaterialSubType == MaterialType.Pbr) //Only PBR has Metalness
            ((PbrMaterial)material).Metalness = value;
    }
}
OverrideMaterialProperty 類型應該有足夠的彈性,可在需要時變更一些其他材質的值。 OverrideMaterialProperty 類型會追蹤覆寫的狀態、維護舊的和新的值,並使用委派來設定覆寫。 如需範例,請查看 ColorOverride:
ColorOverride = new OverrideMaterialProperty<Color>(
    GetMaterialColor(targetMaterial), //The original value
    targetMaterial, //The target material
    ApplyMaterialColor); //The action to take to apply the override
這會建立新的 OverrideMaterialProperty,其中覆寫會包裝 Color 類型。 我們會在建立覆寫時提供目前或原始的色彩。 我們也會為其提供要採取動作的 ARR 材質。 最後,會提供要套用覆寫的委派。 委派是一種可接受 ARR 材質和覆寫所包裝類型的方法。 這個方法是了解 ARR 如何調整材質值最重要的部分。
ColorOverride 會使用 ApplyMaterialColor 方法來執行其工作:
private void ApplyMaterialColor(ARRMaterial material, Color color)
{
    if (material.MaterialSubType == MaterialType.Color)
        ((ColorMaterial)material).AlbedoColor = color.toRemoteColor4();
    else
        ((PbrMaterial)material).AlbedoColor = color.toRemoteColor4();
}
此程式碼會接受材質和色彩。 其會檢查材質的類型,然後進行材質轉換以套用色彩。
RoughnessOverride 和 MetalnessOverride 的工作方式類似 - 使用 ApplyRoughnessValue 和 ApplyMetalnessValue 方法來執行其工作。
接下來,讓我們來測試材質控制器。
- 將 EntityMaterialController 指令碼新增至您的 TestModel GameObject。
- 按下 [在 Unity 中播放],以啟動場景並連線至 ARR。
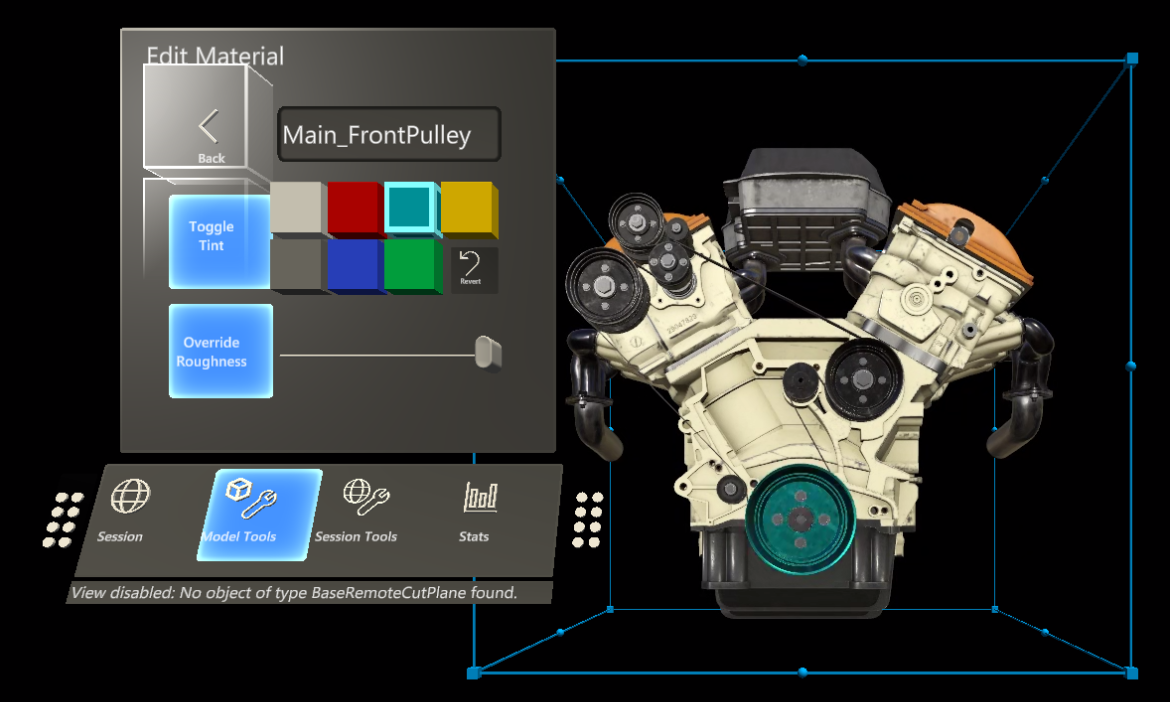
- 將執行時間連線到遠端會話並載入模型之後,請流覽至 AppMenu - > 模型工具 - > 編輯材質
- 使用模擬的手,從模型選取實體,然後按一下 [TestModel]。
- 確認材質檢視控制器 (AppMenu-Model > Tools-Edit > Material) 已更新為目標實體。
- 使用材質視圖控制器來調整目標實體上的材質。
由於我們只會修改網格的第一個材質,因此您可能不會看到材質變更。 使用階層式覆寫 SeeThrough,以查看您所變更的材質是否在網格內。
後續步驟
恭喜! 您現在已實作 Azure 遠端轉譯的所有核心功能。 在下一章節中,我們將了解如何保護您的 Azure 遠端轉譯和 Blob 儲存體。 您將透過這些首要步驟來發行使用 Azure 遠端轉譯的商業應用程式。