教學課程:使用 .NET SDK 在 Azure 認知搜尋 中建立您的第一個搜尋應用程式
本教學課程說明如何建立 Web 應用程式,使用 Azure 認知搜尋和 Visual Studio 來查詢並傳回搜尋索引的結果。
在本教學課程中,您將了解如何:
- 設定開發環境
- 模型資料結構
- 建立網頁來收集查詢輸入和顯示結果
- 定義搜尋方法
- 測試應用程式
您也將瞭解搜尋呼叫的簡單程度。 程式碼中的索引鍵語句會封裝在下列幾行中:
var options = new SearchOptions()
{
    // The Select option specifies fields for the result set
    options.Select.Add("HotelName");
    options.Select.Add("Description");
};

var searchResult = await _searchClient.SearchAsync<Hotel>(model.searchText, options).ConfigureAwait(false);
model.resultList = searchResult.Value.GetResults().ToList();
只有一個呼叫會查詢搜尋索引並傳回結果。
概觀
本教學課程使用 hotels-sample-index,您可以逐步執行匯入 資料快速入門,在自己的搜尋服務上快速建立。 索引包含虛構的旅館資料,可在每個搜尋服務中作為內建資料來源使用。
本教學課程的第一課會建立基本的查詢結構和搜尋頁面,您將在後續的課程中增強,以包含分頁、Facet 和預先輸入體驗。
您可以在下列專案中找到完成的程式碼版本:
必要條件
從 GitHub 安裝並執行專案
如果您想要跳到運作中的應用程式,請遵循下列步驟下載並執行已完成的程式碼。
在 Github 上尋找範例:建立第一個應用程式。
在根資料夾中,選取 [程式碼],接著選取 [複製] 或 [下載 ZIP],以建立專案的私人本機複本。
使用 Visual Studio 瀏覽至基本搜尋頁面 ("1-basic-search-page") 的解決方案並加以開啟,然後選取 [啟動但不偵錯] (或按下 F5 鍵) 以建置及執行程式。
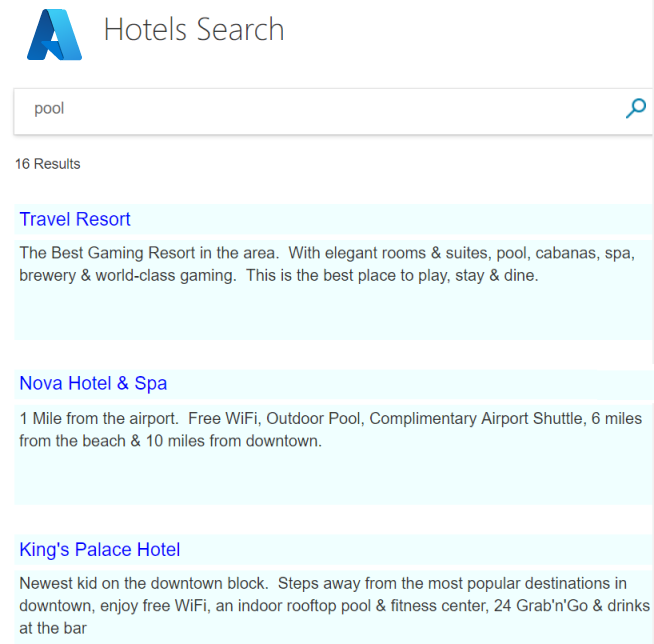
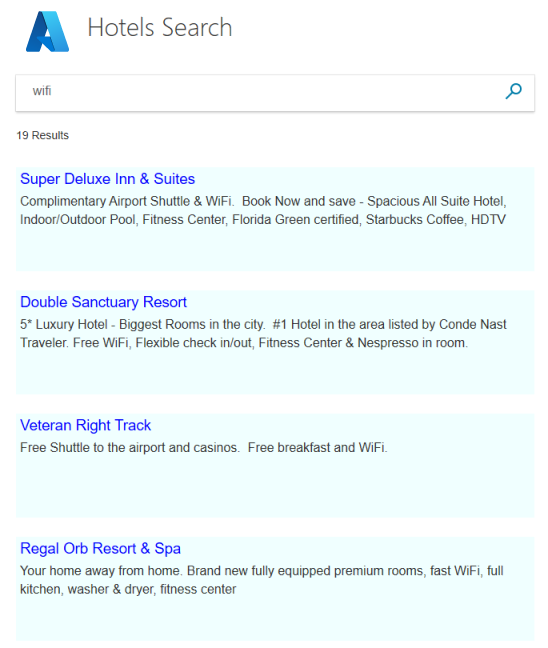
這是旅館索引,因此,您可以用某些字輸入,以搜尋旅館 (例如「wifi」、「view」、「bar」、「parking」) 。 檢查結果。
此應用程式包含更複雜的搜尋基本元件。 如果您不熟悉搜尋開發,您可以逐步重新建立此應用程式,以瞭解工作流程。 下列各節將示範如何。
設定開發環境
若要從頭開始建立此專案,並因此強化Azure 認知搜尋的概念,請從 Visual Studio 專案開始。
在 Visual Studio 中,選取 [新增>專案],然後ASP.NET Core Web 應用程式 (Model-View-Controller) 。

為專案命名,例如 "FirstSearchApp",並設定位置。 選取 [下一步]。
接受目標架構、驗證類型和 HTTPS 的預設值。 選取 [建立]。
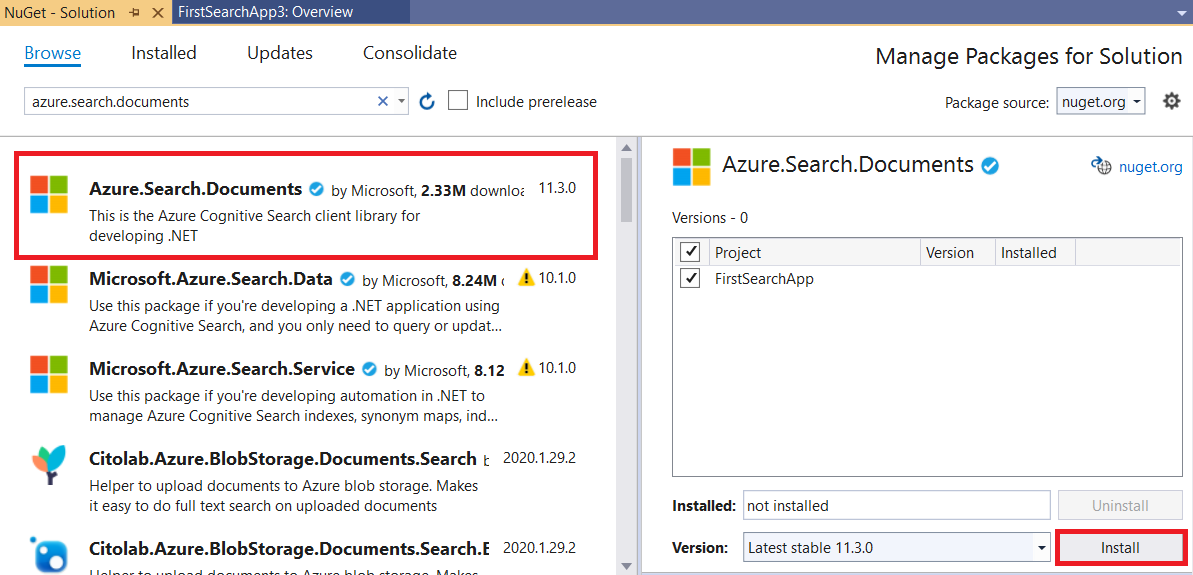
安裝用戶端程式庫。 在[工具>NuGet 套件管理員>管理方案的 NuGet 套件...] 中,選取[流覽],然後搜尋 「azure.search.documents」。 安裝 Azure.Search.Documents (第 11 版或更新版本),接受授權合約和相依性。
初始化 Azure 認知搜尋
在此步驟中,設定端點和存取金鑰,以連線到提供 旅館範例索引的搜尋服務。
開啟 appsettings.json ,並將預設行取代為搜尋服務 URL (格式
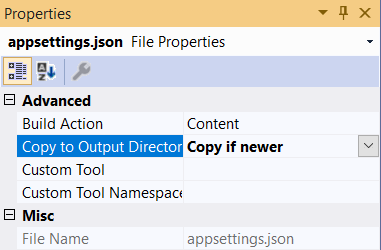
https://<service-name>.search.windows.net) ,以及搜尋服務的 系統管理員或查詢 API 金鑰 。 因為您不需要建立或更新索引,所以您可以使用本教學課程的查詢索引鍵。{ "SearchServiceUri": "<YOUR-SEARCH-SERVICE-URI>", "SearchServiceQueryApiKey": "<YOUR-SEARCH-SERVICE-API-KEY>" }在方案總管中選取檔案,然後在 [屬性] 中,將 [複製到輸出目錄] 設定變更為 [有更新時才複製]。
模型資料結構
模型 (C#類別) 用來傳達用戶端 (檢視)、伺服器 (控制器),以及使用 MVC (模型、檢視、控制器) 架構之 Azure 雲端之間的資料。 一般而言,這些模型會反映所存取資料的結構。
在此步驟中,您將會建立搜尋索引的資料結構,以及在檢視/控制器通訊中使用的搜尋字串模型。 在旅館索引中,每個旅館都有許多房間,而且每個旅館都有多個部分的地址。 合併在一起,旅館完整表示是階層式和巢狀資料結構。 您將需要三個類別來建立每個元件。
Hotel、Address 和 Room 這組類別已知為複雜類型,這是 Azure 認知搜尋的一項重要功能。 複雜類型可以是多層深的類別和子類別,而且會使用比簡單類型 (只包含基本成員的類別) 更複雜的資料結構表示。
在 [方案總管] 中,以滑鼠右鍵按一下 [模型] > [新增] > [新增項目]。
選取 [類別 ],並將專案命名為 Hotel.cs。 以下列程式碼取代 Hotel.cs 的所有內容。 請注意類別的 Address 和 Room 成員,這些欄位本身是類別,因此您也需要這些欄位的模型。
using Azure.Search.Documents.Indexes;
using Azure.Search.Documents.Indexes.Models;
using Microsoft.Spatial;
using System;
using System.Text.Json.Serialization;

namespace FirstAzureSearchApp.Models
{
    public partial class Hotel
    {
        [SimpleField(IsFilterable = true, IsKey = true)]
        public string HotelId { get; set; }

        [SearchableField(IsSortable = true)]
        public string HotelName { get; set; }

        [SearchableField(AnalyzerName = LexicalAnalyzerName.Values.EnLucene)]
        public string Description { get; set; }

        [SearchableField(AnalyzerName = LexicalAnalyzerName.Values.FrLucene)]
        [JsonPropertyName("Description_fr")]
        public string DescriptionFr { get; set; }

        [SearchableField(IsFilterable = true, IsSortable = true, IsFacetable = true)]
        public string Category { get; set; }

        [SearchableField(IsFilterable = true, IsFacetable = true)]
        public string[] Tags { get; set; }

        [SimpleField(IsFilterable = true, IsSortable = true, IsFacetable = true)]
        public bool? ParkingIncluded { get; set; }

        [SimpleField(IsFilterable = true, IsSortable = true, IsFacetable = true)]
        public DateTimeOffset? LastRenovationDate { get; set; }

        [SimpleField(IsFilterable = true, IsSortable = true, IsFacetable = true)]
        public double? Rating { get; set; }

        public Address Address { get; set; }

        [SimpleField(IsFilterable = true, IsSortable = true)]
        public GeographyPoint Location { get; set; }

        public Room[] Rooms { get; set; }
    }
}
重複建立 Address 類別模型的相同程序,將檔案命名為 Address.cs。 將內容取代如下。
using Azure.Search.Documents.Indexes;

namespace FirstAzureSearchApp.Models
{
    public partial class Address
    {
        [SearchableField]
        public string StreetAddress { get; set; }

        [SearchableField(IsFilterable = true, IsSortable = true, IsFacetable = true)]
        public string City { get; set; }

        [SearchableField(IsFilterable = true, IsSortable = true, IsFacetable = true)]
        public string StateProvince { get; set; }

        [SearchableField(IsFilterable = true, IsSortable = true, IsFacetable = true)]
        public string PostalCode { get; set; }

        [SearchableField(IsFilterable = true, IsSortable = true, IsFacetable = true)]
        public string Country { get; set; }
    }
}
同樣地,依照建立 Room 類別的相同程序進行,並將檔案命名為 Room.cs。
using Azure.Search.Documents.Indexes;
using Azure.Search.Documents.Indexes.Models;
using System.Text.Json.Serialization;

namespace FirstAzureSearchApp.Models
{
    public partial class Room
    {
        [SearchableField(AnalyzerName = LexicalAnalyzerName.Values.EnMicrosoft)]
        public string Description { get; set; }

        [SearchableField(AnalyzerName = LexicalAnalyzerName.Values.FrMicrosoft)]
        [JsonPropertyName("Description_fr")]
        public string DescriptionFr { get; set; }

        [SearchableField(IsFilterable = true, IsFacetable = true)]
        public string Type { get; set; }

        [SimpleField(IsFilterable = true, IsFacetable = true)]
        public double? BaseRate { get; set; }

        [SearchableField(IsFilterable = true, IsFacetable = true)]
        public string BedOptions { get; set; }

        [SimpleField(IsFilterable = true, IsFacetable = true)]
        public int SleepsCount { get; set; }

        [SimpleField(IsFilterable = true, IsFacetable = true)]
        public bool? SmokingAllowed { get; set; }

        [SearchableField(IsFilterable = true, IsFacetable = true)]
        public string[] Tags { get; set; }
    }
}
您在本教學課程中建立的最後一個模型是名為 SearchData 的類別,其代表使用者的輸入 (searchText) 和搜尋的輸出 (resultList)。 輸出的類型 (SearchResults<Hotel> ) 非常重要,因為這個類型完全符合搜尋的結果,以及您需要將此參考傳遞到檢視。 使用下列程式碼來取代預設範本。
using Azure.Search.Documents.Models;

namespace FirstAzureSearchApp.Models
{
    public class SearchData
    {
        // The text to search for.
        public string searchText { get; set; }

        // The list of results.
        public SearchResults<Hotel> resultList;
    }
}
建立網頁
專案範本隨附 Views 資料夾中的多個用戶端檢視。 確切的檢視取決於您使用 (3.1 的 Core .NET 版本,此範例) 。 在本教學課程中,您將修改 Index.cshtml 以包含搜尋頁面的元素。
刪除 Index.cshtml 中完整的內容,並使用下列步驟重建檔案。
本教學課程在檢視中使用兩個小型影像:Azure 標誌和搜尋放大鏡圖示 (azure-logo.png 和 search.png)。 將來自 GitHub 專案的影像複製到您專案中的 wwwroot/images 資料夾。
Index.cshtml 的第一行應該參考在用戶端 (檢視) 和伺服器 (控制站) 之間傳達資料所使用的模型,也就是先前建立的 SearchData 模型。 在 Index.cshtml 檔案中加入這一行。
@model FirstAzureSearchApp.Models.SearchData這是輸入檢視標題的標準做法,因此下一行應該是:
@{
    ViewData["Title"] = "Home Page";
}
在標題之後,輸入 HTML 樣式表單的參考,您很快就會建立。
<head>
    <link rel="stylesheet" href="~/css/hotels.css" />
</head>
此檢視的主體會處理兩個使用案例。 首先,在輸入任何搜尋文字之前,第一次使用時必須提供空白頁面。 其次,除了搜尋文字方塊之外,還必須針對重複的查詢處理結果。
若要處理這兩種情況,您必須檢查提供給檢視的模型是否為 Null。 Null 模型表示第一個使用案例 (應用程式的初始執行)。 將下列內容加入至 Index.cshtml 檔案,並完整閱讀註解。
<body>
<h1 class="sampleTitle">
    <img src="~/images/azure-logo.png" width="80" />
    Hotels Search
</h1>

@using (Html.BeginForm("Index", "Home", FormMethod.Post))
{
    // Display the search text box, with the search icon to the right of it.
    <div class="searchBoxForm">
        @Html.TextBoxFor(m => m.searchText, new { @class = "searchBox" }) <input class="searchBoxSubmit" type="submit" value="">
    </div>

    @if (Model != null)
    {
        // Show the result count.
        <p class="sampleText">
            @Model.resultList.TotalCount Results
        </p>

        var results = Model.resultList.GetResults().ToList();

        @for (var i = 0; i < results.Count; i++)
        {
            // Display the hotel name and description.
            @Html.TextAreaFor(m => results[i].Document.HotelName, new { @class = "box1" })
            @Html.TextArea($"desc{i}", results[i].Document.Description, new { @class = "box2" })
        }
    }
}
</body>
新增樣式表。 在 Visual Studio 的 [檔案] > [新增] > [檔案] 中,選取 [樣式表] (醒目提示 [一般])。
使用下列程式碼來取代預設程式碼。 我們不會更詳細地進入此檔案,樣式是標準 HTML。
textarea.box1 {
    width: 648px;
    height: 30px;
    border: none;
    background-color: azure;
    font-size: 14pt;
    color: blue;
    padding-left: 5px;
}

textarea.box2 {
    width: 648px;
    height: 100px;
    border: none;
    background-color: azure;
    font-size: 12pt;
    padding-left: 5px;
    margin-bottom: 24px;
}

.sampleTitle {
    font: 32px/normal 'Segoe UI Light',Arial,Helvetica,Sans-Serif;
    margin: 20px 0;
    font-size: 32px;
    text-align: left;
}

.sampleText {
    font: 16px/bold 'Segoe UI Light',Arial,Helvetica,Sans-Serif;
    margin: 20px 0;
    font-size: 14px;
    text-align: left;
    height: 30px;
}

.searchBoxForm {
    width: 648px;
    box-shadow: 0 0 0 1px rgba(0,0,0,.1), 0 2px 4px 0 rgba(0,0,0,.16);
    background-color: #fff;
    display: inline-block;
    border-collapse: collapse;
    border-spacing: 0;
    list-style: none;
    color: #666;
}

.searchBox {
    width: 568px;
    font-size: 16px;
    margin: 5px 0 1px 20px;
    padding: 0 10px 0 0;
    border: 0;
    max-height: 30px;
    outline: none;
    box-sizing: content-box;
    height: 35px;
    vertical-align: top;
}

.searchBoxSubmit {
    background-color: #fff;
    border-color: #fff;
    background-image: url(/images/search.png);
    background-repeat: no-repeat;
    height: 20px;
    width: 20px;
    text-indent: -99em;
    border-width: 0;
    border-style: solid;
    margin: 10px;
    outline: 0;
}
將樣式表檔案儲存為 hotels.css,並與預設的 site.css 檔案一起儲存到 wwwroot/css 資料夾中。
如此便完成我們的檢視。 此時,模型和檢視都已完成。 只剩下用控制器將所有項目整合在一起。
定義方法
在此步驟中,請修改首頁控制器的內容。
開啟 HomeController.cs 檔案,然後將 using 陳述式取代如下。
using Azure;
using Azure.Search.Documents;
using Azure.Search.Documents.Indexes;
using FirstAzureSearchApp.Models;
using Microsoft.AspNetCore.Mvc;
using Microsoft.Extensions.Configuration;
using System;
using System.Diagnostics;
using System.Linq;
using System.Threading.Tasks;
加入 Index 方法
在 MVC 應用程式中,Index() 方法是任何控制器的預設動作方法。 此方法會開啟索引 HTML 頁面。 本教學課程會針對應用程式啟動使用案例使用預設方法 (不採用任何參數):轉譯空白的搜尋頁面。
在本節中,我們會擴充方法以支援第二個使用案例:當使用者輸入搜尋文字時轉譯頁面。 為了支援這種情況,已擴充索引方法以採用模型作為參數。
在預設的 Index() 方法後面加上下列方法。
    [HttpPost]
    public async Task<ActionResult> Index(SearchData model)
    {
        try
        {
            // Ensure the search string is valid.
            if (model.searchText == null)
            {
                model.searchText = "";
            }

            // Make the Azure Cognitive Search call.
            await RunQueryAsync(model);
        }

        catch
        {
            return View("Error", new ErrorViewModel { RequestId = "1" });
        }
        return View(model);
    }
請注意方法的 async 宣告,以及對 RunQueryAsync 進行的 await 呼叫。 這些關鍵字負責讓呼叫變成非同步的,因此可避免阻絕伺服器上的執行緒。
catch區塊會使用已建立的預設錯誤模型。
請注意錯誤處理以及其他預設檢視和方法
根據您使用的 .NET Core 版本,會建立一組稍微不同的預設檢視。 針對 .NET Core 3.1,預設檢視是 [索引]、[隱私權] 和 [錯誤]。 您可以在執行應用程式時檢視這些預設頁面,並檢查它們在控制器中的處理方式。
您將在本教學課程稍後測試錯誤檢視。
在 GitHub 範例中,已刪除未使用的檢視及其相關聯的動作。
加入 RunQueryAsync 方法
Azure 認知搜尋呼叫會封裝在我們的 RunQueryAsync 方法中。
首先,加入一些靜態變數以設定 Azure 服務,然後加入一個起始這些變數的呼叫。
    private static SearchClient _searchClient;
    private static SearchIndexClient _indexClient;
    private static IConfigurationBuilder _builder;
    private static IConfigurationRoot _configuration;

    private void InitSearch()
    {
        // Create a configuration using appsettings.json
        _builder = new ConfigurationBuilder().AddJsonFile("appsettings.json");
        _configuration = _builder.Build();

        // Read the values from appsettings.json
        string searchServiceUri = _configuration["SearchServiceUri"];
        string queryApiKey = _configuration["SearchServiceQueryApiKey"];

        // Create a service and index client.
        _indexClient = new SearchIndexClient(new Uri(searchServiceUri), new AzureKeyCredential(queryApiKey));
        _searchClient = _indexClient.GetSearchClient("hotels");
    }
現在,加入 RunQueryAsync 方法本身。
private async Task<ActionResult> RunQueryAsync(SearchData model)
{
    InitSearch();

    var options = new SearchOptions()
    {
        IncludeTotalCount = true
    };

    // Enter Hotel property names into this list so only these values will be returned.
    // If Select is empty, all values will be returned, which can be inefficient.
    options.Select.Add("HotelName");
    options.Select.Add("Description");

    // For efficiency, the search call should be asynchronous, so use SearchAsync rather than Search.
    model.resultList = await _searchClient.SearchAsync<Hotel>(model.searchText, options).ConfigureAwait(false);

    // Display the results.
    return View("Index", model);
}
在此方法中,先確定 Azure 設定已起始,然後設定一些搜尋選項。 [選取] 選項會指定要在結果中傳回哪些欄位,因而符合 hotel 類別中的屬性名稱。 如果您省略 Select,則會傳回所有未隱藏的欄位,如果您只對所有可能欄位的子集感興趣,這可能會沒有效率。
搜尋的非同步呼叫會制定要求 (模型化為 searchText) 和回應 (模型化為 searchResult)。 如果您要偵錯此程式碼,如果您需要檢查model.resultList的內容,SearchResult類別是設定中斷點的好候選項目。 您應該發現它是直覺式的,只提供您要求的資料,而不是其他資料。
測試應用程式
現在,讓我們來看看應用程式是否正確執行。
選取 [偵錯] > [啟動但不偵錯],或按下 F5 鍵。 如果應用程式如預期般執行,您應該會看到初始索引檢視。
輸入查詢字串,例如 "beach" (或想到的任何文字),然後按一下搜尋圖示以傳送要求。
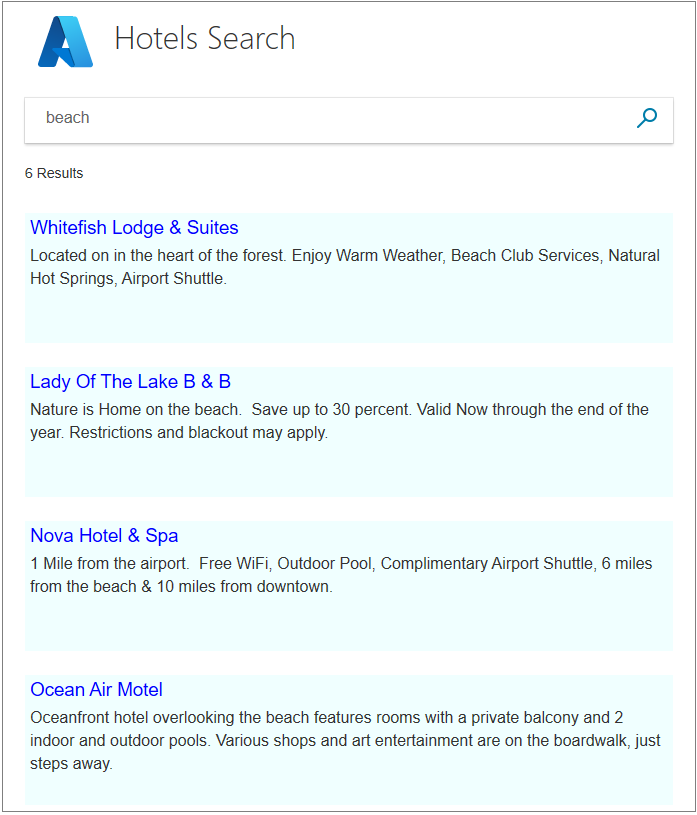
請嘗試輸入"five star"。 請注意,此查詢不會傳回任何結果。 更複雜的搜尋會將 "five star" 視為 "luxury" 的同義字,並傳回這些結果。 Azure 認知搜尋中提供同義字的支援,但是本教學課程系列並未涵蓋此功能。
請嘗試輸入 "hot" 作為搜尋文字。 它不會傳回具有 「hotel」 一字的專案。 我們的搜尋只會找出完整字詞,但是也會傳回幾個結果。
請嘗試其他文字;"pool"、"sunshine"、"view" 等等。 您會看到Azure 認知搜尋最簡單但仍然令人信服的層級。
測試邊緣條件和錯誤
請務必確認我們的錯誤處理功能是否如應般運作,即使專案正常運作也一樣。
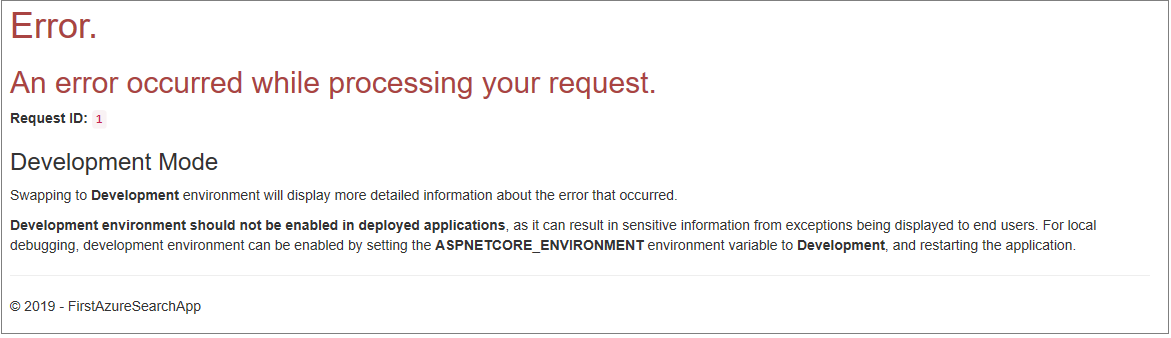
在 Index 方法中的 try { 呼叫後面,輸入 Throw new Exception() 這一行。 當您搜尋文字時,這個例外狀況會強制發生錯誤。
執行應用程式、輸入 "bar" 作為搜尋文字,然後按一下 [搜尋] 圖示。 例外狀況應該會導致錯誤檢視。
重要
在錯誤頁面中傳回內部錯誤號碼時,會被視為安全性風險。 如果您的應用程式適用于一般用途,請遵循發生錯誤時所傳回內容的安全性最佳做法。
當您滿足錯誤處理的運作方式時,請移除 擲回新的例外狀況 () 。
重要心得
請考慮此專案的下列重點:
- Azure 認知搜尋呼叫很簡潔,而且很容易解譯結果。
- 非同步呼叫會將少量的複雜度新增至控制器,但是改善效能的最佳做法。
- 此應用程式執行了簡單的文字搜尋,由 searchOptions中設定的內容所定義。 不過,此類別可以填入許多可對搜尋增加複雜度的成員。 有了更多工作,您就可以讓此應用程式更強大。
後續步驟
若要改善使用者體驗,請新增更多功能,尤其是分頁 (使用頁數或無限捲動),以及自動完成/建議。 您也可以考慮其他搜尋選項 (例如,在指定點的指定半徑內搜尋旅館的地理搜尋) 和搜尋結果排序。
在剩餘教學課程中,將會處理這些後續步驟。 讓我們從分頁著手。