擴大 Service Fabric 叢集主要節點類型
本文說明如何以最短的停機時間擴大 Service Fabric 叢集主要節點類型。 Service Fabric 叢集節點上不支援就地 SKU 升級,因為此類作業可能會牽涉到資料和可用性遺失。 最安全、最可靠且建議的擴大 Service Fabric 節點類型方法為:
將新的節點類型新增到您的 Service Fabric 叢集,由您的已升級 (或已修改) 虛擬機器擴展集 SKU 和設定作為後盾。 此步驟也包含為擴展集設定新的負載平衡器、子網路和公用 IP。
一旦原始和升級的擴展集同時執行,就會一次停用一個原始節點執行個體,讓系統服務 (或具狀態服務的複本) 移轉至新的擴展集。
確認叢集和新節點的狀況良好,然後移除已刪除節點的原始擴展集 (和相關資源) 和節點狀態。
下列程序會逐步引導您使用具有銀級持久性 (由具有五個節點的單一擴展集作為後盾),更新範例叢集主要節點類型 VM 的 VM 大小和作業系統。 我們會升級主要節點類型:
- 從 VM 大小 Standard_D2_V2 升級為 Standard D4_V2,以及
- 從 VM 作業系統 Windows Server 2019 Datacenter 到 Windows Server 2022 Datacenter。
警告
在對生產叢集嘗試此程序之前,建議您先研究範本範例,並確認要對測試叢集所進行的程序。 叢集在短時間內也可能無法使用。
如果叢集狀態狀況不良,請不要嘗試使用主要節點類型擴大程序,因為這只會進一步使叢集不穩定。
以下是我們用來完成此範例升級案例的逐步 Azure 部署範本,可於 GitHub 取得。
設定測試叢集
讓我們設定初始 Service Fabric 測試叢集。 首先,請下載我們將會用來完成此案例的 Azure Resource Manager 範例範本。
接著,登入您的 Azure 帳戶。
# Sign in to your Azure account
Login-AzAccount -SubscriptionId "<subscription ID>"
接下來開啟 parameters.json 檔案並且將 clusterName 的值更新為唯一值 (在 Azure 內)。
下列命令會引導您產生新的自我簽署憑證,並部署測試叢集。 如果您已經有想要使用的憑證,請跳到使用現有的憑證來部署叢集。
產生自我簽署憑證及部署叢集
首先,指派 Service Fabric 叢集部署所需的變數。 針對您的特定帳戶和環境,調整 resourceGroupName、certSubjectName、parameterFilePath 和 templateFilePath 的值:
# Assign deployment variables
$resourceGroupName = "sftestupgradegroup"
$certOutputFolder = "c:\certificates"
$certPassword = "Password!1" | ConvertTo-SecureString -AsPlainText -Force
$certSubjectName = "sftestupgrade.southcentralus.cloudapp.azure.com"
$parameterFilePath = "C:\parameters.json"
$templateFilePath = "C:\Initial-TestClusterSetup.json"
注意
執行命令之前,確保 certOutputFolder 位置存在於本機電腦上,以部署新的 Service Fabric 叢集。
然後部署 Service Fabric 測試叢集:
# Deploy the initial test cluster
New-AzServiceFabricCluster `
    -ResourceGroupName $resourceGroupName `
    -CertificateOutputFolder $certOutputFolder `
    -CertificatePassword $certPassword `
    -CertificateSubjectName $certSubjectName `
    -TemplateFile $templateFilePath `
    -ParameterFile $parameterFilePath
部署完成後,請在本機電腦上找出 .pfx 檔案 ($certPfx),並將其匯入到您的憑證存放區:
cd c:\certificates
$certPfx = ".\sftestupgradegroup20200312121003.pfx"

Import-PfxCertificate `
     -FilePath $certPfx `
     -CertStoreLocation Cert:\CurrentUser\My `
     -Password (ConvertTo-SecureString Password!1 -AsPlainText -Force)
此作業會傳回憑證指紋,您現在可以將其用來連線到新叢集並檢查其健全狀態。 (略過下一節,這是叢集部署的替代方法。)
使用現有的憑證來部署叢集
或者,您可以使用現有的 Azure Key Vault 憑證來部署測試叢集。 若要這樣做,您必須取得 Key Vault 的參考和憑證指紋。
# Key Vault variables
$certUrlValue = "https://sftestupgradegroup.vault.azure.net/secrets/sftestupgradegroup20200309235308/dac0e7b7f9d4414984ccaa72bfb2ea39"
$sourceVaultValue = "/subscriptions/########-####-####-####-############/resourceGroups/sftestupgradegroup/providers/Microsoft.KeyVault/vaults/sftestupgradegroup"
$thumb = "BB796AA33BD9767E7DA27FE5182CF8FDEE714A70"
接下來,指定叢集的資源群組名稱,並且設定 templateFilePath 和 parameterFilePath 位置:
注意
指定的資源群組必須已存在,且位於與您的 Key Vault 相同的區域中。
$resourceGroupName = "sftestupgradegroup"
$templateFilePath = "C:\Initial-TestClusterSetup.json"
$parameterFilePath = "C:\parameters.json"
最後,執行下列命令以部署初始測試叢集:
# Deploy the initial test cluster
New-AzResourceGroupDeployment `
    -ResourceGroupName $resourceGroupName `
    -TemplateFile $templateFilePath `
    -TemplateParameterFile $parameterFilePath `
    -CertificateThumbprint $thumb `
    -CertificateUrlValue $certUrlValue `
    -SourceVaultValue $sourceVaultValue `
    -Verbose
連線到新叢集並檢查健全狀態
連線至叢集,並確保其全部五個節點的狀況良好 (以您自己的值取代 clusterName 和 thumb 變數):
# Connect to the cluster
$clusterName = "sftestupgrade.southcentralus.cloudapp.azure.com:19000"
$thumb = "BB796AA33BD9767E7DA27FE5182CF8FDEE714A70"

Connect-ServiceFabricCluster `
    -ConnectionEndpoint $clusterName `
    -KeepAliveIntervalInSec 10 `
    -X509Credential `
    -ServerCertThumbprint $thumb  `
    -FindType FindByThumbprint `
    -FindValue $thumb `
    -StoreLocation CurrentUser `
    -StoreName My

# Check cluster health
Get-ServiceFabricClusterHealth
我們已準備好開始進行升級程序。
使用升級的擴展集部署新的主要節點類型
為了升級 (垂直調整) 節點類型,我們必須先部署新的節點類型,由新的擴展集和支援的資源作為後盾。 新的擴展集將會標示為主要 (isPrimary: true),就像原始擴展集一樣。 如果您想要擴大非主要節點類型,請參閱擴大 Service Fabric 叢集飛主要節點類型。 在下一節中建立的資源最終會成為叢集中的新主要節點類型,而且會刪除原始主要節點類型資源。
以升級的擴展集更新叢集範本
以下是針對新增新的主要節點類型和支援資源的原始叢集部署範本逐章節修改。
此步驟的必要變更已在 Step1-AddPrimaryNodeType.json 範本檔案中為您進行,以下會詳細說明這些變更。 如果您想要的話,可以略過說明並且繼續取得您的 Key Vault 參考和部署更新的範本,這樣會將新的主要節點類型新增至您的叢集。
注意
請確定您使用與原始節點類型、擴展集、負載平衡器、公用 IP 和原始主要節點類型子網路不同的唯一名稱,因為這些資源會在程序稍後的步驟中刪除。
在現有虛擬網路中建立新的子網路
{
    "name": "[variables('subnet1Name')]",
    "properties": {
        "addressPrefix": "[variables('subnet1Prefix')]"
    }
}
使用唯一的 domainNameLabel 建立新的公用 IP
{
    "apiVersion": "[variables('publicIPApiVersion')]",
    "type": "Microsoft.Network/publicIPAddresses",
    "name": "[concat(variables('lbIPName'),'-',variables('vmNodeType1Name'))]",
    "location": "[variables('computeLocation')]",
    "properties": {
        "dnsSettings": {
            "domainNameLabel": "[concat(variables('dnsName'),'-','nt1')]"
        },
        "publicIPAllocationMethod": "Dynamic"
    },
    "tags": {
        "resourceType": "Service Fabric",
        "clusterName": "[parameters('clusterName')]"
    }
}
為公用 IP 建立新的負載平衡器
"dependsOn": [
    "[concat('Microsoft.Network/publicIPAddresses/',concat(variables('lbIPName'),'-',variables('vmNodeType1Name')))]"
]
建立新的虛擬機器擴展集 (具有升級的 VM 和 OS SKU)
節點類型參考
"nodeTypeRef": "[variables('vmNodeType1Name')]"
VM SKU
"sku": {
    "name": "[parameters('vmNodeType1Size')]",
    "capacity": "[parameters('nt1InstanceCount')]",
    "tier": "Standard"
}
OS SKU
"imageReference": {
    "publisher": "[parameters('vmImagePublisher1')]",
    "offer": "[parameters('vmImageOffer1')]",
    "sku": "[parameters('vmImageSku1')]",
    "version": "[parameters('vmImageVersion1')]"
}
如果您要變更 Linux 叢集中的 OS SKU
在 Windows 叢集中,屬性 vmImage 的值是「Windows」,而 Linux 叢集的相同屬性值是所使用的 OS 映像名稱。 例如 - Ubuntu20_04 (使用最新的 vm 映像名稱)。
因此,如果您要變更 Linux 叢集中的 VM 映像 (OS SKU),則也會更新 Service Fabric 叢集資源上的 vmImage 設定。
#Update the property vmImage with the required OS name in your ARM template
{
    "vmImage": "[parameter(newVmImageName]”
}
注意:newVmImageName 的範例:Ubuntu20_04
您也可以使用下列 PowerShell 命令來更新叢集資源:
# Update cluster vmImage to target OS. This registers the SF runtime package type that is supplied for upgrades.
Update-AzServiceFabricVmImage -ResourceGroupName $resourceGroup -ClusterName $clusterName -VmImage Ubuntu20_04
此外,請確定您包含工作負載所需的任何其他延伸模組。
將新的主要節點類型新增至叢集
現在新的節點類型 (vmNodeType1Name) 已經有自己的名稱、子網路、IP、負載平衡器和擴展集,可以重複使用來自原始節點類型的其他所有變數 (例如 nt0applicationEndPort、nt0applicationStartPort 和 nt0fabricTcpGatewayPort):
"name": "[variables('vmNodeType1Name')]",
"applicationPorts": {
    "endPort": "[variables('nt0applicationEndPort')]",
    "startPort": "[variables('nt0applicationStartPort')]"
},
"clientConnectionEndpointPort": "[variables('nt0fabricTcpGatewayPort')]",
"durabilityLevel": "Bronze",
"ephemeralPorts": {
    "endPort": "[variables('nt0ephemeralEndPort')]",
    "startPort": "[variables('nt0ephemeralStartPort')]"
},
"httpGatewayEndpointPort": "[variables('nt0fabricHttpGatewayPort')]",
"isPrimary": true,
"reverseProxyEndpointPort": "[variables('nt0reverseProxyEndpointPort')]",
"vmInstanceCount": "[parameters('nt1InstanceCount')]"
在您實作範本和參數檔案中的所有變更之後,請繼續下一節,以取得您的 Key Vault 參考,並將更新部署至您的叢集。
取得您的 Key Vault 參考
若要部署更新的設定,您需要數個儲存在 Key Vault 中的叢集憑證參考。 尋找這些值最簡單的方式是透過 Azure 入口網站。 您需要:
叢集憑證的 Key Vault URL。 從 Azure 入口網站的 Key Vault 中,選取 [憑證]> [您需要的憑證]> [祕密識別碼]:
$certUrlValue="https://sftestupgradegroup.vault.azure.net/secrets/sftestupgradegroup20200309235308/dac0e7b7f9d4414984ccaa72bfb2ea39"叢集憑證的指紋。 (如果您連線至初始叢集以檢查其健全狀態,您可能已經有這個憑證。)在 Azure 入口網站中從相同的憑證刀鋒視窗 ([憑證]> [您需要的憑證]),複製 X.509 SHA-1 指紋 (十六進位):
$thumb = "BB796AA33BD9767E7DA27FE5182CF8FDEE714A70"Key Vault 的資源識別碼。 從 Azure 入口網站的 Key Vault 中,選取 [屬性]> [資源識別碼]:
$sourceVaultValue = "/subscriptions/########-####-####-####-############/resourceGroups/sftestupgradegroup/providers/Microsoft.KeyVault/vaults/sftestupgradegroup"
部署更新的範本
視需要調整 templateFilePath,然後執行以下命令:
# Deploy the new node type and its resources
$templateFilePath = "C:\Step1-AddPrimaryNodeType.json"

New-AzResourceGroupDeployment `
    -ResourceGroupName $resourceGroupName `
    -TemplateFile $templateFilePath `
    -TemplateParameterFile $parameterFilePath `
    -CertificateThumbprint $thumb `
    -CertificateUrlValue $certUrlValue `
    -SourceVaultValue $sourceVaultValue `
    -Verbose
當部署完成時,請再次檢查叢集健康情況,並確定兩個節點類型上的所有節點都狀況良好。
Get-ServiceFabricClusterHealth
將種子節點移轉至新的節點類型
我們現在已經準備好將原始節點類型更新為非主要節點,並開始停用其節點。 當節點停用時,叢集的系統服務和種子節點會移轉至新的擴展集。
將原始節點類型取消標示為主要
先從原始節點類型移除範本中的 isPrimary 指定。
{
    "isPrimary": false,
}
然後使用更新來部署範本。 此部署會起始將種子節點移轉至新的擴展集。
$templateFilePath = "C:\Step2-UnmarkOriginalPrimaryNodeType.json"

New-AzResourceGroupDeployment `
    -ResourceGroupName $resourceGroupName `
    -TemplateFile $templateFilePath `
    -TemplateParameterFile $parameterFilePath `
    -CertificateThumbprint $thumb `
    -CertificateUrlValue $certUrlValue `
    -SourceVaultValue $sourceVaultValue `
    -Verbose
注意
需要一些時間才能完成將種子節點移轉至新的擴展集。 為了保證資料一致性,一次只能變更一個種子節點。 每次種子節點變更都需要叢集更新;因此取代種子節點需要兩次叢集升級 (節點新增和移除各需要一次)。 升級此範例案例中的五個種子節點,將會導致 10 次叢集升級。
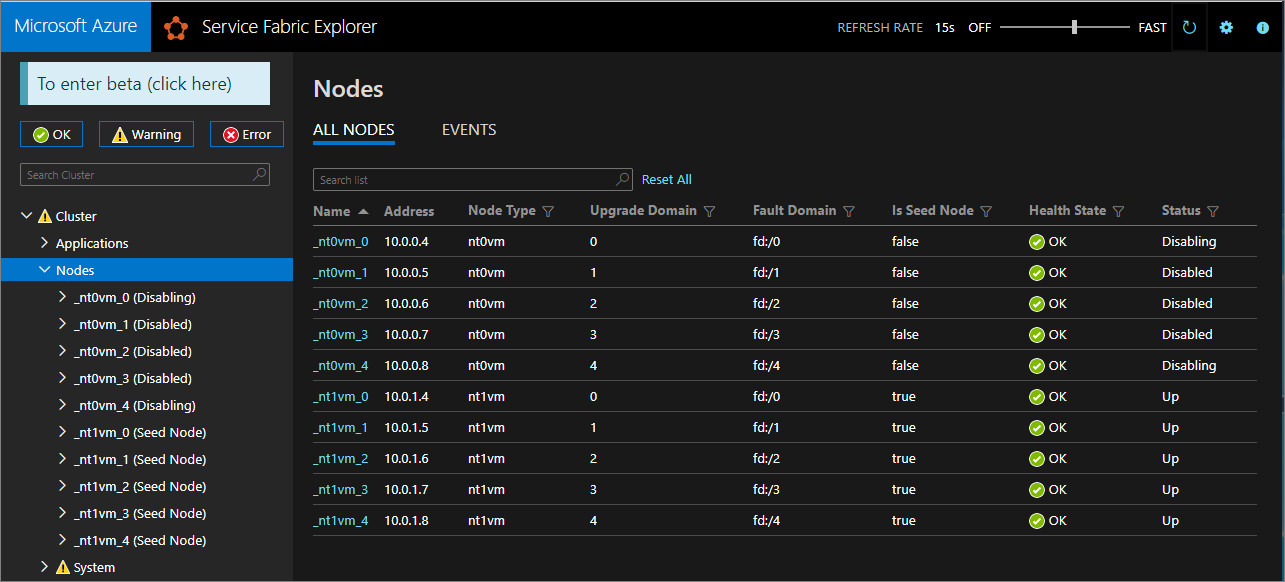
使用 Service Fabric Explorer 來監視將種子節點移轉至新的擴展集。 原始節點類型 (nt0vm) 的節點在 [是種子節點] 資料行中應該全是 false,新節點類型 (nt1vm) 的節點則為 true。
停用原始節點類型擴展集中的節點
當所有種子節點都移轉至新的擴展集之後,您就可以停用原始擴展集的節點。
# Disable the nodes in the original scale set.
$nodeType = "nt0vm"
$nodes = Get-ServiceFabricNode

Write-Host "Disabling nodes..."
foreach($node in $nodes)
{
  if ($node.NodeType -eq $nodeType)
  {
    $node.NodeName

    Disable-ServiceFabricNode -Intent RemoveNode -NodeName $node.NodeName -Force
  }
}
使用 Service Fabric Explorer 來監視原始擴展集中節點的進展,從 [停用中] 變成 [已停用] 狀態。
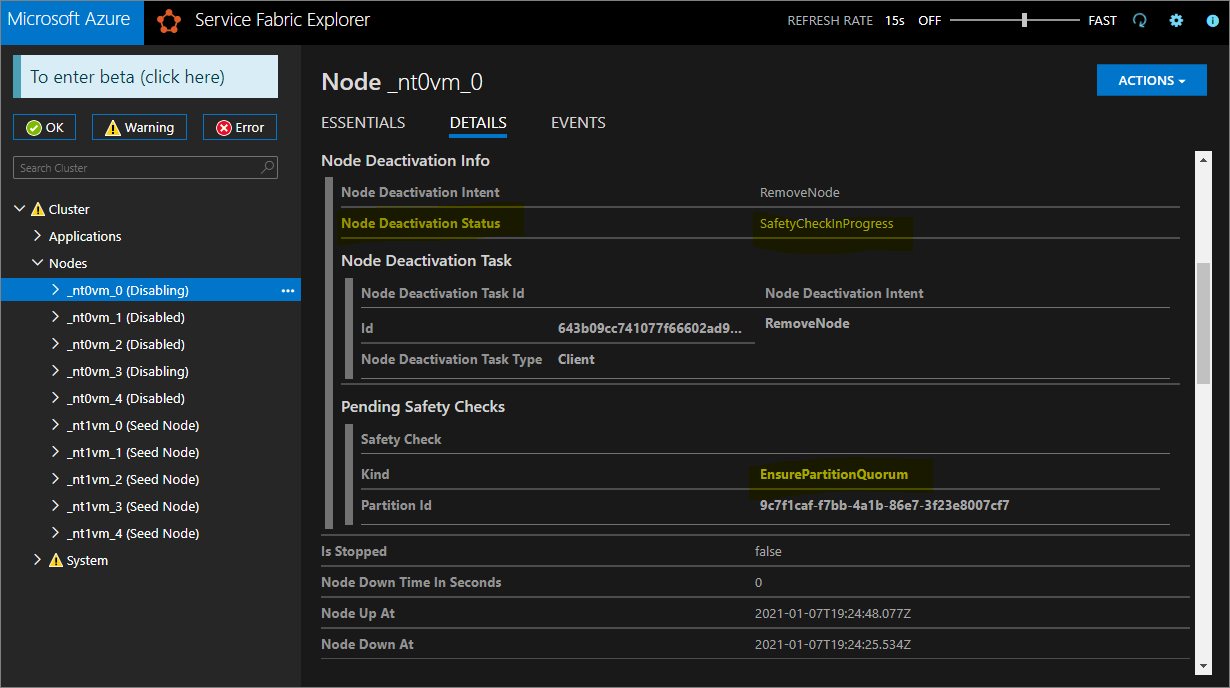
針對銀級和金級持久性,某些節點會進入 [已停用] 狀態,而其他節點可能會維持在 [停用中] 狀態。 在 Service Fabric Explorer 中,檢查處於 [停用中] 狀態節點的 [詳細資料] 索引標籤。 如果顯示 EnsurePartitionQuorem 種類的 [暫止安全性檢查] (確保基礎結構服務資料分割的仲裁),則可以放心繼續。
如果您的叢集具有銅級持久性,請等候所有節點達到 [已停用] 狀態。
停止已停用節點上的資料
現在您可以停止已停用節點上的資料。
# Stop data on the disabled nodes.
foreach($node in $nodes)
{
  if ($node.NodeType -eq $nodeType)
  {
    $node.NodeName

    Start-ServiceFabricNodeTransition -Stop -OperationId (New-Guid) -NodeInstanceId $node.NodeInstanceId -NodeName $node.NodeName -StopDurationInSeconds 10000
  }
}
移除原始節點類型,並清除其資源
我們已準備好移除原始節點類型及其相關聯的資源,以結束垂直調整程序。
移除原始擴展集
先移除節點類型的支援擴展集。
$scaleSetName = "nt0vm"
$scaleSetResourceType = "Microsoft.Compute/virtualMachineScaleSets"

Remove-AzResource -ResourceName $scaleSetName -ResourceType $scaleSetResourceType -ResourceGroupName $resourceGroupName -Force
刪除原始 IP 和負載平衡器資源
您現在可以刪除原始 IP 和負載平衡器資源。 在此步驟中,您也會更新 DNS 名稱。
注意
如果您已經使用 [標準] SKU 公用 IP 和負載平衡器,則此步驟是選擇性的。 在此情況下,相同負載平衡器下可能會有多個擴展集/節點類型。
執行下列命令,視需要修改 $lbname 值。
# Delete the original IP and load balancer resources
$lbName = "LB-sftestupgrade-nt0vm"
$lbResourceType = "Microsoft.Network/loadBalancers"
$ipResourceType = "Microsoft.Network/publicIPAddresses"
$oldPublicIpName = "PublicIP-LB-FE-nt0vm"
$newPublicIpName = "PublicIP-LB-FE-nt1vm"

$oldPrimaryPublicIP = Get-AzPublicIpAddress -Name $oldPublicIpName  -ResourceGroupName $resourceGroupName
$primaryDNSName = $oldPrimaryPublicIP.DnsSettings.DomainNameLabel
$primaryDNSFqdn = $oldPrimaryPublicIP.DnsSettings.Fqdn

Remove-AzResource -ResourceName $lbName -ResourceType $lbResourceType -ResourceGroupName $resourceGroupName -Force
Remove-AzResource -ResourceName $oldPublicIpName -ResourceType $ipResourceType -ResourceGroupName $resourceGroupName -Force

$PublicIP = Get-AzPublicIpAddress -Name $newPublicIpName  -ResourceGroupName $resourceGroupName
$PublicIP.DnsSettings.DomainNameLabel = $primaryDNSName
$PublicIP.DnsSettings.Fqdn = $primaryDNSFqdn
Set-AzPublicIpAddress -PublicIpAddress $PublicIP
從原始節點類型中移除節點狀態
原始節點類型節點的 [健全狀態] 現在會顯示 [錯誤]。 從叢集中移除其節點狀態。
# Remove state of the obsolete nodes from the cluster
$nodeType = "nt0vm"
$nodes = Get-ServiceFabricNode

Write-Host "Removing node state..."
foreach($node in $nodes)
{
  if ($node.NodeType -eq $nodeType)
  {
    $node.NodeName

    Remove-ServiceFabricNodeState -NodeName $node.NodeName -Force
  }
}
Service Fabric Explorer 現在應該只會反映新節點類型 (nt1vm) 的五個節點,其 [健全狀態] 都是 [正常]。 您的叢集健全狀態仍會顯示 [錯誤]。 接下來我們會更新範本以反映最新的變更並且重新部署,以進行補救。
更新部署範本以反映新擴大的主要節點類型
此步驟的必要變更已在 Step3-CleanupOriginalPrimaryNodeType.json 範本檔案中為您進行,後續章節會詳細說明這些範本變更。 如果您想要的話,可以略過說明並繼續部署更新的範本,並完成教學課程。
更新叢集管理端點
更新部署範本上的叢集 managementEndpoint 以反映新的 IP (藉由使用 vmNodeType1Name 更新 vmNodeType0Name)。
"managementEndpoint": "[concat('https://',reference(concat(variables('lbIPName'),'-',variables('vmNodeType1Name'))).dnsSettings.fqdn,':',variables('nt0fabricHttpGatewayPort'))]",
移除原始節點類型參考
從部署範本的 Service Fabric 資源中移除原始節點類型參考:
"name": "[variables('vmNodeType0Name')]",
"applicationPorts": {
    "endPort": "[variables('nt0applicationEndPort')]",
    "startPort": "[variables('nt0applicationStartPort')]"
},
"clientConnectionEndpointPort": "[variables('nt0fabricTcpGatewayPort')]",
"durabilityLevel": "Bronze",
"ephemeralPorts": {
    "endPort": "[variables('nt0ephemeralEndPort')]",
    "startPort": "[variables('nt0ephemeralStartPort')]"
},
"httpGatewayEndpointPort": "[variables('nt0fabricHttpGatewayPort')]",
"isPrimary": true,
"reverseProxyEndpointPort": "[variables('nt0reverseProxyEndpointPort')]",
"vmInstanceCount": "[parameters('nt0InstanceCount')]"
設定健康情況原則以忽略現有的錯誤
僅限銀級以上的持久性叢集,請在叢集資源下新增 applicationDeltaHealthPolicies (如下所示),更新範本中的叢集資源,並將健康情況原則設為略過 fabric:/System 應用程式健康情況。 下列原則會略過現有錯誤,但不允許發生新的健康情況錯誤。
"upgradeDescription":
{
 "forceRestart": false,
 "upgradeReplicaSetCheckTimeout": "10675199.02:48:05.4775807",
 "healthCheckWaitDuration": "00:05:00",
 "healthCheckStableDuration": "00:05:00",
 "healthCheckRetryTimeout": "00:45:00",
 "upgradeTimeout": "12:00:00",
 "upgradeDomainTimeout": "02:00:00",
 "healthPolicy": {
   "maxPercentUnhealthyNodes": 100,
   "maxPercentUnhealthyApplications": 100
 },
 "deltaHealthPolicy":
 {
   "maxPercentDeltaUnhealthyNodes": 0,
   "maxPercentUpgradeDomainDeltaUnhealthyNodes": 0,
   "maxPercentDeltaUnhealthyApplications": 0,
   "applicationDeltaHealthPolicies":
   {
       "fabric:/System":
       {
           "defaultServiceTypeDeltaHealthPolicy":
           {
                   "maxPercentDeltaUnhealthyServices": 0
           }
       }
   }
 }
}
移除原始節點類型的支援資源
從 ARM 範本和參數檔案中移除與原始節點類型相關的其他所有資源。 刪除下面這一行:
    "vmImagePublisher": {
      "value": "MicrosoftWindowsServer"
    },
    "vmImageOffer": {
      "value": "WindowsServer"
    },
    "vmImageSku": {
      "value": "2019-Datacenter"
    },
    "vmImageVersion": {
      "value": "latest"
    },
部署已完成的範本
最後,部署已修改的 Azure Resource Manager 範本。
# Deploy the updated template file
$templateFilePath = "C:\Step3-CleanupOriginalPrimaryNodeType"

New-AzResourceGroupDeployment `
    -ResourceGroupName $resourceGroupName `
    -TemplateFile $templateFilePath `
    -TemplateParameterFile $parameterFilePath `
    -CertificateThumbprint $thumb `
    -CertificateUrlValue $certUrlValue `
    -SourceVaultValue $sourceVaultValue `
    -Verbose
注意
此步驟需要一段時間,最多通常為兩個小時。
這項升級會將設定變更為 InfrastructureService,因此需要重新啟動節點。 在此情況下,會忽略 forceRestart。 參數 upgradeReplicaSetCheckTimeout 用於指定 Service Fabric 等待分割區轉為安全狀態 (若尚未處於安全狀態) 的時間上限。 當節點的所有分割區皆通過安全性檢查,Service Fabric 便會於該節點繼續進行升級。 參數 upgradeTimeout 的值可縮減為 6 小時,但應使用安全性最高的 12 小時。
部署完成之後,請在 Azure 入口網站中確認 Service Fabric 資源狀態為 [就緒]。 確認您可以連線到新的 Service Fabric Explorer 端點、[叢集健全狀態] 為 [正常],而且任何已部署的應用程式都能正常運作。
這樣一來,您就已經垂直調整叢集主要節點類型!
下一步
- 了解如何向群集新增節點類型
- 深入了解應用程式延展性。
- 將 Azure 叢集相應縮小或相應放大。
- 使用 Fluent Azure 計算 SDK,以程式設計方式調整 Azure 叢集。
- 將獨立叢集相應縮小或相應放大。