教學課程:建立和部署含有 ASP.NET Core Web API 前端服務和具狀態後端服務的應用程式
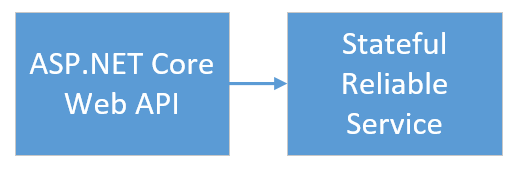
本教學課程是一個系列的第一部分。 您將了解如何建立含有 ASP.NET Core Web API 前端和具狀態後端服務的 Azure Service Fabric 應用程式來儲存您的資料。 當您完成時,您會有一個投票應用程式,其 ASP.NET Core Web 前端會將投票結果儲存在叢集中具狀態的後端服務。 本教學課程系列需要 Windows 開發人員電腦。 如果您不需要以手動建立投票應用程式,可以下載已完成應用程式的原始程式碼並直接前往逐步解說投票範例應用程式。 您也可以視需要觀看本教學課程的視訊逐步解說。
在系列的第一部分中,您將了解如何:
- 建立 ASP.NET Core Web API 服務成為具狀態可靠服務
- 建立 ASP.NET Core Web 應用程式服務成為具狀態可靠服務
- 使用反向 proxy 來與具狀態服務進行通訊
在本教學課程系列中,您將了解如何:
- 建置 .NET Service Fabric 應用程式
- 將應用程式部署到遠端叢集
- 將 HTTPS 端點新增至 ASP.NET Core 前端服務
- 使用 Azure Pipelines 設定 CI/CD
- 設定應用程式的監視和診斷
必要條件
開始進行本教學課程之前:
- 如果您沒有 Azure 訂用帳戶,請建立免費帳戶
- 安裝 Visual Studio 2019 15.5 版或更新版本,其中包含 Azure 開發及 ASP.NET 和 Web 開發工作負載。
- 安裝 Service Fabric SDK
建立 ASP.NET Web API 服務成為可靠的服務
首先,使用 ASP.NET Core 建立投票應用程式的 web 前端。 ASP.NET Core 是輕量型、跨平台的 Web 開發架構,可供您用來建立新式 Web UI 和 Web API。 若要完整了解 ASP.NET Core 如何與 Service Fabric 整合,強烈建議您仔細閱讀 Service Fabric Reliable Services 中的 ASP.NET Core 文章。 現在,您可以依照本教學課程來快速上手。 若要深入了解 ASP.NET Core,請參閱 ASP.NET Core 文件。
以系統管理員身分啟動 Visual Studio。
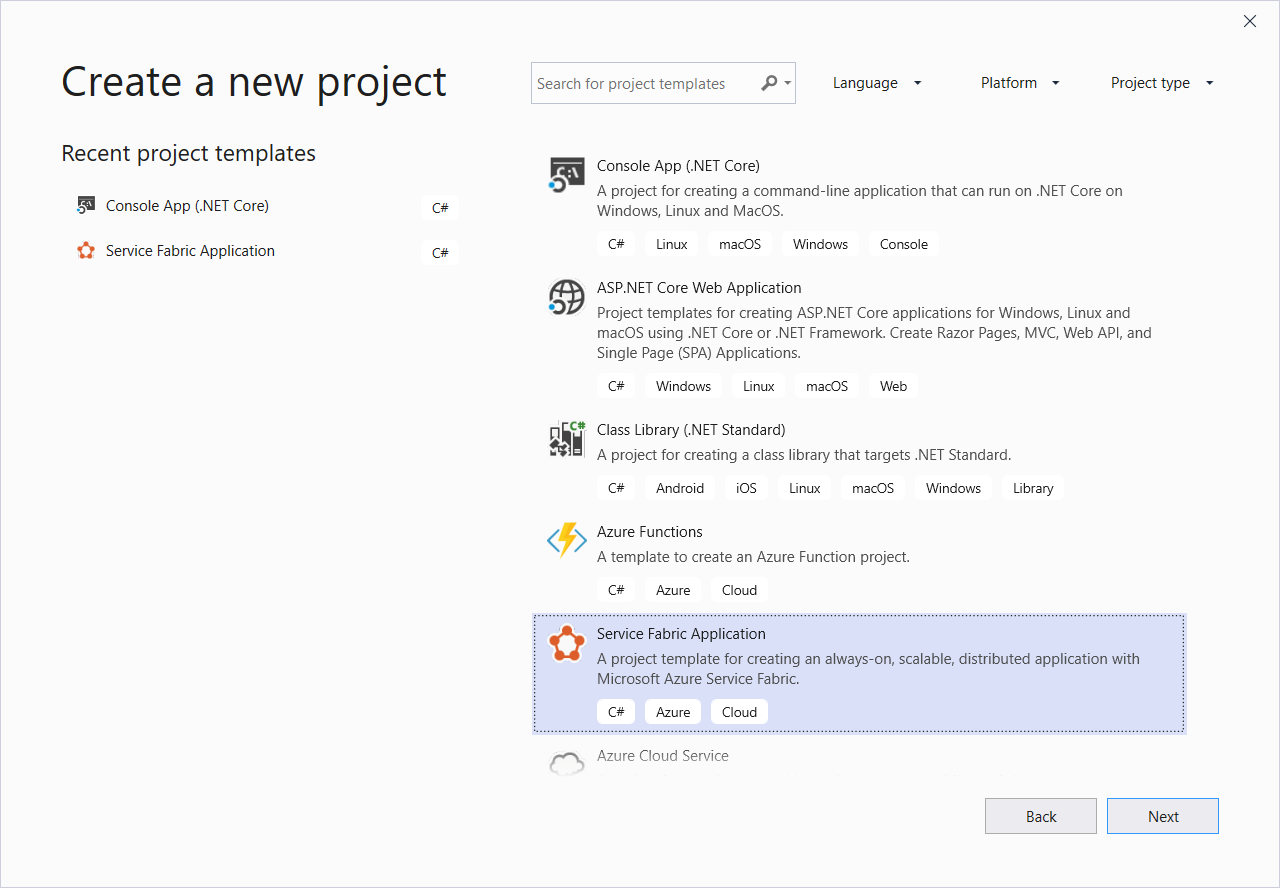
使用檔案->新增->專案建立專案。
在 [新增專案] 對話方塊中,選擇 [雲端] > [Service Fabric 應用程式]。
將應用程式命名為 Voting,然後按一下 [確定]。
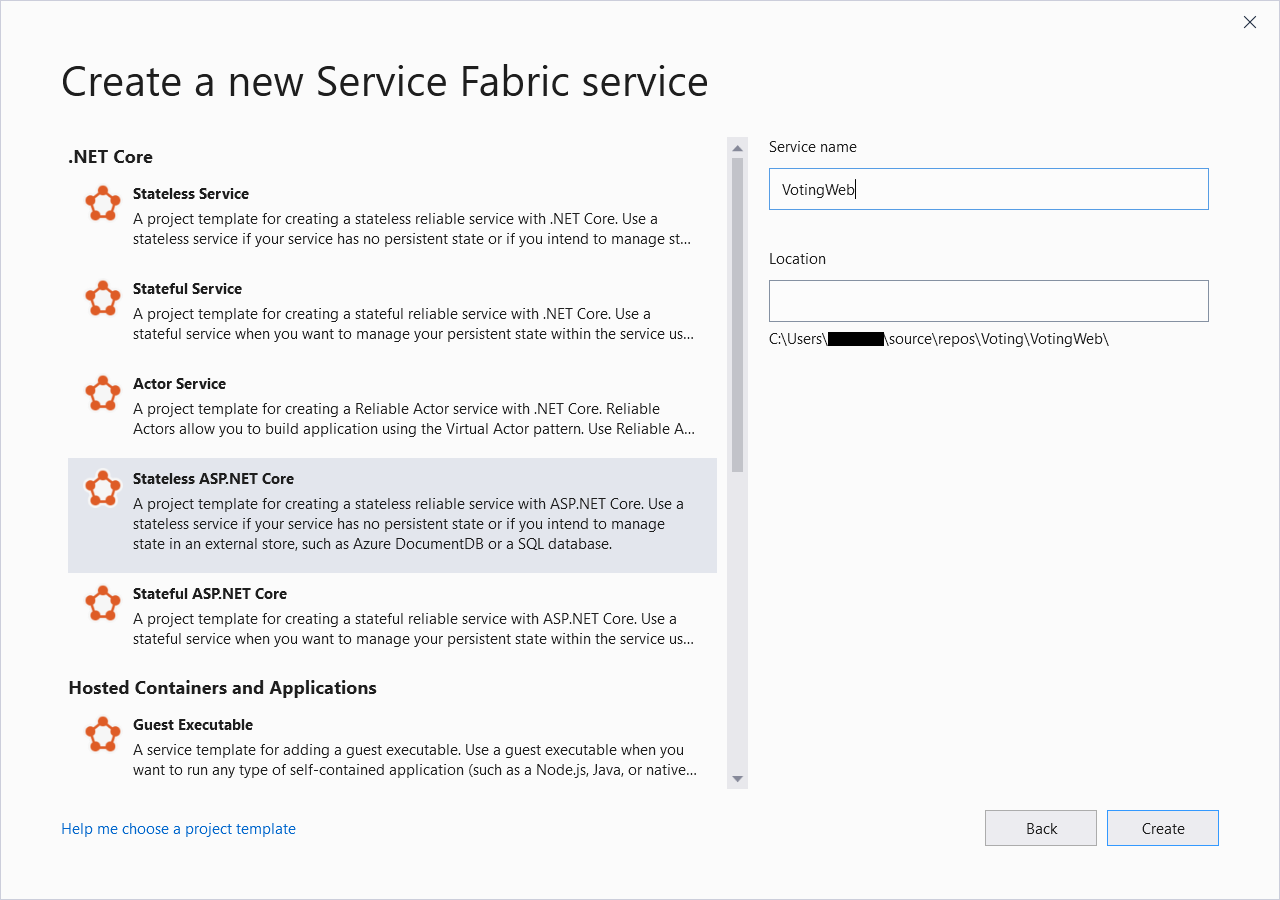
在 [新增 Service Fabric 服務] 頁面上,選擇 [無狀態 ASP.NET Core],將服務命名為 VotingWeb,然後按一下 [確定]。
下一頁會提供一組 ASP.NET Core 專案範本。 針對本教學課程,選擇 [Web 應用程式 (Model-View-Controller)],然後按一下 [確定]。

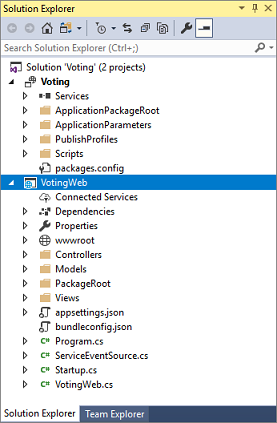
Visual Studio 會建立應用程式和服務專案,並顯示在 [方案總管] 中。
更新 site.js 檔案
開啟 wwwroot/js/site.js。 將其內容取代為 [首頁] 檢視所使用的下列 JavaScript,然後儲存您的變更。
var app = angular.module('VotingApp', ['ui.bootstrap']);
app.run(function () { });

app.controller('VotingAppController', ['$rootScope', '$scope', '$http', '$timeout', function ($rootScope, $scope, $http, $timeout) {

    $scope.refresh = function () {
        $http.get('api/Votes?c=' + new Date().getTime())
            .then(function (data, status) {
                $scope.votes = data;
            }, function (data, status) {
                $scope.votes = undefined;
            });
    };

    $scope.remove = function (item) {
        $http.delete('api/Votes/' + item)
            .then(function (data, status) {
                $scope.refresh();
            })
    };

    $scope.add = function (item) {
        var fd = new FormData();
        fd.append('item', item);
        $http.put('api/Votes/' + item, fd, {
            transformRequest: angular.identity,
            headers: { 'Content-Type': undefined }
        })
            .then(function (data, status) {
                $scope.refresh();
                $scope.item = undefined;
            })
    };
}]);
更新 Index.cshtml 檔案
開啟 Views/Home/Index.cshtml (主控制器特有的檢視)。 將其內容取代為下列項目,然後儲存變更。
@{
    ViewData["Title"] = "Service Fabric Voting Sample";
}

<div ng-controller="VotingAppController" ng-init="refresh()">
    <div class="container-fluid">
        <div class="row">
            <div class="col-xs-8 col-xs-offset-2 text-center">
                <h2>Service Fabric Voting Sample</h2>
            </div>
        </div>

        <div class="row">
            <div class="col-xs-8 col-xs-offset-2">
                <form class="col-xs-12 center-block">
                    <div class="col-xs-6 form-group">
                        <input id="txtAdd" type="text" class="form-control" placeholder="Add voting option" ng-model="item"/>
                    </div>
                    <button id="btnAdd" class="btn btn-default" ng-click="add(item)">
                        <span class="glyphicon glyphicon-plus" aria-hidden="true"></span>
                        Add
                    </button>
                </form>
            </div>
        </div>

        <hr/>

        <div class="row">
            <div class="col-xs-8 col-xs-offset-2">
                <div class="row">
                    <div class="col-xs-4">
                        Click to vote
                    </div>
                </div>
                <div class="row top-buffer" ng-repeat="vote in votes.data">
                    <div class="col-xs-8">
                        <button class="btn btn-success text-left btn-block" ng-click="add(vote.Key)">
                            <span class="pull-left">
                                {{vote.key}}
                            </span>
                            <span class="badge pull-right">
                                {{vote.value}} Votes
                            </span>
                        </button>
                    </div>
                    <div class="col-xs-4">
                        <button class="btn btn-danger pull-right btn-block" ng-click="remove(vote.Key)">
                            <span class="glyphicon glyphicon-remove" aria-hidden="true"></span>
                            Remove
                        </button>
                    </div>
                </div>
            </div>
        </div>
    </div>
</div>
更新 _Layout.cshtml 檔案
開啟 Views/Shared/_Layout.cshtml,ASP.NET 應用程式的預設版面配置。 將其內容取代為下列項目,然後儲存變更。
<!DOCTYPE html>
<html ng-app="VotingApp" xmlns:ng="https://angularjs.org">
<head>
    <meta charset="utf-8"/>
    <meta name="viewport" content="width=device-width, initial-scale=1.0"/>
    <title>@ViewData["Title"]</title>

    <link href="~/lib/bootstrap/dist/css/bootstrap.css" rel="stylesheet"/>
    <link href="~/css/site.css" rel="stylesheet"/>

</head>
<body>
<div class="container body-content">
    @RenderBody()
</div>

<script src="~/lib/jquery/dist/jquery.js"></script>
<script src="~/lib/bootstrap/dist/js/bootstrap.js"></script>
<script src="https://cdnjs.cloudflare.com/ajax/libs/angular.js/1.7.2/angular.min.js"></script>
<script src="https://cdnjs.cloudflare.com/ajax/libs/angular-ui-bootstrap/2.5.0/ui-bootstrap-tpls.js"></script>
<script src="~/js/site.js"></script>

@RenderSection("Scripts", required: false)
</body>
</html>
更新 VotingWeb.cs 檔案
開啟 VotingWeb.cs 檔案,該檔案會使用 WebListener web 伺服器,在無狀態服務內建立 ASP.NET Core WebHost。
將 using System.Net.Http; 指示詞新增至檔案開頭處。
將 CreateServiceInstanceListeners() 函式取代為下列程式碼,然後儲存變更。
protected override IEnumerable<ServiceInstanceListener> CreateServiceInstanceListeners()
{
    return new ServiceInstanceListener[]
    {
        new ServiceInstanceListener(
            serviceContext =>
                new KestrelCommunicationListener(
                    serviceContext,
                    "ServiceEndpoint",
                    (url, listener) =>
                    {
                        ServiceEventSource.Current.ServiceMessage(serviceContext, $"Starting Kestrel on {url}");

                        return new WebHostBuilder()
                            .UseKestrel()
                            .ConfigureServices(
                                services => services
                                    .AddSingleton<HttpClient>(new HttpClient())
                                    .AddSingleton<FabricClient>(new FabricClient())
                                    .AddSingleton<StatelessServiceContext>(serviceContext))
                            .UseContentRoot(Directory.GetCurrentDirectory())
                            .UseStartup<Startup>()
                            .UseServiceFabricIntegration(listener, ServiceFabricIntegrationOptions.None)
                            .UseUrls(url)
                            .Build();
                    }))
    };
}
此外在 CreateServiceInstanceListeners() 下方新增下列 GetVotingDataServiceName,然後儲存變更。 GetVotingDataServiceName 會在輪詢時傳回服務名稱。
internal static Uri GetVotingDataServiceName(ServiceContext context)
{
    return new Uri($"{context.CodePackageActivationContext.ApplicationName}/VotingData");
}
新增 VotesController.cs 檔案
新增可定義投票動作的控制器。 以滑鼠右鍵按一下 [控制器] 資料夾,然後選取新增->新增項目->Visual C#->ASP.NET Core->類別。 將檔案命名為 VotesController.cs,然後按一下 [新增]。
將 VotesController.cs 檔案內容取代為下列項目,然後儲存變更。 稍後,在更新 VotesController.cs 檔案中,這個檔案會經過修改,以從後端服務讀取和寫入投票資料。 現在,控制器會將靜態字串資料傳回至檢視。
namespace VotingWeb.Controllers
{
    using System;
    using System.Collections.Generic;
    using System.Fabric;
    using System.Fabric.Query;
    using System.Linq;
    using System.Net.Http;
    using System.Net.Http.Headers;
    using System.Text;
    using System.Threading.Tasks;
    using Microsoft.AspNetCore.Mvc;
    using Newtonsoft.Json;

    [Produces("application/json")]
    [Route("api/Votes")]
    public class VotesController : Controller
    {
        private readonly HttpClient httpClient;

        public VotesController(HttpClient httpClient)
        {
            this.httpClient = httpClient;
        }

        // GET: api/Votes
        [HttpGet]
        public async Task<IActionResult> Get()
        {
            List<KeyValuePair<string, int>> votes= new List<KeyValuePair<string, int>>();
            votes.Add(new KeyValuePair<string, int>("Pizza", 3));
            votes.Add(new KeyValuePair<string, int>("Ice cream", 4));

            return Json(votes);
        }
     }
}
設定接聽連接埠
建立 VotingWeb 前端服務時,Visual Studio 會隨機選擇服務要接聽的連接埠。 VotingWeb 服務是作為此應用程式的前端,並接受外部流量,因此讓我們將該服務繫結至固定的已知連接埠。 服務資訊清單會宣告服務端點。
在 [方案總管] 中,開啟 VotingWeb/PackageRoot/ServiceManifest.xml。 在 [資源] 區段中尋找 [端點] 元素,並將 [連接埠] 值變更為 8080。 若要在本機上部署並執行應用程式,則必須在您的電腦上開啟應用程式接聽連接埠,並讓此連接埠可供使用。
<Resources>
    <Endpoints>
      <!-- This endpoint is used by the communication listener to obtain the port on which to
           listen. Please note that if your service is partitioned, this port is shared with
           replicas of different partitions that are placed in your code. -->
      <Endpoint Protocol="http" Name="ServiceEndpoint" Type="Input" Port="8080" />
    </Endpoints>
  </Resources>
同時更新 Voting 專案中的 [應用程式 URL] 屬性值,以便您在進行應用程式偵錯時,網頁瀏覽器會開啟至正確的連接埠。 在 [方案總管] 中,選取 [Voting] 專案,並將 [應用程式 URL] 屬性更新至 8080。
在本機部署和執行 Voting 應用程式
您現在可以繼續執行 Voting 應用程式以供偵錯。 在 Visual Studio 中,按 F5 將應用程式部署到偵錯模式中的本機 Service Fabric 叢集。 如果您先前並未以系統管理員身分開啟 Visual Studio,此應用程式將會失敗。
注意
您第一次在本機執行及部署應用程式時,Visual Studio 會建立本機 Service Fabric 叢集以供偵錯。 建立叢集可能需要一些時間。 叢集建立狀態會顯示在 Visual Studio 輸出視窗中。
在 Voting 應用程式部署到本機 Service Fabric 叢集之後,您的 Web 應用程式會在瀏覽器索引標籤中自動開啟,且應如下所示:

若要停止應用程式偵錯,請返回 Visual Studio 並且按Shift+F5。
將具狀態後端服務新增到應用程式
現在,ASP.NET Web API 服務正在應用程式中執行,請繼續新增具狀態可靠服務,將一些資料儲存於應用程式中。
Service Fabric 可讓您使用可靠集合,直接在服務內以一致且可靠的方式儲存資料。 可靠集合是一組高可用性和可靠的集合類別,用過 C# 集合的任何人都會很熟悉。
在本教學課程中,您建立服務,將計數器值儲存於可靠集合中。
在 [方案總管] 中,以滑鼠右鍵按一下 Voting 應用程式專案中的 [服務],然後選擇新增 ->新增 Service Fabric Explorer...。
在 [新增 Service Fabric 服務] 對話方塊中,選擇 [具狀態 ASP.NET Core],將服務命名為 VotingData,然後按 [確定]。
建立服務專案後,您的應用程式中會有兩個服務。 隨著您繼續組建應用程式,您可以用相同的方式新增更多服務。 每個服務都可以獨立設定版本和升級。
下一頁會提供一組 ASP.NET Core 專案範本。 在本教學課程中,選擇 [API]。
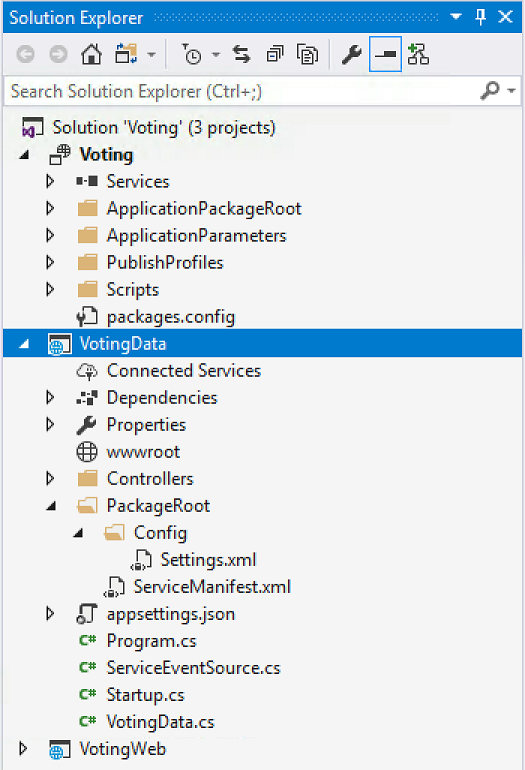
Visual Studio 會建立 VotingData 服務專案並顯示在 [方案總管] 中。
新增 VoteDataController.cs 檔案
在 VotingData 專案中,以滑鼠右鍵按一下 [控制器] 資料夾,然後選取新增->新增項目->類別。 將檔案命名為 VoteDataController.cs,然後按一下 [新增]。 將檔案內容取代為下列項目,然後儲存變更。
namespace VotingData.Controllers
{
    using System.Collections.Generic;
    using System.Threading;
    using System.Threading.Tasks;
    using Microsoft.AspNetCore.Mvc;
    using Microsoft.ServiceFabric.Data;
    using Microsoft.ServiceFabric.Data.Collections;

    [Route("api/[controller]")]
    public class VoteDataController : Controller
    {
        private readonly IReliableStateManager stateManager;

        public VoteDataController(IReliableStateManager stateManager)
        {
            this.stateManager = stateManager;
        }

        // GET api/VoteData
        [HttpGet]
        public async Task<IActionResult> Get()
        {
            CancellationToken ct = new CancellationToken();

            IReliableDictionary<string, int> votesDictionary = await this.stateManager.GetOrAddAsync<IReliableDictionary<string, int>>("counts");

            using (ITransaction tx = this.stateManager.CreateTransaction())
            {
                Microsoft.ServiceFabric.Data.IAsyncEnumerable<KeyValuePair<string, int>> list = await votesDictionary.CreateEnumerableAsync(tx);

                Microsoft.ServiceFabric.Data.IAsyncEnumerator<KeyValuePair<string, int>> enumerator = list.GetAsyncEnumerator();

                List<KeyValuePair<string, int>> result = new List<KeyValuePair<string, int>>();

                while (await enumerator.MoveNextAsync(ct))
                {
                    result.Add(enumerator.Current);
                }

                return this.Json(result);
            }
        }

        // PUT api/VoteData/name
        [HttpPut("{name}")]
        public async Task<IActionResult> Put(string name)
        {
            IReliableDictionary<string, int> votesDictionary = await this.stateManager.GetOrAddAsync<IReliableDictionary<string, int>>("counts");

            using (ITransaction tx = this.stateManager.CreateTransaction())
            {
                await votesDictionary.AddOrUpdateAsync(tx, name, 1, (key, oldvalue) => oldvalue + 1);
                await tx.CommitAsync();
            }

            return new OkResult();
        }

        // DELETE api/VoteData/name
        [HttpDelete("{name}")]
        public async Task<IActionResult> Delete(string name)
        {
            IReliableDictionary<string, int> votesDictionary = await this.stateManager.GetOrAddAsync<IReliableDictionary<string, int>>("counts");

            using (ITransaction tx = this.stateManager.CreateTransaction())
            {
                if (await votesDictionary.ContainsKeyAsync(tx, name))
                {
                    await votesDictionary.TryRemoveAsync(tx, name);
                    await tx.CommitAsync();
                    return new OkResult();
                }
                else
                {
                    return new NotFoundResult();
                }
            }
        }
    }
}
連接服務
在下一個步驟中,將這兩項服務連線,並且讓前端 Web 應用程式從後端服務取得和設定投票資訊。
對於您與可靠服務通訊的方式,Service Fabric 會提供完整的彈性。 在單一應用程式中,您可能有可透過 TCP 存取的服務。 可透過 HTTP 的 REST API 存取的其他服務以及其他任何服務可以透過 Web 通訊端存取。 如需可用選項和相關權衡取捨的背景,請參閱 與服務進行通訊。
此教學課程使用 ASP.NET Core Web API 與 Service Fabric 反向 Proxy,讓 VotingWeb 前端 Web 服務能與後端 VotingData 服務通訊。 依預設,反向 Proxy 會設定為使用連接埠 19081,且應適用於本教學課程。 反向 Proxy 連接埠會設定在用來設定叢集的 Azure Resource Manager 範本中。 若要尋找使用哪個連接埠,請查詢 Microsoft.ServiceFabric/clusters 資源中的叢集範本:
"nodeTypes": [
          {
            ...
            "httpGatewayEndpointPort": "[variables('nt0fabricHttpGatewayPort')]",
            "isPrimary": true,
            "vmInstanceCount": "[parameters('nt0InstanceCount')]",
            "reverseProxyEndpointPort": "[parameters('SFReverseProxyPort')]"
          }
        ],
若要尋找您的本機開發叢集中使用的反向 Proxy 連接埠,請檢視本機 Service Fabric 叢集資訊清單中的 HttpApplicationGatewayEndpoint 元素:
- 開啟瀏覽器視窗,並瀏覽至 http://localhost:19080 以開啟 Service Fabric Explorer 工具。
- 選取叢集->資訊清單。
- 記下 HttpApplicationGatewayEndpoint 元素連接埠。 根據預設,這應該是 19081。 如果不是 19081,您必須變更下列 VotesController.cs 程式碼的 GetProxyAddress 方法中的連接埠。
更新 VotesController.cs 檔案
在 VotingWeb 專案中,開啟 Controllers/VotesController.cs 檔案。 將 VotesController 類別定義內容取代為下列項目,然後儲存變更。 如果您在前一個步驟中探索的反向 proxy 連接埠不是 19081,請將 GetProxyAddress 方法中使用的連接埠從 19081 變更為您探索到的連接埠。
public class VotesController : Controller
{
    private readonly HttpClient httpClient;
    private readonly FabricClient fabricClient;
    private readonly StatelessServiceContext serviceContext;

    public VotesController(HttpClient httpClient, StatelessServiceContext context, FabricClient fabricClient)
    {
        this.fabricClient = fabricClient;
        this.httpClient = httpClient;
        this.serviceContext = context;
    }

    // GET: api/Votes
    [HttpGet("")]
    public async Task<IActionResult> Get()
    {
        Uri serviceName = VotingWeb.GetVotingDataServiceName(this.serviceContext);
        Uri proxyAddress = this.GetProxyAddress(serviceName);

        ServicePartitionList partitions = await this.fabricClient.QueryManager.GetPartitionListAsync(serviceName);

        List<KeyValuePair<string, int>> result = new List<KeyValuePair<string, int>>();

        foreach (Partition partition in partitions)
        {
            string proxyUrl =
                $"{proxyAddress}/api/VoteData?PartitionKey={((Int64RangePartitionInformation) partition.PartitionInformation).LowKey}&PartitionKind=Int64Range";

            using (HttpResponseMessage response = await this.httpClient.GetAsync(proxyUrl))
            {
                if (response.StatusCode != System.Net.HttpStatusCode.OK)
                {
                    continue;
                }

                result.AddRange(JsonConvert.DeserializeObject<List<KeyValuePair<string, int>>>(await response.Content.ReadAsStringAsync()));
            }
        }

        return this.Json(result);
    }

    // PUT: api/Votes/name
    [HttpPut("{name}")]
    public async Task<IActionResult> Put(string name)
    {
        Uri serviceName = VotingWeb.GetVotingDataServiceName(this.serviceContext);
        Uri proxyAddress = this.GetProxyAddress(serviceName);
        long partitionKey = this.GetPartitionKey(name);
        string proxyUrl = $"{proxyAddress}/api/VoteData/{name}?PartitionKey={partitionKey}&PartitionKind=Int64Range";

        StringContent putContent = new StringContent($"{{ 'name' : '{name}' }}", Encoding.UTF8, "application/json");
        putContent.Headers.ContentType = new MediaTypeHeaderValue("application/json");

        using (HttpResponseMessage response = await this.httpClient.PutAsync(proxyUrl, putContent))
        {
            return new ContentResult()
            {
                StatusCode = (int) response.StatusCode,
                Content = await response.Content.ReadAsStringAsync()
            };
        }
    }

    // DELETE: api/Votes/name
    [HttpDelete("{name}")]
    public async Task<IActionResult> Delete(string name)
    {
        Uri serviceName = VotingWeb.GetVotingDataServiceName(this.serviceContext);
        Uri proxyAddress = this.GetProxyAddress(serviceName);
        long partitionKey = this.GetPartitionKey(name);
        string proxyUrl = $"{proxyAddress}/api/VoteData/{name}?PartitionKey={partitionKey}&PartitionKind=Int64Range";

        using (HttpResponseMessage response = await this.httpClient.DeleteAsync(proxyUrl))
        {
            if (response.StatusCode != System.Net.HttpStatusCode.OK)
            {
                return this.StatusCode((int) response.StatusCode);
            }
        }

        return new OkResult();
    }


    /// <summary>
    /// Constructs a reverse proxy URL for a given service.
    /// Example: http://localhost:19081/VotingApplication/VotingData/
    /// </summary>
    /// <param name="serviceName"></param>
    /// <returns></returns>
    private Uri GetProxyAddress(Uri serviceName)
    {
        return new Uri($"http://localhost:19081{serviceName.AbsolutePath}");
    }

    /// <summary>
    /// Creates a partition key from the given name.
    /// Uses the zero-based numeric position in the alphabet of the first letter of the name (0-25).
    /// </summary>
    /// <param name="name"></param>
    /// <returns></returns>
    private long GetPartitionKey(string name)
    {
        return Char.ToUpper(name.First()) - 'A';
    }
}
逐步解說投票範例應用程式
投票應用程式包含兩個服務:
- Web 前端服務 (VotingWeb) 是 ASP.NET Core Web 前端服務,可作為網頁,並公開 Web API 來與後端服務通訊。
- 後端服務 (VotingData) 是 ASP.NET Core Web 服務,會公開 API 來將投票結果儲存在磁碟上所保存的可靠字典中。
當您在應用程式中投票時,會發生下列事件:
JavaScript 會將投票要求當做 HTTP PUT 要求,傳送至 Web 前端服務中的 Web API。
Web 前端服務使用 Proxy 來尋找 HTTP PUT 要求,並將其轉送至後端服務。
後端服務會接受傳入要求,並將更新的結果儲存在可靠的字典中,以複寫至叢集中的多個節點並保存在磁碟上。 應用程式的所有資料都會儲存在叢集中,因此不需要資料庫。
在 Visual Studio 中偵錯
在 Visual Studio 中偵錯應用程式時,您會使用本機 Service Fabric 開發叢集。 您可以根據自己的情況選擇調整偵錯體驗。 在此應用程式中,將資料儲存在使用可靠字典的後端服務中。 當您停止偵錯工具時,Visual Studio 預設會移除應用程式。 移除應用程式也會導致移除後端服務中的資料。 若要保存偵錯工作階段之間的資料,您可以在 Visual Studio 中,將 [應用程式偵錯模式] 當做 [投票] 專案上的屬性來變更。
若要查看對程式碼的影響,請完成下列步驟:
開啟 VotingWeb\VotesController.cs 檔案,並在 Web API 的 Put 方法 (第 72 行) 中設定中斷點。
開啟 VotingData\VoteDataController.cs 檔案,並在 Web API 的 Put 方法 (第 54 行) 中設定中斷點。
按 F5 以在偵錯模式中啟動應用程式。
返回到瀏覽器,並按一下投票選項或新增投票選項。 您到達 Web 前端之 API 控制器的第一個中斷點。
瀏覽器中的 JavaScript 會在此位置,將要求傳送至前端服務中的 Web API 控制器。
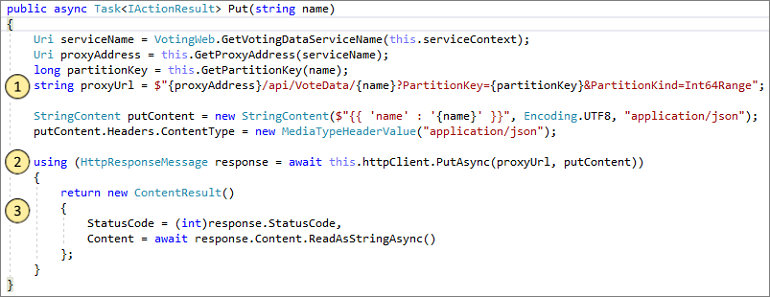
首先,請針對後端服務 (1) 建構 ReverseProxy 的 URL。
接著,將 HTTP PUT 要求傳送至 ReverseProxy (2)。
最後,將後端服務的回應傳回至用戶端 (3)。
按 F5 繼續。
您現在位於後端服務的中斷點。
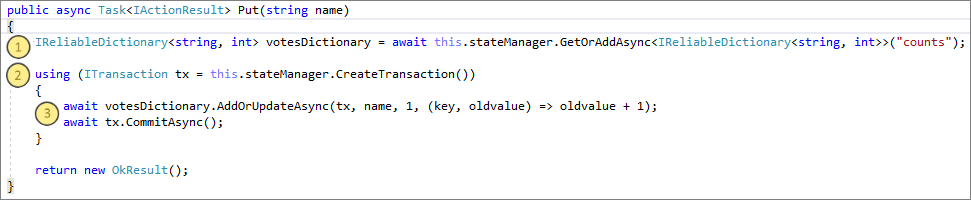
在方法 (1) 的第一行中,使用
StateManager來取得或新增名為counts的可靠字典。與可靠字典中的值進行的所有互動,都需要交易,這會使用陳述式 (2) 建立該交易。
在交易中,更新投票選項的相關索引鍵值,然後認可作業 (3)。 一旦傳回認可方法,字典中的資料會更新並複寫至叢集中的其他節點。 資料現在會安全地儲存在叢集中,而且後端服務可以容錯移轉到仍有可用資料的其他節點。
按 F5 繼續。
若要停止偵錯工作階段,請按 Shift+F5。
下一步
在教學課程的這個部分中,您已了解如何:
- 建立 ASP.NET Core Web API 服務成為具狀態可靠服務
- 建立 ASP.NET Core Web 應用程式服務成為具狀態可靠服務
- 使用反向 proxy 來與具狀態服務進行通訊
前進到下一個教學課程: