快速入門:適用於 JAVA 的 Azure 佇列儲存體用戶端程式庫
開始使用適用於 JAVA 的 Azure 佇列儲存體用戶端程式庫。 Azure 佇列儲存體是用來儲存大量訊息的服務,以便日後擷取和處理。 請遵循下列步驟來安裝套件,並試用基本工作的程式碼範例。
API 參考文件 | 程式庫來源程式碼 | 套件 (Maven) | 範例
使用適用於 JAVA 的 Azure 佇列儲存體用戶端程式庫來:
- 建立佇列
- 將訊息新增至佇列
- 窺視佇列中的訊息
- 更新佇列中的訊息
- 取得佇列長度
- 從佇列接收訊息
- 刪除佇列中的訊息
- 刪除佇列
必要條件
- Java 開發套件 (JDK) 8 版或更新版本
- Apache Maven
- Azure 訂用帳戶 - 建立免費帳戶
- Azure 儲存體帳戶 - 建立儲存體帳戶
設定
本節會引導您準備專案以搭配適用於 JAVA 的 Azure 佇列儲存體用戶端程式庫使用。
建立專案
建立名為 queues-quickstart 的 JAVA 應用程式。
在主控台視窗中 (例如 cmd、PowerShell 或 Bash),使用 Maven 建立名為 queues-quickstart 的新主控台應用程式。 鍵入下列
mvn命令,以建立 "Hello world!"Java 專案。mvn archetype:generate ` --define interactiveMode=n ` --define groupId=com.queues.quickstart ` --define artifactId=queues-quickstart ` --define archetypeArtifactId=maven-archetype-quickstart ` --define archetypeVersion=1.4產生專案的輸出應該看起來像這樣:
[INFO] Scanning for projects...
[INFO]
[INFO] ------------------< org.apache.maven:standalone-pom >-------------------
[INFO] Building Maven Stub Project (No POM) 1
[INFO] --------------------------------[ pom ]---------------------------------
[INFO]
[INFO] >>> maven-archetype-plugin:3.1.2:generate (default-cli) > generate-sources @ standalone-pom >>>
[INFO]
[INFO] <<< maven-archetype-plugin:3.1.2:generate (default-cli) < generate-sources @ standalone-pom <<<
[INFO]
[INFO]
[INFO] --- maven-archetype-plugin:3.1.2:generate (default-cli) @ standalone-pom ---
[INFO] Generating project in Batch mode
[INFO] ----------------------------------------------------------------------------
[INFO] Using following parameters for creating project from Archetype: maven-archetype-quickstart:1.4
[INFO] ----------------------------------------------------------------------------
[INFO] Parameter: groupId, Value: com.queues.quickstart
[INFO] Parameter: artifactId, Value: queues-quickstart
[INFO] Parameter: version, Value: 1.0-SNAPSHOT
[INFO] Parameter: package, Value: com.queues.quickstart
[INFO] Parameter: packageInPathFormat, Value: com/queues/quickstart
[INFO] Parameter: version, Value: 1.0-SNAPSHOT
[INFO] Parameter: package, Value: com.queues.quickstart
[INFO] Parameter: groupId, Value: com.queues.quickstart
[INFO] Parameter: artifactId, Value: queues-quickstart
[INFO] Project created from Archetype in dir: C:\quickstarts\queues\queues-quickstart
[INFO] ------------------------------------------------------------------------
[INFO] BUILD SUCCESS
[INFO] ------------------------------------------------------------------------
[INFO] Total time:  6.394 s
[INFO] Finished at: 2019-12-03T09:58:35-08:00
[INFO] ------------------------------------------------------------------------
切換至新建立的 queues-quickstart 目錄。
cd queues-quickstart
安裝套件
在文字編輯器中開啟 pom.xml 檔案。
新增 azure-sdk-bom,以相依於最新版本的程式庫。 在下列程式碼片段中,將 {bom_version_to_target} 預留位置取代為版本號碼。 使用 azure-sdk-bom 可讓您不必指定每個個別相依性的版本。 若要深入了解 BOM,請參閱 Azure SDK BOM 讀我檔案 (英文)。
<dependencyManagement>
    <dependencies>
        <dependency>
            <groupId>com.azure</groupId>
            <artifactId>azure-sdk-bom</artifactId>
            <version>{bom_version_to_target}</version>
            <type>pom</type>
            <scope>import</scope>
        </dependency>
    </dependencies>
</dependencyManagement>
然後,將下列相依性元素新增至相依性群組。 需要 azure-identity 相依性才能對 Azure 服務進行無密碼連線。
<dependency>
    <groupId>com.azure</groupId>
    <artifactId>azure-storage-queue</artifactId>
</dependency>
<dependency>
    <groupId>com.azure</groupId>
    <artifactId>azure-identity</artifactId>
</dependency>
設定應用程式架構
從專案目錄:
- 瀏覽至 /src/main/java/com/queues/quickstart 目錄
- 在編輯器中開啟 App.java 檔案
- 刪除
System.out.println("Hello, world");陳述式 - 新增
import指示詞
程式碼如下:
package com.queues.quickstart;

/**
 * Azure Queue Storage client library quickstart
 */
import com.azure.identity.*;
import com.azure.storage.queue.*;
import com.azure.storage.queue.models.*;
import java.io.*;

public class App
{
    public static void main(String[] args) throws IOException
    {
        // Quickstart code goes here
    }
}
向 Azure 驗證
大部分 Azure 服務的應用程式要求都必須獲得授權。 在程式碼中實作對 Azure 服務的無密碼連線時,建議使用 Azure 身分識別用戶端程式庫提供的 DefaultAzureCredential 類別。
您也可以直接使用密碼、連接字串或其他認證來授權對 Azure 服務的要求。 不過,應該謹慎使用此方法。 開發人員必須盡可能避免在不安全的地方公開秘密。 能夠取得密碼或祕密金鑰存取的任何人都可以進行驗證。 DefaultAzureCredential 提供優於帳戶金鑰的管理和安全性優點,允許無密碼驗證。 下列範例示範這兩個選項。
DefaultAzureCredential 是適用於 JAVA 的 Azure 身分識別用戶端程式庫所提供的類別。 如需深入了解 DefaultAzureCredential,請參閱 DefaultAzureCredential 概觀。 DefaultAzureCredential 支援多個驗證方法,並在執行階段判斷應該使用哪個方法。 此方法可讓您的應用程式在不同的環境中 (本機或實際執行環境) 使用不同的驗證方法,而不需要實作環境特有的程式碼。
例如,您的應用程式可以在本機開發時使用 Azure CLI 登入認證進行驗證,然後在部署至 Azure 之後,使用 受控識別。 此轉移不需要變更程式碼。
在本機開發時,請確定存取佇列資料的使用者帳戶具有正確的權限。 您將需要 儲存體佇列資料參與者 才能讀取和寫入佇列資料。 若要指派此角色給您自己,您需要被指派使用者存取管理員角色,或另一個包含 Microsoft.Authorization/roleAssignments/write 動作的角色。 您可以使用 Azure 入口網站、Azure CLI 或 Azure PowerShell,將 Azure RBAC 角色指派給使用者。 您可以在範圍概觀頁面上深入了解角色指派的可用範圍。
在此案例中,您會將權限指派給使用者帳戶 (以儲存體帳戶為範圍),以遵循最低權限原則。 此做法只為使用者提供所需的最低權限,並建立更安全的實際執行環境。
下列範例將 儲存體佇列資料參與者 角色指派給使用者帳戶,以針對儲存體帳戶中的佇列資料提供讀取和寫入存取權。
重要
在大部分情況下,角色指派在 Azure 中傳播只需要一兩分鐘,但在罕見情況下,可能需要長達八分鐘。 如果您第一次執行程式碼時收到驗證錯誤,請稍候片刻再試一次。
在 Azure 入口網站中,使用主要搜尋列或左側導覽找出您的儲存體帳戶。
在儲存體帳戶概觀頁面上,從左側功能表中選取 [存取控制 (IAM)]。
在 [存取控制 (IAM)] 頁面上,選取 [角色指派] 索引標籤。
從頂端功能表選取 [+ 新增],然後從產生的下拉功能表中選取 [新增角色指派]。

使用搜尋方塊,從結果篩選出所需的角色。 在此範例中,搜尋儲存體佇列資料參與者,接著選取相符的結果,然後選擇 下一步。
在 [存取權指派對象為] 下,選取 [使用者、群組或服務主體],然後選擇 [+ 選取成員]。
在對話方塊中,搜尋 Microsoft Entra 使用者名稱 (通常是您的 user@domain 電子郵件地址),然後在對話方塊底部選擇選取。
選取 [檢閱 + 指派] 以移至最終頁面,然後再次選取 [檢閱 + 指派] 以完成此程序。

物件模型
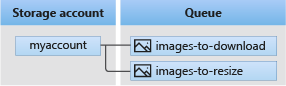
Azure 佇列儲存體是用來儲存大量訊息的服務。 一則佇列訊息的大小可能高達 64 KB。 一則佇列可包含數百則訊息,最高為儲存體帳戶的容量總計限制。 佇列通常用來建立工作待辦項目,以非同步處理。 佇列儲存體提供三種類型資源:
- 儲存體帳戶:已透過儲存體帳戶完成所有 Azure 儲存體的存取。 如需儲存體帳戶的詳細資訊,請參閱 儲存體帳戶概觀
- 佇列:佇列包含一組訊息。 所有訊息都必須在佇列中。 請注意,佇列名稱必須全部小寫。 如需為佇列命名的詳細資訊,請參閱 為佇列和中繼資料命名。
- 訊息:大小上限為 64 KB 的訊息 (任何格式)。 訊息可保留在佇列中的時間上限為 7 天。 在 2017-07-29 版或更新版本中,存留時間上限可以是任何正數或 -1 (表示訊息不會過期)。 如果省略此參數,則預設存留時間為七天。
下圖顯示資源之間的關係。
使用下列 Java 類別與這些資源互動:
QueueClientBuilder:QueueClientBuilder類別會設定並具現化QueueClient物件。QueueServiceClient:QueueServiceClient可讓您管理儲存體帳戶中的所有佇列。QueueClient:QueueClient類別可讓您管理和操作個別佇列及其訊息。QueueMessageItem:QueueMessageItem類別代表在佇列上呼叫ReceiveMessages時所傳回的個別物件。
程式碼範例
這些範例程式碼片段會示範如何使用適用於 Java 的 Azure 佇列儲存體用戶端程式庫執行下列動作:
授權存取並建立用戶端物件
請確定使用您指派角色的相同 Microsoft Entra 帳戶進行驗證。 您可以透過 Azure CLI、Visual Studio Code 或 Azure PowerShell 進行驗證。
使用下列命令透過 Azure CLI 登入 Azure:
az login
驗證之後,您可以使用 DefaultAzureCredential 來建立和授權 QueueClient 物件,以存取記憶體帳戶中的佇列資料。 DefaultAzureCredential 會自動探索並使用您在上一個步驟中用來登入的帳戶。
若要使用 DefaultAzureCredential 授權,請確定您已在 pom.xml 新增 azure-identity 相依性,如安裝套件中所述。 此外,請務必在 App.java 檔案中新增 com.azure.identity 的匯入指示詞:
import com.azure.identity.*;
決定佇列的名稱,並使用 DefaultAzureCredential 進行授權,建立 QueueClient 類別的執行個體。 我們會使用此用戶端物件來建立並與儲存體帳戶中的佇列資源互動。
重要
佇列名稱只能包含小寫字母、數字和連字號,且必須以字母或數字開頭。 每個連字號前後都必須緊接非連字號的字元。 名稱長度也必須為 3 到 63 個字元。 如需為佇列命名的詳細資訊,請參閱為佇列和中繼資料命名。
在 main 方法內新增此程式碼,並確定取代 <storage-account-name> 預留位置值:
System.out.println("Azure Queue Storage client library - Java quickstart sample\n");

// Create a unique name for the queue
String queueName = "quickstartqueues-" + java.util.UUID.randomUUID();

// Instantiate a QueueClient
// We'll use this client object to create and interact with the queue
// TODO: replace <storage-account-name> with the actual name
QueueClient queueClient = new QueueClientBuilder()
        .endpoint("https://<storage-account-name>.queue.core.windows.net/")
        .queueName(queueName)
        .credential(new DefaultAzureCredentialBuilder().build())
        .buildClient();
注意
您使用 QueueClient 類別傳送的訊息,必須採用可以包含在以 UTF-8 編碼的 XML 要求中的格式。 您可以選擇性地將 QueueMessageEncoding 選項設定為 BASE64 來處理不符合規範的訊息。
建立佇列
使用 QueueClient 物件,呼叫 create 方法來在儲存體帳戶中建立佇列。
將此程式碼加入到 main 方法的結尾處:
System.out.println("Creating queue: " + queueName);

// Create the queue
queueClient.create();
將訊息新增至佇列
下列程式碼片段會藉由呼叫 sendMessage 方法,將訊息新增至佇列。 其也會儲存從 sendMessage 呼叫傳回的SendMessageResult。 結果用於在稍後的程式中更新訊息。
將此程式碼加入到 main 方法的結尾處:
System.out.println("\nAdding messages to the queue...");

// Send several messages to the queue
queueClient.sendMessage("First message");
queueClient.sendMessage("Second message");

// Save the result so we can update this message later
SendMessageResult result = queueClient.sendMessage("Third message");
窺視佇列中的訊息
藉由呼叫 peekMessages 方法來窺視佇列中的訊息。 此方法會從佇列前面擷取一或多則訊息,但不會更改訊息的可見性。
將此程式碼加入到 main 方法的結尾處:
System.out.println("\nPeek at the messages in the queue...");

// Peek at messages in the queue
queueClient.peekMessages(10, null, null).forEach(
    peekedMessage -> System.out.println("Message: " + peekedMessage.getMessageText()));
更新佇列中的訊息
藉由呼叫 updateMessage 方法來更新訊息的內容。 此方法可以變更訊息的可見度逾時和內容。 訊息內容必須是大小上限為 64 KB 的 UTF-8 編碼字串。 連同訊息的新內容,使用先前在程式碼中儲存的 SendMessageResult,傳入訊息識別碼和 pop 回條。 訊息識別碼和 pop 回條可識別要更新的訊息。
System.out.println("\nUpdating the third message in the queue...");

// Update a message using the result that
// was saved when sending the message
queueClient.updateMessage(result.getMessageId(),
                          result.getPopReceipt(),
                          "Third message has been updated",
                          Duration.ofSeconds(1));
取得佇列長度
您可估計佇列中的訊息數目。
getProperties 方法會傳回數個值,包括目前在佇列中的訊息數目。 此計數只是一個約略值,因為要求之後仍可新增或移除訊息。 getApproximateMessageCount 方法會傳回呼叫 getProperties 所擷取的最後一個值,而不需要呼叫佇列儲存體。
QueueProperties properties = queueClient.getProperties();
long messageCount = properties.getApproximateMessagesCount();

System.out.println(String.format("Queue length: %d", messageCount));
接收和刪除佇列中的訊息
藉由呼叫 receiveMessages 方法來下載先前新增的訊息。 範例程式碼也會在接收和處理訊息後,從佇列中刪除訊息。 在此情況下,處理只會在主控台上顯示訊息。
應用程式會在接收和刪除訊息之前呼叫 System.console().readLine();,藉以暫停使用者輸入。 在 Azure 入口網站中確認已正確建立資源,然後才予以刪除。 任何未明確刪除的訊息最後都會再次顯示在佇列中,以提供另一次進行處理的機會。
將此程式碼加入到 main 方法的結尾處:
System.out.println("\nPress Enter key to receive messages and delete them from the queue...");
System.console().readLine();

// Get messages from the queue
queueClient.receiveMessages(10).forEach(
    // "Process" the message
    receivedMessage -> {
        System.out.println("Message: " + receivedMessage.getMessageText());

        // Let the service know we're finished with
        // the message and it can be safely deleted.
        queueClient.deleteMessage(receivedMessage.getMessageId(), receivedMessage.getPopReceipt());
    }
);
呼叫 receiveMessages 方法時,您可以選擇性地為 maxMessages 指定值,這是要從佇列擷取的訊息數目。 預設值為 1 則訊息,最大值為 32 則訊息。 您也可以為 visibilityTimeout 指定值,以隱藏逾時期間其他作業的訊息。 預設值為 30 秒。
刪除佇列
下列程式碼會使用 Delete 方法刪除佇列,以清除應用程式所建立的資源。
將此程式碼加入到 main 方法的結尾處:
System.out.println("\nPress Enter key to delete the queue...");
System.console().readLine();

// Clean up
System.out.println("Deleting queue: " + queueClient.getQueueName());
queueClient.delete();

System.out.println("Done");
執行程式碼
此應用程式會建立三則訊息,並將其新增至 Azure 佇列。 程式碼會列出佇列中的訊息,然後在最後刪除佇列之前,先擷取並刪除訊息。
在您的主控台視窗中,瀏覽至您的應用程式目錄,並建置和執行應用程式。
mvn compile
接著,建置封裝。
mvn package
執行下列 mvn 命令來執行應用程式。
mvn exec:java -Dexec.mainClass="com.queues.quickstart.App" -Dexec.cleanupDaemonThreads=false
應用程式的輸出類似下列範例:
Azure Queue Storage client library - Java quickstart sample

Adding messages to the queue...

Peek at the messages in the queue...
Message: First message
Message: Second message
Message: Third message

Updating the third message in the queue...

Press Enter key to receive messages and delete them from the queue...

Message: First message
Message: Second message
Message: Third message has been updated

Press Enter key to delete the queue...

Deleting queue: quickstartqueues-fbf58f33-4d5a-41ac-ac0e-1a05d01c7003
Done
當應用程式在接收訊息之前暫停,請在 Azure 入口網站中檢查您的儲存體帳戶。 確認訊息在佇列中。
按下 Enter 鍵來接收和刪除訊息。 出現提示時,請再次按下 Enter 鍵,以刪除佇列並完成示範。
下一步
在本快速入門中,您已了解如何使用 Java 程式碼建立佇列,並將訊息新增至其中。 然後您會了解如何窺視、擷取和刪除訊息。 最後,您會了解如何刪除訊息佇列。
如需教學課程、範例、快速入門及其他文件,請瀏覽:
適用於 Java 雲端開發人員的 Azure (機器翻譯)
- 如需使用已取代 JAVA 第 8 版 SDK 的相關程式碼範例,請參閱 使用 JAVA 第 8 版的程式碼範例。
- 如需更多 Azure 佇列儲存體範例應用程式,請參閱適用於 JAVA 的 Azure 佇列儲存體用戶端程式庫 - 範例。