Windows Server VM 上的 Django Hello World Web 應用程式
重要
傳統 VM 將於 2023 年 3 月 1 日淘汰。
如果您使用來自 ASM 的 IaaS 資源,請在 2023 年 3 月 1 日前完成移轉。 我們鼓勵您及早切換,以利用 Azure Resource Manager 的許多功能增強功能。
如需詳細資訊,請參閱請於 2023 年 3 月 1 日之前將您的 IaaS 資源遷移至 Azure Resource Manager。
注意
Azure 建立和處理資源的部署模型有二種:Azure Resource Manager 和傳統部署模型。 本文說明傳統部署模型。 我們建議讓大部分的新部署使用 Resource Manager 模型。
自 2017 年 11 月 15 日起,虛擬機器僅能於 Azure 入口網站中取得。
本教學課程會示範如何在 Azure 虛擬機器中裝載 Windows Server 中以 Django 作為基礎的網站。 在教學課程中,我們假設沒有 Azure 的使用經驗。 當您完成教學課程時,將可在雲端啟動並執行以 Django 作為基礎的應用程式。
了解如何:
- 設定 Azure 虛擬機器以裝載 Django。 雖然本教學課程說明如何針對 Windows Server 執行這項操作,您也可以針對 Azure 中裝載的 Linux VM 執行相同操作。
- 在 Windows 中建立新的 Django 應用程式。
本教學課程會示範如何建立基本的 Hello World Web 應用程式。 該應用程式是裝載於 Azure 虛擬機器中。
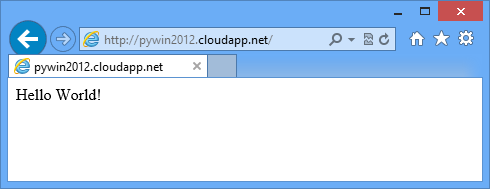
下列螢幕擷取畫面會顯示完成的應用程式:
注意
若要完成此教學課程,您需要 Azure 帳戶。 您可以啟用自己的 MSDN 訂戶權益或是在 Azure 中申請免費試用。
建立並設定 Azure 虛擬機器以裝載 Django
若要使用 Windows Server 2012 R2 資料中心發佈來建立 Azure 虛擬機器,請參閱在 Azure 入口網站中建立執行 Windows 的虛擬機器。
設定 Azure 將連接埠 80 的流量從 Web 導向虛擬機器上的連接埠 80:
- 在 Azure 入口網站中,移至儀表板,然後選取您新建立的虛擬機器。
- 按一下 [端點],然後按一下 [加入]。
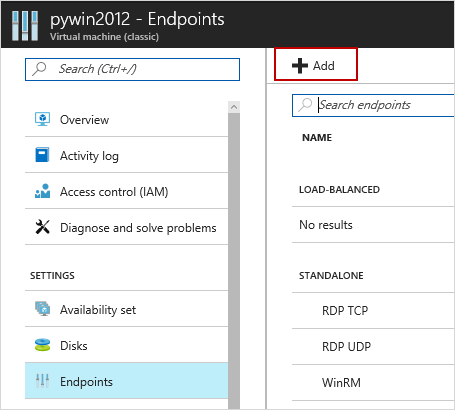
- 在 [新增端點] 頁面上,針對 [名稱] 輸入 HTTP。 將公用和私人 TCP 通訊埠設定為 80。

- 按一下 [確定]。
在儀表板中選取您的 VM。 若要使用遠端桌面通訊協定 (RDP) 來遠端登入新建立的 Azure 虛擬機器,請按一下 [連線]。
重要
下列指示假設您已正確登入虛擬機器。 它們也假設您是要在虛擬機器中,而不是在本機電腦上發出命令。
安裝 Python、Django 和 WFastCGI
注意
若要使用 Internet Explorer 進行下載,您可能必須設定 Internet Explorer 增強式安全性設定設定。 若要這樣做,請按一下[啟動>系統管理工具>伺服器管理員>Local 伺服器]。 按一下 [IE 增強式安全性設定],然後選取 [關閉]。
從 python.org安裝最新版的 Python 2.7 或 Python 3.4。
使用 pip 安裝 wfastcgi 和 django 封裝。
針對 Python 2.7,請使用下列命令:
 c:\python27\scripts\pip install wfastcgi
 c:\python27\scripts\pip install django
針對 Python 3.4,請使用下列命令:
 c:\python34\scripts\pip install wfastcgi
 c:\python34\scripts\pip install django
安裝含 FastCGI 的 IIS
使用 FastCGI 支援安裝 Internet Information Services (IIS)。 執行的時間可能需要幾分鐘。
start /wait %windir%\System32\PkgMgr.exe /iu:IIS-WebServerRole;IIS-WebServer;IIS-CommonHttpFeatures;IIS-StaticContent;IIS-DefaultDocument;IIS-DirectoryBrowsing;IIS-HttpErrors;IIS-HealthAndDiagnostics;IIS-HttpLogging;IIS-LoggingLibraries;IIS-RequestMonitor;IIS-Security;IIS-RequestFiltering;IIS-HttpCompressionStatic;IIS-WebServerManagementTools;IIS-ManagementConsole;WAS-WindowsActivationService;WAS-ProcessModel;WAS-NetFxEnvironment;WAS-ConfigurationAPI;IIS-CGI
建立新的 Django 應用程式
在 C:\inetpub\wwwroot 中,如需建立新的 Django 專案,請輸入下列命令:
針對 Python 2.7,請使用下列命令:
C:\Python27\Scripts\django-admin.exe startproject helloworld針對 Python 3.4,請使用下列命令:
C:\Python34\Scripts\django-admin.exe startproject helloworld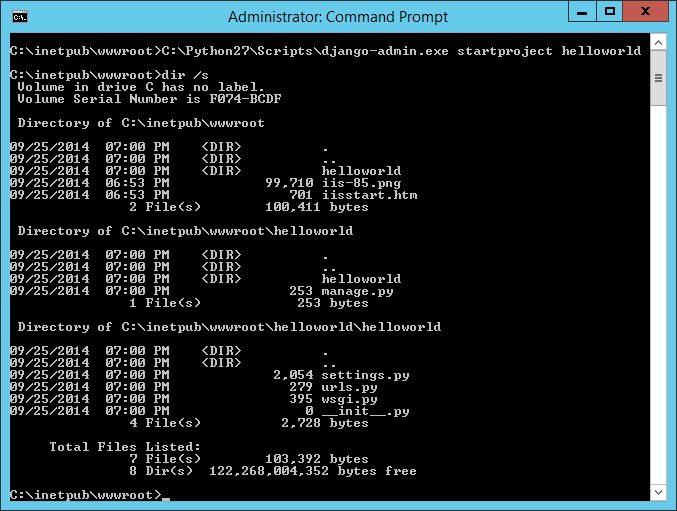
django-admin命令會為以 Django 作為基礎的網站產生一個基本結構:helloworld\manage.py可協助您開始裝載及停止裝載以 Django 作為基礎的網站。helloworld\helloworld\settings.py具有您應用程式的 Django 設定。helloworld\helloworld\urls.py具有每個 URL 及其檢視之間的對應程式碼。
在 C:\inetpub\wwwroot\helloworld\helloworld 目錄中,建立名為 views.py 的新檔案。 這個檔案具有轉譯 "hello world" 頁面的檢視。 在程式碼編輯器中,輸入下列命令:
from django.http import HttpResponse
def home(request):
    html = "<html><body>Hello World!</body></html>"
    return HttpResponse(html)
使用下列命令取代 urls.py 檔案的內容:
from django.conf.urls import patterns, url
urlpatterns = patterns('',
    url(r'^$', 'helloworld.views.home', name='home'),
)
設定 IIS
在全域 applicationhost.config 檔案中,解除鎖定處理常式區段。 這會讓您的 web.config 檔案可使用 Python 處理常式。 新增這個命令:
%windir%\system32\inetsrv\appcmd unlock config -section:system.webServer/handlers啟動 WFastCGI。 這會將應用程式新增至全域 applicationhost.config 檔案,其中表示您的 Python 解譯器可執行檔和 wfastcgi.py 指令碼。
在 Python 2.7 中:
C:\python27\scripts\wfastcgi-enable在 Python 3.4 中:
C:\python34\scripts\wfastcgi-enable在 C:\inetpub\wwwroot\helloworld 中建立 web.config 檔案。
scriptProcessor屬性的值應該符合上一個步驟中的輸出。 如需 wfastcgi 設定的詳細資訊,請參閱 pypi wfastcgi。在 Python 2.7 中:
 <configuration>
   <appSettings>
     <add key="WSGI_HANDLER" value="django.core.handlers.wsgi.WSGIHandler()" />
     <add key="PYTHONPATH" value="C:\inetpub\wwwroot\helloworld" />
     <add key="DJANGO_SETTINGS_MODULE" value="helloworld.settings" />
   </appSettings>
   <system.webServer>
     <handlers>
         <add name="Python FastCGI" path="*" verb="*" modules="FastCgiModule" scriptProcessor="C:\Python27\python.exe|C:\Python27\Lib\site-packages\wfastcgi.pyc" resourceType="Unspecified" />
     </handlers>
   </system.webServer>
 </configuration>
在 Python 3.4 中:
 <configuration>
   <appSettings>
     <add key="WSGI_HANDLER" value="django.core.handlers.wsgi.WSGIHandler()" />
     <add key="PYTHONPATH" value="C:\inetpub\wwwroot\helloworld" />
     <add key="DJANGO_SETTINGS_MODULE" value="helloworld.settings" />
   </appSettings>
   <system.webServer>
     <handlers>
         <add name="Python FastCGI" path="*" verb="*" modules="FastCgiModule" scriptProcessor="C:\Python34\python.exe|C:\Python34\Lib\site-packages\wfastcgi.py" resourceType="Unspecified" />
     </handlers>
   </system.webServer>
 </configuration>
更新 IIS 預設網站的位置,以指向 django 專案資料夾:
%windir%\system32\inetsrv\appcmd set vdir "Default Web Site/" -physicalPath:"C:\inetpub\wwwroot\helloworld"在您的瀏覽器中載入網頁。
關閉 Azure 虛擬機器
當您完成本教學課程時,建議您將為本教學課程建立的 Azure VM 關閉或移除。 這樣可為其他教學課程釋放資源,您也可以避免產生 Azure 使用量費用。